
How to configure No-IP DUC service in your Raspberry PI
Last Updated on 11th April 2024 by peppe8o
Many Raspberry PI projects (like using it as a server, as home automation or simply for Raspberry PI remote access) involve having its services exposed to the internet. It means that your Raspberry PI will not only answer its local IP address queries, but it will be available also with internet external access. This is useful for accessing your home server, monitoring IP cameras & managing your website’s DNS among many other things.
No-IP is a widely known Dynamic DNS service offering free hostnames easily manageable from a web dashboard. No-IP owns a wide number of public domains and gives its customers the use of subdomains for free. No-IP will take care to publish your IP to public DNS servers so that your subdomain will be reachable from everywhere in the world. Once defined your favourite hostname, your work will be only update IP associated with your hostname with the dynamic IP address you get from your Internet Service Provider. To simplify also this operation, the No-IP team gives you a free Dynamic Update Client (DUC), available for Windows, Linux and MacOS, which scans at defined intervals your current public IP and operates dynamic updates to your subdomain A record.
Before digging into the DNS topic, you have to take in consideration some networking concepts which can negatively influence this project’s success.
Networking Considerations
Public IP (Internet Protocol) addresses – usually referring only to IPv4 – are a list of IP addresses known and reachable worldwide. They are managed following IEEE recommendations and through local agencies deputed to assure IP usability. They are associated with mnemonic labels (domain names) with the help of a world-wide connected network of public DNS servers (Domain Name Servers).
These assets are really important for computer communications because they are the main way internet devices can communicate with each other. Public IPs are also precious resources because their number is far lower than available internet devices.
To face the Public IP addresses lack, Internet Providers usually make use of some networking techniques like NAT (Network Address Translation), giving their customers only reusable private IP addresses which are after gathered and exposed from a single public IP address. This allows them to reduce static IP address usage.
So, the first requirement for dynamic DNS usage is: you need to ask your Internet Provider if you have a public or private IP address. You can also get this info by comparing your internet gateway device (usually your router) WAN IP with output from this terminal command:
curl icanhazip.com If those values are different, the only way is to ask your Internet Provider if they can get you a Public IP address instead of a Private IP address.
If those values are the same, then you are on the right way to get a working dynamic DNS. But this IP address can change according to Internet Service Provider operations since ISP usually assign dynamic IP addresses. The last problem is the reason why No-IP helps.
The second consideration regards Port Forwarding. This part isn’t strictly required for dynamic DNS, but it is needed for publishing Raspberry PI services. If use a router to connect your Raspberry PI to internet and you want to expose to public network some R<PI services, then your router needs to know that incoming traffic to specific TCP or UDP port(s) needs to be directly forwarded to one of its internal lan devices.
Let’s use an example. You need to publish your HTTP page hosted in your Raspberry PI (let’s assume with local network IP 192.168.1.10) to the internet. HTTP service usually relies on port 80. In this case, you have to configure in your router a rule to port forward TCP connection incoming from every internet device in its port 80 to your Raspberry PI port 80. This operation varies with different router models and you need to check the router user guide for detailed procedures to make it work.
What We Need

As usual, I suggest adding from now to your favourite e-commerce shopping cart all the needed hardware, so that at the end you will be able to evaluate overall costs and decide if to continue with the project or remove them from the shopping cart. So, hardware will be only:
- Raspberry PI Computer Board (including proper power supply or using a smartphone micro USB charger with at least 3A)
- high speed micro SD card (at least 16 GB, at least class 10)
Step-by-Step Procedure
Raspberry PI configuration is simple, but the project requires some propaedeutic configurations at No-IP page. You need to arrange your dynamic DNS record before installing the DUC client in your RPI.
Prepare No-IP account
Start creating with your browser a free No-IP.com account (if not available) on No-IP signup page. With a free plan, you can get, without costs, up to 3 dynamic DNS names. Another operation to do with a free account will be that you need to confirm your hostname every 30 days. This task is really simple and can be achieved easily from notice mail that No-IP will send to you a few days before dynamic hostname expiration. Take note of your account mail and password, because they will be needed in Raspberry PI No-IP setup.
This procedure will require at least 1 hostname.
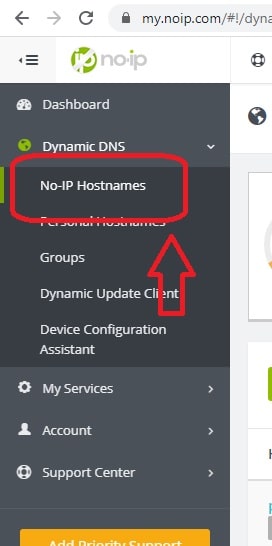
After logging, from your dashboard go to Dynamic DNS -> No-IP Hostnames:
Use the Create Hostname button to open the hostname creation form:
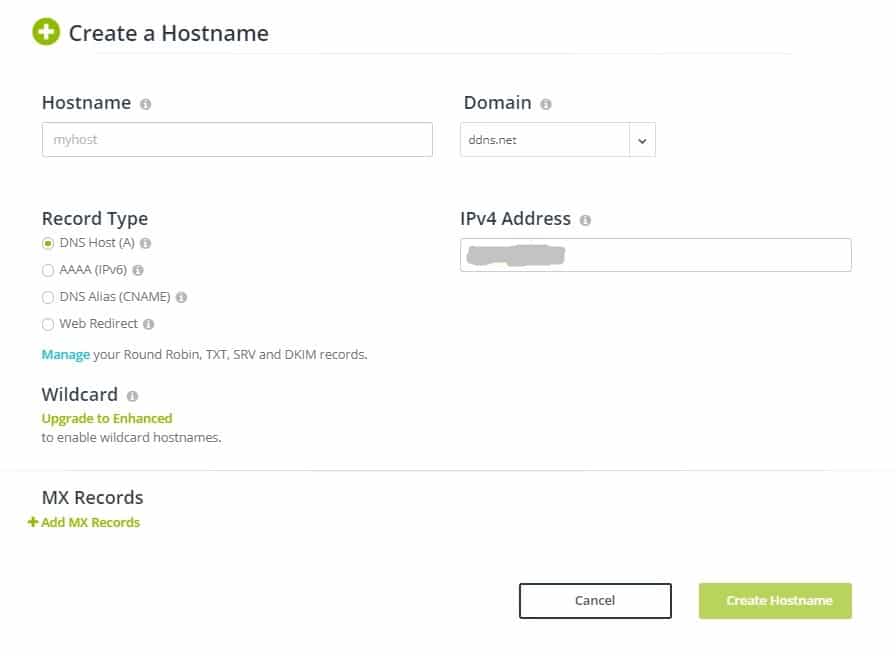
The public IP address of your current PC will be automatically filled in “IPv4 Address” field. This can be left as is because it will be soon updated automatically by DUC.
From here, you can select your favourite “Domain” from the related dropdown list of freely available. Let’s suppose you decide to leave the default “webhop.me” (later, it will be harder to find available your favourite hostname with the most common no-ip domain: ddns.net). This will be the final part of your URL.
The hostname is an important part of this process. This will be the record your update client will edit on changes. You have to write your favourite one (No-IP will check that it is not already used on confirmation). Your hostname should be simple so that you can easily remember it because it will be the initial part of your URL. Let’s suppose you decide to use “myhomepi” as hostname, your complete URL will be “myhomepi.webhop.me”.
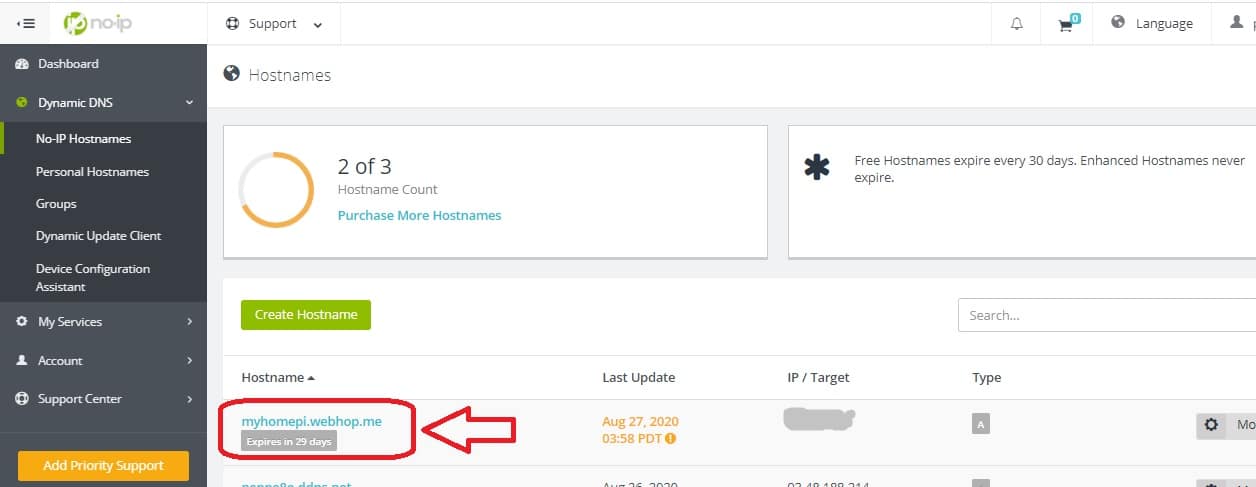
So, once added your favourite hostname and domain, click “Create Hostname” at the bottom of the form. If your hostname is available, a new “A” type record will appear in your No-IP hostnames list:
Tasks on No-IP are now finished. Let’s move on to setting up the update client on Raspberry PI.
Install No-IP DUC in Your Raspberry PI
For Raspberry PI operations, we’ll work from the terminal. So this procedure will be valid both on Lite and Desktop Raspberry PI OSs.
If not already done, install your Operating System. If this is your first time, please refer to installing Raspberry PI OS Lite. Update your operating system, from the terminal:
sudo apt update
sudo apt upgrade
Create a folder from where the No-IP update client will be installed and enter it:
mkdir noip
cd noip
Download and uncompress the No-IP package with the following commands:
wget https://www.noip.com/client/linux/noip-duc-linux.tar.gz
tar vzxf noip-duc-linux.tar.gz
It will create a new folder whose name includes the current No-IP update client version. Let’s suppose our version is 2.1.9-1, enter the folder:
cd noip-2.1.9-1Finally install the software:
sudo make
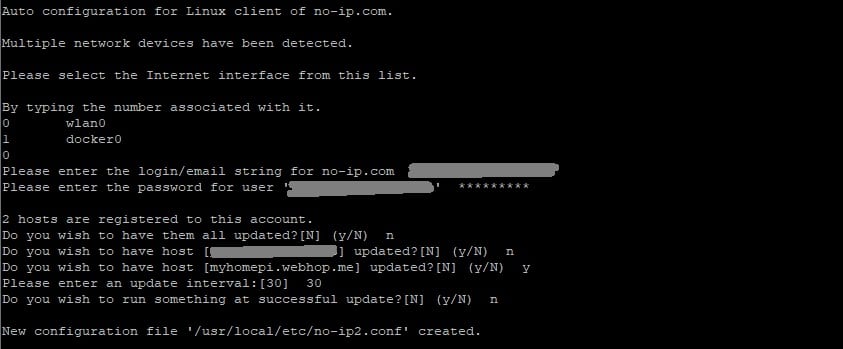
sudo make installThe second command will require some info to configure your setup:
- Device interface to use – select your Raspberry PI interface used to connect Internet
- NoIP.com account user (mail) and password – use the ones to login with your account in Noip.com
- Hostnames to update – if you have more than one hostname registered in your No-IP account, you should probably not update all hostnames together, but only the one referring your Raspberry PI (myhomepi.webhop.me in our example)
- update frequency – this is the time between IP refresh on No-IP servers, in minutes. According to No-IP, this value should be greater than 5 minutes. The default is 30 minutes.
The following screenshot shows my configuration (with some fields greyed), used with a Raspberry PI Zero W connected to the internet with a wireless interface and Docker installed (docker creates its own internal virtual network interface
At this point, the No-IP update client is configured and working sending dynamic updates when on public address changes. To check its status, please type in your terminal:
sudo /usr/local/bin/noip2 -S(the last letter is a capital S). This command will give back your No-IP configuration.
After each Raspberry PI reboot, you need to launch again your No-IP DUC client with the command:
sudo /usr/local/bin/noip2To avoid this boring task at each reboot, you can include noip2 start command in your sudo nano rc.local file:
sudo nano /etc/rc.localthen add “/usr/local/bin/noip2” string just before the final “exit 0” row:
....
 printf "My IP address is %s\n" "$_IP"
fi

/usr/local/bin/noip2

exit 0
This way, on the next restart your DUC will start on boot.
No-IP update client will start checking its Public IP and will send dynamic updates to your hostname only on IP address change (not when it is different from what the host is currently set to).
Test No-IP Dynamic DNS Resolution
In this paragraph, we’ll prepare a very easy test for our dynamic DNS service resolution by publishing a simple Apache test page from Raspberry PI.
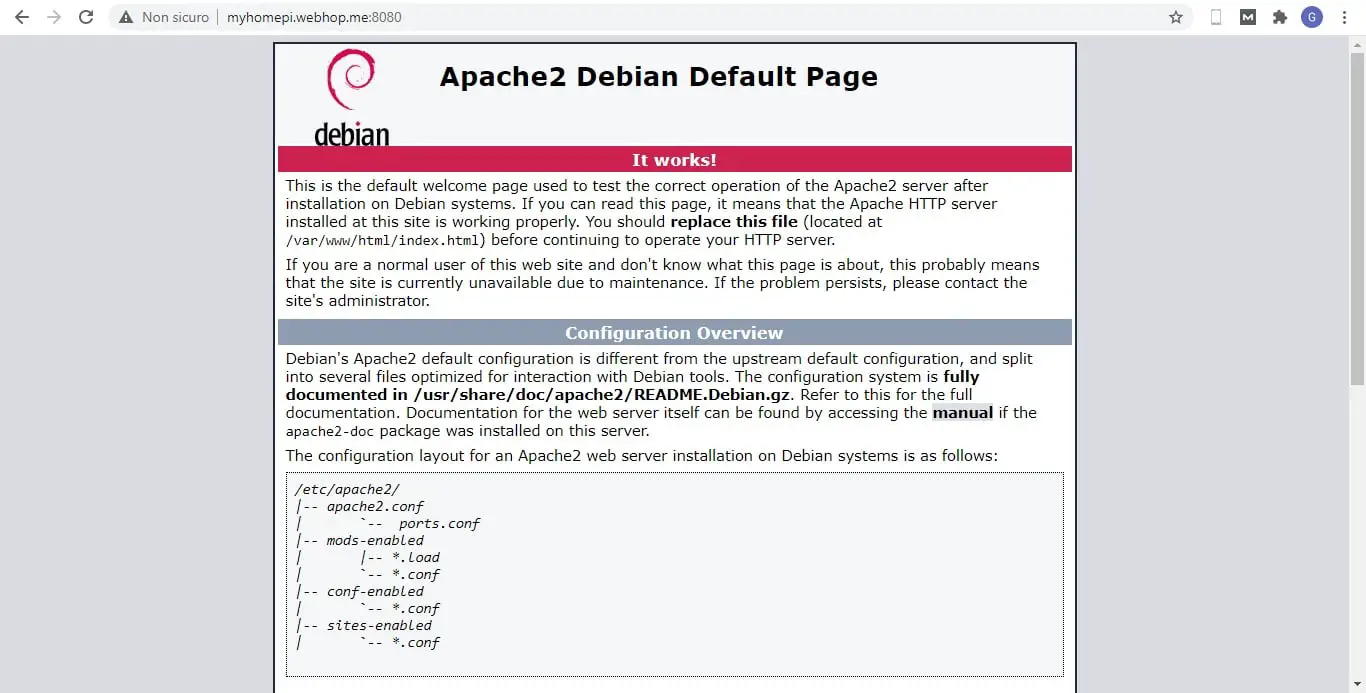
Before starting, I’m assuming that you already configured port forwarding in your router. I want to add a new tip. In this test I’ll use a different external port (8080) which is a port forwarded in my router to Raspberry PI port 80:
RPI (80) <—> Router (8080) <—> Internet
When you call a URL from the browser, it uses by default (hiding it in the address bar) port 80 (for HTTP pages) or port 443 (for HTTPS pages). If you need to browse a different port, you need to append it to URL with colon char (for example, with our test the resulting external URL will be http://myhomepi.webhop.me:8080 (because router exposes port 8080), while access from lan will result (changing <<RaspberryPiAddress>> with your RPI local IP) in http://<<RaspberryPiAddress>> (because Raspberry PI is available from local network and is exposing port 80).
Start installing Apache in your Raspberry PI from the terminal:
sudo apt install apache2 Wait for the installation to finish.
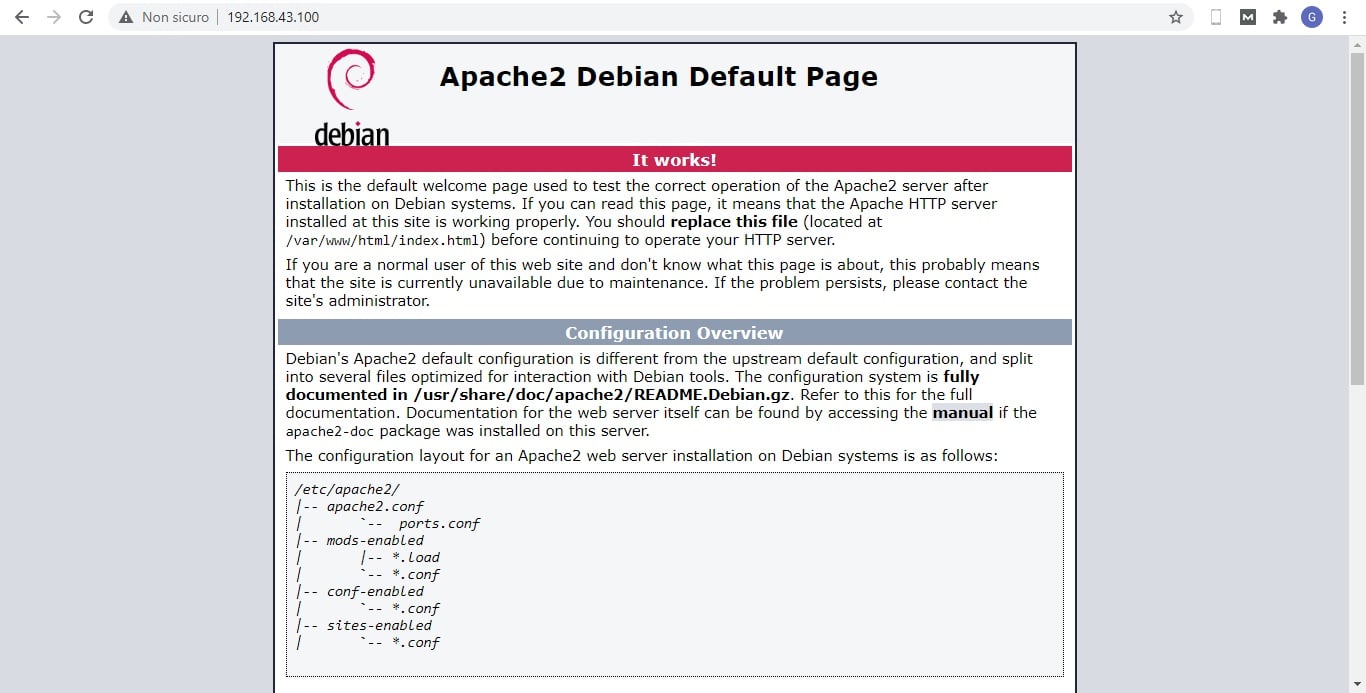
Using your Raspberry PI IP Address for local area network browsing (my RPI IP is 192.168.43.100):
While external remote access to the same page will result in the same output from different URLs:
Enjoy your free dynamic DNS!
