How to use n8n and Raspberry PI to create workflows and automate APIs
Last Updated on 12th April 2024 by peppe8o
Using Raspberry PI as server can lead to a need in managing a wide number of triggers to enable some automation workflows. It may be a GPIO external condition, a system internal state, or a web trigger enabling notifications, code execution or more complex workflows.
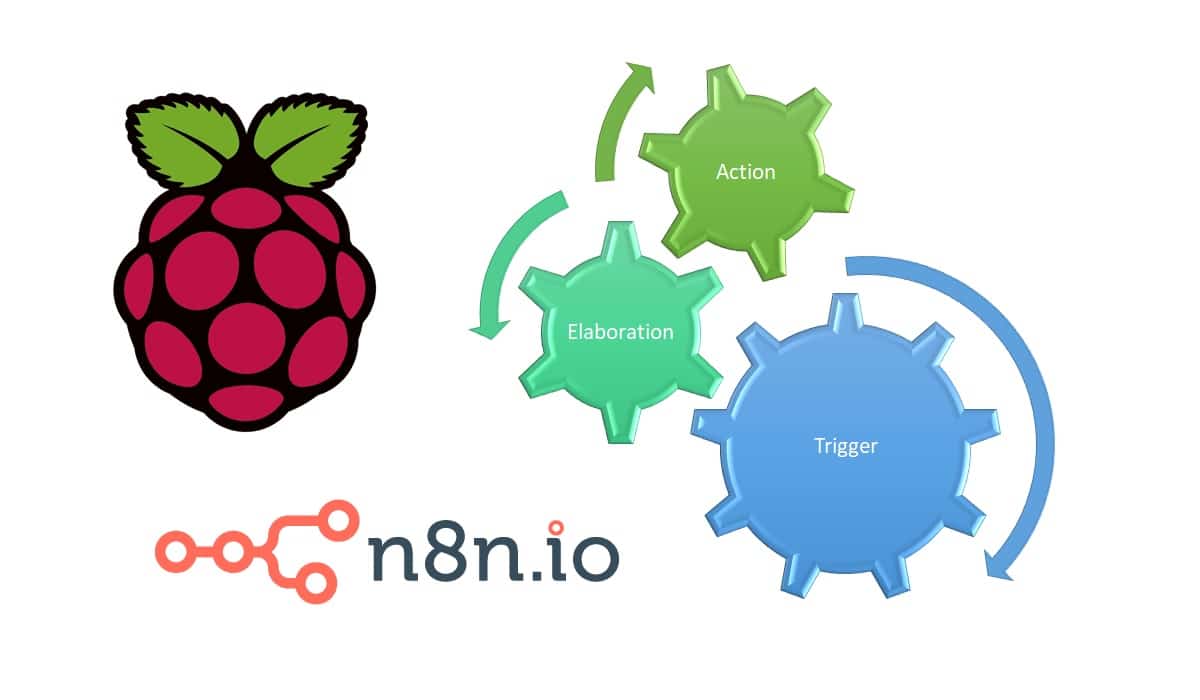
N8n is a great open source tool which simplify managing workflows and APIs interaction. It comes with an intuitive graphical interface and can run also in very low capacity hardware.
It can run both locally or in the cloud, allowing to manage access grantings. It aims to make easy incorporating custom functions and apps with minimal engineering effort. N8n’s node based editor lets you map anything to everything and go beyond basic ETL. Its home page reports following main features:
- Sync data between 90+ apps – Move and transform data between different apps and databases without getting caught up in API docs and troubleshooting CORS errors.
- Design powerful workflows – Go beyond ETL: start with simple no-code flows and add javascript functions, conditional logic, or custom http requests in a snap.
- Create custom integrations – Design bespoke nodes for a proprietary CRM, endpoints for your product, or any other software, and empower your marketing and ops teams to create their own workflows.
In this guide I’ll show you how to install n8n in Raspberry PI Zero W. This guide will work also with newer Raspberry PI boards.
I’ll also show you how to create your very first simple workflow which checks Raspberry PI internal temperature and sends email warnings if it overcomes a defined threshold.
What Do You Need
As usual, I suggest adding from now to your favourite e-commerce shopping cart all the needed hardware, so that at the end you will be able to evaluate overall costs and decide if to continue with the project or remove them from the shopping cart. So, hardware will be only:
- Raspberry PI Zero W (including proper power supply or using a smartphone micro usb charger with at least 3A) or newer Raspberry PI Board
- high speed micro SD card (at least 16 GB, at least class 10)
Check hardware prices with following links:


Step-by-Step Procedure
Prepare Raspberry PI Operating System
Start preparing your Raspberry PI opeating system with the guide to install Raspberry PI OS Lite.
Be sure your OS is updated with following commands from terminal:
sudo apt update
sudo apt upgrade
Install n8n
Official setup procedure gives you 2 diffferent ways. You can use docker, so after installing docker in your Raspberry PI the command is the following:
docker run -it --rm --name n8n -p 5678:5678 -v ~/.n8n:/root/.n8n n8nio/n8n:0.78.0-rpiBut actually this command doesn’t work with my Raspberry PI Zero W (maybe because it has an ARMv5 architecture. So I prefer installing it with NPM.
Install npm
From terminal type:
sudo apt install npmWe also want to prevent permission errors, so we need following operations (credits to https://stackoverflow.com/questions/49894620/npx-command-not-found):
mkdir ~/.npm-global # create folder where npm will install packages
npm config set prefix '~/.npm-global' # configure npm
echo 'export PATH=~/.npm-global/bin:$PATH' >> ~/.profile # add folder to path in user profile
source ~/.profile # reload current user profile
From here, you can install n8n with simple command:
npm install n8n -gThis command could output some warnings related to nodejs version compatibility. Anyway, these warnings didn’t affect my installation and should be related to repositories updates.
After a while, you will be prompted with the installation terminated. To start n8n type from the terminal:
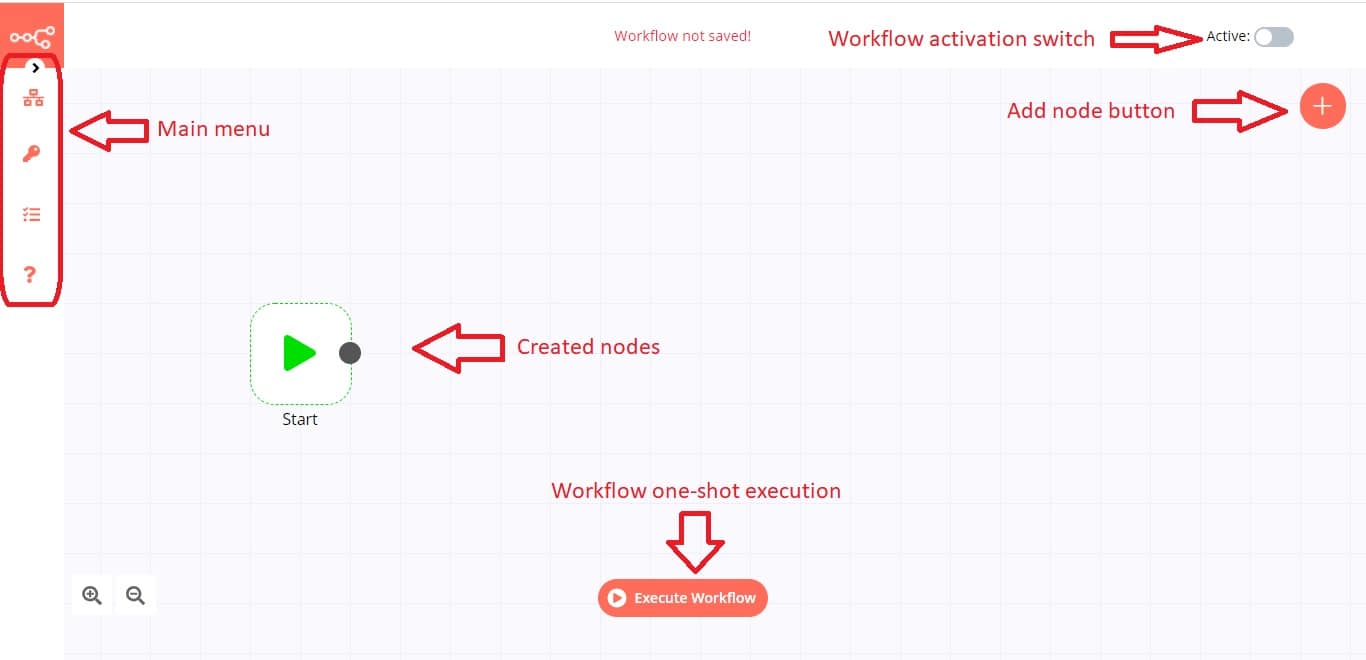
n8n start --tunnelWait for the service to be completely loaded and then use in your favourite browser the URL “http://<<YourRaspberryPiAddress>>:5678” (of course, change “<<YourRaspberryPiAddress>>” string with your Raspberry PI IP Address). The N8n dashboard will appear, with the field marked in the following picture:
Run n8n As Service
You will soon note that your n8n service doesn’t give you back prompt from terminal and will close if you press CTRL+C.
To run n8n at each system boot and without having to call it manually from terminal, use pm2:
npm install pm2@latest -g
pm2 start n8n
To start pm2 services on every system boot:
pm2 startupPrevious command will generate a code. You need to copy and paste in your terminal to generate the startup script. Then type:
pm2 savewhich saves the startup script so that it is automatically executed the next time your system reboots.
Other pm2 useful command:
pm2 stop n8n # stops n8n
pm2 restart n8n # restarts n8n
pm2 reload n8n # reloads n8n
pm2 delete n8n # deletes n8n
pm2 list # lists active pm2 services
pm2 monit # opens pm2 monitor console
Install Local Email Service
A common need with workflows is having a warning in certain conditions. People usually prefer email warnings because they don’t need direct and continuous access to systems. For this purpose and for following example usage we’ll install Exim4 in our Raspberry PI. From terminal:
We need also to send mail (like for notifications and user registration). Let’s install Exim:
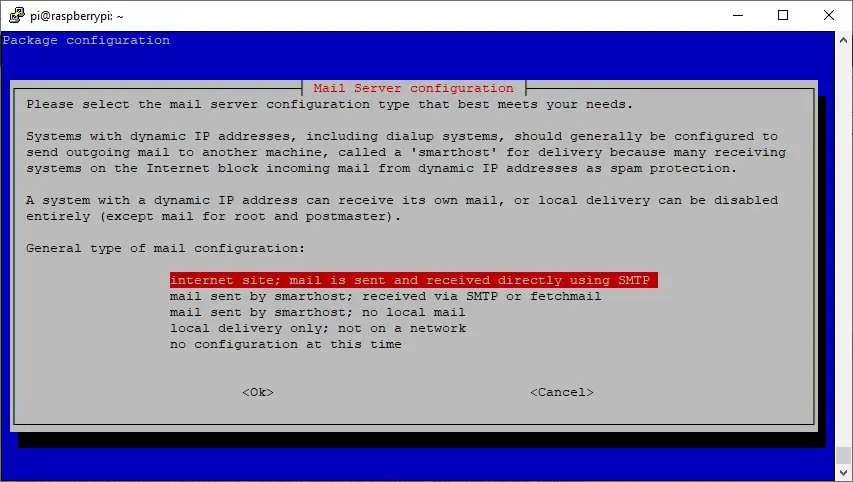
sudo apt install exim4Configure exim in sending mail to external domains:
sudo dpkg-reconfigure exim4-configChange only the first screen configuring installation as “internet site”:
You can leave all other parameters as default or change them at your choice.
Test sending a mail. The following command will open an Exim session. The terminal will listen to what added from the user to add it in the mail sent (change myEmail@example.com) with your mail:
exim -v myEmail@example.comThen type:
From: yourEmailAddress@example.com
Subject: Exim Subject test
Text to be included in message Body
Then press CTRL+D and your mail will be sent. Once sending is complete, you can press ENTER to go back to the terminal prompt.
Also, check it in your recipient Spam box that the test email has been delivered.
Configure a Simple Temperature Check Workflow
Our simple workflow will perform a simple check on Raspberry PI temperature, compare read value with a threshold and send a warning mail only if this value is higher.
Please find below the overall workflow:
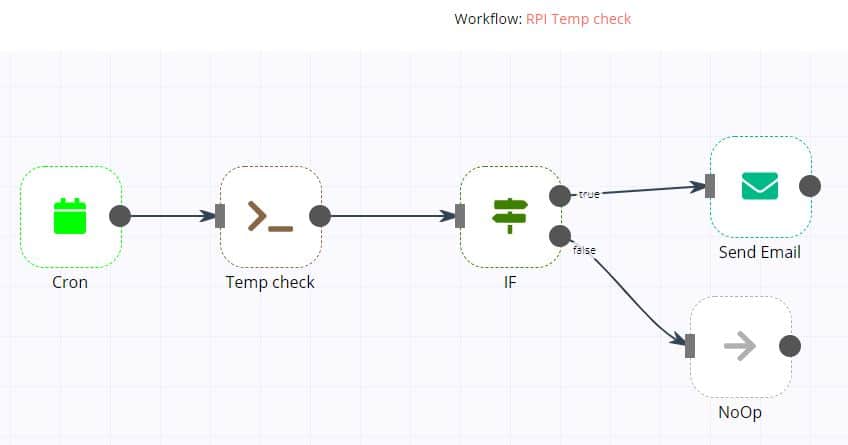
This simple flow will be composed of:
- 1 Cron node which triggers workflow start every defined time
- 1 Command Execution node (renamed to Temp check), which will execute a command in your host to get Raspberry PI temperature
- 1 IF node, which will compare read temperature with a defined threshold
- when IF condition is true (read higher than threshold), the Send Email node will deliver a warning email, and then the workflow ends
- when IF condition is false (read lower than threshold), no operations will be executed and workflow ends
Following pictures show how nodes are configured in this example. Create all required nodes with the Add Node buttom on top right of your dashboard (a cross on red circle). For the moment, they can stay without connection arrows.
Once created, double click on a node will enter node configuration.
Cron Node
This is a simple and basilar cron node configuration:
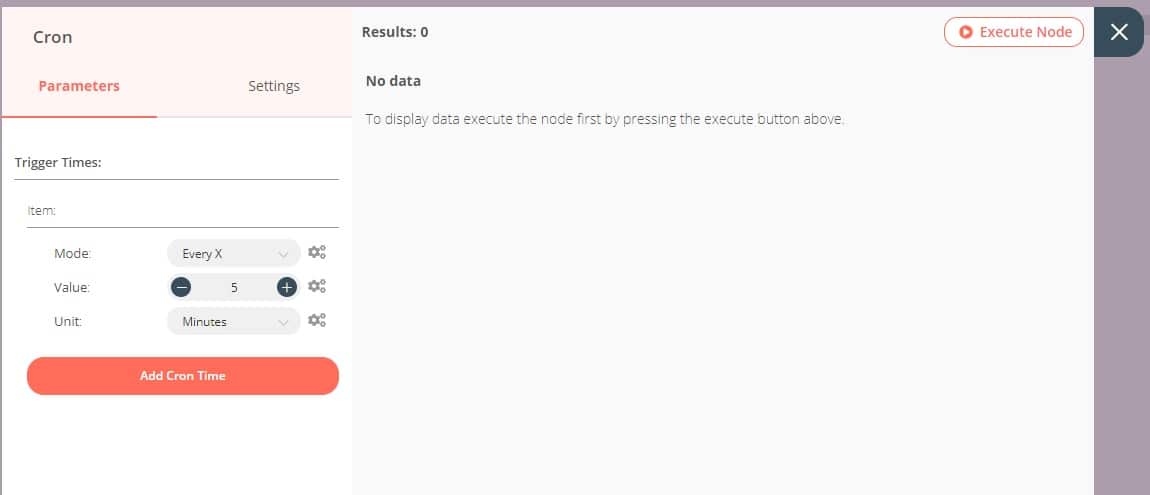
Set following parameters:
- Mode: Every X
- Value: 5
- Unit: Minutes
Close this window.
Temperature Check (derived from Execute Command node)
Use a Execute Command node to get this element. To rename it from standard “Execute Command” to “Temp check” you need only to click on “Execute Command” label on top left of this window, change name and apply. This will be useful later to identify this node.
Temp check node will be configured with a single line terminal command which gets Raspberry PI temperature and divide it by 1000 (command used to get temperature gives a value in degrees without point, so must be divided by 1000):

Configure it with following command:
echo $(($(cat /sys/class/thermal/thermal_zone0/temp)/1000))You need a first run with this node in order to check that command works and to make at least one result available for IF node configuration. So, click the Execute Node buttom on top right of this window and wait for result to be available.
Then close this window.
IF Node
This node will do the comparison with our predefined threshold. I set it to 30 degrees, which is a very low threshold, to be sure in my very first test to have a warning mail and test the workflow. A better threshold for Raspberry PI should be around 70. Value 1 appears as “0”, but this must be configured as follows.
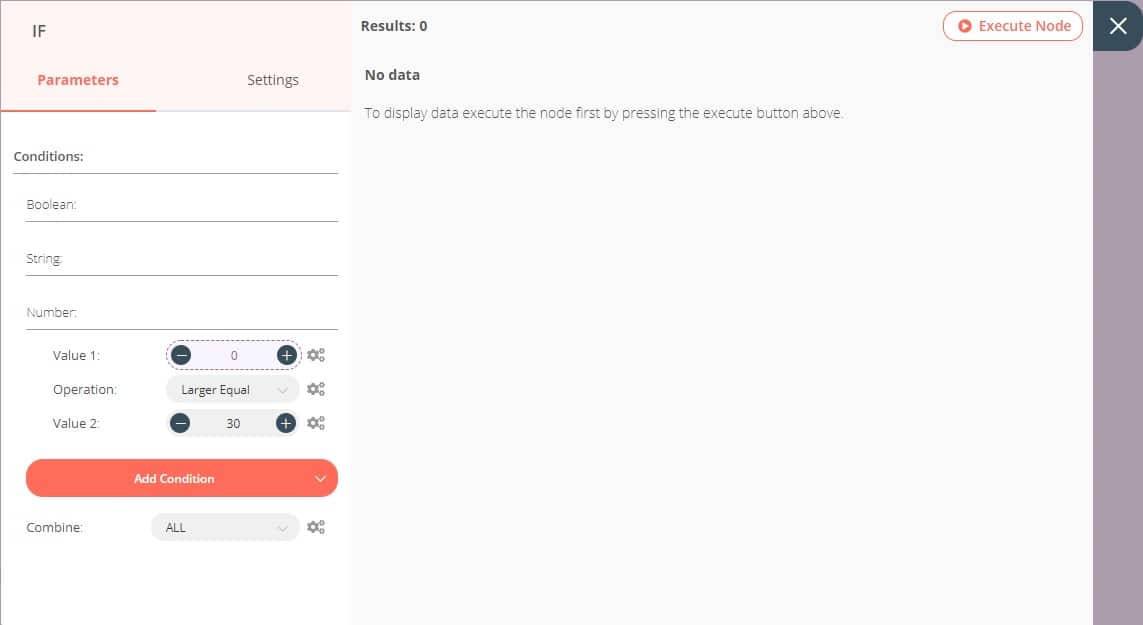
IF node can perform both Boolean, String and Value condition. Be sure you are using a Value Condition (with the Add Condition button if needed).
Value 1 needs to get results from previous node. Click to gears on right of this parameter and then select “Add Expression”, In next window be aware to clear the “0” value inside Expression.
Scroll down Nodes list on left, open Temp check tree, Output Data and JSON. Select “stdout” line, which will generate expression as following picture:
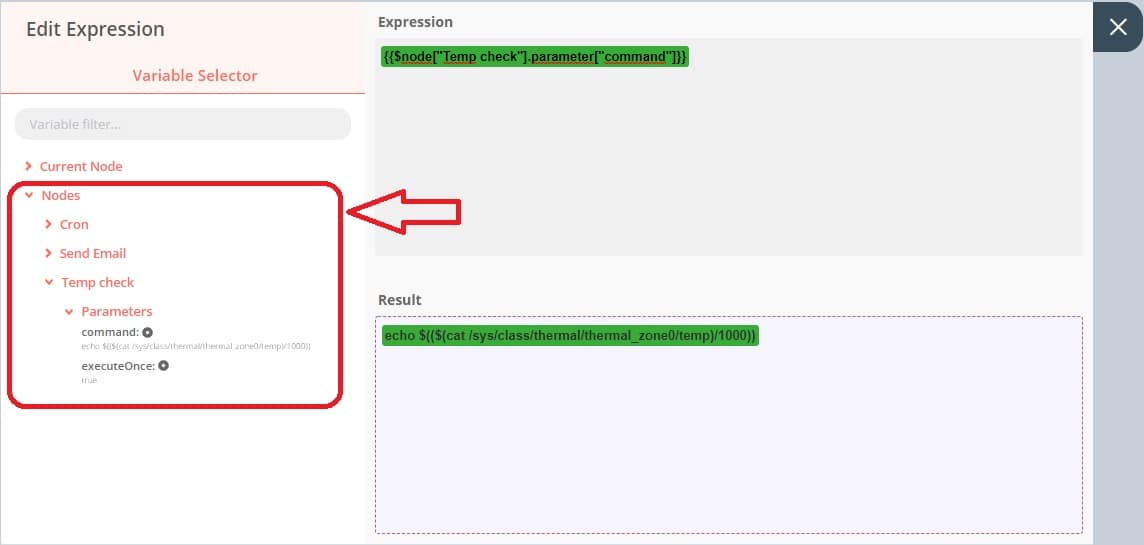
Close this windows (no save is needed as it saves your changes on every window close) and go back to complete IF configuration.
Set “Operation” field to “Larger Equal” and Value 2 to your Raspberry PI temperature warning threshold. A value of 30 degrees will generate a sure warning message as my Raspberry PI Zero W measures 37 degrees with only n8n service active. This is useful because a so low threshold will execute all the workflow to end.
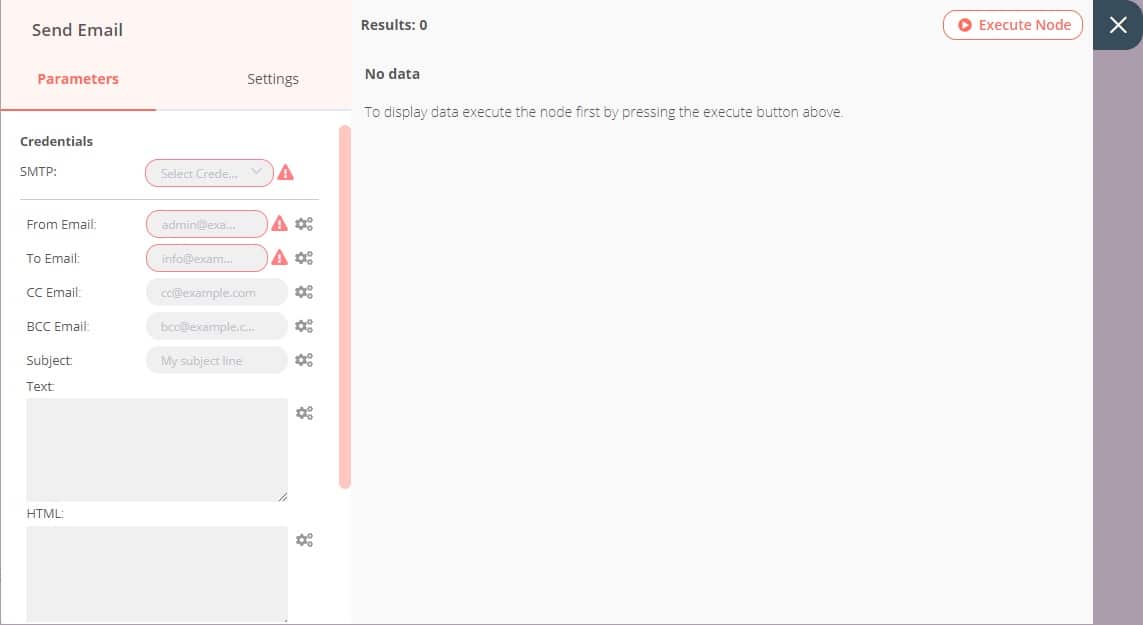
Send Email Node
This node will use previously installed Exim service to send mails from Raspberry PI without the need of external SMTP email services. It will work without technical problems, but it can result in your mail received in recipient SPAM folder for first times, at least untill you will set used “from” address as trusted in your receiving mail service.
Send Email node configuration window will appear as following when opened:
In SMTP field, use Select Credentials drop down menu to “Cerate New” email service configuration.
Use following settings for Credentials form. I will use my local pi user and password (the ones you use for SSH access).
- Credentials Name: it can be any label you prefer and is used only for mnemonic purposes (mine one is “Exim localhost”
- User: pi
- Password: your system “pi” user password if changed (as suggested). Default one is the pi default password (“raspberry”)
- Host: localhost
- port: 25 (exim listens on port 25 when installed)
- SSL/TLS: disabled
- Nodes with access: scroll down and flag on to grant Send Email access.
Your configuration should appear similar to following one:
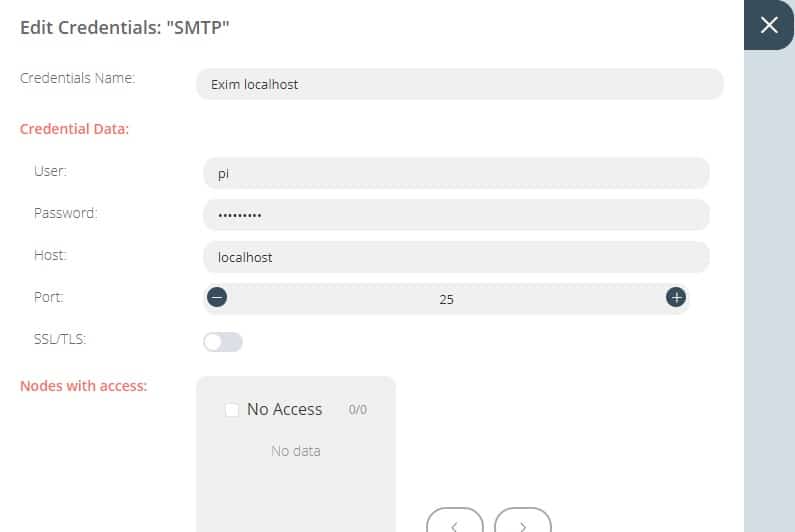
Scroll down to bottom and click “Save” button. This will bring you back to Send Email configuration.
Complete Send Email config with following settings:
- SMTP should be alread set to “EXIM localhost” (or whatever label you choose).
- From Email; this can be configured to whatever mail address you want, without need to register this mail address. For example, n8n@local.com
- To Email, CC Email, BCC Email: use these fields to add recipients mail addresses. These mail address must be, of course, real and existing mail addresses you can access to check emails
- Subject: the subject that will be reported in email
- Text, HTML: these fields will be set to configure your email body. With the first one, you set a plain text body, with the second one you can use a more complex html body. For this very first test, you can configure only Text field to “Your Raspberry PI temperature is too high!”
NoOp node
This node does nothing than ending the workflow cicle. It doesn’t need any configuration.
Connect Nodes and execute workflow
Finally, you can connect nodes using the grey circles on nodes right and grey rectangles on nodes left. Drag and drop lines from circles to rectagles (click and keep clicked from circles, move mouse to rectngles and then release mouse button) composing the workflow according to its diagram:
Click the “Execute Workflow” button on bottom-center of your dashboard to test the overall workflow. Your workflow is now running.
Please refer to n8n documentation pages for more usage info.
Enjoy!

I’m stuck at installing n8n with npm. At about 30-40% of progress it throws bunch of “Unsupported engine” warnings and than it freezes for 10-15 minutes untill it compleatly breaks and looses SSH connection.
Could you please update your tutorial and check if installing n8n on pi zero 2w is possible now days?
Hi Tom,
With RPI Zero 2W you should be able to use the docker installation (please use the 64-bit OS for your Raspberry PI). Please, can you try this way?