Install Ubuntu Server 64 bit OS in Raspberry Pi
Last Updated on 3rd August 2023 by peppe8o
Raspberry Pi comes out with a default OS choice that appears logical to all people: Raspberry PI OS.
Raspberry Pi Foundation is behind both products, so everyone supposes that this pair assures the best compatibility and performance. However, some people could find it interesting to test services provided by Ubuntu, one of the most famous open-source OS, supported by a very strong web community.
The version that we are going to install is the server one (without Desktop Environment), release 19.04.
So, this article is going to provide a guide to installing Ubuntu Server OS in Raspberry Pi 3 model B+ but should also work on newer RPIs (for example RPI4).
What do you need
HARDWARE
As usual, I suggest adding from now to your favourite e-commerce shopping cart all the needed hardware, so that at the end you will be able to evaluate overall costs and decide if to continue with the project or remove them from the shopping cart. So, hardware will be only:

- Raspberry PI 3 Model A+ (including proper power supply or using a smartphone micro USB charger with at least 3A) or newer Raspberry PI Board
- high speed micro SD card (at least 16 GB, at least class 10)
- a USB/wireless keyboard
You also need a PC (notebook or desktop) to flash images.
SOFTWARE
- Ubuntu Server disk image. I will use the preinstalled server image, which allows you to unpack a preinstalled version of Ubuntu onto a target device. The official image for different RPI computer board models can be downloaded here.
- an image flashing software like, for example, Etcher or Raspberry PI Imager.
Step-by-Step Guide
Download and install in your PC Etcher (if not available).
Download the Ubuntu disk image (img.xz compressed file).
Insert your SD card into your PC/SD card reader.
Run Etcher on your PC.
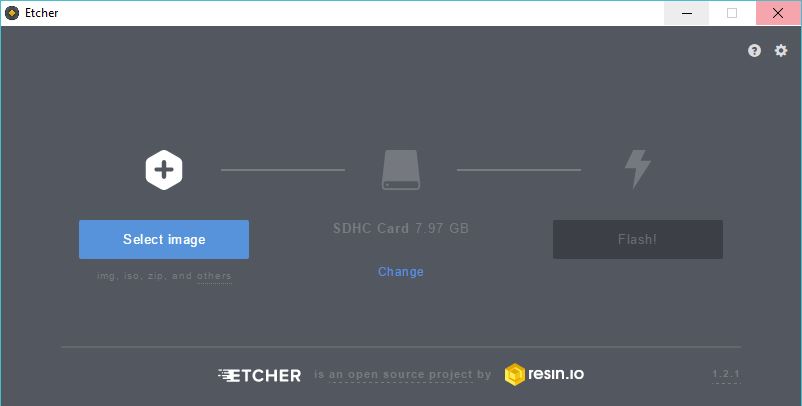
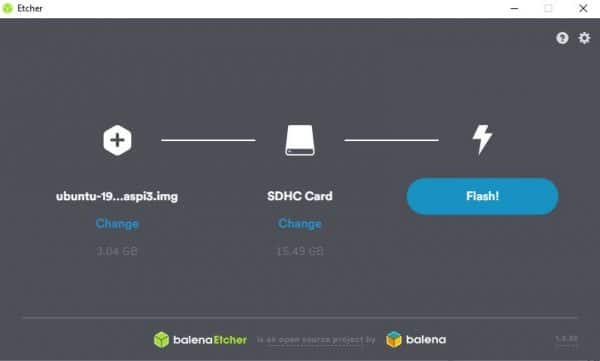
Click “Select Image” and select the Ubuntu disk image previously downloaded. Now Etcher should also have recognized your SD card. Otherwise, click Change and select the correct SD card.
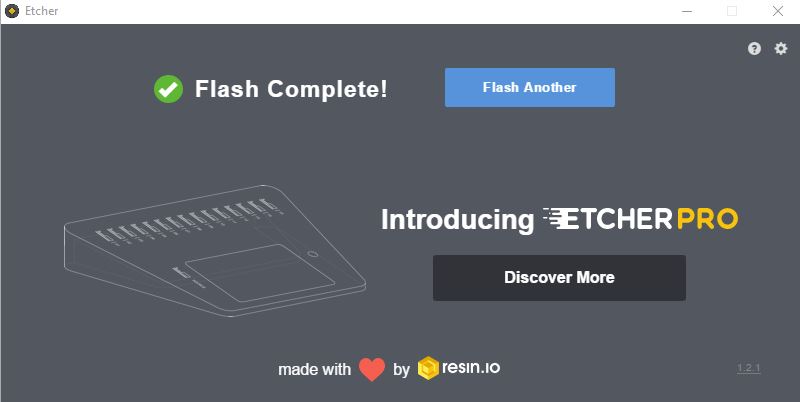
Click on “Flash! button and wait for the operation to be completed.
Now extract the SD Card from your PC and insert it into your Raspberry Pi (that must be already connected also via HDMI to a monitor/TV). Power on the RPI and wait for the boot till the login prompt.
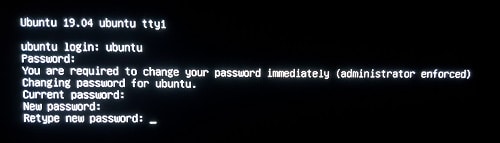
Login with default Ubuntu credentials (please wait a while if it returns an authentication error):
user: ubuntu
password: ubuntu
The first login will require changing the Ubuntu password. Change it at your choice:
Networking Setup
For those who use RPI via Ethernet connection, you can go ahead to the next paragraph (SSH Setup).
If we want to use WiFi connectivity, we must create a new YAML file, named 01-netcfg.yaml:
sudo nano /etc/netplan/01-netcfg.yamlNetplan is quite strict about indentation and spacing; proofread carefully. Configure as follows:
network:
 version: 2
 renderer: networkd
 wifis:
  wlan0:
   dhcp4: yes
   dhcp6: no
   access-points:
    "network_ssid_name":
     password: "**********"
change network_SSID_name and password with yours. Note that both are enclosed in quotation marks (“). Save and exit. Activate the new networking setup by typing the following commands:
sudo netplan generate
sudo netplan apply
Test if all is working with a simple ping:
ping -c3 www.ubuntu.comFind your RPI IP address with the single command:
ifconfiglooking at wlan0 section. This IP will be used to connect remotely via SSH at the end of next step.
SSH Setup
Reboot to have a clean environment:
sudo rebootBefore all, update your installation:
sudo apt-get updateUbuntu Server doesn’t come with ssh enabled, so we need to install the related package:
sudo apt-get install openssh-serverAfter this operation, you are able to connect remotely via SSH to your RPI server.
Final Check
Type the following command:
dpkg --print-architecturethat will show you have an arm64 (64-bit) OS:
arm64BONUS
Booting Ubuntu Server may require more time than Raspbian Lite. A way to improve it is to avoid the boot check on the Ethernet connection if you use only WiFi. This also fixes the warning “A start job is running for wait for network to be configured.” on booting, which wastes time if no Ethernet cable is plugged (WiFI only networking). The goal can be achieved by editing 50-cloud-init.yaml:
sudo nano /etc/netplan/50-cloud-init.yamland commenting all networking sections (inserting # before each line), so that the file will appear like the following:
# This file is generated from information provided by
# the datasource. Changes to it will not persist across an instance.
# To disable cloud-init’s network configuration capabilities, write a file
# /etc/cloud/cloud.cfg.d/99-disable-network-config.cfg with the following:
# network: {config: disabled}
#network:
# version: 2
# ethernets:
# eth0:
# dhcp4: true
# match:
# macaddress: xx:xx:xx:xx:xx:xx
# set-name: eth0
Final Considerations
Having a 64-bit OS on RPI can give great help to those people using Raspberry with CPU-intensive applications. This doesn’t help if you need more RAM, which is limited by hardware sizing. Other performance improvements can come from some shrewdness regarding the correct Power Supply use, high-performance SD Cards, and others listed in 4 tricks to improve Raspberry Pi performance and power consumption article.
Other Raspberry PI Projects
If you want to discover many other projects for your Raspberry PI, you can take a look at peppe8o Raspberry PI tutorials.
Enjoy!

The current ubuntu-21.04-preinstalled-server-armhf+raspi.img.xz & ubuntu-21.10-preinstalled-server-armhf+raspi.img.xz do not support USB booting? Any idea how to update them to support USB booting? The RPi images work fine but just copying the boot partition doesn’t work for me.
Hi Jeff. With Raspberry PI 4 Model B it should be a simple job. Just use first steps from my ubuntu-desktop-and-raspberry-pi-4-fast-home-computer-booting-from-ssd/ tutorial, except that instead of Ubuntu Desktop image you have to use the server image. With other Raspberry PI computer boards, it should be not possible (maybe RPI 3 Model B, but with a different and more invasive procedure)