Private Git Web Portal in Raspberry PI With Gogs
Last Updated on 13th April 2024 by peppe8o
In this tutorial, I’m going to show you how to setup a private Git web portal in a cheap board, installing Gogs on Raspberry PI. I’ll use a Raspberry PI Zero W, but this tutorial works also with newer Raspberry PI boards.
Code development requires continuous reworks, fixes, updates and downgrades. Managing it with Git allows easy code revisions management, but it is fully terminal-only based. Installing Gogs in Raspberry PI grants a private Git web portal (similar to Github) to host your own code and share it with your friends.
More details on using Git can be found in Use GitHub with Raspberry PI OS from Terminal article.
What is Gogs
Gogs is a self-hosted Git service. From the software perspective, it seems to be composed of a simple web server, empowered with Git support, and a database.
Gogs has very low minimal hardware requirements since we can install it on RPI Zero. It is so lightweight that its homepage reports that some users even run instances on their NAS devices.
You can install from binary, source, packages or Docker image (but the ARM tag is missing).
The following list shows the prerequisites:
- Database (MySQL, PostgreSQL, TiDB). I’ll use MariaDB, which is a lightweight MySQL fork able to run on Raspberry PI Zero W.
- Git
- SSH server
What We Need
As usual, I suggest adding from now to your favourite e-commerce shopping cart all the needed hardware, so that at the end you will be able to evaluate overall costs and decide if to continue with the project or remove them from the shopping cart. So, hardware will be only:
- Raspberry PI Zero W (including proper power supply or using a smartphone micro usb charger with at least 3A) or newer Raspberry PI Board
- high speed micro SD card (at least 16 GB, at least class 10)
Check hardware prices with following links:


Step-by-Step Procedure
Prepare Operating System
Start installing your OS. For these projects I suggest to install Raspberry PI OS Lite since it is fast and you can use it without a monitor/keyboard (with a remote SSH connection). You can also install Raspberry PI OS Desktop, using the following procedure with its internal terminal.
Make your OS up to date. From terminal:
sudo apt update -y && sudo apt upgrade -yInstall also Git, as required:
sudo apt install gitInstall MariaDB database
You will need both MariaDB server and the client as the latter will be used to initialize the database for Gogs instance.
From terminal:
sudo apt install mariadb-server mariadb-clientAt this point you can evaluate perfecting the secure setting already explained in LAMP server on Raspberry PI at “Install Database” paragraph.
To prepare the database instance, choose your favourite user, password and DB name to use instead of gogsUser, gogsPassword and gogsDb in the following script. These credentials will be needed from Gogs application for internal database usage and will be different from the ones to access the web portal.
From the terminal (if you didn’t set a root password with MariaDB secure installation script, it will be empty):
sudo mysql -uroot -pThen type the following commands. Each command includes a finishing semicolumn followed by ENTER key pressure:
create database gogsDb;
create user gogsUser@'%' identified by 'gogsPassword';
grant all privileges on gogsDb.* to gogsUser@'%';
flush privileges;
quit
Get Gogs
From the terminal, get the latest ARMv7 binary package (check it from https://gogs.io/docs/installation/install_from_binary page, copying ZIP download link):
wget https://dl.gogs.io/0.12.3/gogs_0.12.3_linux_armv7.zipMove this file to your favourite folder (I’ll leave it on the pi home) and then unzip it:
unzip gogs_0.12.3_linux_armv7.zipEnter the extracted folder:
cd gogsCreate Gogs Service for Systemctl
To avoid manually running gogs start at each reboot, we need to configure it as daemon. This way we can run it in the background from boot and manage its status from systemctl. In this part, I’m supposing you left Gogs folder in /home/pi/ folder.
Create a new service under /etc/systemd/system/ folder:
sudo nano /etc/systemd/system/gogs.serviceand add the following lines:
[Unit]
Description=Gogs service script
After=network.target
StartLimitIntervalSec=0

[Service]
Type=simple
Restart=always
RestartSec=1
User=root
ExecStart=/home/pi/gogs/gogs web

[Install]
WantedBy=multi-user.target
Close and save. Configure service to start on reboot:
sudo systemctl enable gogs.serviceStart your new service with the command:
sudo systemctl start gogs.serviceCheck it is running correctly with systemctl status, getting something similar to the following:
pi@raspberrypi:~ $ sudo systemctl status gogs.service
● gogs.service - Gogs service script
Loaded: loaded (/etc/systemd/system/gogs.service; enabled; vendor preset: enabled)
Active: active (running) since Fri 2020-12-04 06:49:34 GMT; 2s ago
Main PID: 893 (gogs)
Tasks: 4 (limit: 881)
CGroup: /system.slice/gogs.service
└─893 /home/pi/gogs/gogs web
Dec 04 06:49:36 raspberrypi gogs[893]: 2020/12/04 06:49:36 [ WARN] Custom config "/home/pi/gogs/custom/conf/ap
Dec 04 06:49:36 raspberrypi gogs[893]: 2020/12/04 06:49:36 [TRACE] Log mode: Console (Trace)
Dec 04 06:49:36 raspberrypi gogs[893]: 2020/12/04 06:49:36 [ INFO] Gogs 0.12.3
Dec 04 06:49:36 raspberrypi gogs[893]: 2020/12/04 06:49:36 [TRACE] Work directory: /home/pi/gogs
Dec 04 06:49:36 raspberrypi gogs[893]: 2020/12/04 06:49:36 [TRACE] Custom path: /home/pi/gogs/custom
Dec 04 06:49:36 raspberrypi gogs[893]: 2020/12/04 06:49:36 [TRACE] Custom config: /home/pi/gogs/custom/conf/ap
Dec 04 06:49:36 raspberrypi gogs[893]: 2020/12/04 06:49:36 [TRACE] Log path: /home/pi/gogs/log
Dec 04 06:49:36 raspberrypi gogs[893]: 2020/12/04 06:49:36 [TRACE] Build time: 2020-10-07 03:43:11 UTC
Dec 04 06:49:36 raspberrypi gogs[893]: 2020/12/04 06:49:36 [TRACE] Build commit: f0e3cd90f8d7695960eeef2e4e54b
Dec 04 06:49:36 raspberrypi gogs[893]: 2020/12/04 06:49:36 [ INFO] Run mode: Development
Start Gogs
With your favourite browser, use your Raspberry PI IP address as URL, followed by port 3000 and “install” subfolder. My RPI IP address is 192.168.1.79, so in my case URL will be “http://192.168.1.79:3000/install”. The Gogs installation page will appear in the following picture:
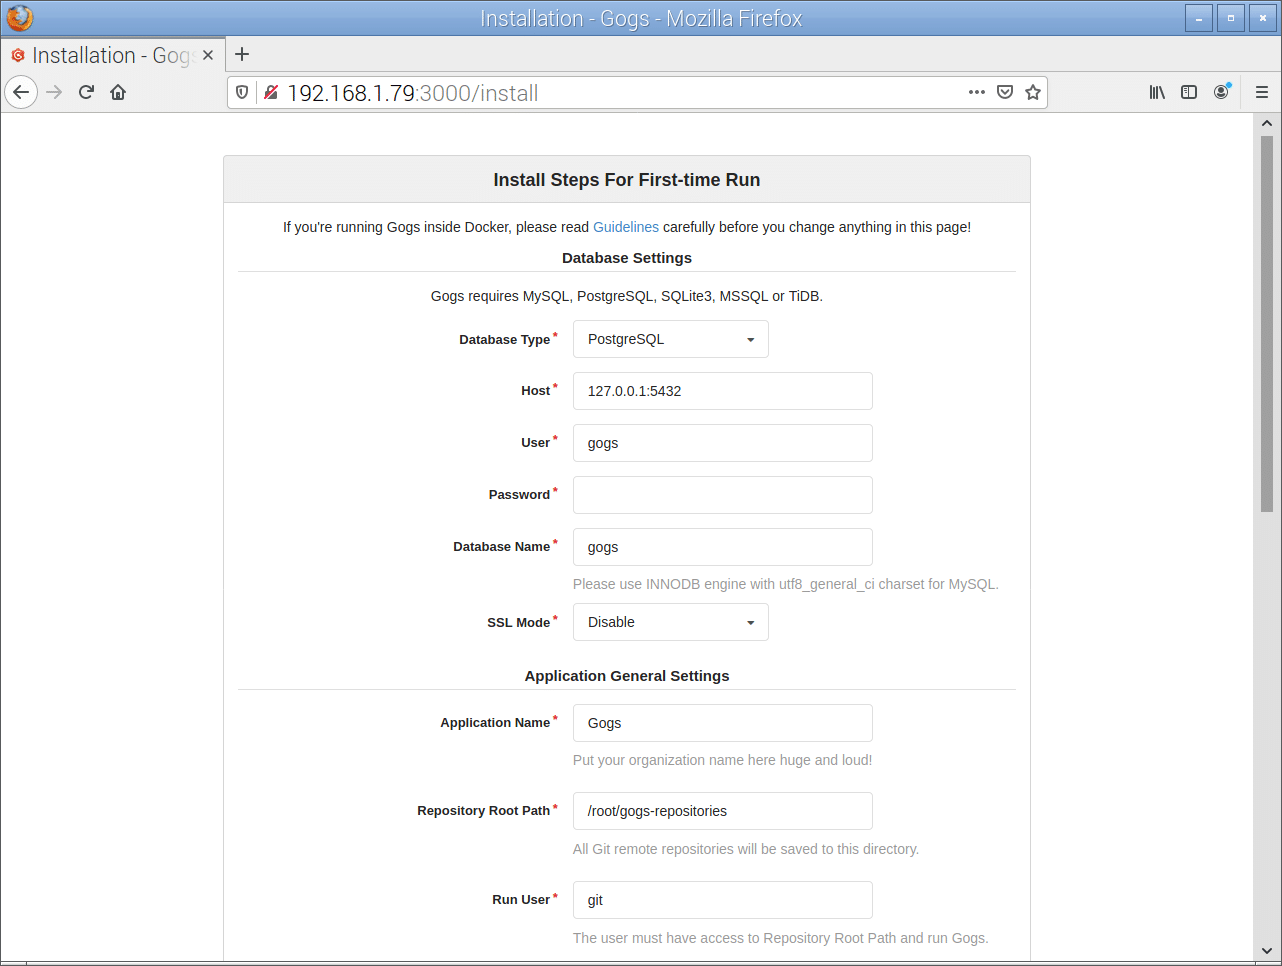
Setup this page with the following (leaving default where not specified). Take care to use your MariaDb user, password and database name instead of mine. If you want to expose this service externally to your local network (with services like NoIP DUC), please edit Domain and Application URL parameters accordingly.
- Database settings:
- Database Type: MySQL
- User: gogsUser
- Password: gogsPassword
- Database Name: gogsDb
- Application General Settings
- Application Name: your website/organization name
- Run User: root
- Domain: 192.168.1.79
- Application URL: http://192.168.1.79:3000/
Moreover, use “Admin Account Settings” to setup your very first (admin) user for the web portal by setting your favourite username, password and your email address.
Finally, click “Install Gogs” button at the end of this page.
NOTE: at this part, I got an error: “Run user isn’t the current user: root -> git”. Launching again “Install Gogs” button “magically” worked with no more errors.
The Gogs page will then redirect to your user home page:
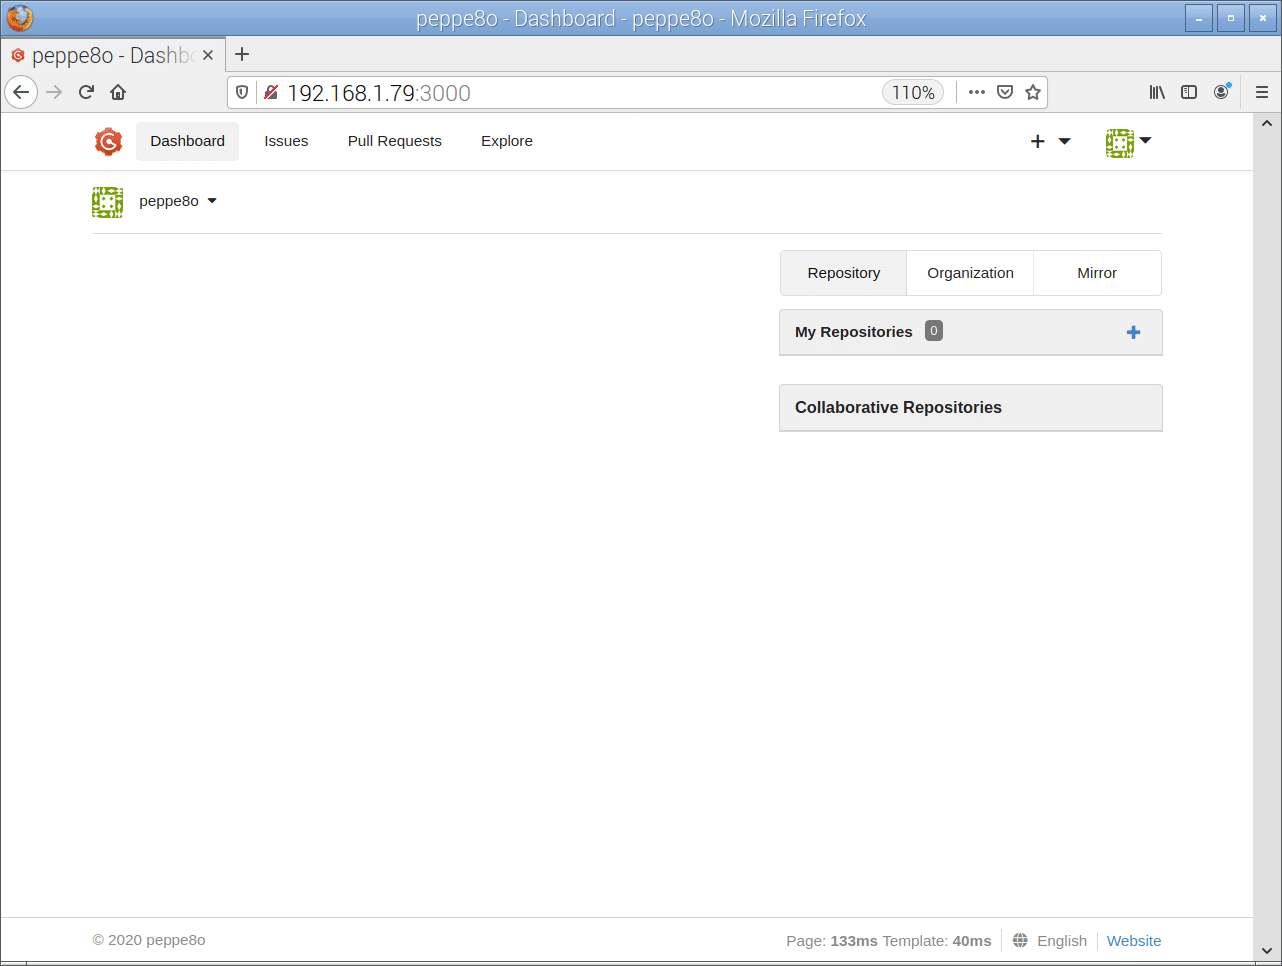
If you didn’t set your Account setting, then you will have Gogs login page. You will need to register as a new user. The very first user in Gogs will have administrative privileges.
More info can be found in Gogs Offical Documentation page.
Enjoy!
