Raspberry PI VPN Server with PiVPN
Last Updated on 2nd September 2023 by peppe8o
In this tutorial, I’m going to show you how to setup a VPN server with a cheap Raspberry PI Zero W using PiVPN and send certificates via email. This guide applies also to newer Raspberry PI boards.
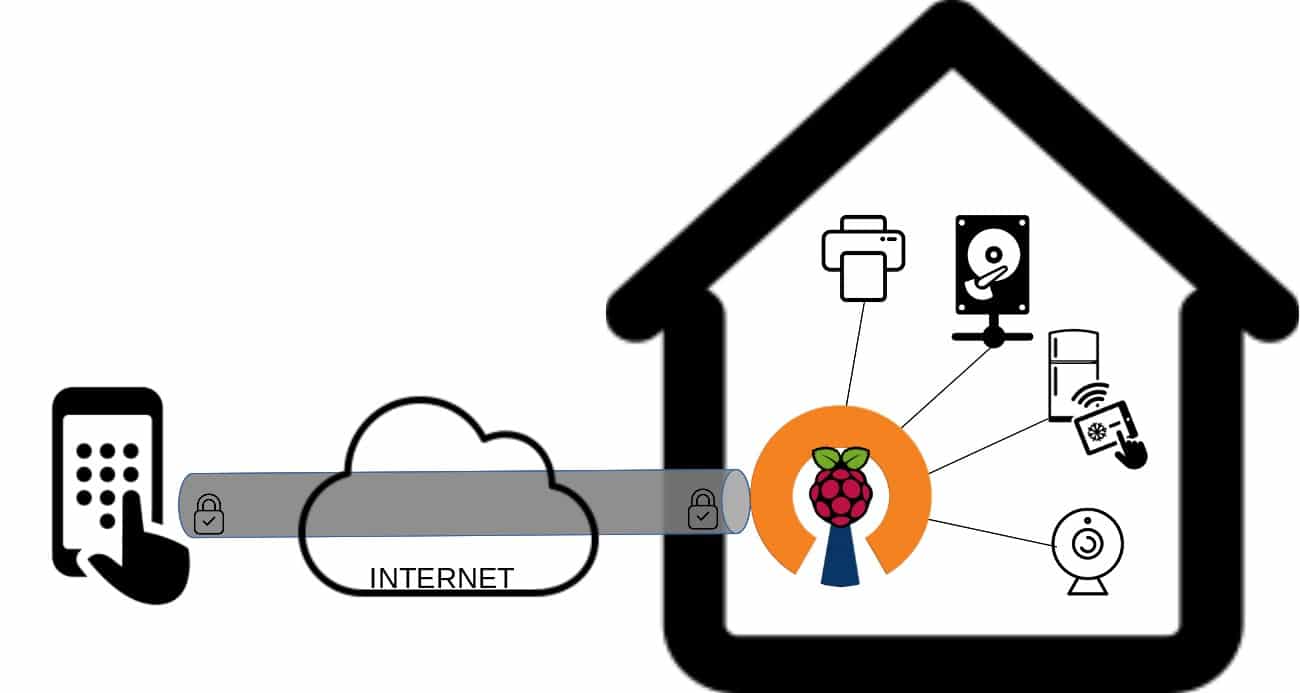
Requests for accessing home or mall office services from remote devices increased in last years as open source self hosted platforms evolved. Also needs to securing with VPN connections (for example from man in the middle attacks). Installing your own vpn server in Raspberry PI with PiVPN make your local network accessible from remote devices in short time
Raspberry PI can provide a number of linux services able to easily solve problems to manage your home network with cheap solutions. Using an OS based on Debian, it can run Open Source software and drastically help you with your home ICT needs as well as small office needs.
A common need for increasing networking security and access to your home services from outside is having a VPN (Virtual Private Network) server which grants secure access from an external network to your internal services.

A simple solution to implement an OpenVPN server or WireGuard server (the 2 most widely known VPN open source services) is using the convenient PiVPN setup tool.
What is a Virtual Private Network
As described in Wikipedia VPN definition page, “A virtual private network (VPN) extends a private network across a public network and enables users to send and receive data across shared or public networks as if their computing devices were directly connected to the private network. Applications running across a VPN may therefore benefit from the functionality, security, and management of the private network.“
Before Starting
If you are looking for a VPN, you probably want to reach your VPN server from an external, remote device coming from internet.
For this reason, you need to check if your provider is giving you a public IP address and may be useful getting a DNS record. This topic and how to get a dynamic DNS can be found in my How to configure No-IP DUC service in your Raspberry PI tutorial.
You will also need access in your home router to setup port forwarding.
What We Need
As usual, I suggest adding from now to your favourite e-commerce shopping cart all the needed hardware, so that at the end you will be able to evaluate overall costs and decide if to continue with the project or remove them from the shopping cart. So, hardware will be only:
- Raspberry PI Zero W (including proper power supply or using a smartphone micro usb charger with at least 3A) or newer Raspberry PI Board
- high speed micro SD card (at least 16 GB, at least class 10)
Check hardware prices with following links:


Step-by-Step Procedure
Prepare Operating System
Start installing Raspberry PI OS operating system. I suggest to install Raspberry PI OS Lite to have a light (headless) environment. Otherwise, you can also opt for Raspberry PI OS Desktop, then working from its internal terminal.
Make your OS up to date. From ssh terminal connection, use following command:
sudo apt update -y && sudo apt upgrade -y
Install and Configure PiVPN
PiVPN make VPN installation really easy. In this setup procedure, I’ll show you how to install OpenVPN server. WireGuard server will use the same wizard, opting for this solution in next screens.
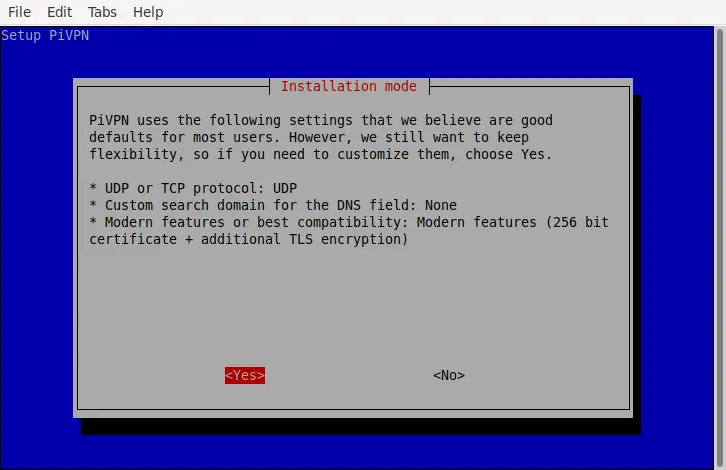
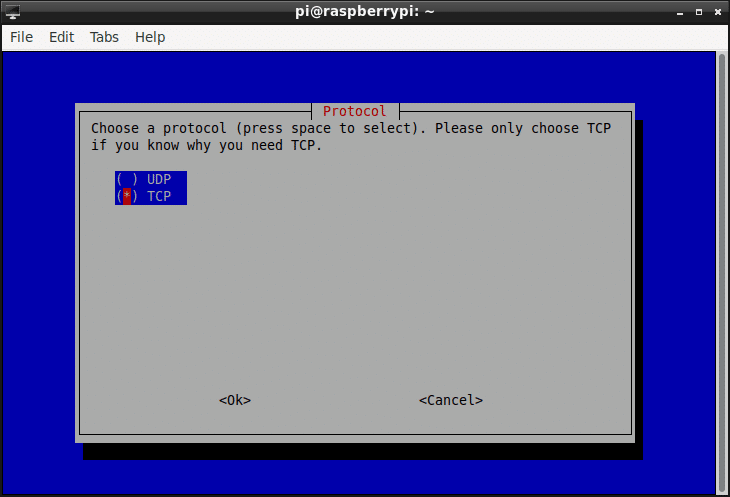
Many of following steps during wizard execution will use the default values. Be careful in selecting between UDP and TCP protocol: some router models have issues in managing TLS handshaking at VPN client connection with UDP protocol. For this reason, I suggest to use TCP instead.
From the command line, use following to download the installer and start the setup wizard:
sudo curl -L https://install.pivpn.io | bash
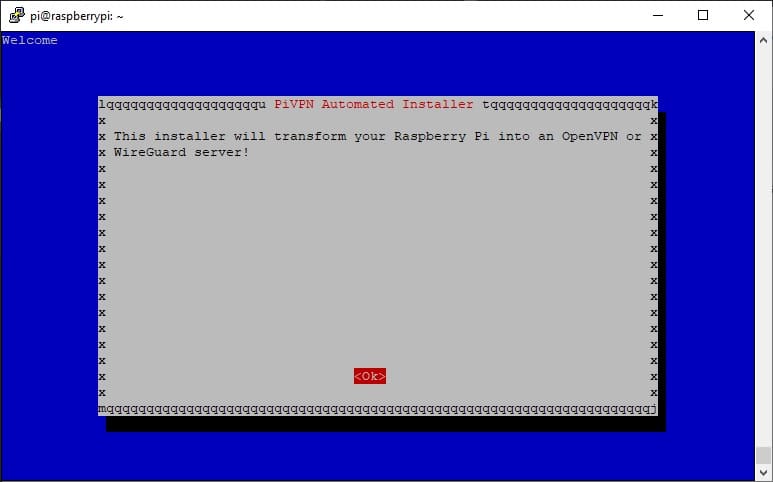
It will start the setup process by installing the required packages. After this operation, an interactive terminal session will start as in the following pictures.
First screen requires a simple confirmation to start installer steps. Press ENTER key.
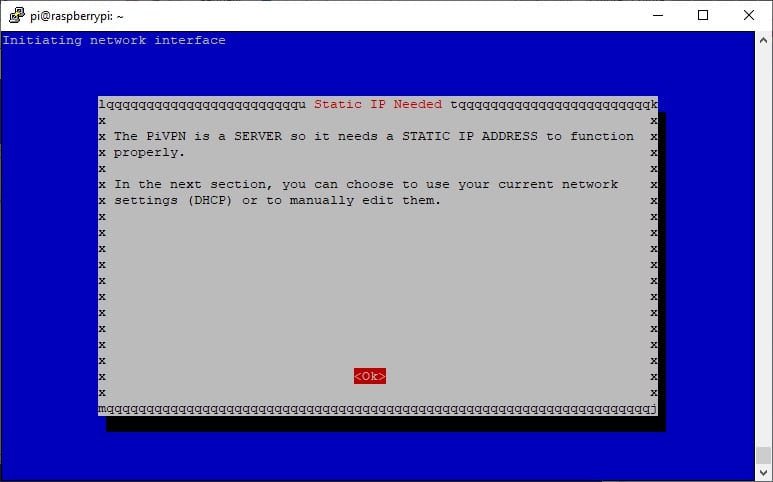
The second screen warns to use a static IP for your Raspberry PI. When you’ll setup port forwarding in your home router, this rule will drive traffic for the selected port from the outside (internet) to your RPI IP address. So, it is important that Raspberry PI doesn’t change its IP on reboot. This will be granted with a static IP. To be completely sure, you will need to set static IP assignment also in your home network DHCP service (usually on router). However, many routers are enough smart to identify devices and assign them always the same IP. So, in next screen press enter to confirm.
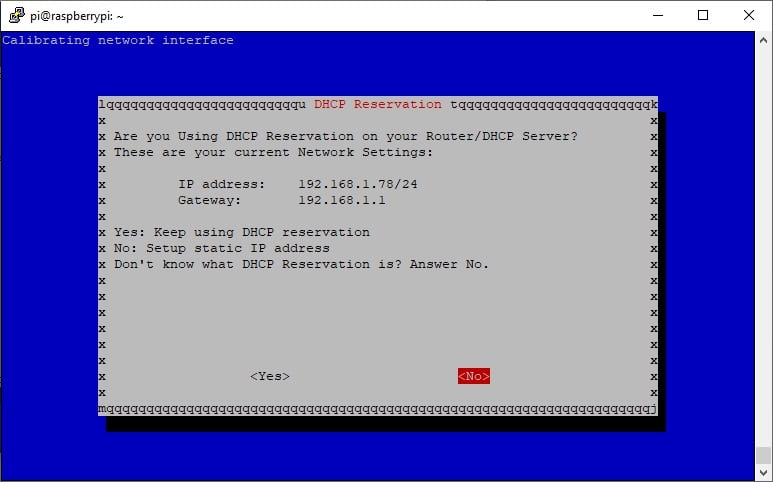
In this screen you can see my internal IPs: IP address is my Raspberry PI, Gateway is my router. You should find already your ones. Press ENTER to confirm “no” selection (which will set these IP as static):
In next screen a confirmation is required for IP configuration. I suggest to configure with static ip address so that you will be sure your RPI will be accessible from same address over reboots. Press ENTER to confirm:

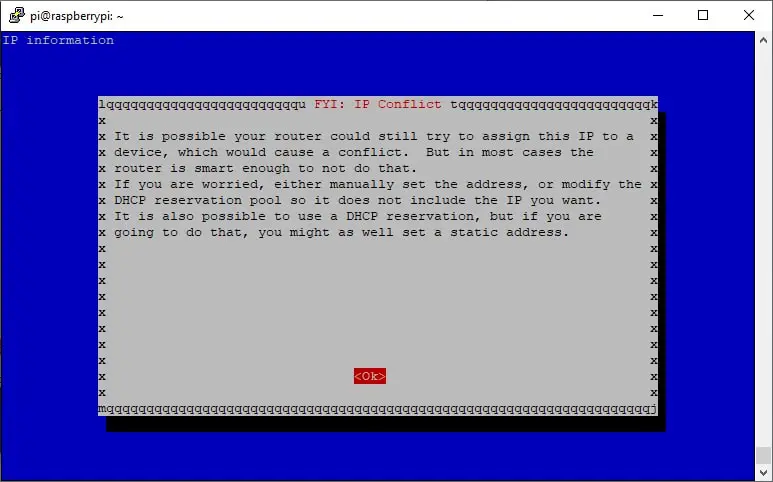
Next screen is still confirming what was said above and suggests you to arrange same MAC address / static IP address also on router side. This to avoid potential IP conflicts, even if routers are already enough smart (from years) to manage these configurations. Press ENTER to confirm:
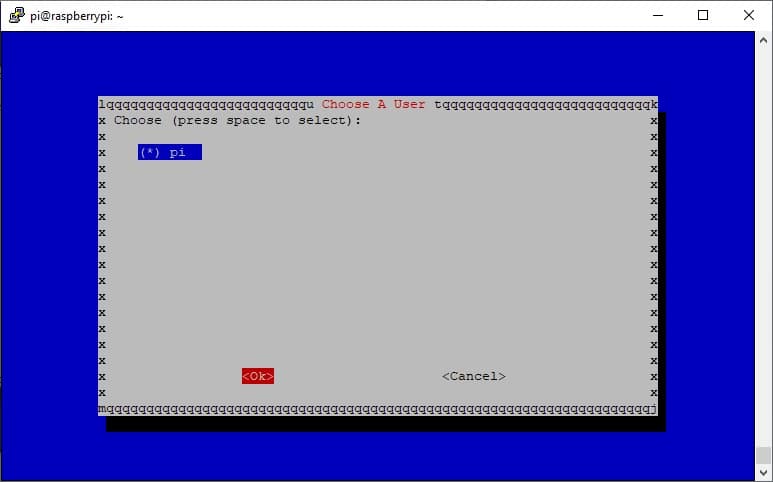
This screen warns that a list of users will be provided to select which one will keep VPN configuration files in its home. Press ENTER to continue:

Only “pi” user will be available in a fresh Raspberry PI OS installation. Select a different user (if available and if you choose it) or press ENTER to confirm using “pi”:
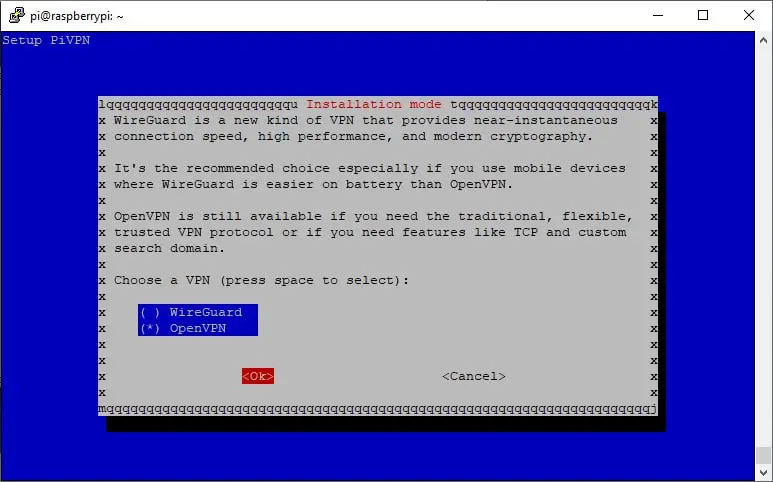
In next screen, we need to change selection from default Wireguard to OpenVPN. Use arrow keys from keyboard to move up/down and space bar to select your desired option (OpenVPN to follow this tutorial). Ten press ENTER to confirm:
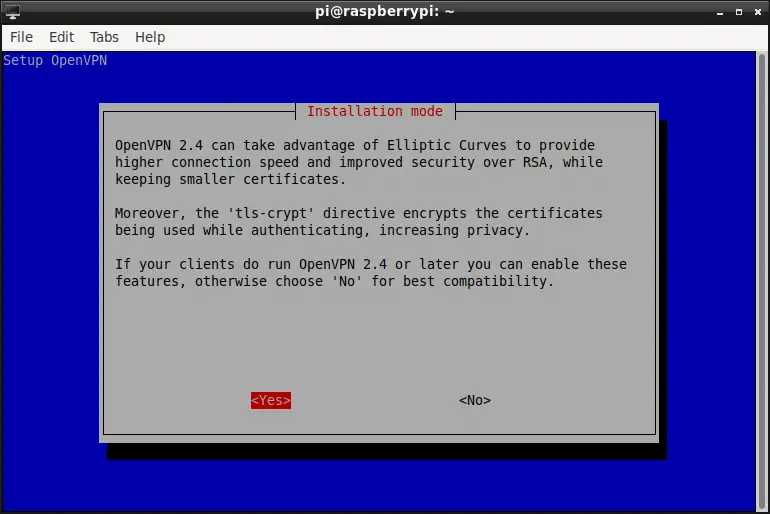
In next screen we need to change from default, too. Because of mentioned TLS handshake issues with some routers, select YES (with left arrow key) and confirm pressing ENTER:
OpenVPN packages will be downloaded in this phase. At the end, change default selection to use TCP as in following picture and press ENTER:
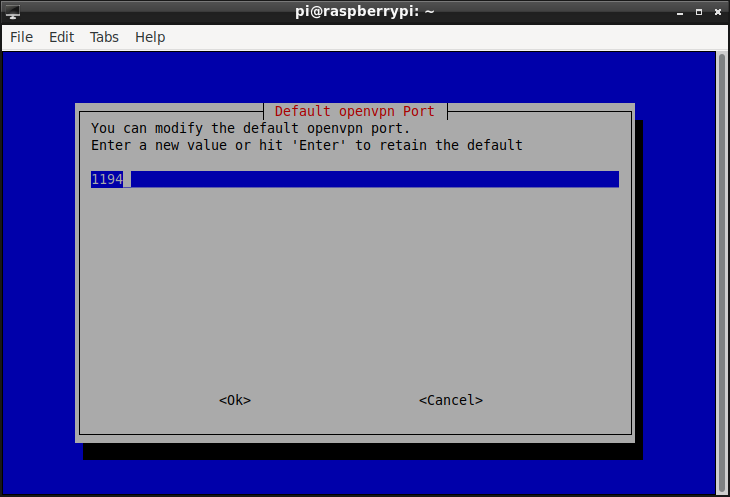
In next screen you will be asked to select your VPN port. This will be also the port to configure on router as Port Forwarding. You can leave the default 443, you can also set the OpenVPN default 1194 or choose your favourite port number. I will use 1194. Press ENTER after value insertion:
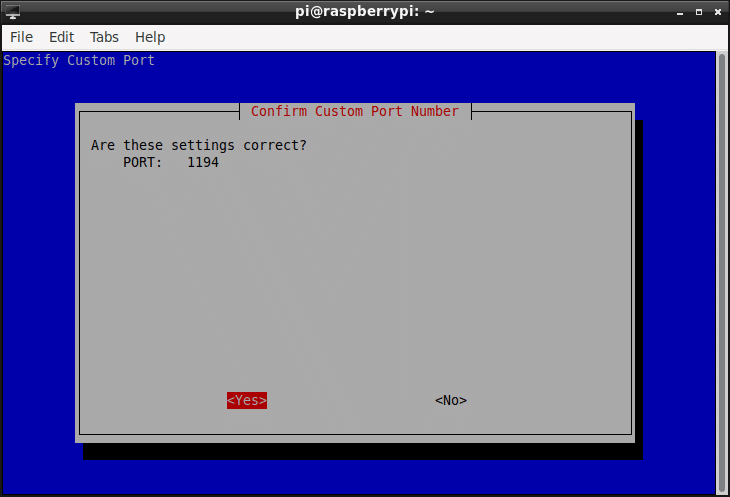
In next screen, please confirm port selection by pressing ENTER:
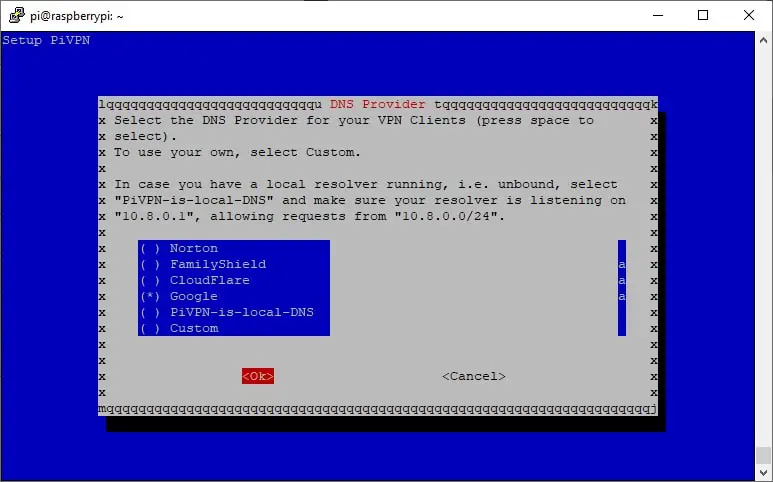
In next screen, you can select your favourite DNS provider. You can use one of the listed or your custom one. I will use Google, but this choice doesn’t change following steps. After selection, please press ENTER to confirm:
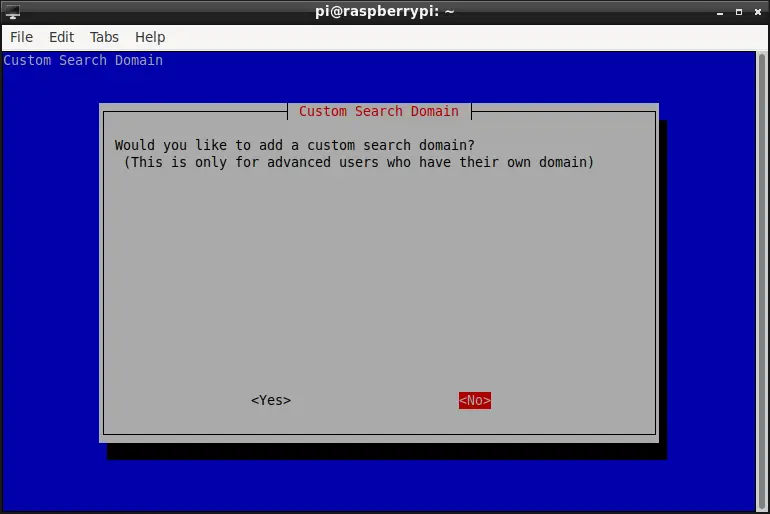
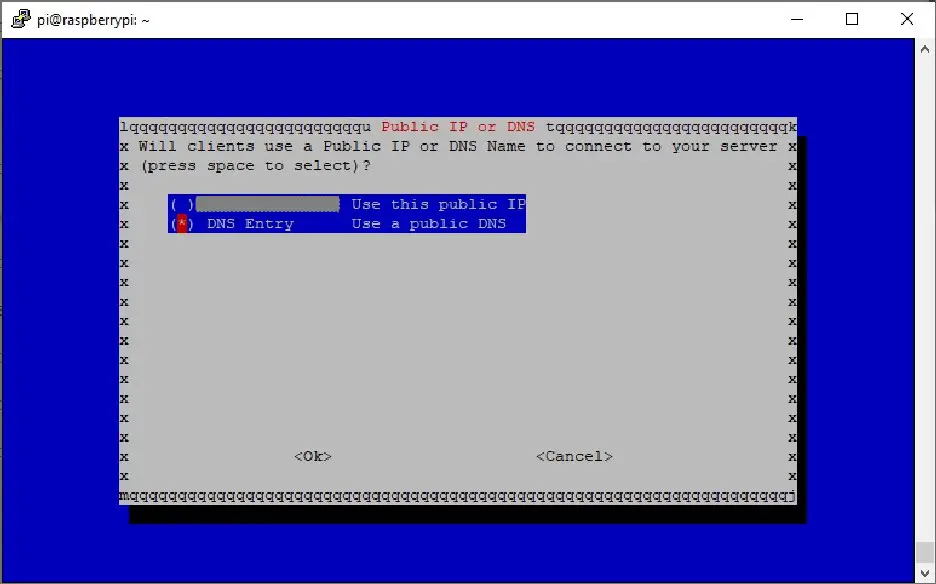
Now, you are asked to set how clients will contact your VPN server. Using IP address will result in the risk that your Internet Provider could change the IP address your router is visible from internet (unless it is public AND static). Using a free dynamic DNS will enable to refer a more friendly domain name updating itself on IP changes. This dynamic DNS comes from No-IP configuration guide referenced at the start of this tutorial. In next screen change the default selection to YES to add a DNS and press ENTER:
In this screen, please select DNS and press ENTER:
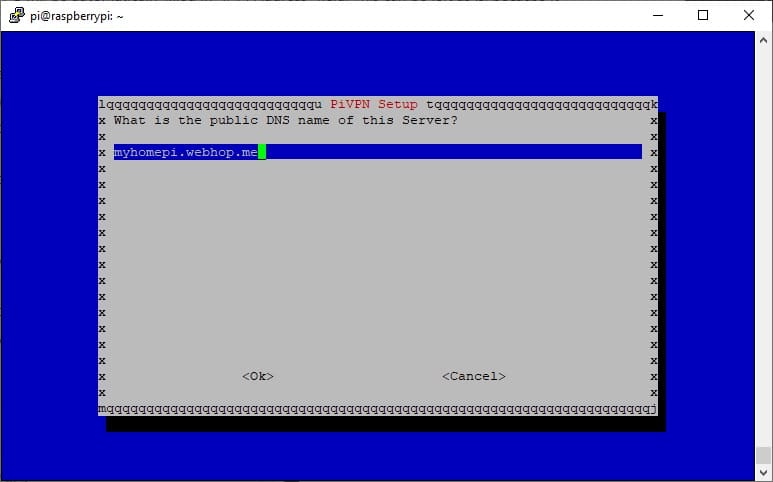
In next screen, use the registered domain and press ENTER to confirm:
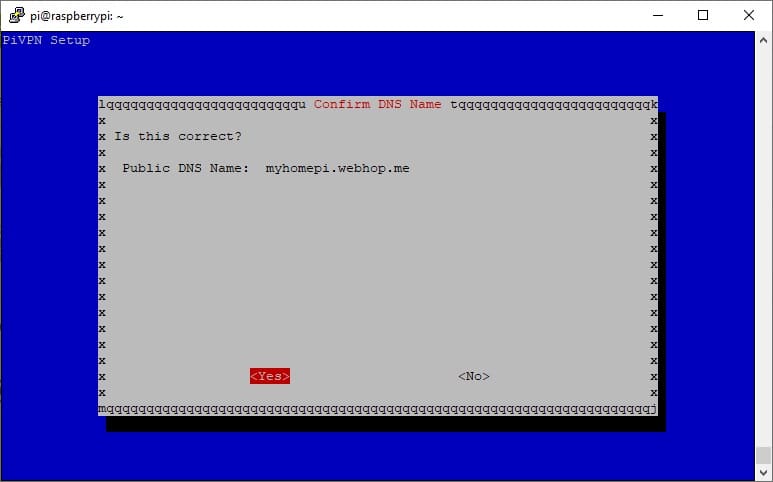
In next screen, confirm DNS name by pressing ENTER:
We will use a new OpenVPN client, so confirm YES on next screen:
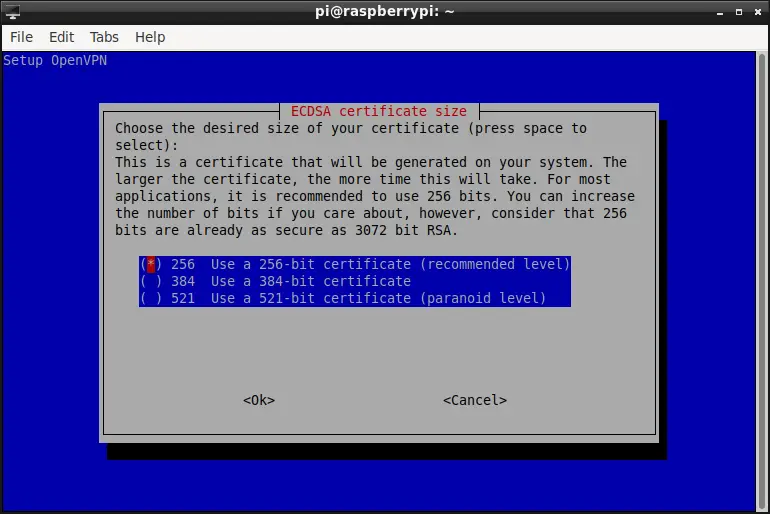
On the next screen, you can select your favourite certificate size. A longer certificate means improved security, but the default one is a good compromise between performance and security level for home services. Confirm by pressing ENTER:
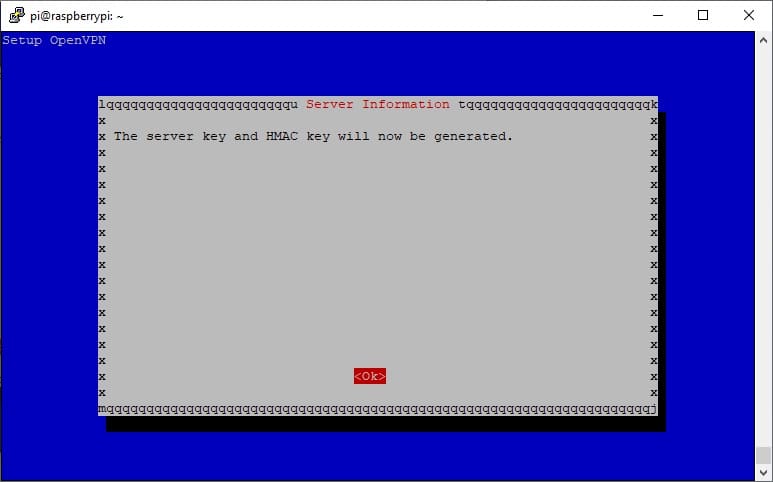
Also, next screen requires one more confirmation to generate keys:
In this step an error occurred in my installation:
iptables/1.8.2 Failed to initialize nft: Protocol not supported
However, I continued with installation and everything resulted in being working…
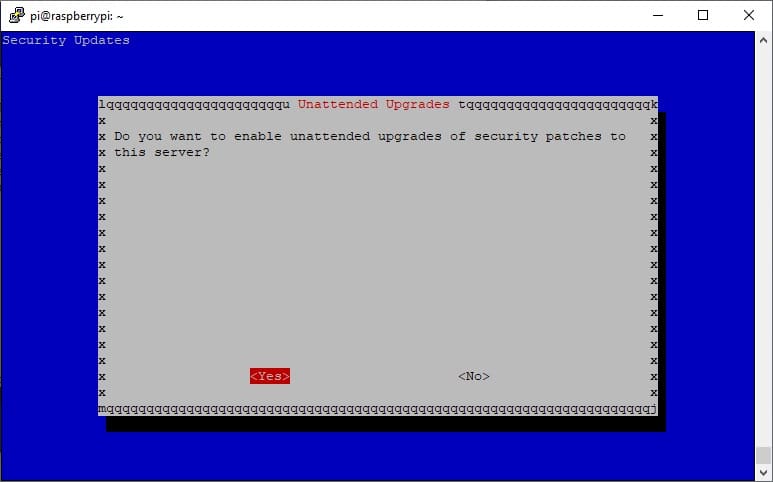
Next screen warns that being your Raspberry PI exposed to the internet, it is safer to setup unattended upgrades. I suggest using it. Confirm by pressing ENTER:
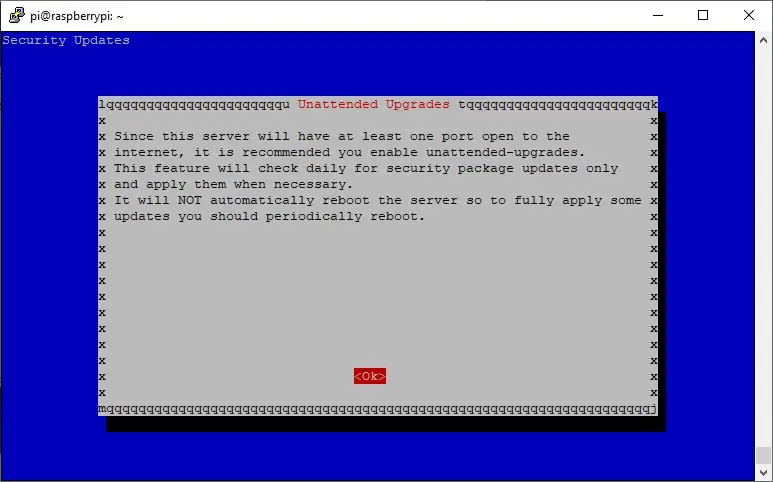
And choose if enable unattended upgrades. It will confirm yes in my installation:
Required packages will be downloaded and installed now.
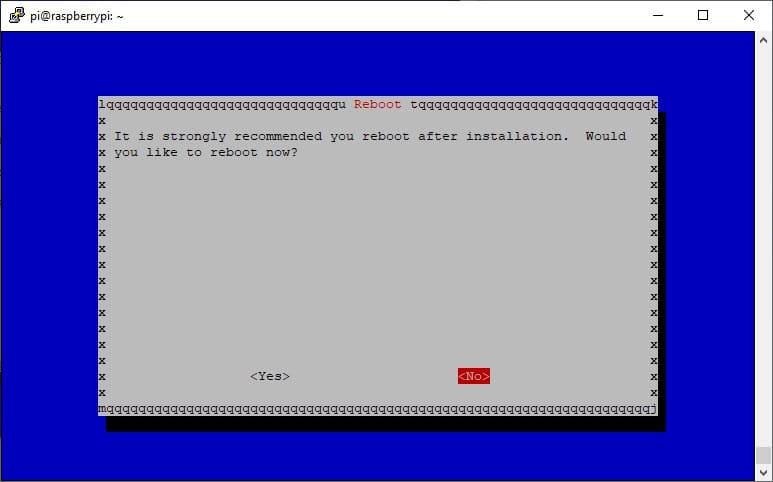
Last two screens will suggest how to create your very first client profile (we’ll see it in a few) and require a reboot. Please confirm both pages:
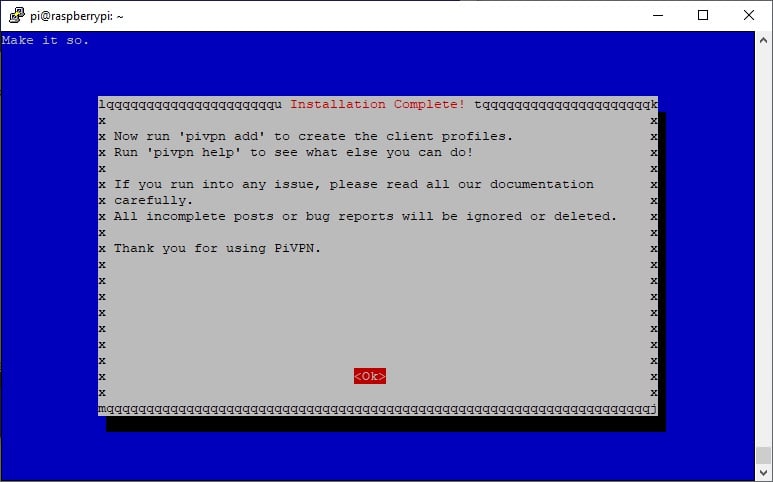
At this point, your OpenVPN is installed. Now, let’s move to configure client profiles sending.
Configure Client Profiles Sending
We’ll send profiles by email. For this purpose, I’ll use Mutt, a text-based email client and I’ll show a basic configuration for using it with a Gmail account. Other email services will require configuring IMAP/SMTP settings according to their provider.
Once Raspberry PI reboot is finished, from terminal type following command:
sudo apt install mutt
You will also need a basic configuration. From your user home, you need to create folders to store cache and an empty file for certificates:
mkdir -p .mutt/cache/headers
mkdir .mutt/cache/bodies
The next step is creating a configuration file for Mutt. From terminal, type:
nano .mutt/muttrc
Use the following lines in this file, caring to change email_username, email_password and User Alias with your ones:
# IMAP settings
set imap_user = email_username@gmail.com
set imap_pass = email_password
set spoolfile = imaps://imap.gmail.com/INBOX
set folder = imaps://imap.gmail.com/
set record="imaps://imap.gmail.com/[Gmail]/Sent Mail"
set postponed="imaps://imap.gmail.com/[Gmail]/Drafts"
set mbox="imaps://imap.gmail.com/[Gmail]/All Mail"
set header_cache = "~/.mutt/cache/headers"
set message_cachedir = "~/.mutt/cache/bodies"

# SMTP settings
set smtp_url = "smtp://email_username@smtp.gmail.com:587/"
set smtp_pass = $imap_pass
set ssl_force_tls = yes

# Compose and sending settings
set editor = "nano"
set edit_headers = yes
set charset = UTF-8 # value of $LANG; also fallback for send_charset
unset use_domain
set realname = "User Alias"
set from = "email_username@gmail.com"
set use_from = yes
Sending a test email with Mutt client will result in the following terminal command (set email@example.com with your recipient address):
echo "Email test message body" | mutt -s "Subject here" email@example.com
Check your email box and you will find the test message just sent.
Create your First Client Profile
This simple task requires the following terminal command:
pivpn add
Answer questions (keep password set in this step) and complete client profile creation:
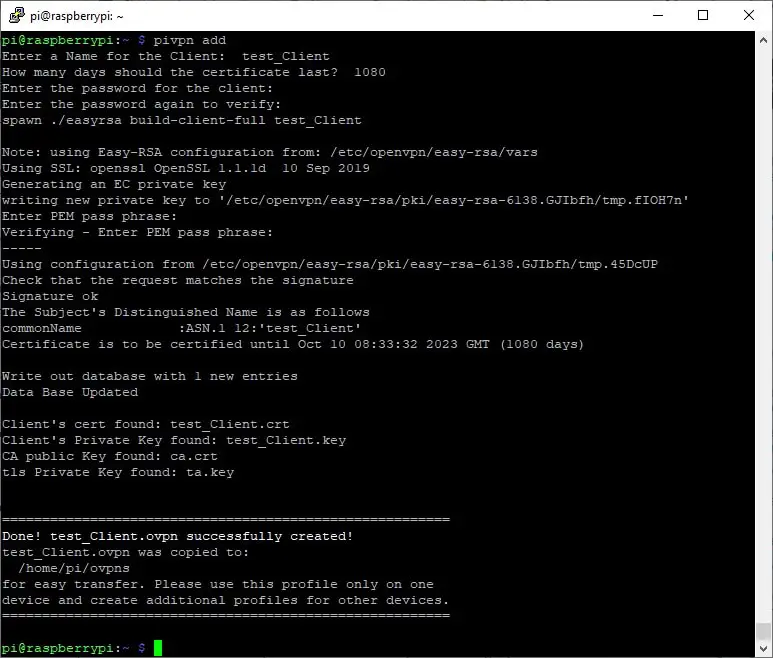
New “.ovpn” files will be created in “/home/pi/ovpns/” folder. These files will be sent to clients to be used in OpenVPN client to connect your server.
You can send it by typing from terminal:
echo "Please find Client Certificate attached" | mutt -s "Client Certificate" email@example.com -a "ovpns/test_Client.ovpn"
Final Checks
Please remember to set your router Port Forwarding rules according to Raspberry PI’s IP address and port number used during PiVPN installation. According to my tutorial variables, you will need to set a port forwarding rule for TCP traffic from external port 1194 to IP 192.168.1.78 port 1194.
Install OpenVPN client on your remote device (it is also available for Android in Google Play Store).
Use sent “.ovpn” file, taking care to use the password set on Client Profile creation.
Enjoy!

Hi, I’m interested in using pivpn not for a server but for a client on the RPi/RPi OS. I successfully went through all the steps with the exclusion of sending email. How do I implement a pivpn vpn on the same RPi that the server resides? I looked at /etc/pivpn/openvpn/setupVars.conf . Thanks.
Hi Ofruin,
if you need to use RPI only as client, you don’t need to follow this procedure (which configures a server). You can use official OpenVPN doc for Raspberry PI (https://www.ovpn.com/en/guides/raspberry-pi-raspbian). It refers to Raspbian but I think this will apply also to Raspberry PI OS. Change Step 6 (Download configuration file & setup OpenVPN) with getting client certificate from your VPN provider.
If you need to setup both server and client on same device, with client connecting to its internal server, it seems a really strange configuration… However you should follow same client installation and use locally generated certificate.
Let me know if any help is required.