While working with Raspberry PI, I often see on search engines results many Arduino projects connecting electronic sensors and devices. So I ended deciding to give it a try and enter this amazing world so spread within makers. Looking for available starter kits on eCommerce I noticed one coming from an industry I already experienced in my Control a simple stepper motor with a Raspberry PI project: Elegoo.
The kit I’m going to review is ELEGOO UNO Project Super Starter Kit with Tutorial and UNO R3 Compatible with Arduino IDE.
By the way, I was able to contact Elegoo Marketing Team and obtained a special coupon for peppe8o.com readers to get a discount on Amazon for Elegoo kits. Please scroll down this page to find it. Code expiring on Feb, 22th!
If you want to understand the main differences between Arduino and Raspberry Pi, please refer to my Arduino vs Raspberry PI article.
This is the first question everybody asks himself. the answer is quite simple: an only factory where it was built. Arduino is an open-source project and Elegoo is using the same project to build its board. In fact, also Elegoo Industries invites customers to evaluate a donation to the Arduino project. Supporting Arduino Foundation is the best way to assure these amazing projects can continue in future to enjoy young and old people. Also from me, consider contributing to Arduino with the following link: https://www.arduino.cc/en/Main/Contribute
Ordered from Amazon, this kit arrived in a few days. Shipped from Amazon, the overall packaging merits few words for care on details and security which come both from the shipper and the producer. The outer package is the classic Amazon Prime one, with a bubble bag securing products from accidental shocks. This bag is about 25×38 cm.
Opening the Prime package, a second bubble bag come from Elegoo Industries. A 22×25 cm bag protects doubly my kit. What confirms care on the packaging is a lateral label suggesting the customer reject and do not sign the package if the seal on this bubble bag is damaged or peeled off.
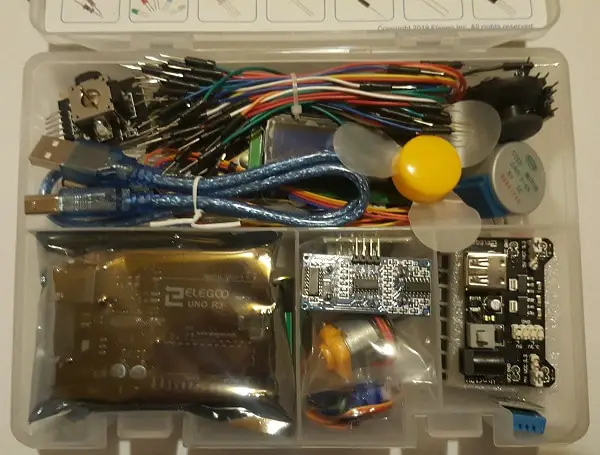
Once opened the second bag, content appears well suited in a solid case (please find below the top and bottom pictures):
This case is 20x15x5 cm and its weight is about 600g. Opening the case we can find all items ordered and carefully packaged in single small sachets. A useful list and description are printed below the cover, to better identify single components and their function.
Kit components are listed in the following table:
| Uno R3 Controller board | LCD 1602 module | Prototype Expansion Module |
| Power Supply Module | ULN2003 Stepper Module Driver Module | Stepper Motor |
| Servo Motor SG90 | 5V Relay | IR Receiver module |
| Joystic Module | DHT11 Temperature and Humidity Module | Ultrasonic Sensor |
| Fan Blade and 3-6V Motor | Active Buzzer | Passive Buzzer |
| 74HC595 IC | L293D | Button |
| Potentiometer | 1 Digit 7-Segment Display | 4 Digit 7-Segment Display |
| Tilt Ball Switch | Romote | 830 Tie-points Breadboard |
| USB Cable | Female-to-Male Dupont Wire | Breadboard Jumper Wire |
| 9V Battery with Snap-on Connector Clip | Resistors | LEDs |
| RGB LEDs | Thermistor | Diode Rectifier |
| Photoresistor (Photcell) | NPN Transistor | CD with guides and examples |
The only suggestion I can give to Elegoo, is to use a bit bigger case: once pieces are put out of the box, it’s really hard to recompose the puzzle and fit again them in.
People ordering this kit figure of cheap, little and low quality kit. When the kit arrived, I was positively surprised by both the number of components available inside the kit and the good-to-excellent quality. Every piece can be used alone – for simpler projects – or together with another one – for more and more complex projects – with stunning ease of use. CD and docs on the Elegoo website include clear instruction both on connecting electronics and programming on IDE.
Opening the case I remembered the same emotions I felt when I was young and disrupted RC cars and radio to get a look at their circuits, motors and their working, but never being able to get them back to work. With these kits, also kids are now able to build their personal robots and learn programming and composing circuits in a very few days.
This kit is a surprising solution capable of attracting interest for children of all ages and makers. It makes it very easy to learn electronics and programming. Like all Arduino projects, its low voltage assures security also for children.
In my opinion, it is the right way to enter the fabulous world of Arduino and start your journey in electronics.
Enjoy!
In this tutorial, we will use two Arduino Uno to demonstrate the Serial Peripheral Interface…
In this tutorial, we will be making an automatic irrigation system (AIS) with Arduino and…
This tutorial will show you how to use Python Virtual Environment with Raspberry PI computer…
This tutorial will show you how to get betting odds with Raspberry PI by using…
This tutorial will show you how to perform the backup of Raspberry PI (computer board)…
This tutorial will show you how to install Honeygain on a Raspberry PI computer board…


