
Last Updated on 15th August 2024 by peppe8o
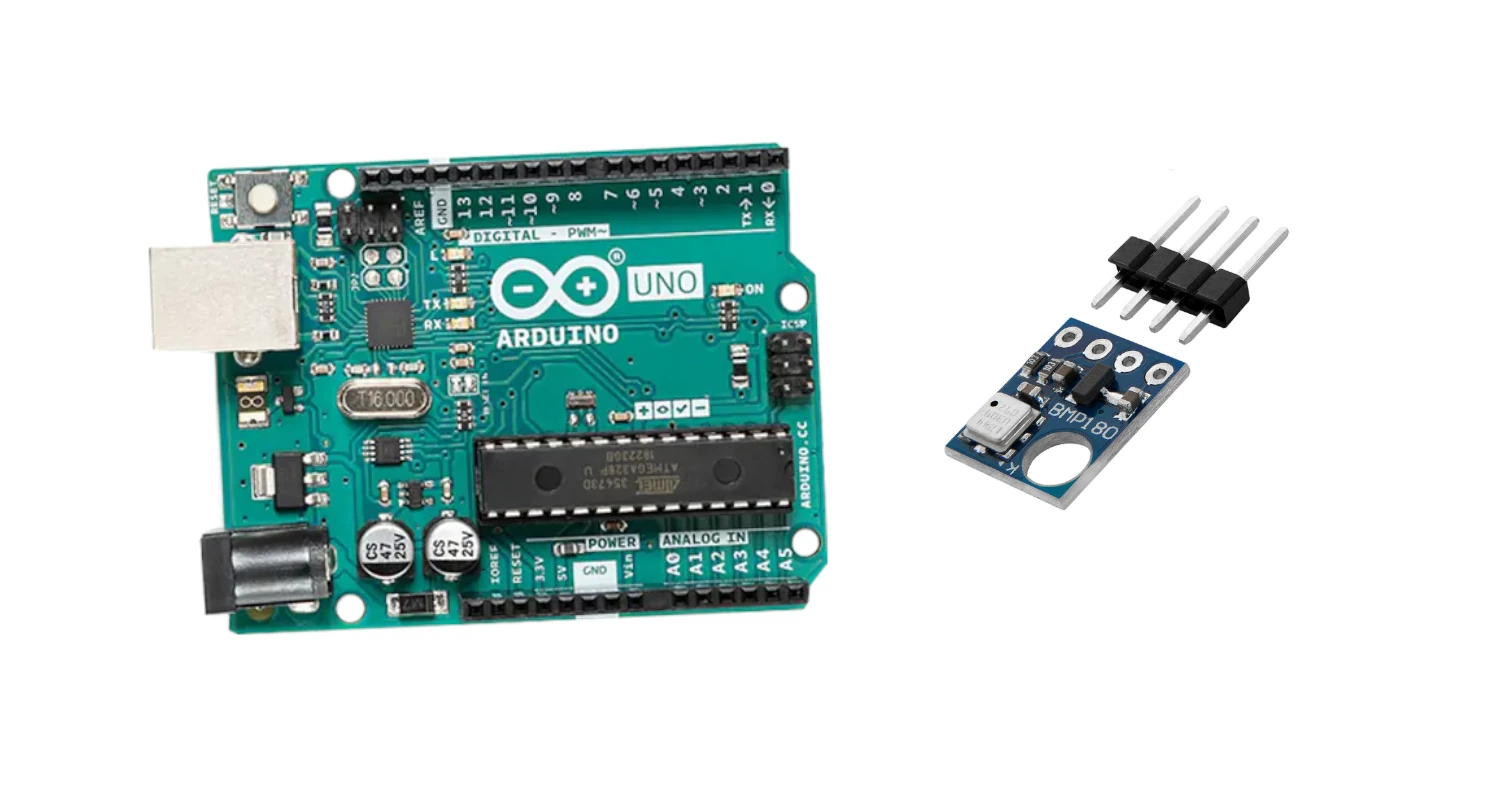
In this tutorial, we will use a Barometric pressure/temperature sensor BMP180 with Arduino Uno. This sensor has great application in tourism used by hikers, and climbers to deal with altitude, temperature and pressure. The mobile handset contains this module to keep updated on these parameters in offline mode.
About the BMP180 Barometric Sensor
The BMP180 sensor is used for the accurate measurement of the temperature and atmospheric pressure. It has applications in the domain of weather monitoring and navigation systems.
Due to its small size and low current requirements has greater application in portable gadgets.
It works with the microcontroller in I2C (inter-integrated circuit) and SPI communication which make it enables Arduino-based projects to make real-time applications.
This sensor can measure up to 9000 to 12000 meters above sea level while can measure temperatures within the range of +40°C to +85°C.
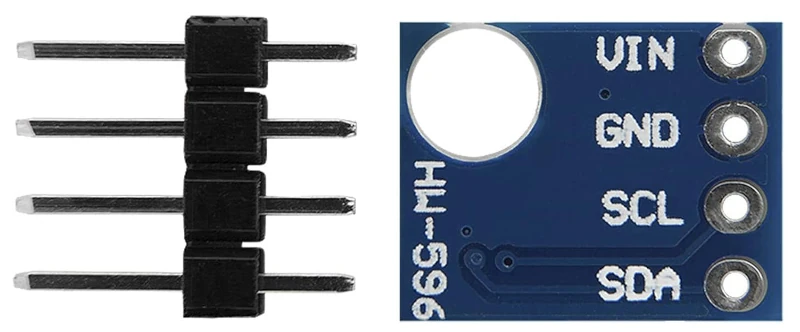
The BMP180 pinout is quite intuitive:
| Pinout Label | Description |
|---|---|
| VIN | Power input from Arduino |
| GND | Ground reference from Arduino |
| SCL | I2C clock reference |
| SDA | I2C data PIN |
What We Need
As usual, I suggest adding from now to your favourite e-commerce shopping cart all the needed hardware, so that at the end you will be able to evaluate overall costs and decide if to continue with the project or remove them from the shopping cart. So, hardware will be only:

Step-by-Step Procedure
Wiring Diagram of BMP180 with Arduino Uno
The BMP180 according to the Arduino UNO Pinout.
| Arduino | BMP180 sensor |
| VCC | 5V |
| GND | GND |
| A4 | SDA |
| A5 | SCL |
Please find below a picture showing the BMP180 Barometric/temperature sensor connected to the Arduino Uno wiring diagram:

Get the code for the BMP180 sensor with Arduino
Connect your PC to Arduino and open Arduino IDE. For the very first steps, you can refer to Connecting Windows PC with Arduino tutorial. You can get the .ino code from my download area with the following link:
The library, from the following link, can be added to the document>> Arduino>> libraries folder before uploading the code to the Arduino.
BMP180 with Arduino – Barometric Sensor – Code Explanation
Section 1: Before setup
In this section, the libraries for the BMP and I2C wires are defined, and then the child label for the BMP sensor is defined. The current altitude at the current location is provided to the sensor for further calibrations (you can find your one at https://whatismyelevation.com/).
#include <SFE_BMP180.h>
#include <Wire.h>
SFE_BMP180 pressure;
#define ALTITUDE 477.0
Section 2: In the setup
In the setup, we set the baud rate of the serial monitor to 9600.
The sensor is initialized through the I2C communication and checks if there’s any connection error.
void setup()
{
  Serial.begin(9600);
  Serial.println("REBOOT");

  if (pressure.begin())
    Serial.println("BMP180 init success");
  else
  {
    Serial.println("BMP180 init fail\n\n");
    while(1);
  }
}
Section 3: Loop section
This is the section for the main loop.
The default setting for the altitude is set and printed on the serial monitor.
void loop()
{
  char status1;
  double T,P,p0,a;

  Serial.println();
  Serial.print("provided altitude: ");
  Serial.print(ALTITUDE,0);
  Serial.print(" meters, ");
  Serial.print(ALTITUDE*3.28084,0);
  Serial.println(" feet");
Every check verifies with the status variable if the measurement is available for printing.
The temperature and altitude values are continuously measured from the BMP180 sensor with the following line. The temperature is displayed in Celsius and Fahrenheit for the temperature sensor.
  status1 = pressure.startTemperature();
  if (status1 != 0)
  {
    delay(status1);

    status1 = pressure.getTemperature(T);
    if (status1 != 0)
    {
      Serial.print("temperature: ");
      Serial.print(T,2);
      Serial.print(" deg C, ");
      Serial.print((9.0/5.0)*T+32.0,2);
      Serial.println(" deg F");
The pressure is measured and displayed in the millibars and after conversion to inches of mercury.
      status1 = pressure.startPressure(3);
      if (status1 != 0)
      {
        // Wait for the measurement to complete:
        delay(status1);

        status1 = pressure.getPressure(P,T);
        if (status1 != 0)
        {
          // Print out the measurement:
          Serial.print("absolute pressure: ");
          Serial.print(P,2);
          Serial.print(" mb, ");
          Serial.print(P*0.0295333727,2);
          Serial.println(" inHg");
The altitude pressure at sea level and computed altitude is displayed:
          p0 = pressure.sealevel(P,ALTITUDE);
          Serial.print("relative (sea-level) pressure: ");
          Serial.print(p0,2);
          Serial.print(" mb, ");
          Serial.print(p0*0.0295333727,2);
          Serial.println(" inHg");

          a = pressure.altitude(P,p0);
          Serial.print("computed altitude: ");
          Serial.print(a,0);
          Serial.print(" meters, ");
          Serial.print(a*3.28084,0);
          Serial.println(" feet");
        }
The final block returns to you the errors, if they occur:
        else Serial.println("error retrieving pressure measurement\n");
      }
      else Serial.println("error starting pressure measurement\n");
    }
    else Serial.println("error retrieving temperature measurement\n");
  }
  else Serial.println("error starting temperature measurement\n");
these readings will repeat every 5 seconds with the following delay statement:
delay(5000);
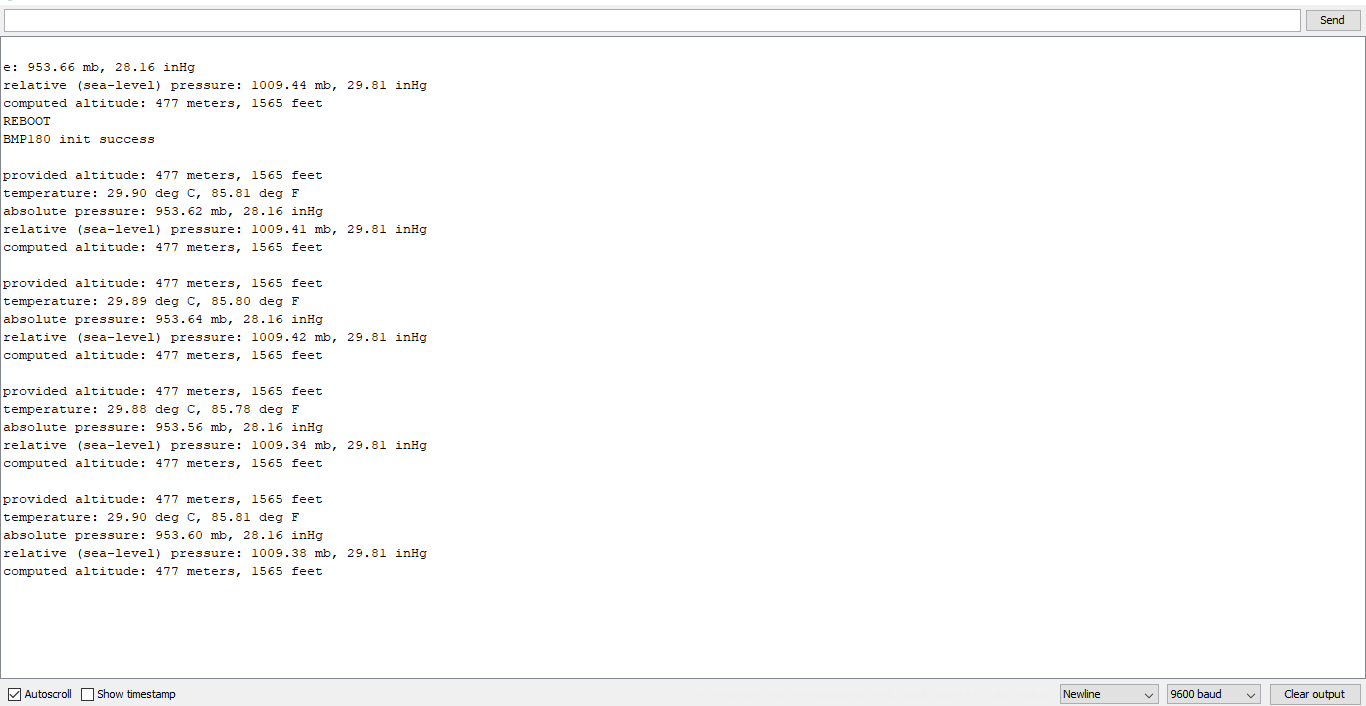
}Results from BMP180 with Arduino – Barometric sensor
The results demonstrate the experimentation of the BMP180 with Arduino Uno.
The results show the temperature, pressure, altitude and the computed altitude on the serial monitor.
What’s Next
Please find more tutorials on Arduino in peppe8o Arduino archives.
Enjoy!
Umar Jamil
For any queries and help with work, please contact me at:
Whatsapp: +92-346-661-7017/ Link Fiverr for order custom work
Email: umarjamil0007@gmail.com

I'm an Electronic Engineer, well-skilled to solve the issues of hardware and software. I do have laboratory which contains unlimited sensors and modules for testing the working. Also, I am experienced in Arduino programming, Android mobile application, microcontroller programming, IOTs and embedded projects. I provide services to control, realize the sensor data in the Mobile Application. For any queries and help for work Contact: Whatsapp:+92-346-661-7017 Email: umarjamil0007@gmail.com
![]()