In this tutorial I’m going to show you how to connect and configure a 7 segment display with a Raspberry PI. If you are searching for “4 digit-7 segment display” guide, you may be interested in my 4 Digit diplay tutorial.
7 segment display is a simple electronic display composed of 7 (surprise) LEDs. It is common to find an addictional led for a little dot near classic 7 segments. It runs in a very simple way with Raspberry PI GPIOs and Python coding
7 segment display is used within a wide number application, usually to single a display number. These devices have simple internal wiring diagram, which maps one by one LEDs to its pins:
In this article we’ll control a 7 Segment Display from a Raspberry PI Zero W. This article applies also to newer Raspberry PI computer boards.
As usual, I suggest adding from now to your favourite e-commerce shopping cart all the needed hardware, so that at the end you will be able to evaluate overall costs and decide if to continue with the project or remove them from the shopping cart. So, hardware will be only:
Many of listed hardware (except from Raspberry PI Zero W and micro SD Card) can be bought alone or can be also found in the useful Elegoo starter kit.
Check hardware prices with following links:
Prepare cabling according to following wiring diagram:
This wiring produces the following mapping between Display and Raspberry PI:
| Display Segment | Display Pin | Raspberry PI phisical pin | Raspberry PI BCM GPIO |
| A | 7 | 11 | 17 |
| B | 6 | 13 | 27 |
| C | 4 | 15 | 22 |
| D | 2 | 19 | 10 |
| E | 1 | 21 | 9 |
| F | 9 | 23 | 11 |
| G | 10 | 29 | 5 |
| DP | 5 | 31 | 6 |
| GRD | 3 | 6 | GRD |
| GRD | 8 | 6 | GRD |
So, each Raspberry PI pin / GPIO powers on/off its related segment. Powering on appropriated segments together will display the number we want to show.
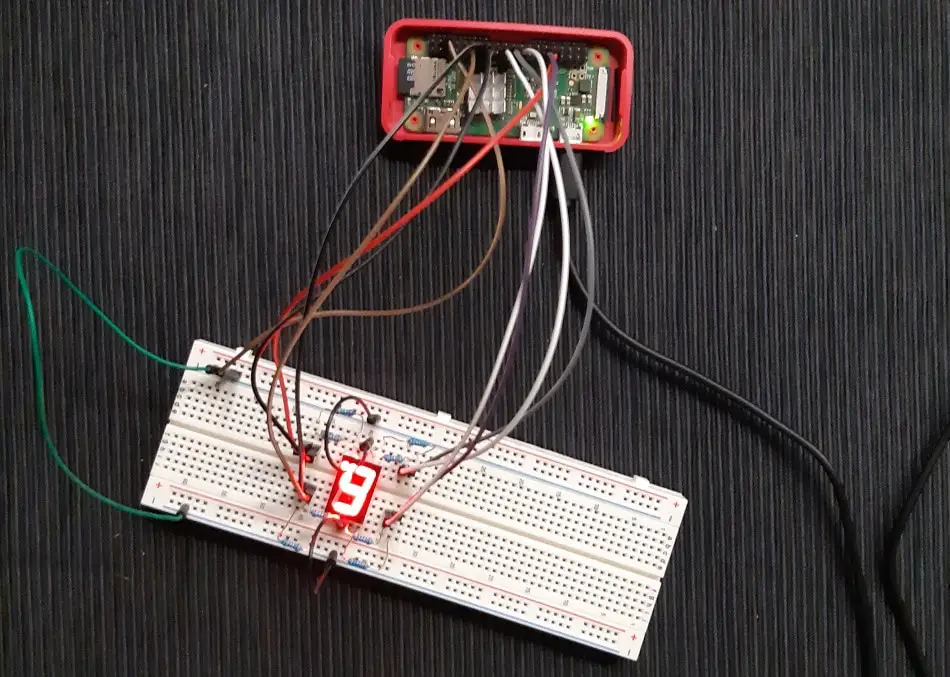
Please find below the overall picture:
Start with OS installation using install Raspberry PI OS Lite guide. This procedure also works with Raspberry PI OS Desktop, using its internal terminal.
Make your OS up-to-date. From the terminal, use the following commands:
sudo apt update
sudo apt upgrade
RPI.GPIO should be already installed (otherwise, you can get it installed with the command “sudo apt install python3-rpi.gpio”).
Get segDisplay.py script from my download area:
wget https://peppe8o.com/download/python/segDisplay.pyThis script will be explained later in this post.
This script can be used by simply calling segDisplay.py with a simple argument passing the number to display and the dot (if required). So, for example:
python3 segDisplay.py 1.Will display the number “1” and powers ON the dot led.
python3 segDisplay.py 5Will display the number “5” and powers OFF the dot led.
python3 segDisplay.py 10Will power OFF the whole display.
First section imports required libraries
import sys
import RPi.GPIO as GPIO
This script works mapping following pins activation according to wiring diagram:
Num_to Display -> GPIO pins state
0 -> [1,1,1,1,1,1,0]
1 -> [0,1,1,0,0,0,0]
2 -> [1,1,0,1,1,0,1]
3 -> [1,1,1,1,0,0,1]
4 -> [0,1,1,0,0,1,1]
5 -> [1,0,1,1,0,1,1]
6 -> [1,0,1,1,1,1,1]
7 -> [1,1,1,0,0,0,0]
8 -> [1,1,1,1,1,1,1]
9 -> [1,1,1,1,0,1,1]
10 (OFF) -> [0,0,0,0,0,0,0]
Dot GPIO (6) is managed alone. The last array is used to deactivate the Display.
GPIO id order is stored in a simple array. GPIO order is according to mapping. GPIOs are also all set as output.
display_list = [17,27,22,10,9,11,5]
GPIO.setmode(GPIO.BCM)

GPIO.setwarnings(False)
for pin in display_list:
 GPIO.setup(pin,GPIO.OUT) # setting pins
 GPIO.setup(6,GPIO.OUT) # setting dot pin
GPIO.setwarnings(True)
Warnings are disabled because this script will leave display active after execution.
A new array is defined, listing all possible combinations to Display. So, arrSeq[0] stores GPIO status to show “0” on display. arrSeq[10] will be managed alone to push a GPIO.cleanup.
arrSeg = [[1,1,1,1,1,1,0],\ # -> arrSeq[0] displays 0
 [0,1,1,0,0,0,0],\ # -> arrSeq[1] displays 1
 [1,1,0,1,1,0,1],\ # -> arrSeq[2] displays 2
 [1,1,1,1,0,0,1],\ # -> arrSeq[3] displays 3
 [0,1,1,0,0,1,1],\ # -> arrSeq[4] displays 4
 [1,0,1,1,0,1,1],\ # -> arrSeq[5] displays 5
 [1,0,1,1,1,1,1],\ # -> arrSeq[6] displays 6
 [1,1,1,0,0,0,0],\ # -> arrSeq[7] displays 7
 [1,1,1,1,1,1,1],\ # -> arrSeq[8] displays 8
 [1,1,1,1,0,1,1]] # -> arrSeq[9] displays 9
Then a basic error check on the passed argument is performed. On error, program exits:
if len(sys.argv) > 2:
 print("ERROR: too many arguments")
 sys.exit()
elif len(sys.argv) == 1:
 print("ERROR: missing argument")
 sys.exit()
elif int(sys.argv[1].replace(".", "")) > 10 or int(sys.argv[1].replace(".", ""))<0:
 print("ERROR: insert a number between 0 and 10")
 sys.exit()
Dot led activation is managed alone, so the only number is passed to the main diplay procedure:
if sys.argv[1].count(".") == 1:GPIO.output(6,1)
numDisplay = int(sys.argv[1].replace(".", ""))
The final operation is just activating GPIOs according to the number passed on the argument. This script then exits:
if numDisplay == 10: GPIO.cleanup()
else: GPIO.output(display_list, arrSeg[numDisplay])

sys.exit()
Enjoy!
In this tutorial, we will use two Arduino Uno to demonstrate the Serial Peripheral Interface…
In this tutorial, we will be making an automatic irrigation system (AIS) with Arduino and…
This tutorial will show you how to use Python Virtual Environment with Raspberry PI computer…
This tutorial will show you how to get betting odds with Raspberry PI by using…
This tutorial will show you how to perform the backup of Raspberry PI (computer board)…
This tutorial will show you how to install Honeygain on a Raspberry PI computer board…


View Comments
Hello ! One segment is NOT working.
E segment is not working
=Display Pin 1
=Raspb physical : pin 21
= BCM GPIO 9
that means numbers 8 6 0 2 do not show up
In the code I cannot find this instruction :
10 (OFF) -> [0,0,0,0,0,0,0]
Cleanup is not working either ...
# Display number in argument
if numDisplay == 10:
GPIO.cleanup()
else:
GPIO.output(display_list, arrSeg[numDisplay])
Any idea why ? Connections seem to be fine ...
Hi Franz,
if only one segment is not working (Display Ph. 1 -> BCM 9 -> RPI Ph 21), then there must be a wiring problem. It may be:
- a failing soldering on RPI -> you can try changing the Raspberry PI port for the segment 1
- a failing wire -> you can try changing the wire
- a failing resistor -> you can try changing the resistor
- a failing breadboard line -> you can try changing the display position in your breadboard
- a failing display PIN -> you can try connecting the display PIN 1 to the 3,3V port on Raspberry PI via the resistor
In the code, the command "10" performs the "GPIO.cleanup()", which clears all the Raspberry PI GPIOs status (put them to zero), so shutting down the whole display. WHat is not working in this?
Thank You for the response. I use such a GPIO Adapter ... (with Raspberry 3)
https://www.openimpulse.com/blog/products-page/product-category/2-pcs-gpio-adapter-raspberry-pi-v3-model-b-t-shape/
There were two reasons why it did not work :
a) I always look at the physical PIN for the connections with the Dupont cable. The numbers on the breadboard are not perfectly aligned with the numbers on the GPIO adapter ... so one connection was bad.
b) The resistors did loose the contact with the breadboard