As seen in my previous post (Connecting Raspberry PI Zero W to Arduino only via terminal), we can easily control an Arduino board from Raspberry PI OS Lite with the help of arduino-cli. However, if you want to add more functionalities to your Arduino board you will need to import external libraries.
In this post, we’ll se how to import libraries from terminal.
Install Libraries From Arduino Ecosystem
One of most common and simpler practice to add functionalities to your Arduino is searching in Arduino ecosystem the library you need. With arduino-cli it is a very simple operation.
To show you this procedure, we’ll install a library which provides a debouncing strategy to better handle button inputs (based on https://github.com/arduino/arduino-cli#add-libraries) example.
Let’s search a libary with the keyword “debounce”:
arduino-cli lib search debounce
Search gives you a number of alternatives. As you can see from your results, the lib search option of arduino-cli isn’t case sensitive (you can use uppercase or lowercase characters, giving the same results).
Let’s install “FTDebouncer” library. Please note that lib install option IS case sensitive:
pi@raspberrypi:~ $ arduino-cli lib install FTDebouncer
FTDebouncer depends on FTDebouncer@1.3.0
Downloading FTDebouncer@1.3.0…
FTDebouncer@1.3.0 downloaded
Installing FTDebouncer@1.3.0…
Installed FTDebouncer@1.3.0arduino-cli lib install FTDebouncer
Selected library is now installed and usable in your sketches. This is confirmed listing your installed libraries:
pi@raspberrypi:~ $ arduino-cli lib list
Name        Installed Available Location
FTDebouncer 1.3.0     -         user
Let’s give a closer look to installed library. You will note that a new folder have been created. Type the following command:
pi@raspberrypi:~ $ ls -la Arduino/libraries/
total 12
drwxr-xr-x 3 pi pi 4096 Jan 31 17:33 .
drwxr-xr-x 3 pi pi 4096 Jan 31 17:33 ..
drwxr-xr-x 4 pi pi 4096 Jan 31 17:33 FTDebouncer
Now we want to see how this folder is built. For this purpose, we’ll use the tree command. But we have to install it:
sudo apt install tree
Then look at arduino library folder with:
pi@raspberrypi:~ $ tree Arduino/libraries/
Arduino/libraries/
└── FTDebouncer
    ├── examples
    │   └── FTDebouncer_demo
    │       └── FTDebouncer_demo.ino
    ├── library.json
    ├── library.properties
    ├── LICENSE
    ├── README.md
    └── src
        ├── FTDebouncer.cpp
        └── FTDebouncer.h
So, each library consists in a folder (which gives its name to library) with library content inside. Clear and simple.
Install Libraries From Zip Files
Library Zip files are simply folders containing code needed from library to work, with a structure like the one seen in previious paragraph. So, installing a zip library for arduino-cli consists simply in:
- Obtaining library ZIP file
- Unzipping it
- uploading library content on your Raspberry PI under /home/pi/Arduino/libraries/, inside a folder with correct library name
As example, I’ll try to install DHT library coming from Elegoo for its DHT11 temperature and humidity sensor.
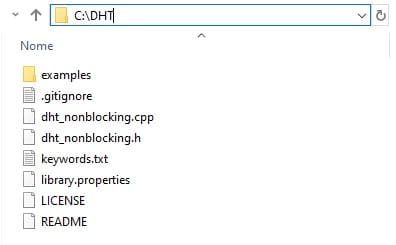
Download and unzip library file, making attention that DHT folder contains all files. Following picture shows DHT content in my Windows PC:

With your favourite SFTP software, transfer via SFTP the entire folder to path “/home/pi/Arduino/libraries” in your Raspberry PI. Common (default) SFP connection parameters are:
- host: your Raspberry Pi IP address
- user: pi
- password: raspberry (if you didn’t changed pi default password)
- port: 22
Once completed, new libraries tree will be the following:
pi@raspberrypi:~ $ tree Arduino/libraries/
Arduino/libraries/
├── DHT
│   ├── dht_nonblocking.cpp
│   ├── dht_nonblocking.h
│   ├── examples
│   │   └── DHT_nonblocking
│   │       └── DHT_nonblocking.ino
│   ├── keywords.txt
│   ├── library.properties
│   ├── LICENSE
│   └── README
└── FTDebouncer
    ├── examples
    │   └── FTDebouncer_demo
    │       └── FTDebouncer_demo.ino
    ├── library.json
    ├── library.properties
    ├── LICENSE
    ├── README.md
    └── src
        ├── FTDebouncer.cpp
        └── FTDebouncer.h
7 directories, 14 files
Your Zip file – library is now installed.
Enjoy!

Open source and Raspberry PI lover, writes tutorials for beginners since 2019. He's an ICT expert, with a strong experience in supporting medium to big companies and public administrations to manage their ICT infrastructures. He's supporting the Italian public administration in digital transformation projects.

