Last Updated on 19th April 2024 by peppe8o
In this tutorial, I will show you how to connect and use a Raspberry PI Pico e-paper (e-ink) display by using MicroPython.
Raspberry PI Pico e-paper (e-ink) displays are output devices that make cool your project results and help to save a lot of power. Once configured with the content to show, they can keep the display images active even without the need for any power source!
How e-paper Displays Work
The technology behind e-paper displays is not really new. According to Wikipedia, the e-ink notion exists since the 1970s and the official E Ink company have been founded in 1997.
Leaving the history to the related Wikipedia link, the e-paper displays have a really ingenious working principle, that I will describe briefly.
A delimited, clear fluid space encloses a consistent number of particles with different colors (usually black and white). The black pigments are electrically attracted by positive poles, while the white particles are attracted by negative poles.
On the top and bottom of these fluid spaces, two controlled electrodes will create the positive or negative pole required to move on the top side (the side visible from the user) the white or black pigments, giving the output result according to the color moving to the top:
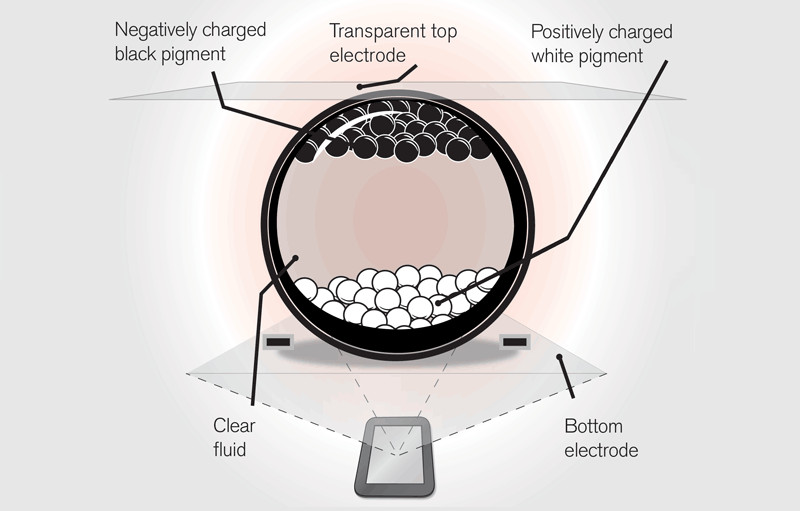
Each of these systems will compose a single pixel of the e-paper display, so allowing our image to be shown as a dense assemble of particles moving up or down.
What is important is that once the pigments have moved to the top (or down) side, they don’t need to get still polarized: they will keep the state until a different polarization will move them into a different position.
What We Need
As usual, I suggest adding from now to your favourite e-commerce shopping cart all the needed hardware, so that at the end you will be able to evaluate overall costs and decide if to continue with the project or remove them from the shopping cart. So, hardware will be only:
- A common computer (maybe with Windows, Linux or Mac). It can also be a Raspberry PI Computer board
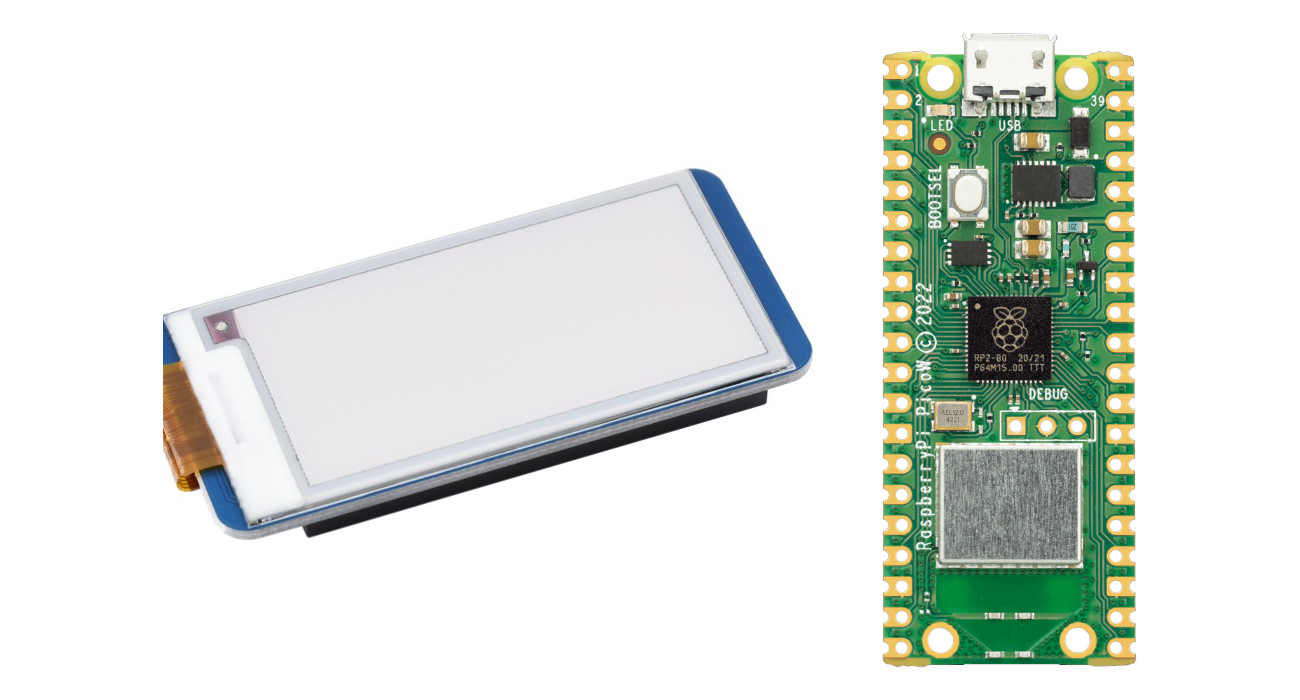
- Raspberry PI Pico microcontroller (with a common micro USB cable)
- e-paper module (the mine is from SunFounder shop)
Step-by-Step Procedure
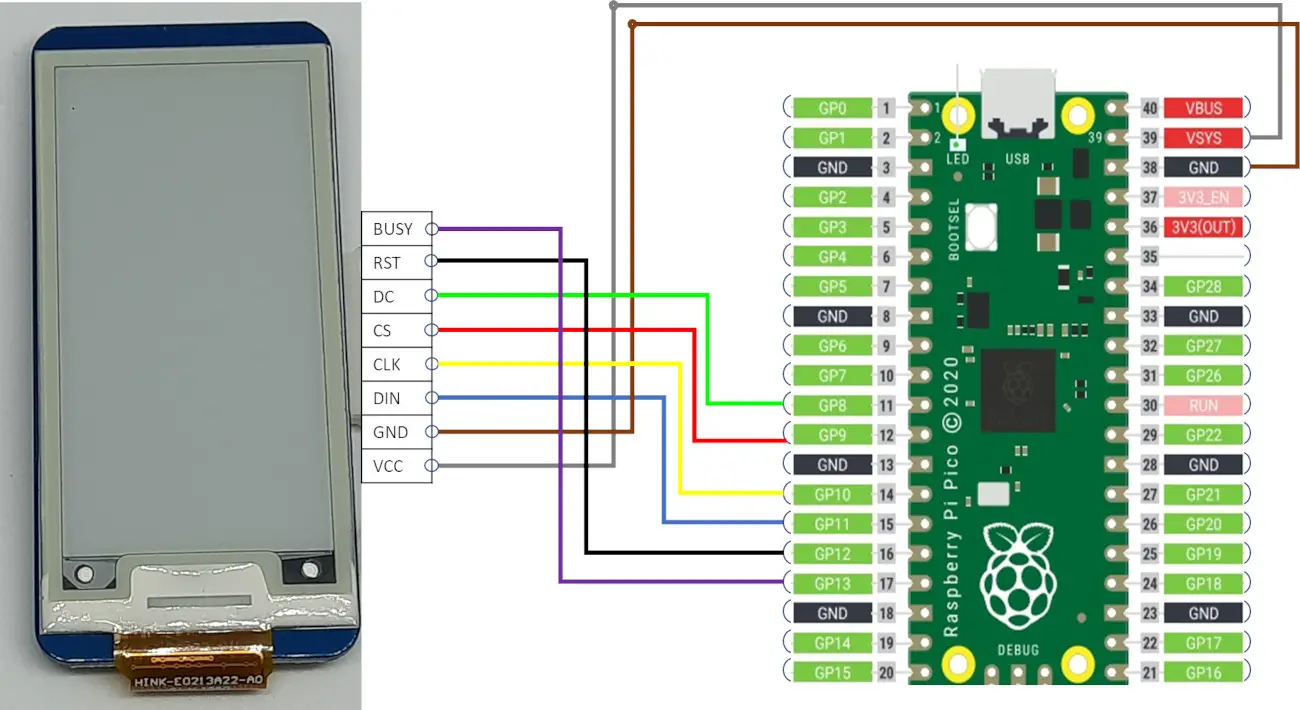
Wiring diagram for e-paper Raspberry PI Pico
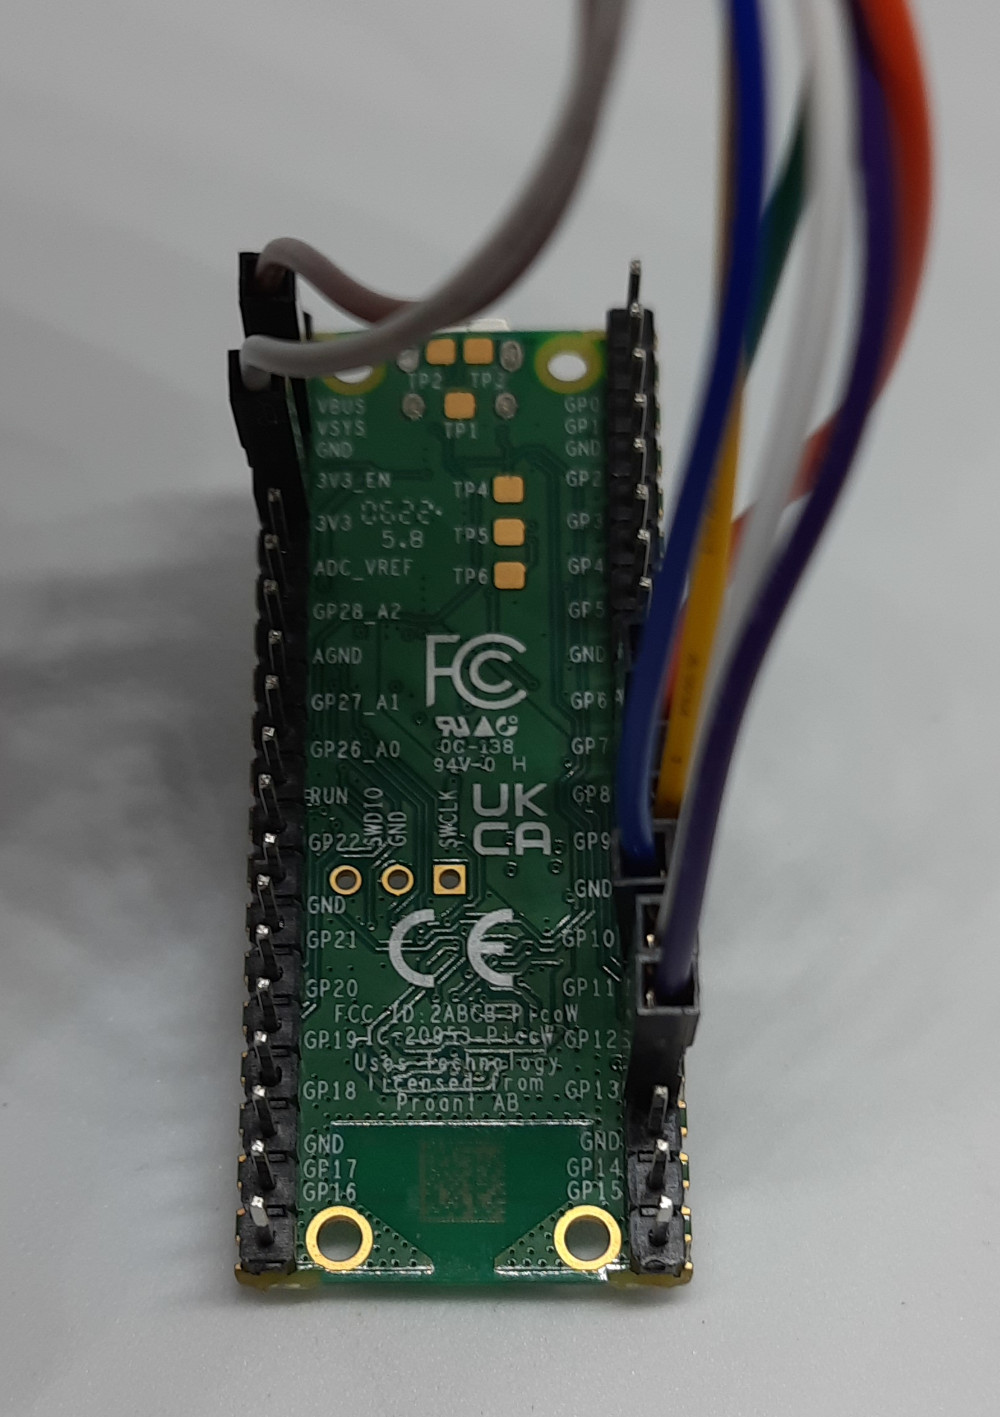
Please arrange the Raspberry PI Pico e-paper display connections according to the following diagram, according to the Raspberry PI Pico pinout:
| Raspberry PI Pico | e-paper |
|---|---|
| VSYS | VCC |
| GND | GND |
| GP11 | DIN |
| GP10 | CLK |
| GP9 | CS |
| GP8 | DC |
| GP12 | RST |
| GP13 | BUSY |
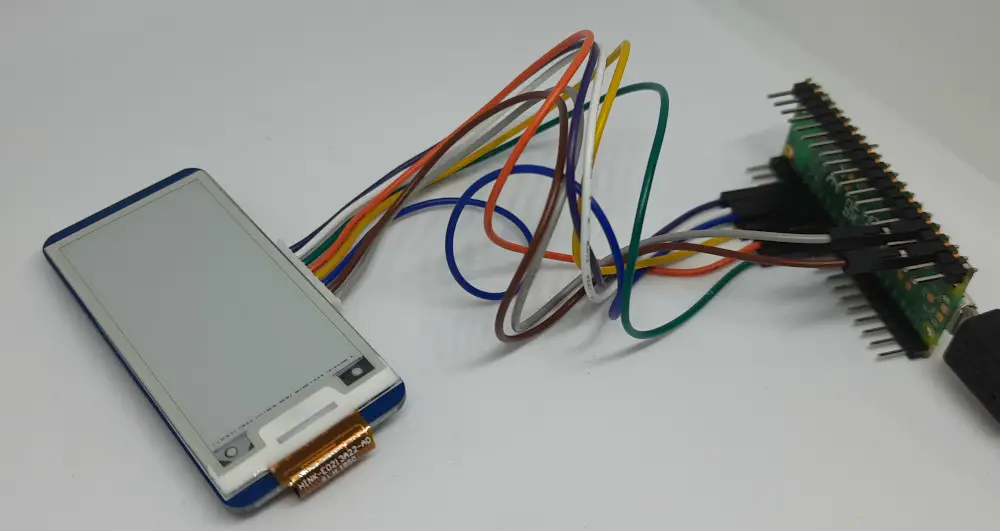
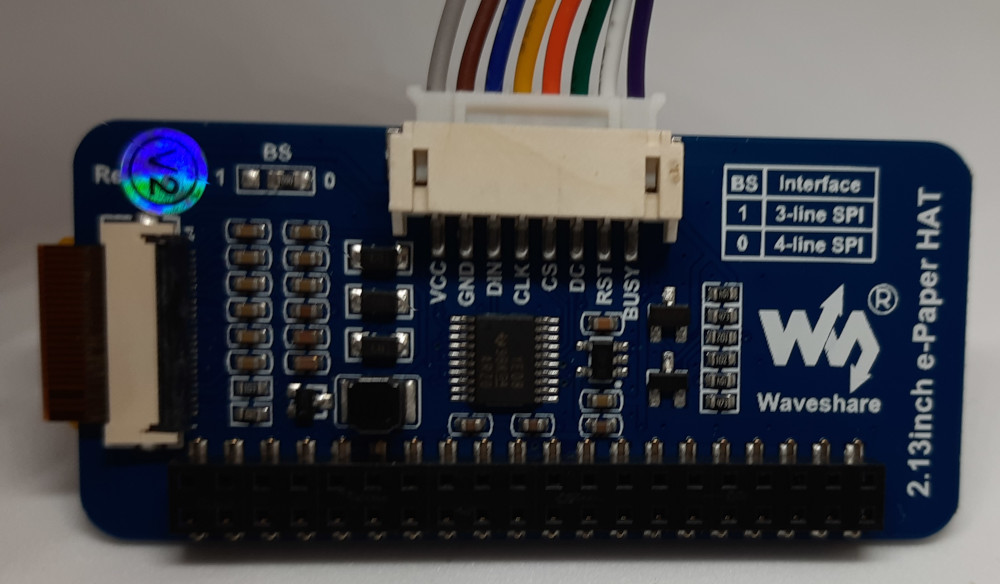
Please find below some pictures from my connection, where I had a 8-wires cable allowing me to connect the e-paper display directly to my Raspberry PI Pico
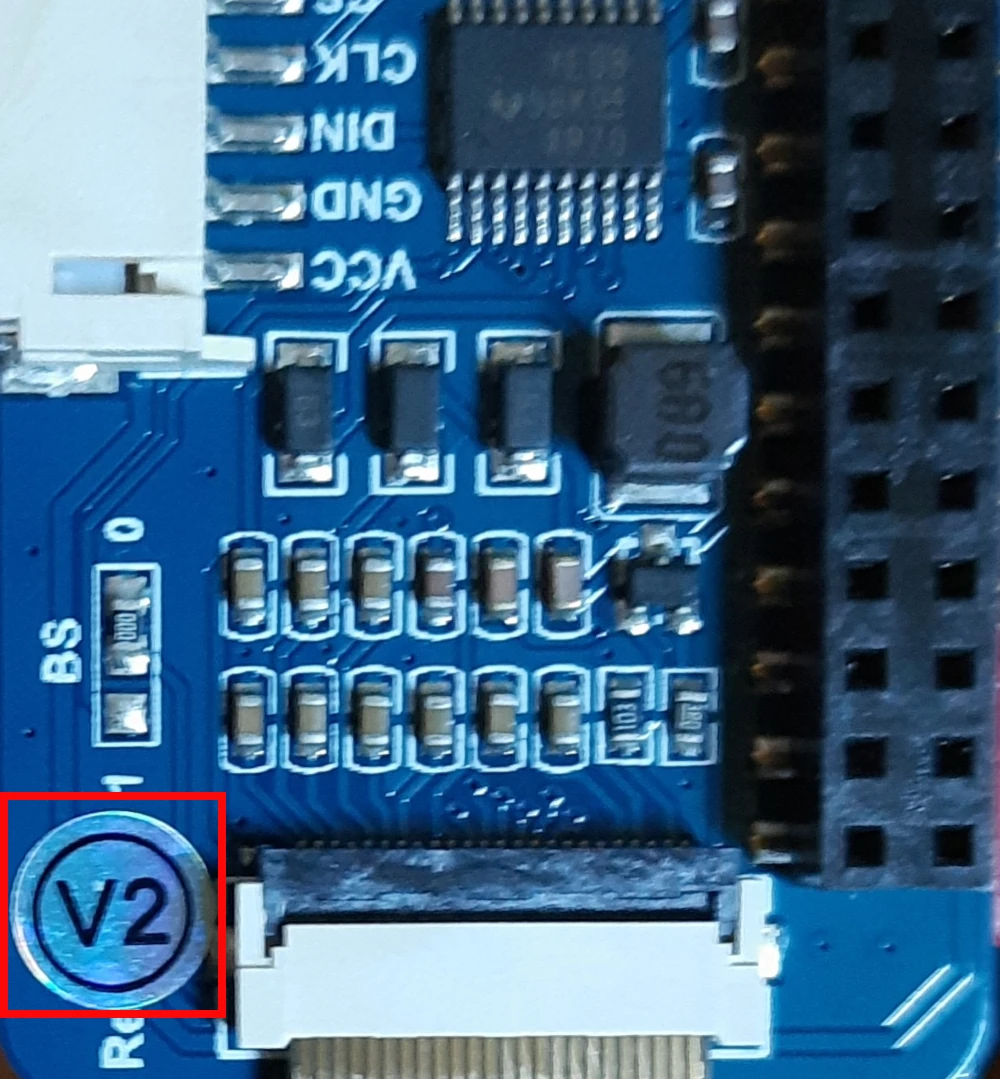
Check the Epaper Hardware Version
For people having the Waveshare Raspberry PI Pico Epaper display, it’s really important to check your display hardware version in order to get it working properly. I found that mine is the V2, as you can see from the label on my display backside:
Install MicroPython on Raspberry PI Pico
Connect RPI Pico to Thonny. For the very first steps and to install MicroPython, you can refer to my tutorial about the First steps with Raspberry PI Pico.
Get the Epaper MicroPython Library
Download the proper library from Waveshare library: https://github.com/waveshare/Pico_ePaper_Code/tree/main/python
A copy of the Raspberry PI Pico V2 e-paper display library with MicroPython is also available from my download area, with the following link:
Download the library code (for my download area or the raw code from the Waveshare GitHub page) and save it in your RPI Pico Storage naming it “pico_epaper”. As it includes a few tests at the end, you can test the raw library by running it with Thonny in order to double-check if the downloaded library is the right for your hardware.
Please note that the library file must be saved in your Raspberry PI Pico root folder or in your library folders according to my Adding external modules to MicroPython with Raspberry PI Pico tutorial.
The MicroPython Framebuffer module
In order to correctly work with the display, you need to know that its library uses the MicroPython Framebuffer module.
In a few words, it means that every drawing command you submit to the display will be converted into a byte array and sent to the display with the “epd.display()” (or similar partial display) command.
When you send a new drawing command, it will be merged over the old byte array buffer, so resulting in a new image coming with the old buffer plus the new drawing.
It’s really important also for the cleaning phase of your display, as the default “Clear” command results in the display becoming white, but a new drawing will bring back all the old pixels. The right way to get your display to show fresh images is to fill all the display with the white color or fill a specific area with white.
We’ll see it better in the following examples.
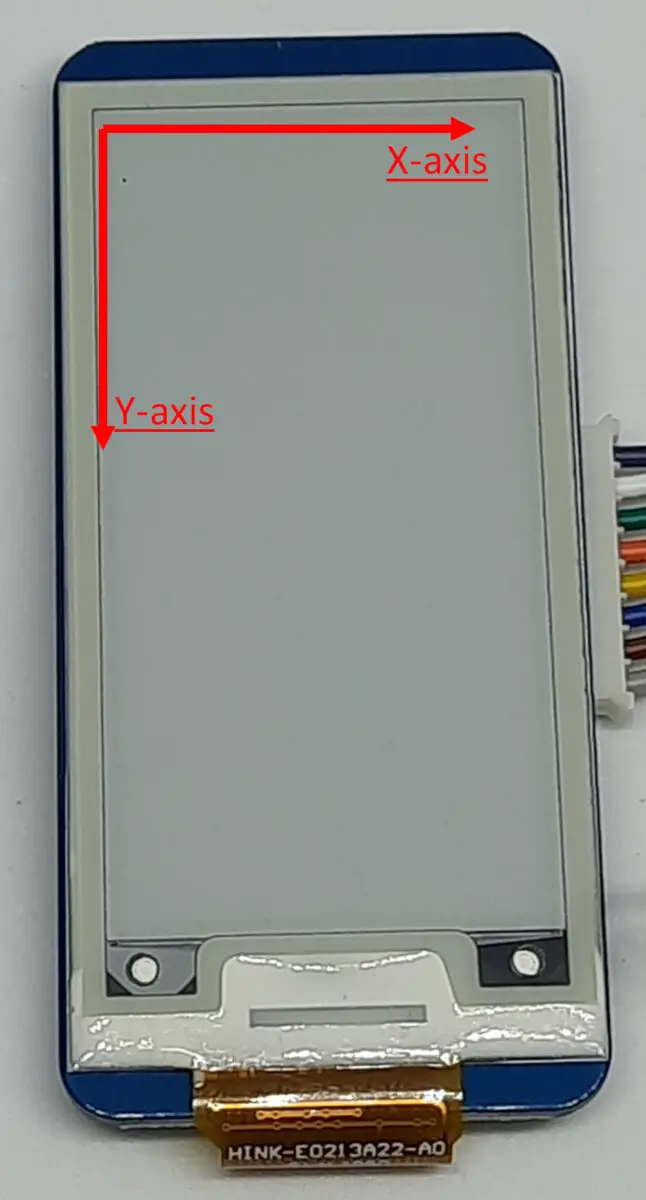
The e-paper Display Axes
As you will see in the following examples, the e-paper display usually refers to a 2-axes coordinate in order to address the position where objects are positioned. I will refer in my examples to X-Axis and Y-axis that match what is shown in the following picture:
Create your Custom MicroPython code for Raspberry PI Pico e-paper Display
For the following examples, you can both write the lines in your Thonny IDE or get the file with all the examples from my download area with this link:
Create a new empty file in your Raspberry PI Pico storage. It will include our custom code.
Identify the main class in the e-paper downloaded library. For my V2 display, I have only one class named “EPD_2in13”, while you could have different classes for different hardware (sometimes a landscape class and a portrait class), depending on your library. It will impact only the first 2 lines of this custom code
Call the class from the first line of your empty code with the MicroPython import function, by using the library file name (without the “.py” extension) and the class name.
from pico_epaper import EPD_2in13We needed to remove the minus (“-“) and dots characters from the library name as they will result in MicroPython errors as these chars are not allowed on library names.
We can now initialize the epd (E-Paped Display):
epd = EPD_2in13()
epd.init(epd.full_update)
Some newest hardware should also support the partial update, but this didn’t work with my hardware… So I will give you in the examples a way to get only part of the screen updated.
I also suggest defining two variables with color names in order to keep our code simpler:
black=0x00
white=0xff
If you are here now, the hardest job has been performed and now the funny things become with usage examples.
Raspberry PI Pico E-paper Drawing Examples
In the following examples, I will assume that you already run the previous commands and that your Raspberry PI Pico session is active. I also suppose that you will fill the screen with white color before each of the following examples, as shown in the first example.
Fill the entire display
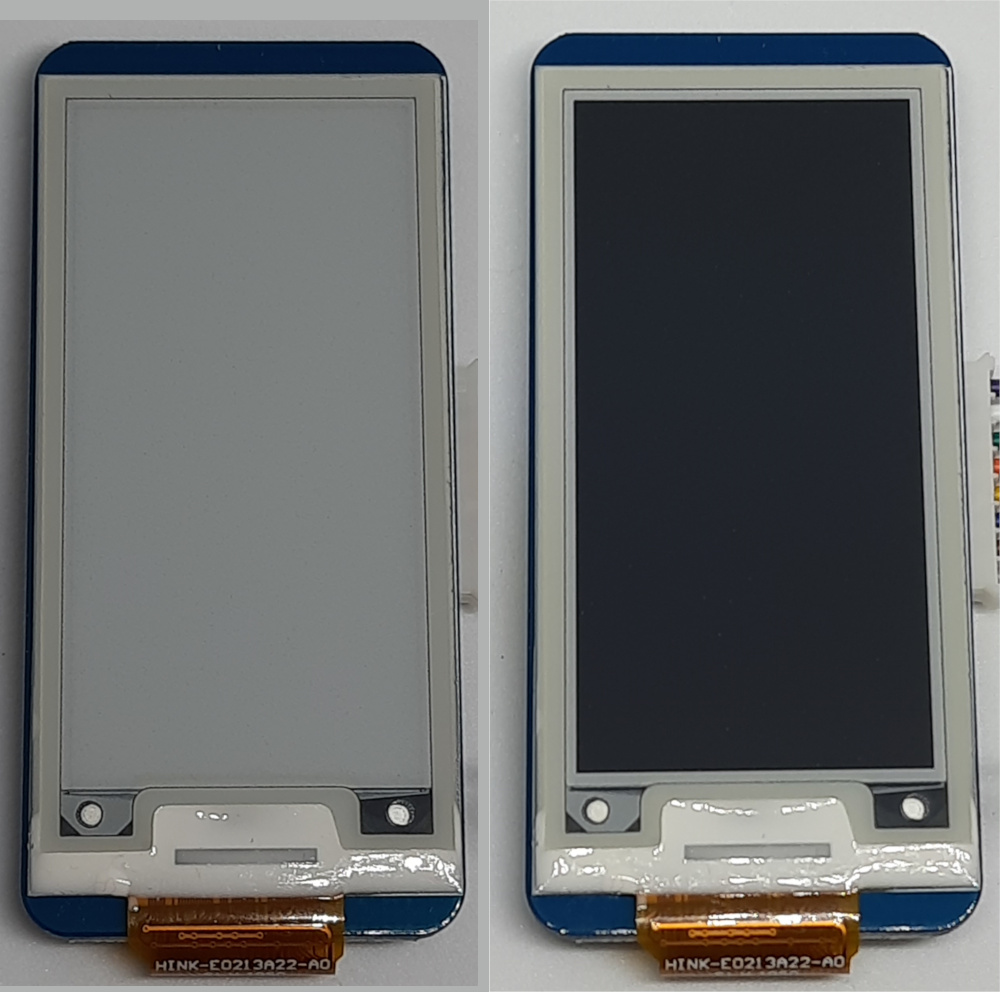
You can fill the entire screen with a specified color by using the fill property and then updating the display. This is a common operation at the beginning of every script, as it allows us to start with a blank screen. You can fill it both with white:
epd.fill(white)
epd.display(epd.buffer)
or black:
epd.fill(black)
epd.display(epd.buffer)
The two results are shown in the following picture:
Draw a Pixel
To draw a pixel, we can use the “pixel” method. Let’s mark a pixel at column 5 (X-axis) and row 20 (Y-axis). As we’re going to draw a black pixel, I’ll start with a screen filled with white. The command will be:
epd.pixel(5,20,black)
epd.display(epd.buffer)
And the result in our Raspberry PI Pico e-paper display:
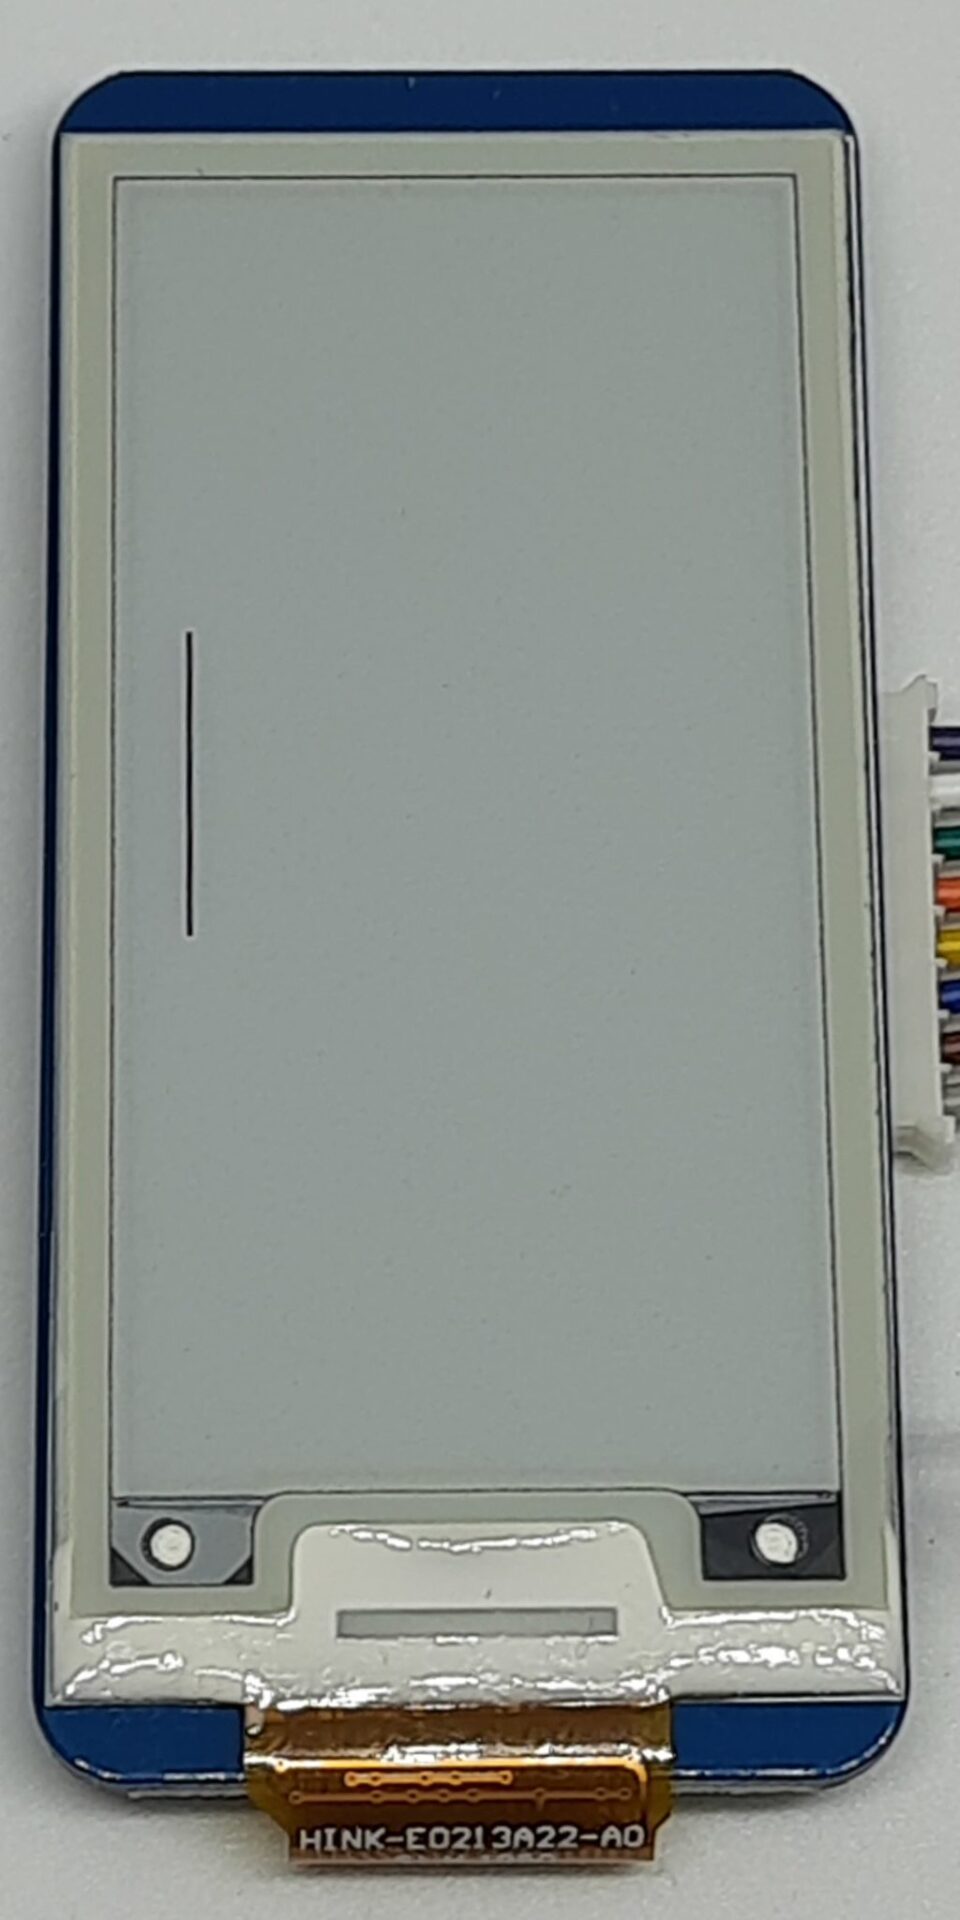
Draw a vertical line
The Framebuffer allows a simple method to draw a vertical line: the vline(). The MicroPython command will be the following:
epd.vline(10, 90, 60, black)
epd.display(epd.buffer)
Starting from column 10 (X-axis) and row 90 (Y-axis), this command will draw a 60-pixel vertical line:
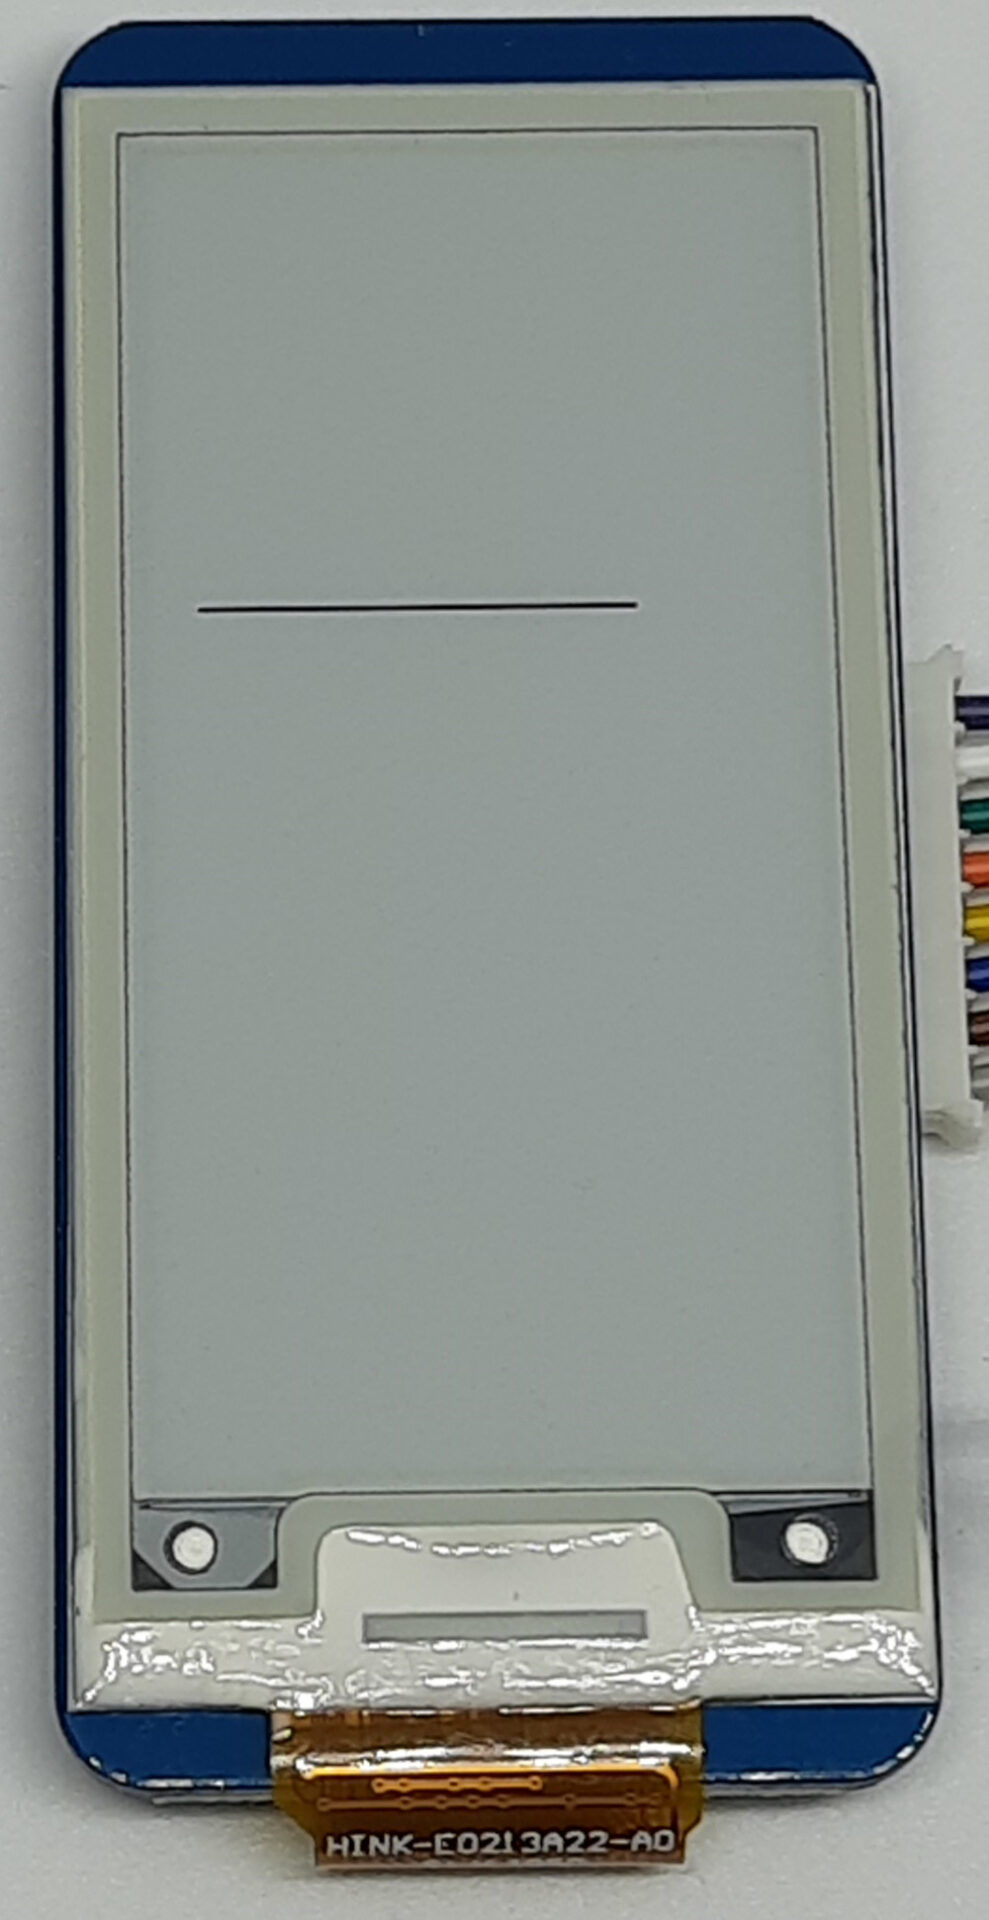
Drawing a horizontal line
Similarly, the hline() will make it possible for us to draw a horizontal line starting from a specified display pixel. The command:
epd.hline(10, 90, 80, black)
epd.display(epd.buffer)
Will create a line starting from column 10 (X-axis) and row 90 (Y-axis), large 80 pixels:
Draw a diagonal line
The MicroPython Framebuffer library also allows us to draw a line with specified coordinates for both start and end of the line itself. For example, the command:
epd.line(10, 90, 90, 150, black)
epd.display(epd.buffer)
will draw a line starting from the pixel at 10 (X-axis) / 90 (Y-axis) till the pixel 90 (X-axis) / 150 (Y-axis):
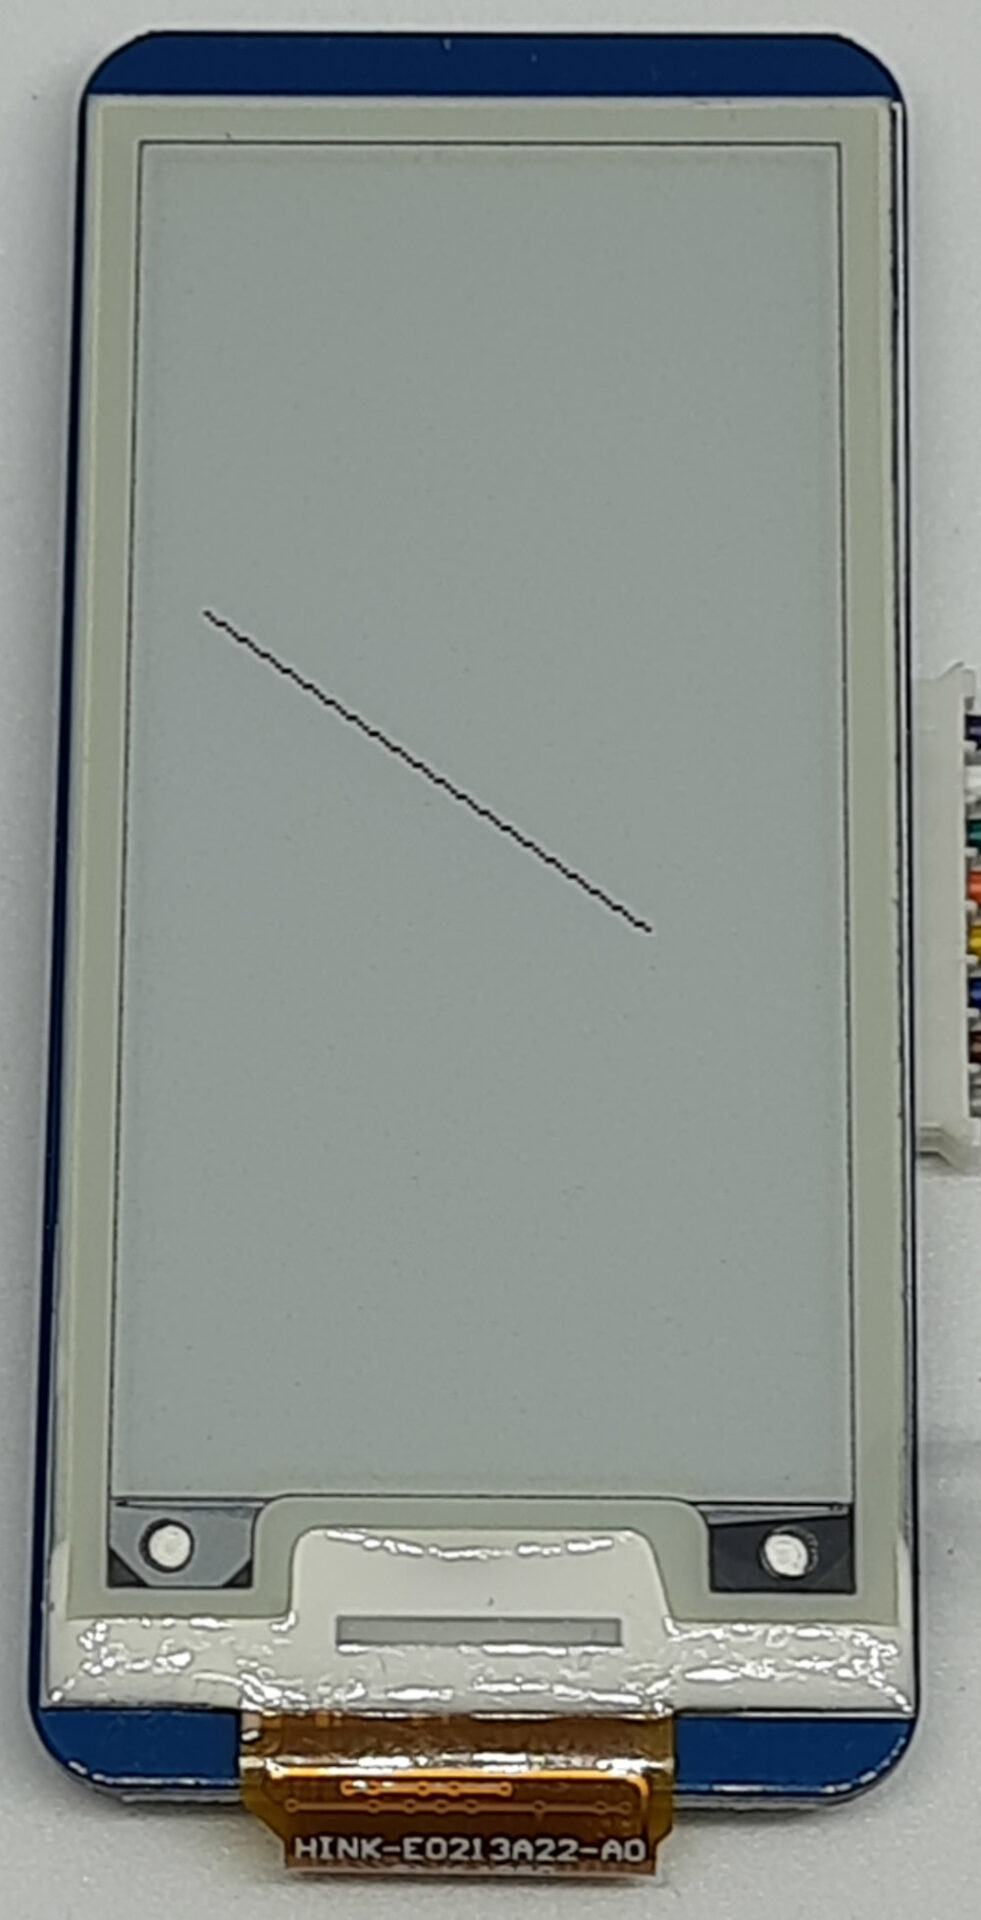
In the image, the line appears to be pixeled as of the high resolution I used. When You will see it live, you will check that the pixelled effect is far less annoying.
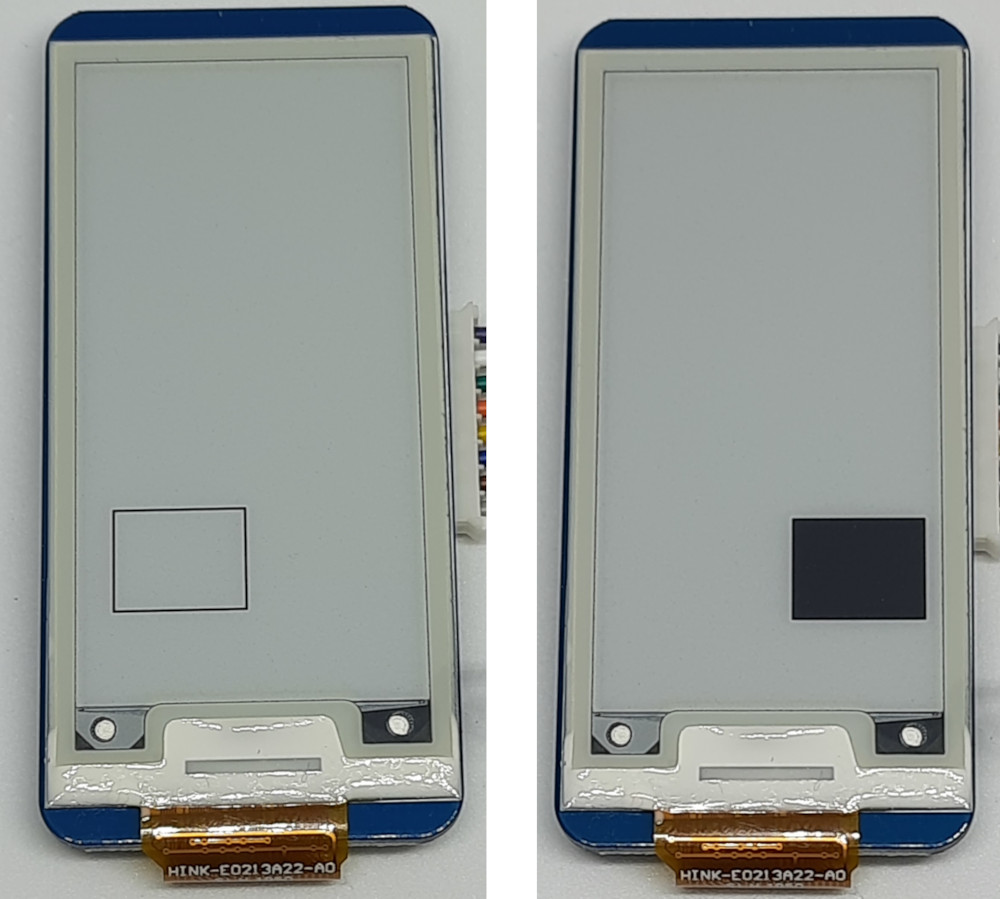
Drawing rectangles
Rectangles can be drawn both empty (with the lines defining edges) or filled with a specified color. Both require the starting position and the sizes on X-axis / Y-axis of the rectangle, with the color.
The rect() method draws an empty rectangle. You can define a black empty rectangle starting from the pixel at 10 (X-axis) / 180 (Y-axis), large 50 pixels and tall 40 pixels with the following:
epd.rect(10, 180, 50, 40, black)
epd.display(epd.buffer)
The fill_rect() uses the same inputs to define a filled rectangle:
epd.fill_rect(70, 180, 50, 40, black)
epd.display(epd.buffer)
The following picture shows our results:
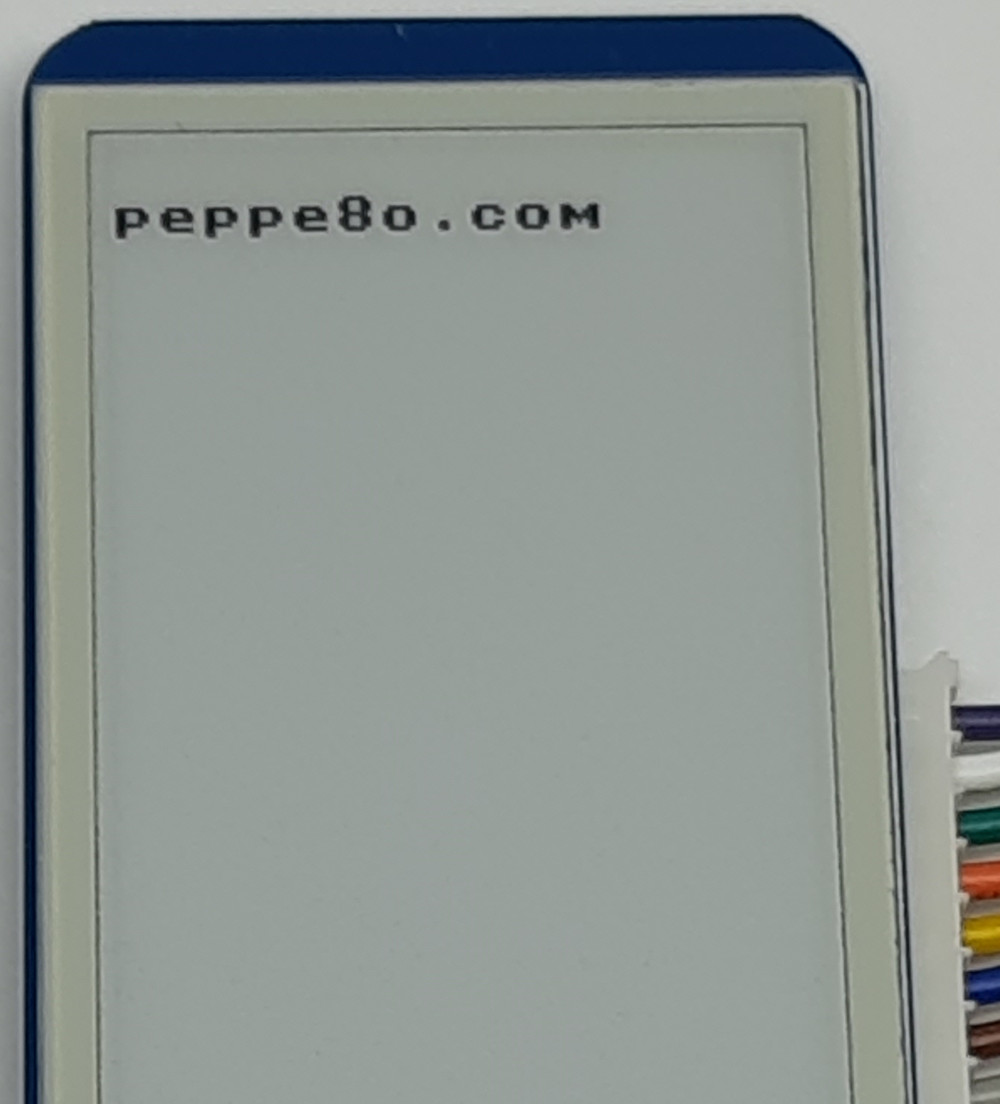
Displaying a Text
Also for this task, the Framebuffer library makes the job for us. Writing whatever text to your display will require just telling our Raspberry PI Pico e-paper display the string to show, the starting position and the color:
epd.text("peppe8o.com", 0, 10, black)
epd.display(epd.buffer)
Please note that each character of our text will be drawn within an imaginary box of 8×8 pixels. This is useful to know as it allows us to define the position for different text lines. Usually, different lines keep a 2-pixel distance in order to avoid getting them too close. This means that if you write a text line from row 10, you should write the following line from row 20 = 10 (the previous line position) + 8 (the character height of every single line) + 2 (the spacing between different lines).
Back to our example, this will be the result:
Updating the text
What we learned in the previous examples is also useful when trying to update your displayed text. In fact, if you try to write a new text over the existing one, you will get an overlapping of the two prints, resulting in a wrong display output. For example, let’s try changing the previous text with an upper case for the first char (the first “p” letter). Without cleaning the screen, the command sequence:
epd.text("peppe8o.com", 0, 10, black)
epd.display(epd.buffer)


epd.text("Peppe8o", 0, 10, black)
epd.display(epd.buffer)
will finally result in the following output, where you can check that the first letter is coming from the overlapping of the previous text with the new one:
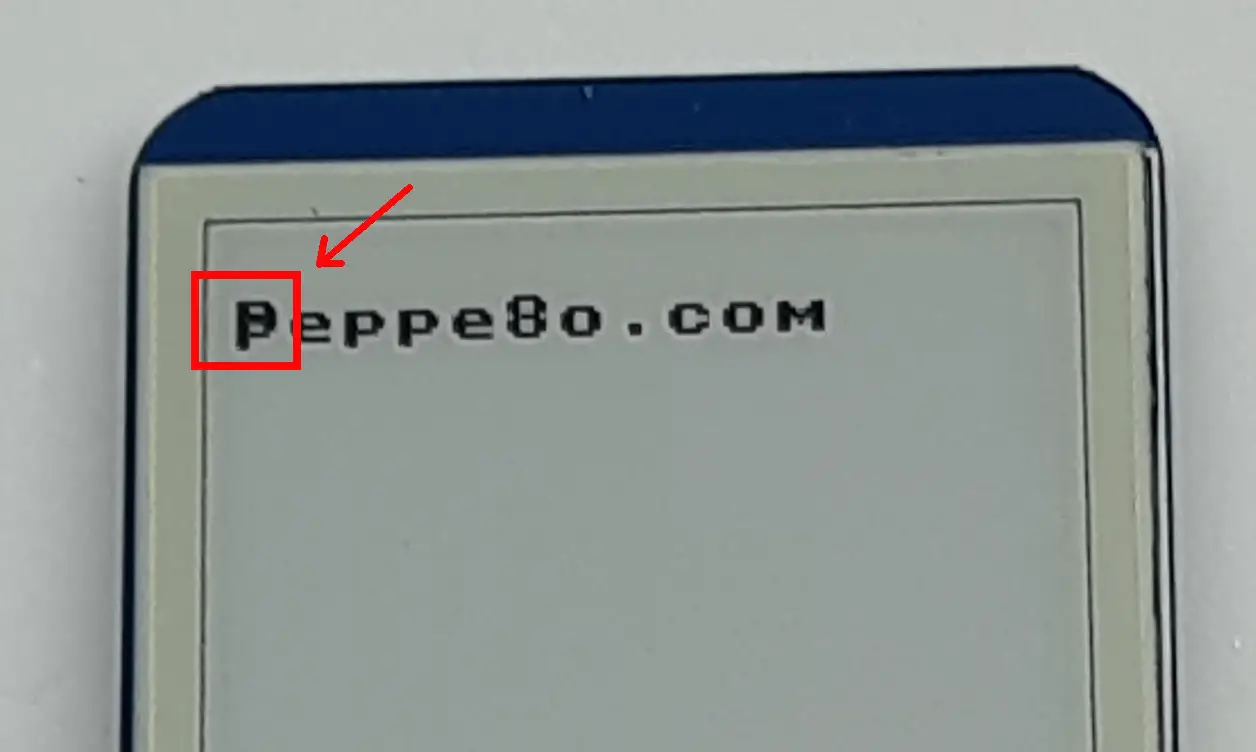
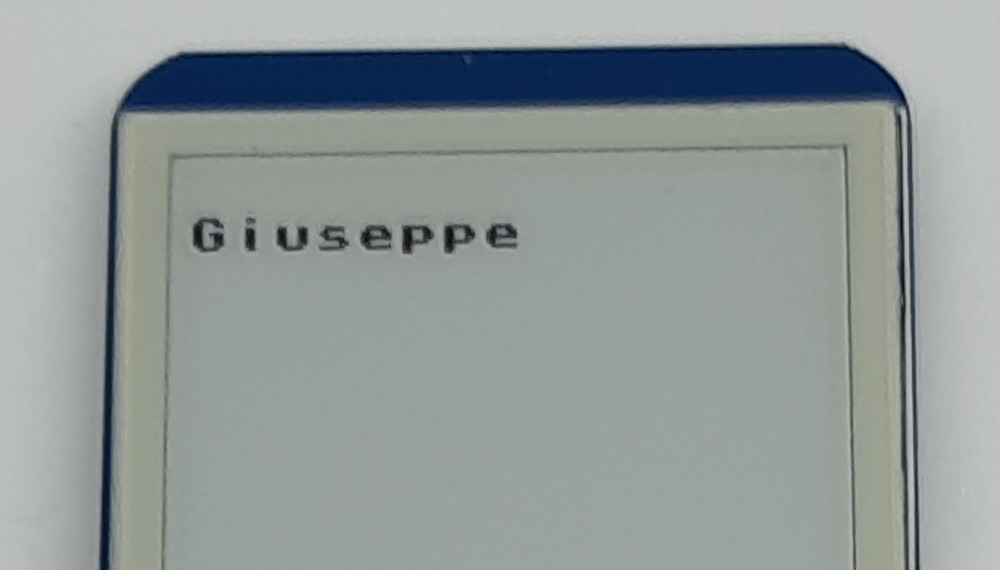
In order to avoid this problem, if the partial update doesn’t work with your hardware (as in mine one), you can use a white-filled rectangle starting at the first char position and with height and width given from your line height (8 pixels, as said) and your text lenght multiplied by 8 pixels.
For example, I want to update the “peppe8o.com”, 11 chars = (11×8) 88 pixels width, to “Giuseppe”, I can use the following steps:
epd.text("peppe8o.com", 0, 10, black)
epd.display(epd.buffer)

epd.fill_rect(0, 10, 88, 8, white)
epd.text("Giuseppe", 0, 10, black)
epd.display(epd.buffer)
That will show correctly the update of our e-paper display section, with the final result:
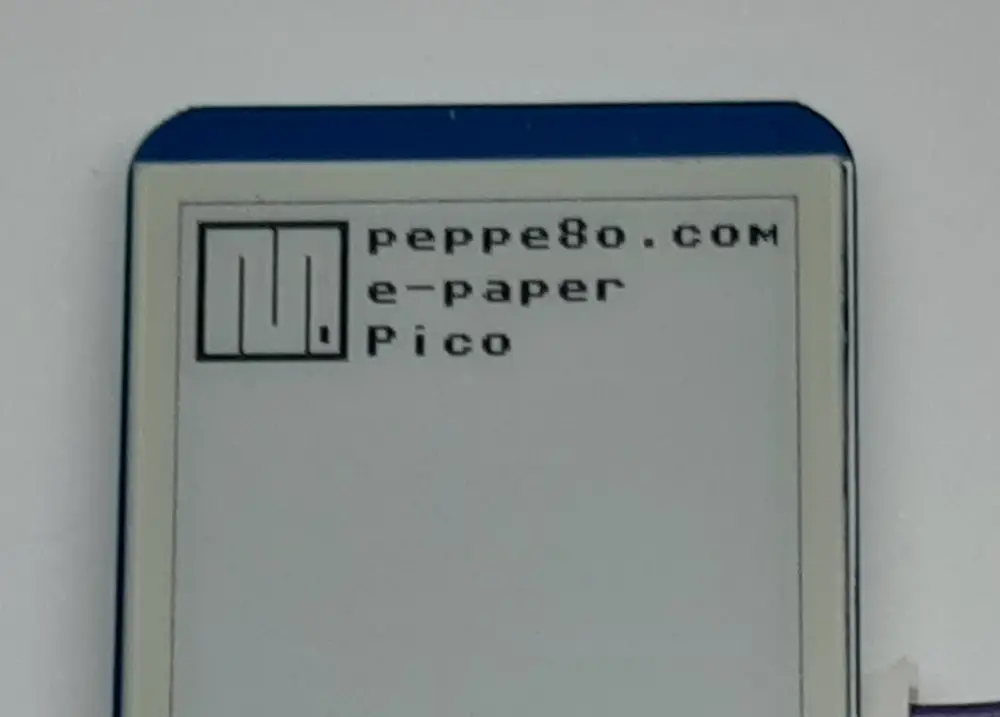
Composing the drawings
Even if the previous examples may appear so simple, we can already perform complex drawings by putting them together into a combined picture. The following example combines different forms to get the MicroPython logo printed in our screen:
epd.fill_rect(0, 1, 32, 32, black)
epd.fill_rect(2, 3, 28, 28, white)
epd.vline(9, 9, 22, black)
epd.vline(16, 3, 22, black)
epd.vline(23, 9, 22, black)
epd.fill_rect(26, 25, 2, 4, black)
epd.text('peppe8o.com', 35, 1, black)
epd.text('e-paper', 35, 13, black)
epd.text('Pico', 35, 25, black)
epd.display(epd.buffer)
and gives the result shown in the following picture:
Draw a Picture from a File
The Framebuffer library offers also a great method allowing us to display whatever picture or image from a file. This is a bit more complex to perform as it requires image manipulation before showing it in our Raspberry PI Pico e-paper display, as already performed in my Add an OLED display to Raspberry PI Pico with MicroPython tutorial.
Briefly, you must scale the picture you want to show to fit your display size, convert it to a black/white image and export it as PBM file. All these operations can be performed with the great open-source GIMP.
For this example, I will convert my logo (a 512×512 jpg image):
With GIMP, open your file with GIMP and resize it to the desired size (limited by your e-paper display. I will resize my logo to 60×61 with the GIMP function available from the Image menu -> Scale Image. The result is the following:

When there are parts with light colors, they may not appear correctly in your display (that is Black/White). So, we can get a better final result by managing the color curves to get an increased contrast (a darker picture): in GIMP, Colors -> Curves and move the curve to the lower part to get a higher contrast. The following is the result:

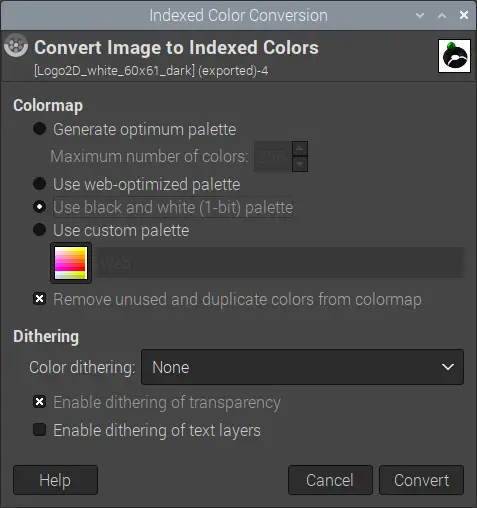
Now, we’ll use the GIMP function Image -> Mode -> Indexed function to get an indexed image color with black/white palette. The following are the settings to use:
And this will be the result:

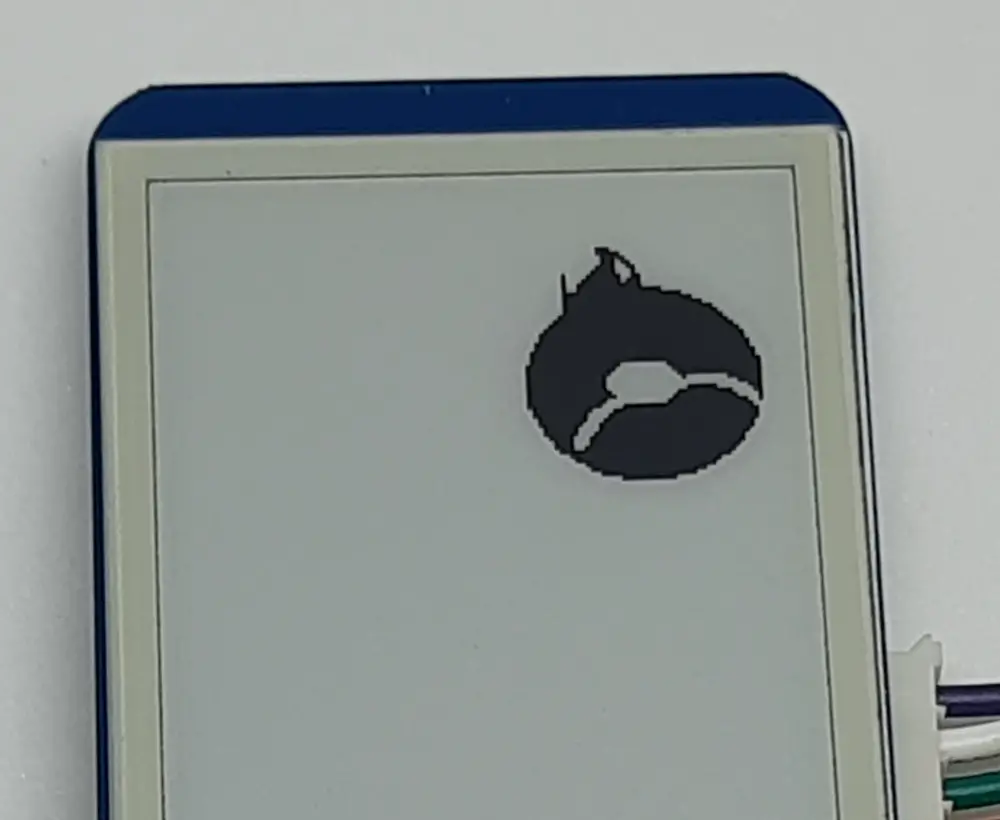
In order to make it work with the e-paper display and differently from the OLED display, I also had to work with an inverted logic of the color. So, the final job from GIMP is to invert the black/white with Colors -> Invert menu from GIMP. The result is the following:

Now you can export this image to the PBM format with GIMP File -> Export by setting the correct file extension.
Once you have the “.pbm” image uploaded to your Raspberry PI Pico storage, you can use a custom function that I’ve coded to make the job simpler. At the start of your script, you have to import the MicroPython framebuf library and use the following custom function:
import framebuf
def pbm_draw(x_pos,y_pos,file):
    with open(file, 'rb') as f:
        f.readline()
        f.readline()
        size = f.readline().decode('utf-8')
        (x,y)=size.split("\n")[0].split(" ")
        data = bytearray(f.read())
    fbuf = framebuf.FrameBuffer(data, int(x), int(y), framebuf.MONO_HLSB)
    epd.blit(fbuf, x_pos, y_pos, white)
In this custom function, after opening the pbm file we ignore the first 2 rows (with the readline commands) as they include some general information about the file and the program that generated it. The third line includes the file size, which is read and translated from a byte record into numbers. Then, the bytearray() function reads all the bits from the image, finally stored into a FrameBuffer object. The blit() method prepares the display buffer. Please note that the blit() function gets finally the “white” color input to get the image color inversion managed.
With this custom function, you can draw your picture with the following command:
pbm_draw(60,10,'Logo2D_white_2.pbm')
epd.display(epd.buffer)
And the result is:
Scrolling the display
The Raspberry PI Pico e-paper display technically supports also the scroll of the screen. I’m specifying “technically” as the result get (at least for my hardware/library) shows part of the previous image that hurts the final result, so I would suggest you to test with your hardware in order to check if it may work with different versions. Starting from the previous logo image still in place, the following command:
epd.scroll(0,50)
epd.display(epd.buffer)
will generate a scroll of 0 pixels in the horizontal line and 50 pixels in the vertical line, with the following result:
Cleaning the Display
As already mentioned, the clear() method will make your display empty:
epd.Clear(white)This will clear your display, but just calling the epd.display() will show back the old screen.
epd.display(epd.buffer)So, the only way to get your Raspberry PI Pico e-paper display really clear is to fill it with white color.
Sleeping the Display
The last method is the sleep(). This function allows our display to go sleeping:
epd.sleep()It is important to know that, even this function hasn’t a great impact on our power budget because the e-paper display doesn’t have a big power consumption, the producer suggests using it to avoid the display remaining in a high voltage state for a long time, so risking damages. E-paper displays don’t need to get powered to show their content (even after the sleep function, you will continue to see your content). You have to mind only that after the sleep method you will need a new “epd.init(epd.full_update)” command to get back control of your display.
Moreover, even after completely powering off your Raspberry PI Pico you will get your images still printed on your display!
What’s Next
Interested in doing more with your Raspberry PI Pico? Try to look at my Raspberry PI Pico tutorials for useful and funny projects!
Enjoy!
Community Projects
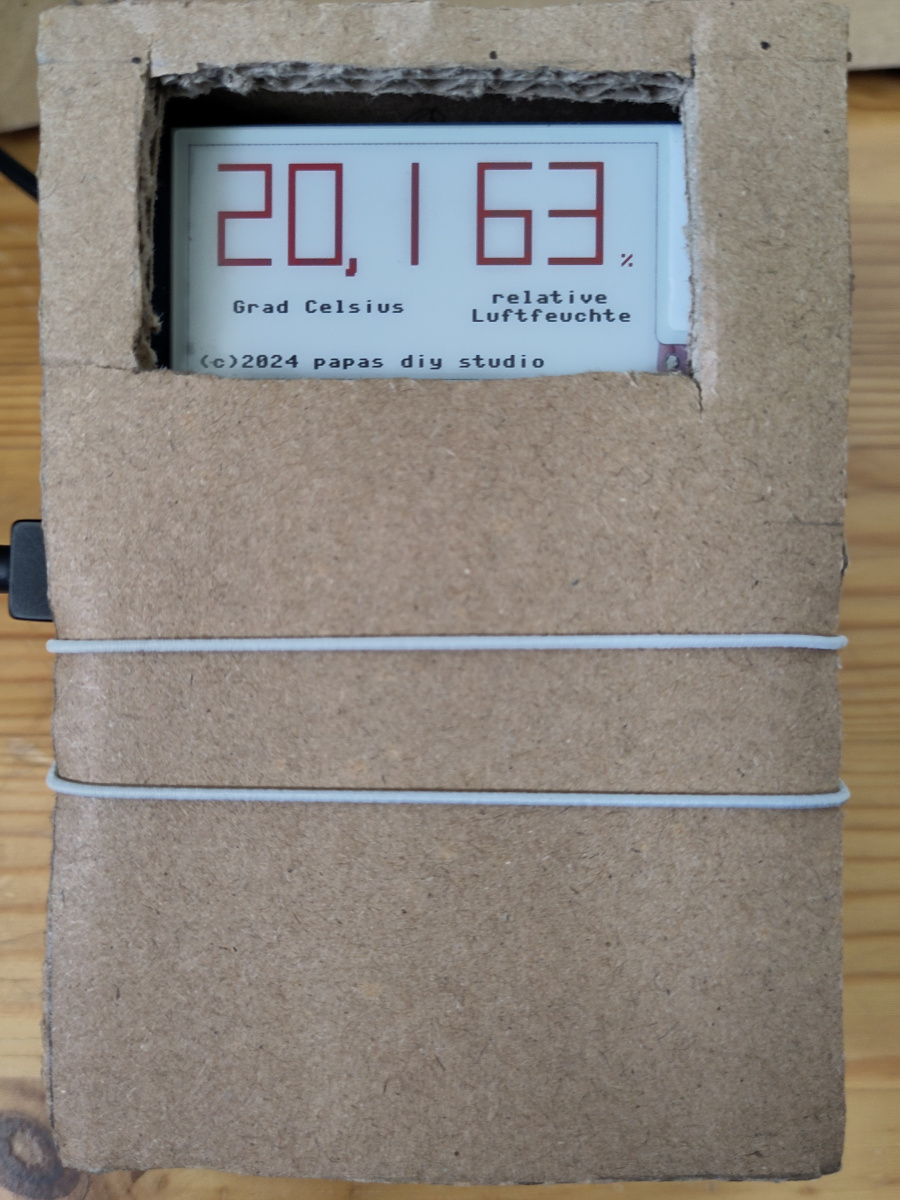
By Peter Johannsen-Klug
The following project is proposed by Peter Johannsen-Klug. It is important to note that:
- ePaper with red is used (2.13-B V4)
- the cardboard case is provisional
It uses a DHT22 temperature and Humidity sensor to detect environmental measures and shows them with the e-paper display.
The code is available at the following link: DHT22_7Segment_EN_Pico_ePaper-2.13-B_V4.py.
Please find below a picture from the project (cardboard case is provisional):

Open source and Raspberry PI lover, writes tutorials for beginners since 2019. He's an ICT expert, with a strong experience in supporting medium to big companies and public administrations to manage their ICT infrastructures. He's supporting the Italian public administration in digital transformation projects.
![]()
![]()
![]()
![]()
![]()
![]()
![]()


Can you demonstrate how to display things in landscape mode? I have the 2.9″ flexible display, but I can’t find an example for any of the screen sizes.
Thanks!
Hi. Currently I’m on holidays, so I don’t have a Pico and my e-paper display with me. But, if your hardware doesn’t support landscape mode natively, you can save the images rotated by 90 degrees and use them for your display. Consider that even the text can be displayed with a rotated image
Hello,
thank you very much for the instructions!
Can you perhaps add how to change the font size?
Many thanks for a message!
Best regards
Peter JK
I found a solution myself: I displayed the digits in a suitable size using the familiar 7-segment display, with additional text in the normal font size.
Hi Peter,
I’m really sorry, I competely missed your original question.
Anyway, I’m really happy that you fixed the requirement. Do you want to share your solution here?
Hello peppe8o,
No problem, everybody sometimes overlooks something.
First of all, I (unfortunately) use the Waveshare 19588 Pico-ePaper-2.13-B which can display red . Unfortunately because the refresh time is 15 seconds instead of 5 seconds for the black and white version. This is the disadvantage of the additional red color component I overlooked when I bought the ePaper. Well, I’m sure my script can certainly be transferred to the black and white version. Here it is how I installed the 7-segment method:
The most important things are, first, to break down the two measured values (temperature, humidity) into five digits (temperature with one decimal place, humidity without decimal place, e.g. 20.7 and 56). Secondly, assigning the seven segment bars to the digits 0 to 9.
1) Break down measured values into digits
sensor.measure()
# temperature
temp = round(sensor.temperature(), 1)
messziffern = str(temp)
# split for decimal place (messziffer3)
int_messziffern, messziffer3 = messziffern.split(‘.’)
# relative humidity
hum = round(sensor.humidity(), 0)
messziffern_hum = str(hum)
# break down data into digits, messziffer3 see above
messziffer1 = int_messziffern[0:1]
messziffer2 = int_messziffern[1:2]
messziffer4 = messziffern_hum[0:1]
messziffer5 = messziffern_hum[1:2]
2) Assign the seven segment bars to the digits 0 to 9
# note: German abbreviations
# v: vertical
# h: horizontal
# r: right
# l: left
# o: top (“oben”)
# u: bottom (“unten”)
flags = {‘1’: [‘vro’, ‘vru’],
‘2’: [‘ho’, ‘hm’, ‘hu’, ‘vlu’, ‘vro’],
‘3’: [‘ho’, ‘hm’, ‘hu’, ‘vro’, ‘vru’],
‘4’: [‘hm’, ‘vlo’, ‘vro’, ‘vru’],
‘5’: [‘ho’, ‘hm’, ‘hu’, ‘vlo’, ‘vru’],
‘6’: [‘ho’, ‘hm’, ‘hu’, ‘vlo’, ‘vlu’, ‘vru’],
‘7’: [‘ho’, ‘vro’, ‘vru’],
‘8’: [‘ho’, ‘hm’, ‘hu’, ‘vlo’, ‘vlu’, ‘vro’, ‘vru’],
‘9’: [‘ho’, ‘hm’, ‘hu’, ‘vlo’, ‘vro’, ‘vru’],
‘0’: [‘ho’, ‘hu’, ‘vlo’, ‘vlu’, ‘vro’, ‘vru’]
}
for n in range(1,6,1):
ho = False
hm = False
hu = False
vlo = False
vlu = False
vro = False
vru = False
messz = globals()[prefix + str(n)]
if messz in flags:
for flag in flags[messz]:
globals()[flag] = True
The display positions must then be defined on a pixel basis. For example, for ho (horizontal, top) the code is:
epd.imagered.fill_rect(start_x, start_y, ziffer+strich, strich, 0x00)
I have defined 4 pixels as the line width (“strich”), for the digit width 26 pixels each plus individual distance. The individual pixel positions for each digit can be defined using the variable messziffer+n:
if n == 1:
# startpx digit 1
start_x = 13
start_y = 13
elif n == 2:
# startpx digit 2
# ePaper border 13
# digit
# distance 13
start_x = 13+ziffer+13
start_y = 13
elif n ==3
…
Maybe the code is not perfect, but it works :-))
I hope it helps. Maybe you can add this approach to your tutorial.
Kind regards,
Peter
Unfortunately, all the spacing has been lost and the code is difficult to read. Perhaps we should communicate again separately by e-mail.
I withdraw it, the distances are still there!
I am quite confused with the blit() function. I am not finding it anywhere. I am using Pico_ePaper-2.13-B_V4.py
Thanks.
Hi Rick,
the blit() methond comes from micropython frambuf methods. It simply draws a specified area over an existing framebuffer object (ref. https://docs.micropython.org/en/latest/library/framebuf.html)
Dear peppe80!
I like your post about Raspberry PI Pico and e-paper (e-ink) Display, it’s very well done with details, photos and diagrams. However I have already once obliterated one pico by connecting AAA batteries to the wrong GPIOs causing it to send smoke signals and buzzing off to the afterlife 😅
Anyway that’s why I’d like to ask if the photo you’ve posted (https://peppe8o.com/wp-content/uploads/2023/04/raspberry-pi-pico-epaper-wiring-detailis-01.jpg) shows the cables going from VCC and GND of the e-ink to GPIO 38 GND and GPIO 36 3V3(OUT) whereas the diagram above the photo indicates GPIO 39 VSYS and GPIO 28 GND as the correct connection.
I’d very much appreciate your reply.
Best, D10v
Hi D10v,
you have hawk eyes!!! The e-paper module can work both with 5V and 3.3V, so you can use both the VSYS or the 3V3 PIN from the Pico for the e-paper’s VCC.
Thank you for your feedback!
Hi Peppe, Hi Peter
thanks for sharing your inputs here. I took the code of Peter and modified it a bit so it can display different size numbers and also the degree and percent signg. I admin the percent sign loos a bit odd. But I still like to share my code for you and other interested in it.
I use a Waveshare ePaper 2.13 inch black and white. The epaper driver can be found here https://github.com/waveshareteam/Pico_ePaper_Code/blob/main/python/Pico_ePaper-2.13_V4.py
from epaper2in13v4 import EPD_2in13_V4_Landscape
import re, array
epd = EPD_2in13_V4_Landscape()
epd.Clear()
# draws black decimal numbers in the 7 segment format
# start_x and start_y are the coords for the upper left start point
# text ist the chars to display. only the chars ‘0-9,°%’ are supported
# digit_width the width in pixels of one digit, the height is always twice the width
# line_width ist the thickness in pixel of the char lines
# space ist the amount of pixels inbetween the cahrs
def drawNumber(start_x, start_y, text, digit_width, line_width, space):
for digit in text:
if digit in [‘2′,’3′,’5′,’6′,’7′,’8′,’9′,’0’]:
#horizontal top
epd.fill_rect(start_x, start_y, digit_width+line_width, line_width, 0x00)
if digit in [‘-‘,’2′,’3′,’4′,’5′,’6′,’8′,’9’]:
#horizontal middle
epd.fill_rect(start_x, start_y+digit_width, digit_width, line_width, 0x00)
if digit in [‘2′,’3′,’5′,’6′,’8′,’9′,’0’]:
#horizontal bottom
epd.fill_rect(start_x, start_y+digit_width*2, digit_width+line_width, line_width, 0x00)
if digit in [‘1′,’4′,’5′,’6′,’8′,’9′,’0’]:
#vertical left top
epd.fill_rect(start_x, start_y, line_width, digit_width, 0x00)
if digit in [‘1′,’2′,’6′,’8′,’0’]:
#vertical left bottom
epd.fill_rect(start_x, start_y+digit_width, line_width, digit_width+line_width, 0x00)
if digit in [‘2′,’3′,’4′,’7′,’8′,’9′,’0’]:
#vertical right top
epd.fill_rect(start_x+digit_width, start_y, line_width, digit_width+line_width, 0x00)
if digit in [‘3′,’4′,’5′,’6′,’7′,’8′,’9′,’0’]:
#vertical right bottom
epd.fill_rect(start_x+digit_width, start_y+digit_width, line_width, digit_width+line_width, 0x00)
if digit in [‘,’, ‘.’]:
epd.fill_rect(start_x, start_y + digit_width*2, line_width, line_width+line_width, 0x00)
if digit in [‘°’,’%’]:
r1 = digit_width//2-line_width
r2 = digit_width//2-line_width-line_width//2
epd.ellipse(start_x+r1, start_y+r1, r1, r1, 0x00, True)
epd.ellipse(start_x+r1, start_y+r1, r2, r2, 0xFF, True)
if digit == ‘%’:
epd.ellipse(start_x+digit_width, start_y+digit_width*2+line_width-r1, r1, r1, 0x00, True)
epd.ellipse(start_x+digit_width, start_y+digit_width*2+line_width-r1, r2, r2, 0xFF, True)
coords = array.array(‘I’, [digit_width+line_width//2, 0, digit_width+line_width, 0, line_width, digit_width*2+line_width, line_width//2, digit_width*2+line_width])
# print(“Array: “, coords)
epd.poly(start_x, start_y, coords, 0x00, True)
if digit in [‘1′,’,’, ‘.’]:
start_x += space
else:
start_x += digit_width+space
while True:
epd.fill(0xff)
drawNumber(10,10,”78%”,18,4,10)
drawNumber(10,70,”12,34°”,18,4,10)
epd.display(epd.buffer)
epd.delay_ms(3000)
epd.fill(0xff)
drawNumber(10,10,”12%”,10,3,8)
drawNumber(10,40,”0,123456789°”,10,3,8)
drawNumber(10,70,”0,123456789°”,10,3,8)
drawNumber(10,100,”0,123456789°”,10,3,8)
epd.display(epd.buffer)
epd.delay_ms(3000)
Hi Rene,
thank you for sharing your code. If you want, you can also send pictures of your project at giuseppe@peppe8o.com to publish them in this page
fyi – the v2.3 universal driver board that comes with the 7.5 epaper now has ‘two’ power related pins so your excellent blog is a little outdated re: wiring. Here’s what worked for me.
Colors below are the ones that are the 9-pin that came with the universal driver board so they differ from your diagram above. These are in the order top-to-botton on the 9-pin connector markings on the board.
(hope the comments upload doesn’t mess up the formatting…)
brown PWR to pin 39 VSYS
purple BUSY to pin 17 GP13
white RST to pin 16 GP12
green DC to pin 11 GP8
orange CS to pin 12 GP9
yellow CLK to pin 14 GP10
blue DIN to pin 15 GP11
black GND to pin 38 GND
red VCC to pin 36 3V3(OUT)