
Last Updated on 30th December 2024 by peppe8o
In this tutorial, I’m going to show you how to wire and use the 28BYJ-48 and ULN2003 with Raspberry PI Pico, with MicroPython code.
Stepper motors can trasform your code logic into move in robotic projects. The 28BYJ-48 stepper motor (with ULN2003 motor driver) is the cheapest model and works with a simple code on Rapsberry PI Pico.
Please note that, if you need the code for Raspberry PI computer boards, you can refer to my Controlling a stepper motor with Raspberry Pi Zero W tutorial.
What is a Stepper Motor
A stepper motor is a brushless DC electric motor. Their hardware makes it possible to divide a full rotation into a number of equal steps. Compared to common DC motors, they are far more precise but they have less rotation speed. They usually fit well into applications to control cameras, robotic arms, or whenever you need to perform precise rotations. When choosing the stepper motor to use for your project, please check carefully the required torque force and speed (usually available from the producer datasheet), as it may impact your final result.
As stepper motors are current hungry devices, a motor driver is usually included to manage the power supply and keep it isolated from microcontroller circuits.
The 28BYJ-48 stepper motor works by powering a specific sequence into the ULN2003 driver Pins. The states for each sequence step are the following:
| SEQ0 | SEQ1 | SEQ2 | SEQ3 | SEQ4 | SEQ5 | SEQ6 | SEQ7 | |
| IN4 | 1 | 1 | 0 | 0 | 0 | 0 | 0 | 1 |
| IN3 | 0 | 1 | 1 | 1 | 0 | 0 | 0 | 0 |
| IN2 | 0 | 0 | 0 | 1 | 1 | 1 | 0 | 0 |
| IN1 | 0 | 0 | 0 | 0 | 0 | 1 | 1 | 1 |
To move the stepper you have to produce sequence 1 first at the pins, then sequence 2, then sequence 3, and so on. Moving the stepper in opposite direction can be achieved just by working in the opposite sequence (sequence 0, sequence 7, sequence 6, and so on).
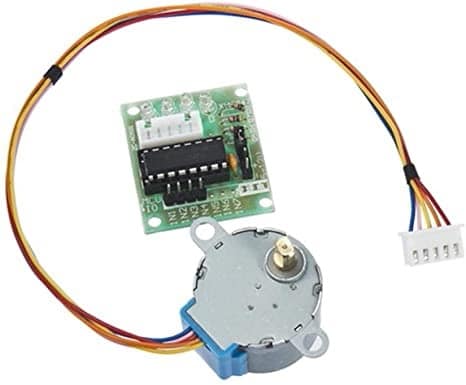
In this tutorial, I’m going to use the 28BYJ-48 stepper motor and the ULN2003 motor driver, which are usually sold together.
What We Need
As usual, I suggest adding from now to your favourite e-commerce shopping cart all the needed hardware, so that at the end you will be able to evaluate overall costs and decide if to continue with the project or remove them from the shopping cart. So, hardware will be only:
- A common computer (maybe with Windows, Linux or Mac). It can also be a Raspberry PI Computer board
- Raspberry PI Pico microcontroller (with a common micro USB cable)
- 28BYJ-48 stepper motor with ULN2003 motor driver
- dupont wirings
Check hardware prices with the following links:


Step-by-Step Procedure
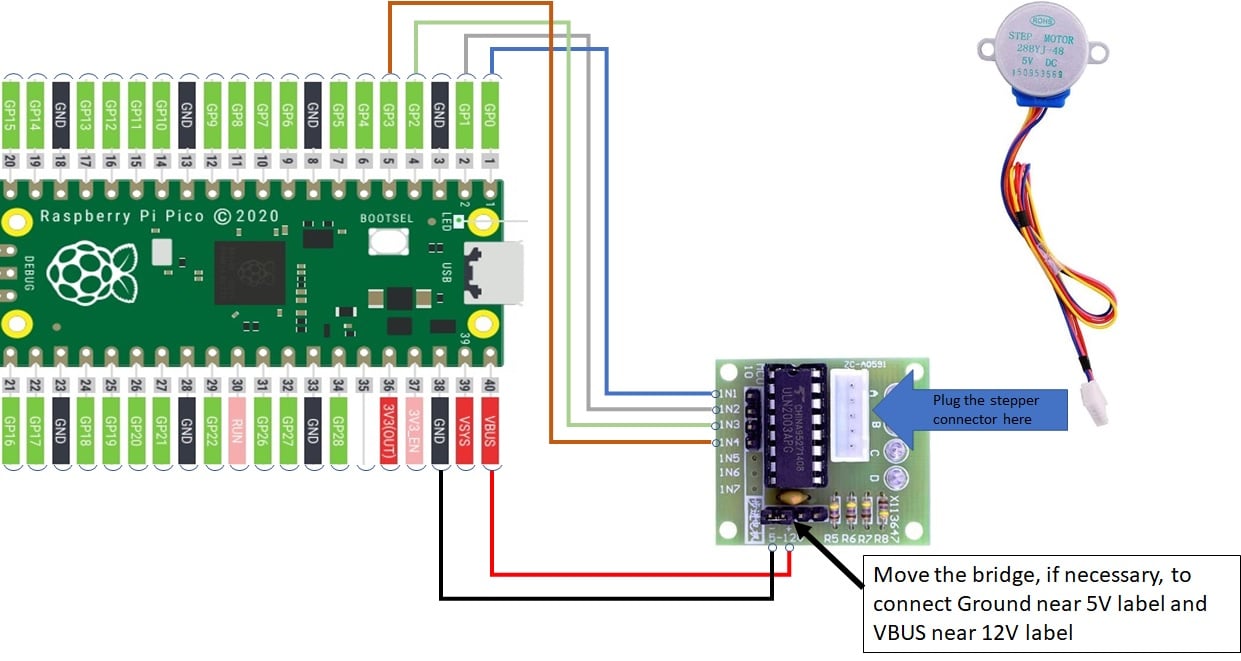
Prepare Wiring
Please arrange cabling according to the following diagram, according to Raspberry PI Pico pinout:
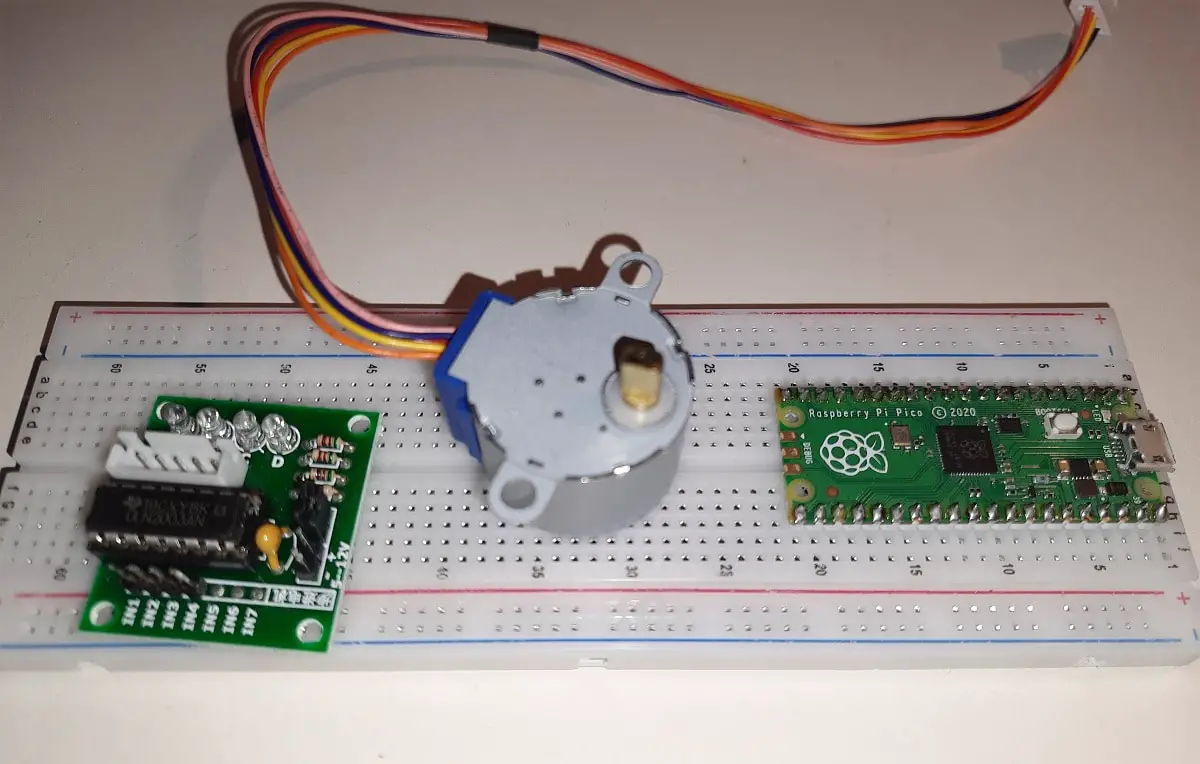
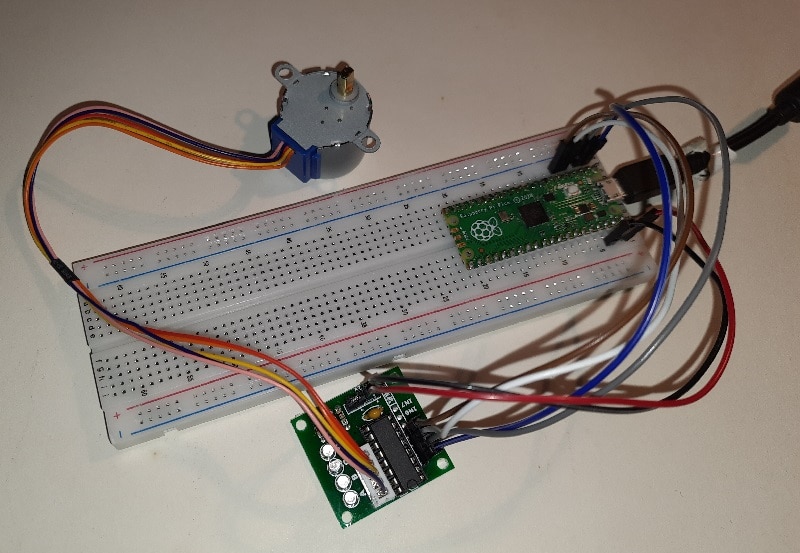
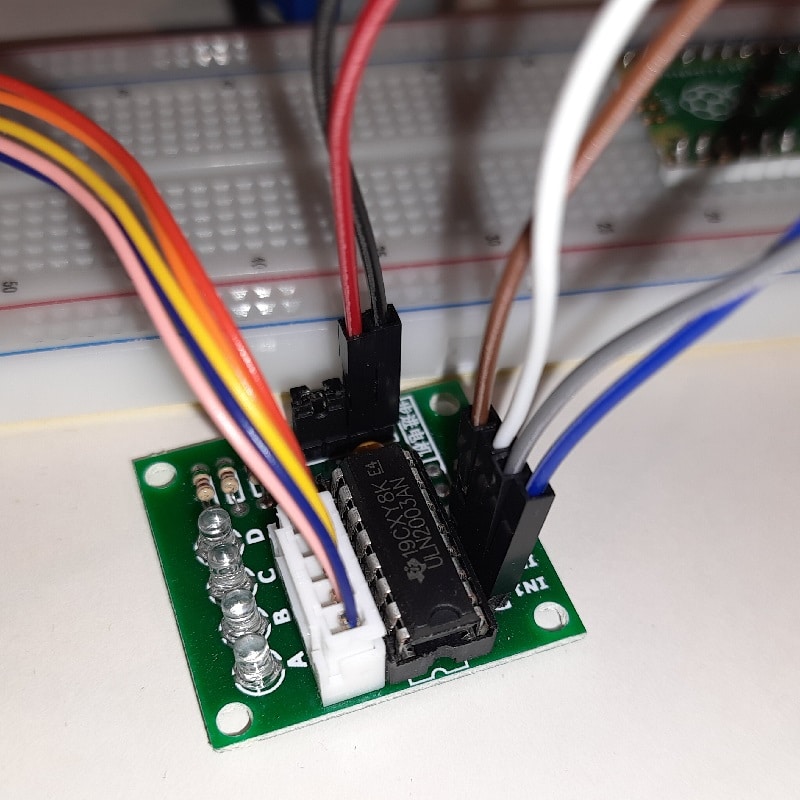
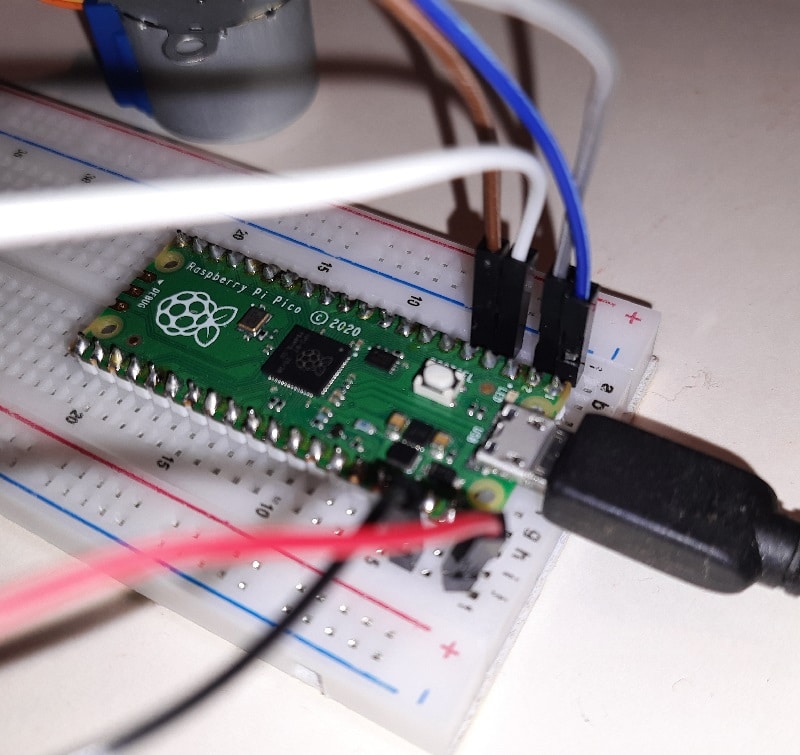
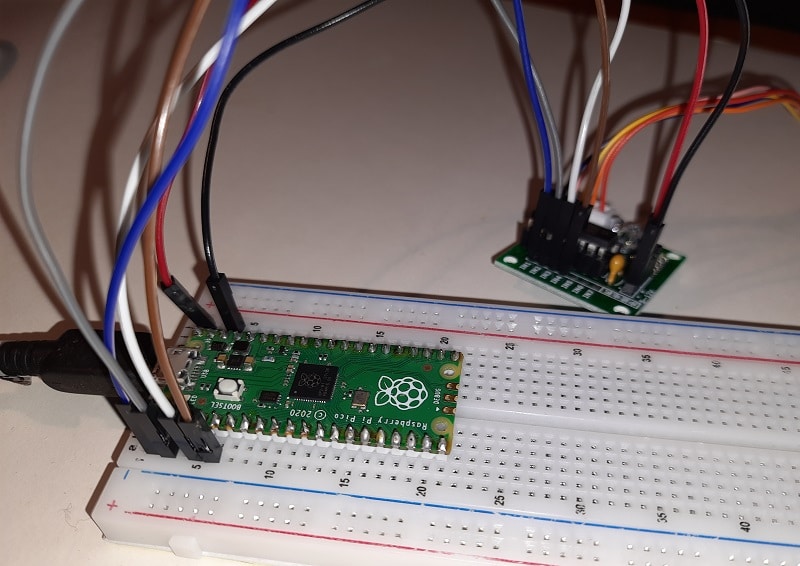
Please find below some detail pictures from my lab:
Get and Understand my picoStepper.py Code
Now download the following file to use your 28BYJ-48 stepper motor with ULN2003:
You can both load it in your Raspberry PI Pico storage or run it from your computer.
I’ll explain all code lines in the following paragraphs.
First of all, required modules are imported:
from machine import Pin
from time import sleep
Then we define some variables. The first one identifies what are the GP number from Raspberry PI Pico connected with ULN2003, in order with IN1, IN2, IN3, and IN4. According to my cabling, I use GP0, GP1, GP2, and GP3, so:
motor_GP = [0,1,2,3]Then I use a sequence pointer. This is going to be a global variable so that the function which moves the stepper motor is able to update it at each step:
seq_pointer=[0,1,2,3,4,5,6,7]I also use a “stepper_obj” array. This will include the 4 Pin objects of Raspberry PI Pico, in order to get the following code simplified:
stepper_obj = []The last variable lists all the sequence steps as an array of array. Please note that arrSeq[0] is equal to Seq0 from the previous table:
arrSeq = [[0,0,0,1],\
          [0,0,1,1],\
          [0,0,1,0],\
          [0,1,1,0],\
          [0,1,0,0],\
          [1,1,0,0],\
          [1,0,0,0],\
          [1,0,0,1]]
Before going into the main function/loop, I initialize all the Raspberry PI Pico pins to output and append those objects (the Pin() function creates an object) to my stepper_obj. As you can see, the array structure allows setting all the 4 Raspberry PI Pico Pins with a single-line loop. The user is warned that Pins are going to be initialized with a shell message:
print("Setup pins...")
for gp in motor_GP: stepper_obj.append(Pin(gp, Pin.OUT))
The stepper_move() function is where all the stuff is managed. It requires an input variable: direction. It must be “+1” or “-1” in order to have forward or backward rotation.
The “global” statement makes this function able to edit the seq_pointer variable:
def stepper_move(direction): # direction must be +1 or -1
    global seq_pointer
When the code enters this function, we rotate the sequance pointer by 1 step.
At the start of this script, the seq_pointer equals to [0,1,2,3,4,5,6,7]. Executing “seq_pointer[1:]+seq_pointer[:1]” we’ll get a new value for seq_pointer equal to [1,2,3,4,5,6,7,0]. The following execution will implement the same rotation.
On the other side, from seq_pointer = [0,1,2,3,4,5,6,7], executing “seq_pointer[-1:]+seq_pointer[:-1]” we’ll get a new value for seq_pointer equal to [7,0,1,2,3,4,5,6].
At each iteration the first value of seq_pointer array will be the real pointer to be used to select how to power GP pins according to arrSeq map:
seq_pointer=seq_pointer[direction:]+seq_pointer[:direction]So, seq_pointer[0] will be our pointer at every step. Used as index for arraySeq, we’ll get the ordered list of values to set into our Pins. For example:
- when seq_pointer = [7,0,1,2,3,4,5,6]
- -> seq_pointer[0] = 7
- -> arrSeq[seq_pointer[0]] = arrSeq[7] = [1,0,0,1]
So, the following row calculates the power to set at each Raspberry PI Pico Pin and assign that value within a single for loop:
for a in range(4): stepper_obj[a].value(arrSeq[seq_pointer[0]][a])Before closing the stepper_move() function, we add a delay because a too fast execution will result in no move…:
sleep(0.001)That done, moving the 28BYJ-48 stepper forward will be achieved by calling the stepper_move() function with direction parameter set to 1, as in the following loop:
while True:
    stepper_move(1)
If you need to move backward, you just need to change “1” into “-1”:
while True:
    stepper_move(-1)
Running the picoStepper.py Script
Run this script in your Thonny IDE (F5) and your stepper motor will start rotating.
What’s Next
Interested to do more with your Raspberry PI Pico? Try to look at my Raspberry PI Pico tutorials for useful and funny projects!
Enjoy!

Open source and Raspberry PI lover, writes tutorials for beginners since 2019. He's an ICT expert, with a strong experience in supporting medium to big companies and public administrations to manage their ICT infrastructures. He's supporting the Italian public administration in digital transformation projects.
![]()
![]()
![]()
![]()
![]()
![]()
![]()


Implemented your code in my Clock project, where the clock are driven by stepper motor controlled by Raspberry Pico. MicroPython code. The algorithm you provided works flawlessly! Great job! I will definitely look into all your articles, but would like to ask you to submit your tutorials for Timer and for Interrupting in Raspberry Pico MicroPython.
Thank you!
Hi Joseph,
thank you for your feedback! I’m happy it helped in your project.
What do you mean for timing and interrupt?
How do you get it to rotate only one full turn and stop every say 1/6 of the way around for a given time.
Hi Noah,
let me say that the stepper motor is rarely a preferred device for high precision angles. In these projects, the SG-90 servo motor works far better.
Every step should perform a 5.625 degrees rotation, so you should count the step numbers to stop at the desired position. I’m writing “should” as the info on these data is really confusing on the web.
It would be interesting to check if this measure is correct. According to this theory, if you perform 64 steps you should complete a 360 degrees rotation. Please let me know if this theory matches with the practice
Thanks for sharing. This seems to be on par with about everything else I’ve came across on hooking up one of these stepper motors to a Pico. However, I saw a bit of info that states that those steppers motors require up to 240mA and even draw power on idle, so it’s best to externally power them from a 5-12v source.
“The 28BYJ-48 stepper motor requires 240mA current to operate and it also consumes power at an idle condition. Therefore, it is recommended not to power the 28BYJ-48 stepper motor directly from any microcontroller. Instead use an external 5 volts power supply.”
Most other examples I see also have the motor hooked up externally to power instead of straight into the VBUS of the Pico. I’m sure it works ok and everything, just a small critique.
Your project was very interesting, I am just a bit curious about your PCB setup do you possibly have an image of the schematic 🙂
Hi Yuri. Thank you for your feedback on my project. The goal of these projects is to show how to connect (with dupont wires) and program the sensors. So I don’t have a PCB design to share. I’m sorry