
Last Updated on 22nd June 2023 by peppe8o
In this tutorial, we will make a locker system which locks and unlock using the keypad interfaced with Arduino Uno. LCD displays the information about the lock and unlocks based on the password.
Introduction
A locker security system is a storage with electronic and mechanical components to control the locker opening. The electronic components controlling the locker opening will grant security and user authentication, allowing access only to those people who have a specified password.
For a simple DIY locker with password protection, you can use:
- a servo motor (managing the locking and unlocking mechanism),
- an Arduino board,
- and a keypad.
Our Arduino board analyzes the user input from the keypad and manages the servo motor position. When the user will type the right password, the servo motor will move to a position that opens the lock mechanism.
Working principle of the locker system
The locker works based on the matching and mismatching of the password entered from the keypad. The password is set initially in the code, which stores it in the microcontroller memory.
When the entered password matches the specified password, Arduino sends a signal to the servo motor to start the unlocking process. To simulate unlocking the locker, the servo motor spins or moves to a specified angle or position.
The Arduino starts the locking procedure when the entered password does not match the specified password. To lock the locker, the servo motor move in a different direction or at a different angle.
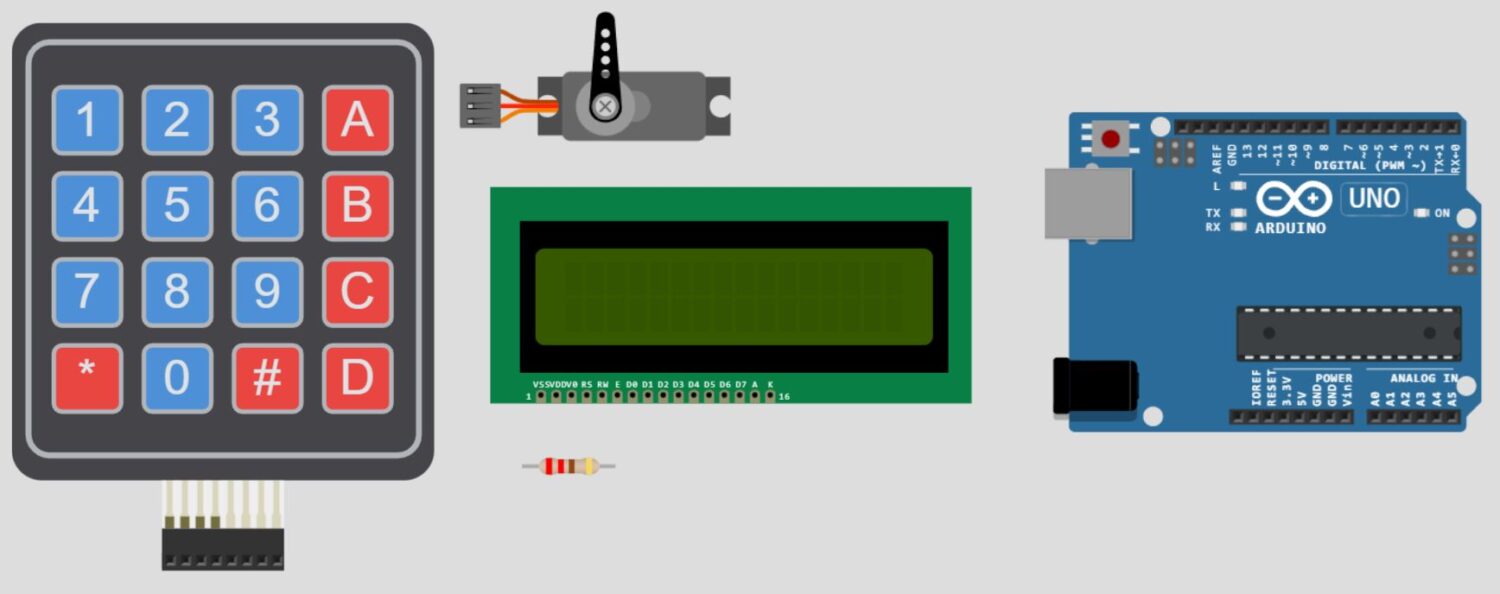
What We Need

As usual, I suggest adding from now to your favourite e-commerce shopping cart all the needed hardware, so that at the end you will be able to evaluate overall costs and decide if to continue with the project or remove them from the shopping cart. So, hardware will be only:
Step-by-Step Procedure
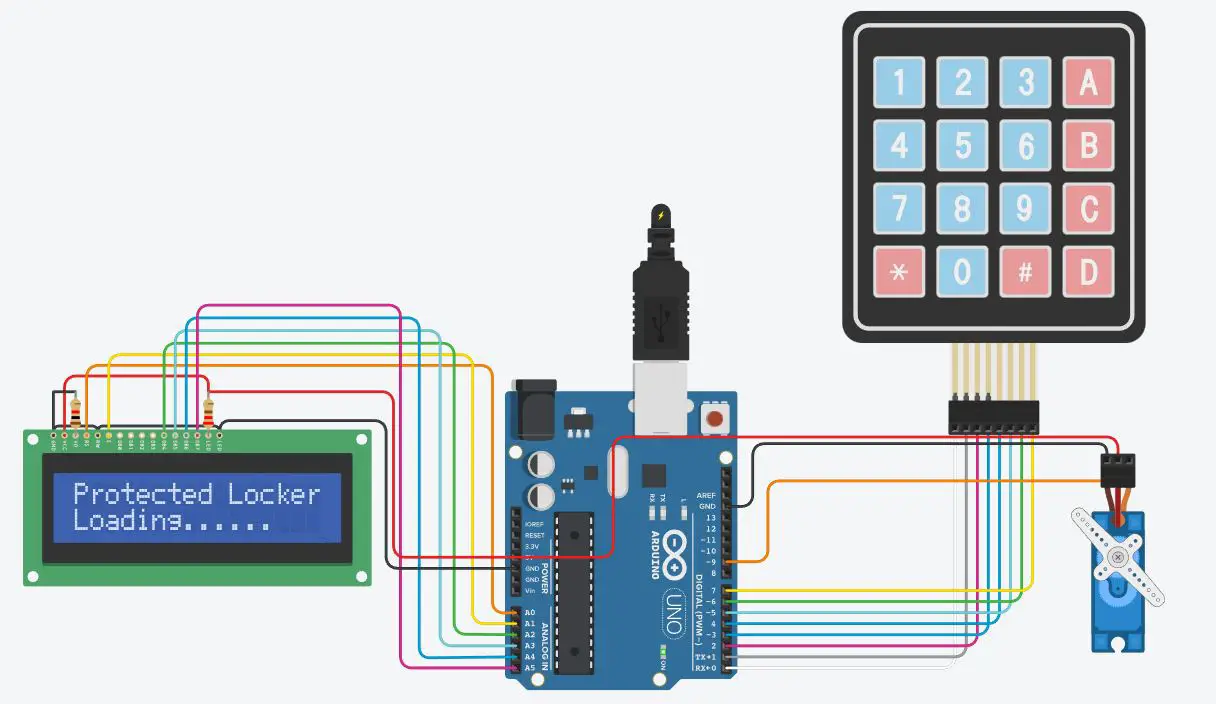
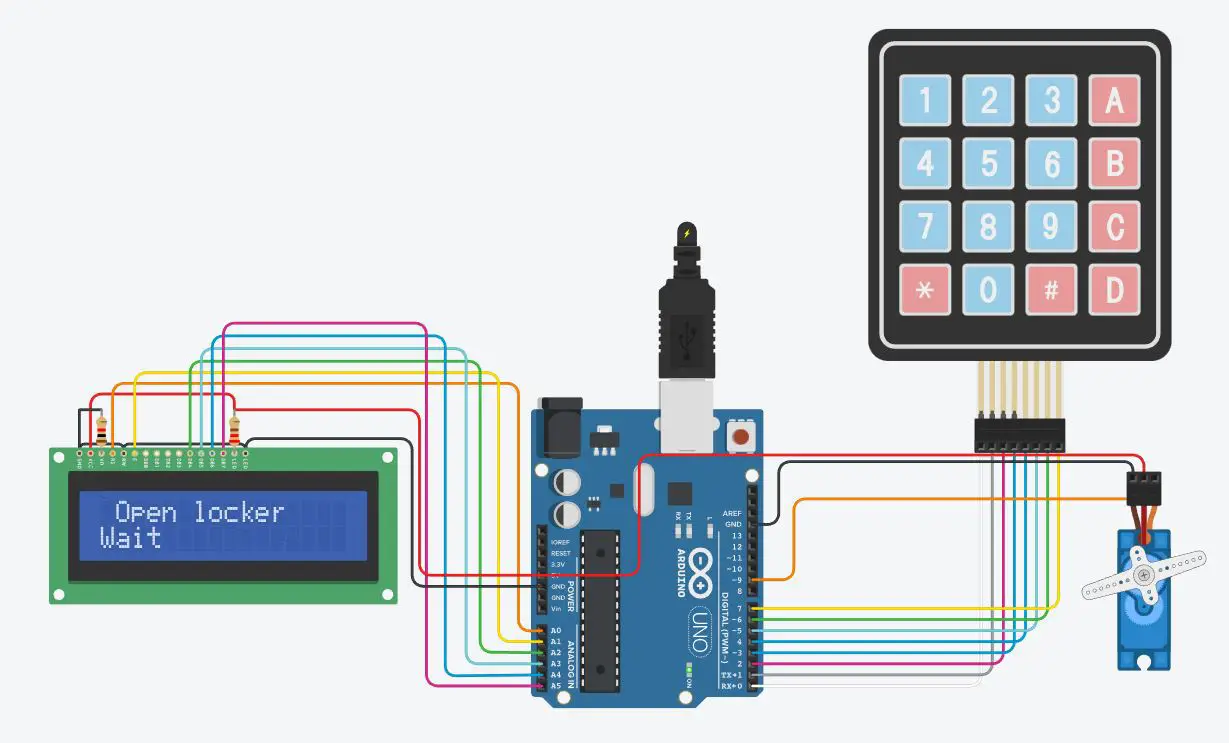
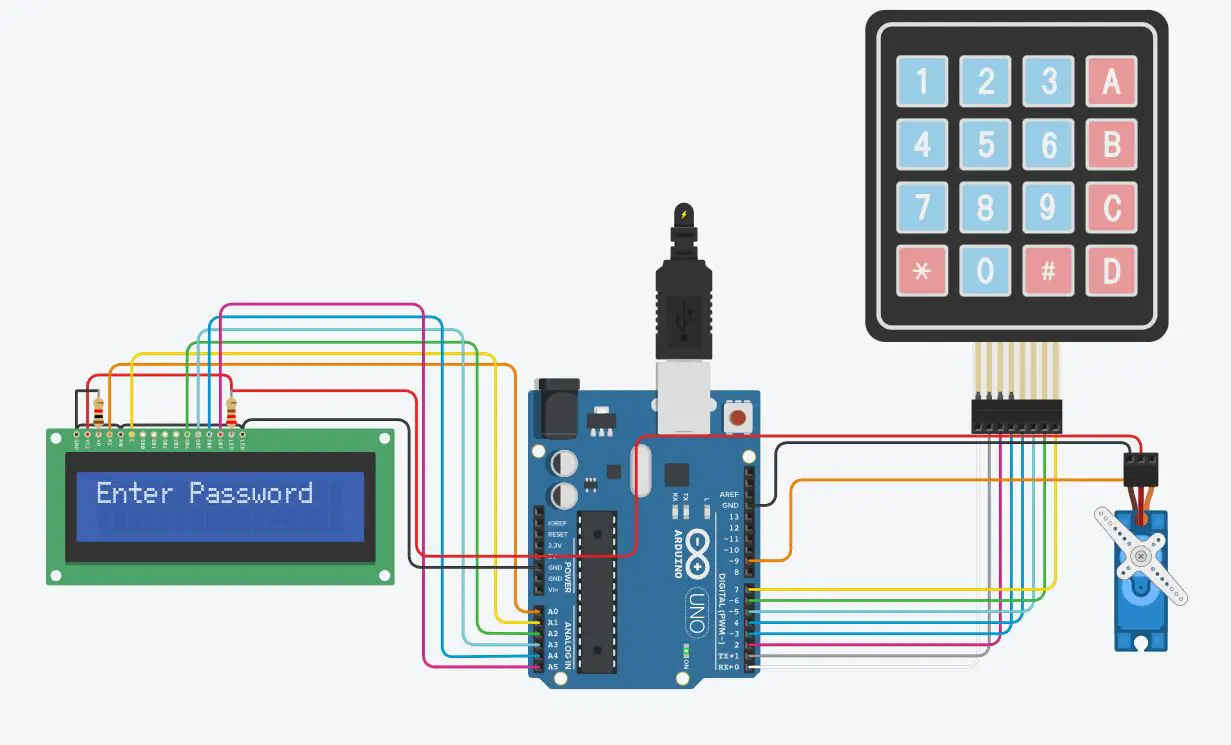
Wiring Diagram of the locker with Arduino and LCD
The figure represents the wiring diagram of the keypad, servo, and LCD with Arduino Uno. The servo works on a PWM pin, so connect with any pin with a sign ~ (here I used the PIN 9).
| Keypad | Arduino | LCD | Servo |
|---|---|---|---|
| Pin 1 (right side) | 7 | ||
| Pin 2 | 6 | ||
| Pin 3 | 5 | ||
| Pin 4 | 4 | ||
| Pin 5 | 3 | ||
| Pin 6 | 2 | ||
| Pin 7 | 1 | ||
| Pin 8 | 0 | ||
| A0 | Pin 4 (left side) | ||
| A1 | Pin 6 | ||
| A2 | Pin 11 | ||
| A3 | Pin 12 | ||
| A4 | Pin 13 | ||
| A5 | Pin 14 | ||
| VCC | Pin 15 with a resistor, Pin 3 without a resistor | ||
| GND | Pin 16, 5, 1 | ||
| GND | Pin 1 left side | ||
| VCC | Pin 2 | ||
| 9 | Pin 3 |
The following picture also shows the wiring diagram of our locker with Arduino project.
Get the code of Locker System with Arduino
Connect your PC to Arduino and open Arduino IDE. For the very first steps, you can refer to Connecting Windows PC with Arduino tutorial. You can get the .ino code from my download area with the following link:
Code Explanation
Section 1: Libraries
This is the section before setup which we’ll use for libraries addition.
The Keypad library allows the use of a keypad for input. The LiquidCrystal library enables communication with a liquid crystal display (LCD). The Servo library allows control of a servo motor. All the libraries here used are already included in the Arduino software, so we need just to call them from our code:
#include <Keypad.h>
#include <LiquidCrystal.h>
#include <Servo.h>
Section 2: Variables Before Setup section
In this section, we start defining the max length of our password:
#define Password_Length 5We also create a servo object and an object for the LiquidCrystal (“lcd”) using pins A0, A1, A2, A3, A4, and A5.
Servo myservo;
LiquidCrystal lcd(A0, A1, A2, A3, A4, A5);
It also initializes an integer variable named “pos” to 0, this will mark the position.
int pos = 0;Then, the code declares 2 character arrays, having the size defined by “Password_Length”: the “Data” and “Master”. The last one also gets a default value set to “1234”.
Finally, two-byte variables named “data_count” and “master_count” are declared and initialized to 0:
char Data[Password_Length];
char Master[Password_Length] = "1234";
byte data_count = 0, master_count = 0;
Section 3: Before setup section
This code uses two boolean variables to open and close the door. When pass_is_good gets true then the locker system gets open.
bool Pass_is_good;
bool door = false;
The keypad matrix of 4X4 items is defined with its alphabets for each row and column.
char customKey;
const byte ROWS = 4;
const byte COLS = 4;
char keys[ROWS][COLS] = {
  {'1', '2', '3', 'A'},
  {'4', '5', '6', 'B'},
  {'7', '8', '9', 'C'},
  {'*', '0', '#', 'D'}
};
The pin numbers of the keypad are set with the rowPins and colPins arrays. The object is created for the keypad to access the keypad features:
byte rowPins[ROWS] = {0, 1, 2, 3};
byte colPins[COLS] = {4, 5, 6, 7};
Keypad customKeypad( makeKeymap(keys), rowPins, colPins, ROWS, COLS);
Section 4: Setup section
The pulse width range is adjusted between 2000 and 2400 microseconds, and the servo motor is connected to pin 9.
void setup()
{
  myservo.attach(9, 2000, 2400);
The servo is originally closed by calling the ServoClose() function.
ServoClose();
The LCD starts out with 2 rows and 16 columns. On the LCD, the word “Protected Locker” is written. To show a message, the loading() method uses which shows the dots while waiting.
  lcd.begin(16, 2);
  lcd.print("Protected Locker");
  loading("Loading");
The LCD display is clean.
  lcd.clear();
}
Section 5: Loop section
If the value of the variable “door” is true, it means that the door is open at the moment. When the door is open, the customKeypad checks to see if a key press on the keypad:
void loop()
{
  if (door == true)
  {
    customKey = customKeypad.getKey();
The “customKey” variable holds the output of the getKey() function. A delay of 3000 milliseconds is added, the LCD screen is cleared, the servo is closed using the ServoClose() function, “locker Closed” is printed on the LCD, and the “door” variable is set to false, indicating that the door is now closed, if the key hit is ‘#’. It invokes the Open() function if the door is not already open.
    if (customKey == '#')
    {
      lcd.clear();
      ServoClose();
      lcd.print("locker Closed");
      delay(3000);
      door = false;
    }
  }
  else
    Open();
}
Section 6: Functions LCD loading and clear LCD data
The code defines the “loading” function, which accepts a character array (string) as a parameter.
Using lcd.setCursor(0, 1), the “loading” function moves the LCD cursor to the first column of the second row. Using lcd.print(msg), it prints the supplied message (msg[]) on the LCD. After then, it starts a 9-iteration cycle.
The loop uses the function delay(1000) to apply a 1000-millisecond delay for each iteration. It uses lcd.print(“”) to print a dot “.” on the LCD in order to produce the loading animation effect.
void loading (char msg[]) {
  lcd.setCursor(0, 1);
  lcd.print(msg);

  for (int i = 0; i < 9; i++) {
    delay(1000);
    lcd.print(".");
  }
}
void clearData()
{
  while (data_count != 0)
  {
    Data[data_count--] = 0;
  }
  return;
}
Section 7: Servo opening and closing
In this section, the servo closes with 10 degrees change, similarly, the other function opens the servo with 10 degrees of increment.
This means that during the closing the servo moves towards 0 degrees, While for the opening it moves towards 90 degrees.
void ServoClose()
{for (pos = 90; pos >= 0; pos -= 10) {
    myservo.write(pos);}}

void ServoOpen()
{for (pos = 0; pos <= 90; pos += 10) {
  myservo.write(pos);
  }}
Section 8: Check the password
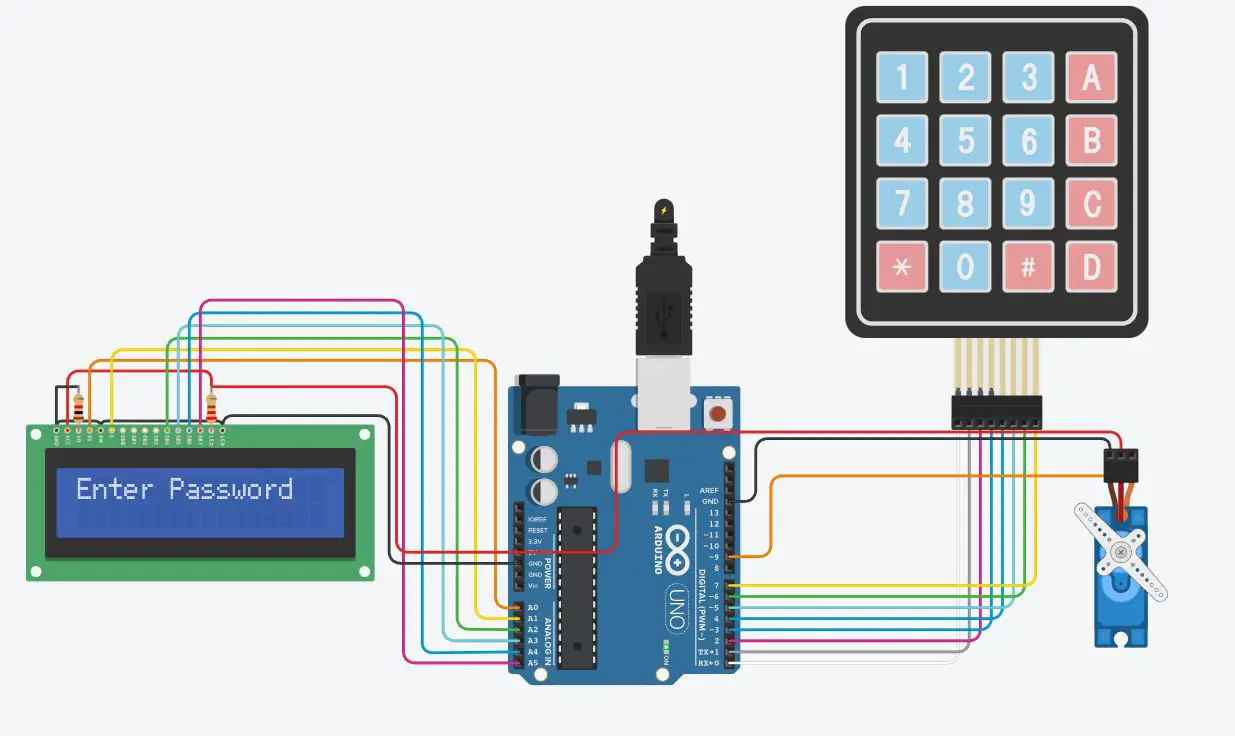
The password entry and verification process is handled by a function called “Open” which is defined in the code.
It shows the message “Enter Password” on the LCD panel.
void Open()
{
  lcd.setCursor(0, 0);
  lcd.print("Enter Password");
It updates the LCD display, reads a key press from the keypad, adds it to the “Data” array, and increases the “data_count” variable.
  customKey = customKeypad.getKey();
  if (customKey)
  {
    Data[data_count] = customKey;
    lcd.setCursor(data_count, 1);
    lcd.print(Data[data_count]);
    data_count++;
  }
The strcmp() function is used to compare the entered password (Data) with the master password (Master) to check if the length of the password exceeds the intended length (Password_Length – 1).
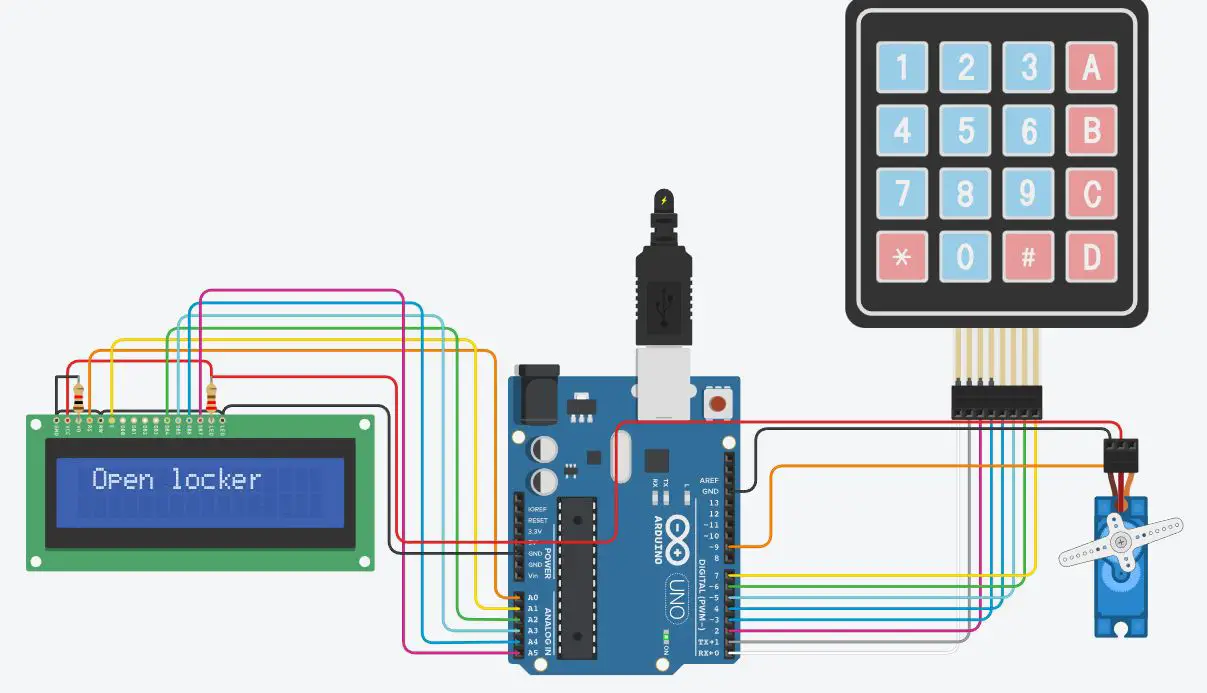
If the passwords matches, it calls the ServoOpen() method, shows “Open locker” on the LCD, sets the “door” variable to true, and waits for 5 seconds.
  if (data_count == Password_Length - 1)
  {
    if (!strcmp(Data, Master))
    {
      lcd.clear();
      ServoOpen();
      lcd.print(" Open locker ");
      door = true;
      delay(5000);
      loading("Wait");
      lcd.clear();
      lcd.print(" Time out! ");
      delay(1000);
      ServoClose();
      door = false;
    }
If the passwords are different, it does nothing. The LCD reads “Wrong Password!” and the “door” variable is set to false if the passwords don’t match.
    else
    {
      lcd.clear();
      lcd.print("Wrong Password! ");
      door = false;
    }
    delay(1000);
    lcd.clear();
    clearData();
  }
}
Results
Initially, the LCD display invites the user to enter the password. After this message, we can enter the code.
When the code is correct, the servos move rotates 90 degrees.
When the password is incorrect, it remains still. After some time it returns back to 0 degrees. If the password is wrong then the servo, not moves and LCD shows the Wrong password.
What’s Next
Please find more tutorials on Arduino in peppe8o Arduino archives.
Enjoy!
Umar Jamil
For any queries and help for work, please contact me at:
Whatsapp: +92-346-661-7017/ Link
Fiverr: Link

I'm an Electronic Engineer, well-skilled to solve the issues of hardware and software. I do have laboratory which contains unlimited sensors and modules for testing the working. Also, I am experienced in Arduino programming, Android mobile application, microcontroller programming, IOTs and embedded projects. I provide services to control, realize the sensor data in the Mobile Application. For any queries and help for work Contact: Whatsapp:+92-346-661-7017 Email: umarjamil0007@gmail.com
![]()


