
Last Updated on 23rd January 2024 by peppe8o
In this tutorial, I will show you the process to compile a MicroPython firmware for your Raspberry PI Pico from your Raspberry PI computer board.
This is useful if you want to create a custom MicroPython firmware for your microcontroller or if you want to test the very latest MicroPython code.
What MicroPython Firmware Compiling means
In generic terms, compiling code means transforming programming instructions written by humans (like Python or C programs) to a format that a computer or microcontroller can directly execute. A specialized program, called “compiler” performs this transformation.
As you may suppose, microcontrollers and computers work with a sequence of bits (0 and 1) which represent machine language instructions. So, the compiler job is to translate your programs, made by loops, print, if, and so on statements into a final sequence of bits according to the machine instruction set.
Nowadays, the process of compilation has become more complex, as it also involves code optimization at different levels to make your code faster, besides analysis, error detection and translation.
The resulting output is often referred to as “compiled code” or “executable code.”
Specifically, about MicroPython for Raspberry Pi Pico, compiling code has a quite different goal. It means creating a software substrate able to directly transform your Python-like scripts into machine language code without the need to re-compile your code every time. This software substrate is the MicroPython Firmware, which usually comes in a “.uf2” file to install in your Raspberry PI Pico.
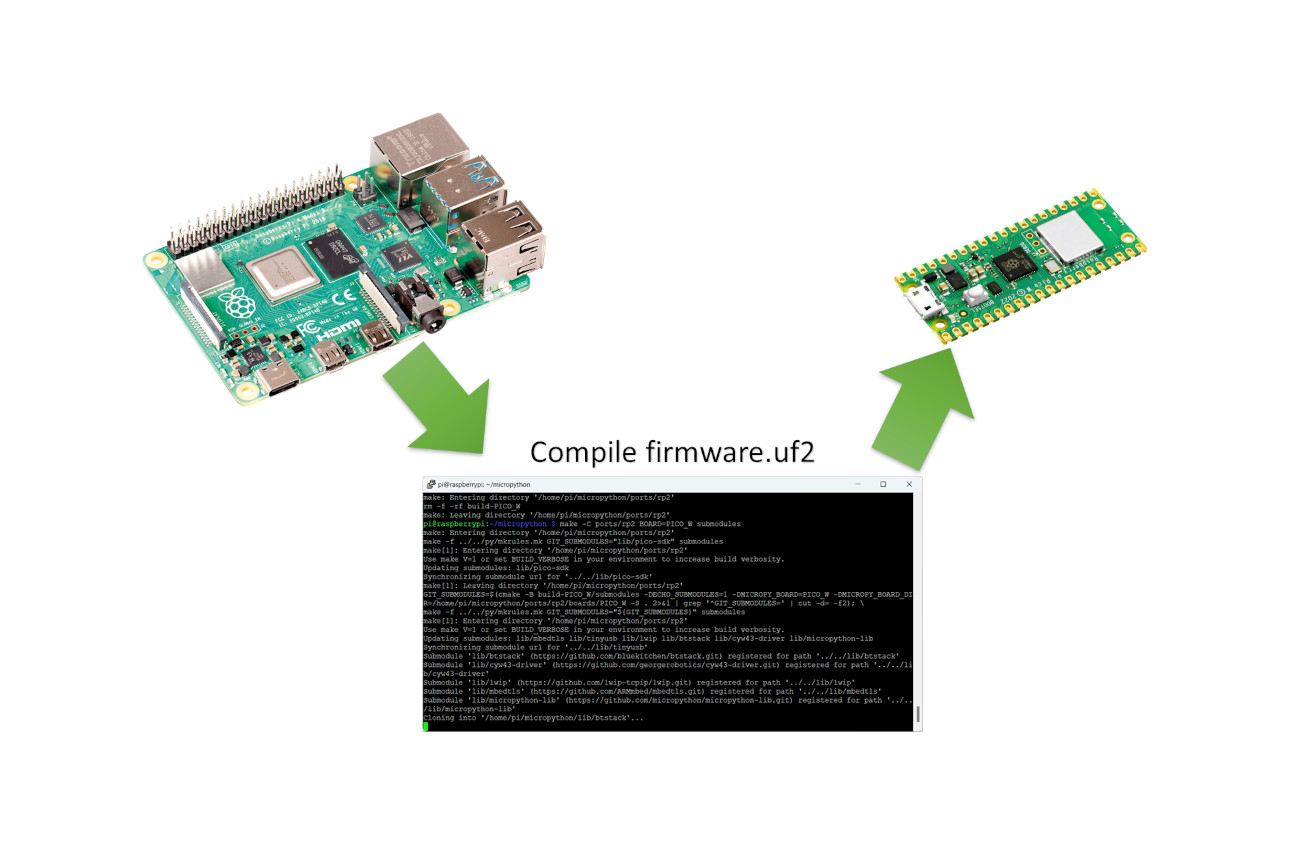
With the output of this process, you will get a “firmware.uf2” file that you can install in your Raspberry PI Pico microcontroller similarly to what explained in my First Steps with Raspberry PI Pico for Beginners tutorial, with the difference that once the RP2 storage opens in your computer you will just copy the “firmware.uf2” fil in that storage. This will automatically reboot the Raspberry PI Pico, with the new firmware running.
For this tutorial, I’ve used a Raspberry PI 3 model B computer board (64-bit OS) as a computer to get the source code and compile the firmware for my Raspberry PI Pico, but you should be able to perform the same steps with any Raspberry PI computer board.
What We Need
As usual, I suggest adding from now to your favourite e-commerce shopping cart all the needed hardware, so that at the end you will be able to evaluate overall costs and decide if to continue with the project or remove them from the shopping cart. So, hardware will be only:

- Raspberry PI Computer Board (including proper power supply or using a smartphone micro USB charger with at least 3A)
- high speed micro SD card (at least 16 GB, at least class 10)
- a USB/wireless keyboard
- Raspberry PI Pico microcontroller (with a common micro USB cable)
Step-by-Step Procedure
Prepare Raspberry PI OS
Please start installing the Operating System for your Raspberry PI computer board. You can use both Raspberry PI OS Lite (for a fast, headless OS) or Raspberry PI OS Desktop (in this case, using its internal terminal). Please note that if you use Raspberry PI OS Lite, you may need an SFTP file client to download a copy of your uf2 file and put it in your Raspberry PI Pico.
Get your OS up to date. From the terminal, please use the following:
sudo apt update -y && sudo apt upgrade -yWe also need to install a few more packages. Still from the terminal:
sudo apt install cmake build-essential libffi-dev git pkg-config gcc-arm-none-eabi -yGet the Source Code
The “git clone” command gives us a way to directly download a complete copy of the source code (hosted for the official MicroPython pages on GitHub), with its sub-folders. A complete guide to using git is available in my Use GitHub with Raspberry PI OS from Terminal tutorial.
For our purpose, the following command will clone the latest MicroPython source code:
git clone https://github.com/micropython/micropythonThe time to complete this task will depend on your internet speed, but it should not take too much.
You can now enter the downloaded folder locally:
cd micropython/We need also to get the Raspberry PI Pico specific submodules. We can get them with the following:
git submodule update --init -- lib/pico-sdk lib/tinyusbCompile the MicroPython Firmware for Raspberry PI Pico
We are now ready to compile the MicroPython firmware. This is the longest part (in terms of elaboration time) and depends both on your Raspberry PI computer board version and your Raspberry PI computer storage speed. it requires only the following 4 command lines (I suggest running them line by line):
make -C mpy-cross
make -C ports/rp2 BOARD=RPI_PICO_W clean
make -C ports/rp2 BOARD=RPI_PICO_W submodules
make -C ports/rp2 BOARD=RPI_PICO_W -j 16
At the end of the compiling process, you will get the firmware in the following folder:
cd ports/rp2/build-RPI_PICO_W/And the MicroPython firmware to copy in your Raspberry PI Pico is the following file:
firmware.uf2What’s Next
You are now ready to try microelectronics projects with your Raspberry PI Pico. Try to look at my Raspberry PI Pico tutorials for useful and funny tutorials!
Want to know more cool things to do with Raspberry PI computer boards? In this case, the right resource for you is my Raspberry PI tutorials page.
Enjoy!

Open source and Raspberry PI lover, writes tutorials for beginners since 2019. He's an ICT expert, with a strong experience in supporting medium to big companies and public administrations to manage their ICT infrastructures. He's supporting the Italian public administration in digital transformation projects.
![]()
![]()
![]()
![]()
![]()
![]()
![]()


Hi, it appears the board targets have been changed to include the prefix RPI_, i.e. BOARD=RPI_PICO_W
Thank you Craig. I will check it and update the post soon
Post updated. Thank you again for your warning!