

Last Updated on 13th April 2024 by peppe8o
In this tutorial, I’m going to show you how to configure the automount of USB storage on Raspberry PI (with Raspberry PI OS Lite) at boot or when plugged in to be ready to use.
While Raspberry PI OS Desktop has the ability to automatically mount external USB devices on plug in, the Lite version doesn’t include this feature. For this reason, projects needing USB storage automounted on Raspberry PI must include some settings to find the storage ready from boot.
Automounting USB devices, especially USB storage, enables our Raspberry PI server to use larger disks to store application data.
Even if this feature could appear as a must in modern Linux OSes (and it is so in Raspberry PI OS Desktop), you will have a bad surprise when trying to connect and Hard Disk to Raspberry PI OS Lite and not getting it available for write.
For this reason, I decided to write down a small tutorial explaining how to make USB storages auto mounted on boot or at their plug-in with Raspberry PI OS Lite.
For this tutorial, I’m going to use a Raspberry PI 3 Model A+ computer board, but this should work with all Raspberry PI computer boards, with Raspberry PI OS Lite both 32 and 64 bit.
What We Need
As usual, I suggest adding from now to your favourite e-commerce shopping cart all the needed hardware, so that at the end you will be able to evaluate overall costs and decide if to continue with the project or remove them from the shopping cart. So, hardware will be only:
- Raspberry PI 3 Model A+ (including proper power supply or using a smartphone micro usb charger with at least 3A) or newer Raspberry PI Board
- high speed micro SD card (at least 16 GB, at least class 10)
We also need a USB storage device (like a USB Stick or USB Hard Disk).
Check hardware prices with the following links:


Step-by-Step Procedure
Prepare Operating System
As said, this tutorial focuses on Raspberry PI OS Lite (both 32 and 64 bit versions). So, install the OS and make it updated from the terminal:
sudo apt update -y && sudo apt upgrade -yNow prepare your USB storage by formatting it. I will format my USB stick with FAT32 file system and I will give it the “USBSTORAGE” label.
Before starting with the 2 possible methods, we need to identify the USB storage UUID. The UUID (Universally Unique IDentifier) is a 128-bit label used to identify uniquely the device. It’s like a Serial Number but built according to a common structure agreement. The UUID is detected from your OS once the device is plugged in, even if it is not mounted.
Getting your device UUID is a really simple job from the Raspberry PI terminal, and with the following procedure, you can’t get a wrong value. First of all, please detach (or keep out) the USB and use the blkid command, a command-line utility to locate/print block device attributes, to discover the storage devices actually connected:
pi@raspberrypi:~ $ sudo blkid
/dev/mmcblk0p1: LABEL_FATBOOT="boot" LABEL="boot" UUID="F914-FF4D" BLOCK_SIZE="512" TYPE="vfat" PARTUUID="f6cca138-01"
/dev/mmcblk0p2: LABEL="rootfs" UUID="1943b829-a99b-45b8-9fe5-7136dbea4c4a" BLOCK_SIZE="4096" TYPE="ext4" PARTUUID="f6cca138-02"
The two partitions appearing are the standard ones created for Raspberry PI OS.
Connect USB Storage (and repeat until it appears). A new partition will appear, as highlighted in red in the following picture:
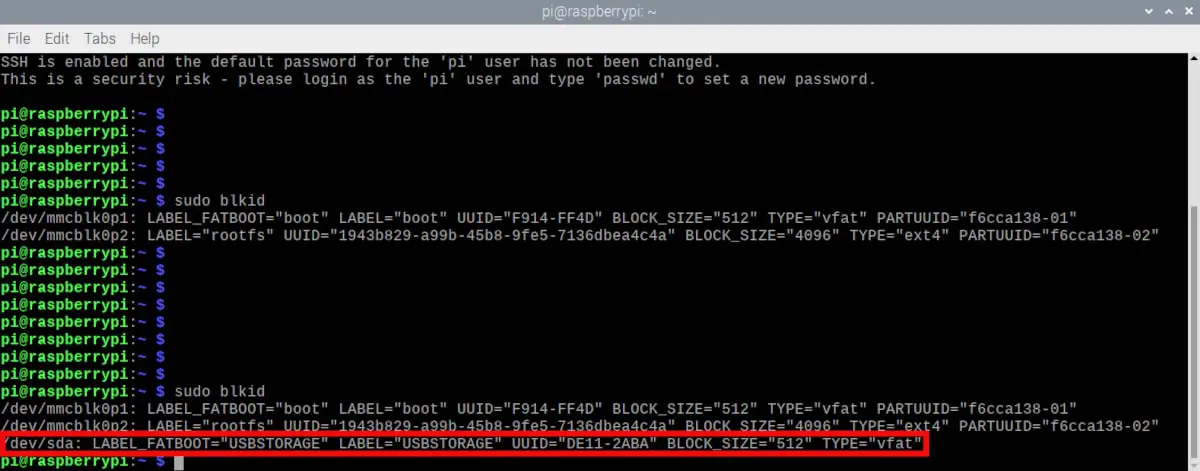
Of course, your one will be different and will depend on your device. Already from now, we get a lot of useful info:
- the device is mapped as /dev/sda
- the discovered label is “USBSTORAGE”, which double confirms that it is our USB storage
- the famous UUID is displayed. For my USB stick it is DE11-2ABA but your one will be different and can have a different format. Please take note of it
- the discovered file system is vfat
Now, we are ready to learn how to automount USB storage on Raspberry PI OS Lite boot with one of the following methods.
Method 1: the FSTAB
The first method is by editing the FSTAB (File System TABle). It is a file listing all available partitions, instructing the OS how to initialize and/or integrate them into the overall system’s file system.
Before going to the procedure, please note that:
PROs: using fstab doesn’t require installing new packages to manage the USB storage mounting. It will work correctly mounting the USB device on RPI OS boot.
CONs: this method will not automatically mount the USB storage if plugged in when the OS is already running. This will require a “mount -a” terminal command or a system reboot.
To setup the automount with fstab, please create the mount point where your storage will be attached (that is the path to retrieve your USB storage content). I will name it as “myUSB” and mount it in the “media” folder:
sudo mkdir /media/myUSBNow, please open the fstab file for editing:
sudo nano /etc/fstabThe partitions in fstab must be declared with the following syntax:
UUID=<uuid-of-your-drive> <mount-point> <file-system-type> <mount-option> <dump> <pass>where:
- UUID matches your USB device UUID
- mount-point is the path where to attach your storage
- file-system-type depends on the file system used to format your USB storage
- mount-option give the user the ability to include additional settings to mounted storage. This is important expecially for permissions to access the storage, as using “defaults” here make your storage writable only from root user
- the dump option, on ext2/3 filesystem, and determines the need to back up the FS. If you don’t need the FS backaup (maybe because you will backup it to a different storage with different tecniques, you can put it to 0
- the pass option determines the order in which filesystem checks are done at boot time. The root filesystem should be specified with a value of 1 for this option. Other filesystems should have a value of 2.
More info on fstab are available from https://man7.org/linux/man-pages/man5/fstab.5.html
According to previous descriptions, mounting my USB storage at mount point “/media/myUSB” and making it accessible in read/write for the Raspberry PI default user (uid=pi,gid=pi) means appending the following row to my fstab file:
UUID=DE11-2ABA /media/myUSB vfat uid=pi,gid=pi 0 2Save and close the fstab.
Now, we can mount the storage in 2 ways. You can issue the following terminal command:
sudo mount -aor you can reboot the Raspberry PI.
In both cases, your /media/myUSB partition will appear and is visible from “df -H” terminal command, which also shows the storage free space.
Method 2: the Autofs
Autofs is a Linux package caring for the automount process.
PROs: autofs can mount the USB Storage partition even when the OS is running (not only at boot time)
CONs: autofs has to be installed, even if installation is simple with aptitude repository
Start installing autofs in your OS. From the terminal, please use the following command:
sudo apt install autofsThe autofs method basically resides in preparing 2 files. The auto.master, already available with autofs installation, is where we map the mount point folder. Here we link the second file (we’ll create it soon), which explains what to mount and the mount options.
Still, with my example values (UUID=DE11-2ABA and mounting it to /media/myUSB), we open the auto.master file for edit:
sudo nano /etc/auto.masterAdd the following line to this file (I added it on top of my file):
/media /etc/auto.usb --timeout=60 --ghostNow we can create the referred auto.usb file. Still from the terminal:
sudo nano /etc/auto.usbAnd insert the following line:
myUSB -fstype=auto,uid=pi,gid=pi,rw UUID=DE11-2ABA- the fstype option is used to specify a filesystem type when different from the default NFS type
- uid=pi and gid=pi specify the system user that will mount the drive. Here you have to change it instead of the default “pi” if you want to use the drive with a different user. Not specifying this will mount the drive with the “root” user. In this case you will need the “sudo” to edit/execute files inside the USB storage or the root user
- rw makes the files enabled to read/write
Save and close. Please restart the autofs service:
sudo systemctl restart autofs.servicePlease note that if you change the options from auto.usb file you will probably need to reboot your Raspberry PI to have your new options enabled.
Now, when you plug in the USB storage you could not see it from your “df -H” command. But as you enter the mounted folder:
cd /media/myUSByou will find all your fiels and now the “df -H” command will show the mounted partition.
Please note also that, to safely remove the USB storage with OS running, you will have to use the following command:
sudo umount /media/myUSBWith the OS running, if not done in this way you will be not able to remount automatically the USB storage, besides risking to corrupt your data. In this case, you will need a reboot.
What’s Next?
Looking for more cool projects with your RPI? Take a look at peppe8o Raspberry PI computers tutorials.
Enjoy!

Open source and Raspberry PI lover, writes tutorials for beginners since 2019. He's an ICT expert, with a strong experience in supporting medium to big companies and public administrations to manage their ICT infrastructures. He's supporting the Italian public administration in digital transformation projects.
![]()
![]()
![]()
![]()
![]()
![]()
![]()


Thanks. Autofs worked. I’ve been fighting with fstab for a couple of days, changing all sorts of settings but to no avail. Why is accessing an HDD om a Pi soooo difficult? I’m setting up tvheadend on a Pi4.
Thank you for your feedback, Greg. I also found accessing USB storages overcomplicated on Raspberry PI OS Lite, that’s the reason of this tutorial.
Let’s see the positive side: in this way you get the opportunity to know peppe8o.com 🙂
I’m also very thankful, peppe80. Do you know a way to replace UUID=bla by something that mounts all connected drives?
Hi Daniel,
the autofs service should allow you to automount any USB storage with generic options (not including the UUID). You can try to use the autofs man page (also available online at ). In these days I can’t test it, please let me know if it works