
Last Updated on 23rd February 2025 by peppe8o
In this tutorial, I will show you how to install FarmOS on Raspberry PI computer boards. For this project I will use a Docker installation, completing the official docker compose file with the required lines to start the software with a MariaDB database.
About FarmOS
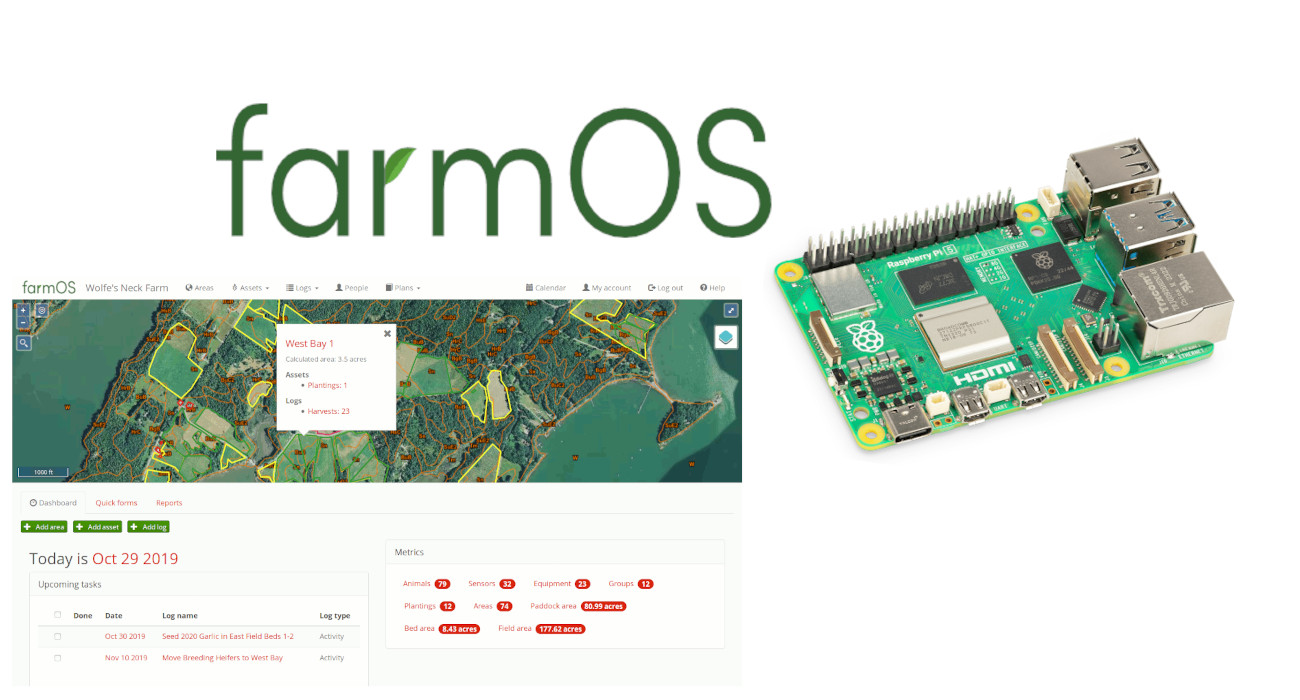
Built on top of Drupal, farmOS is an open-source application for farm management, planning, and record keeping. It has a web-based interface, so you don’t need to install clients in you remote devices to use it, as you can control it from any web browser.
The underling Drupal framework makes farmOS modular, extensible, and secure: you can install and develop plugins to add functionalities to your farm management server.
FarmOS also offers a “FarmOS Field Kit”, which is a way to connect to your farmOS server from your mobile device even when working outside of wifi or cellular range: you can create and modify farm logs wherever you’re at, whenever you need to; then, when you are back within signal range, you can synchronize all your logs with your farmOS server. But this kit is outside of this tutorial scope.
Both are licensed under the GNU General Public License, which means they are free and open source. All code is available in the farmOS GitHub organization.
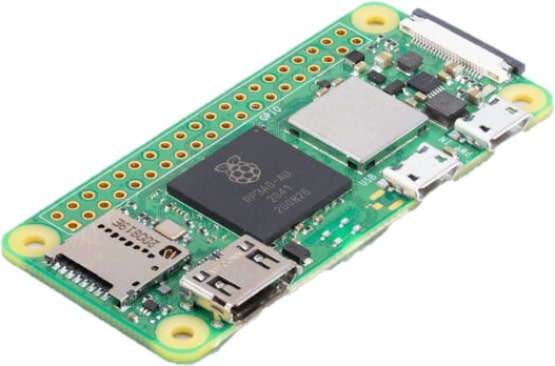
For this tutorial, I’m going to use my Raspberry PI Zero 2W. This bard is a bit too small to get a full farmOS working for your people and can be used just for a testing environment. I suggest you to use a Raspberry PI model with more resources, as this applies to any Raspberry PI computer board compatible with the 64-bit OS.
What We Need
As usual, I suggest adding from now to your favourite e-commerce shopping cart all the needed hardware, so that at the end you will be able to evaluate overall costs and decide if to continue with the project or remove them from the shopping cart. So, hardware will be only:
- Raspberry PI Zero 2 W (including proper power supply or using a smartphone micro USB charger with at least 3A) or newer Raspberry PI Board
- high speed micro SD card (at least 16 GB, at least class 10)
Step-by-Step Procedure
Preparing the Raspberry PI Operating System
The first step is installing the Raspberry PI OS Lite (please note that we need the 64-bit version) to get a fast and light operating system (headless). In this case, you will need to work from a remote SSH terminal.
If you need a desktop environment, you can also use the Raspberry PI OS Desktop, in this case working from its terminal app. Please find the differences between the 2 OS versions in my Raspberry PI OS Lite vs Desktop article. NOTE: if you’re working with a low capabilities Raspberry PI (like a Raspberry PI Zero 2 W) you should use the OS Lite version.
Make sure that your system is up to date. Connect via SSH terminal and type the following command:
sudo apt update -y && sudo apt upgrade -yWe also need to install Docker. For this step please refer to my Docker on Raspberry PI tutorial.
With low RAM (less than 1 GB) Raspberry PI devices I also suggest increasing the Swap memory to higher values than the default value, increasing it to 1000 MB. You can refer to my Set Raspberry PI Swap Memory tutorial to achieve this task.
With older Raspberry PI computer boards, you can also reduce the memory assigned to RAM (if you use the Raspberry PI OS Lite version) to the minimal value (16MB), so giving more resources to the RAM. You can achieve this goal with my Manage Raspberry PI GPU Memory Split tutorial.
Install FarmOS on Raspberry PI with Docker
The official FarmOS image for docker is available at https://hub.docker.com/r/farmos/farmos, where you can check the different releases. I suggest to avoid using the latest release, especially if released from a very few days, as it may bring errors and bugs still not fixed. So, keep in the docker hub page the release you prefer (I will use the 3.3.3).
First of all, let’s create a folder where all of our files will be stored, and enter it. From the terminal:
mkdir farmos
cd farmos
Now, please create a docker-compose.yml file:
nano docker-compose.ymlPaste the following lines, making it sure that the indentation is respected:
services:
  web:
    image: farmos/farmos:3.3.3
    volumes:
      - sites:/opt/drupal/web/sites
      - modules:/opt/drupal/web/modules
    ports:
      - 80:80
    restart: unless-stopped
  database:
    image: mariadb
    restart: unless-stopped
    environment:
      - MYSQL_DATABASE=farmosdb
      - MYSQL_USER=farmosuser
      - MYSQL_PASSWORD=farmospassword
      - MYSQL_RANDOM_ROOT_PASSWORD='yes'
    volumes:
      - db:/var/lib/mysql
volumes:
  sites:
  modules:
  db:
Please change the release number (“3.3.3”) with your favorite one, and the database name and credentials from “farmosdb”, “farmosuser”, and “farmospassword” with your preferred ones and note them into a notepad.
Save and close the file.
The following paragraphs will explain the file lines.
In this file, there are 2 services: the “web” service, including the Drupal instance with farmOS files, and the “database” service, implemented with a MariaDB container.
The “volume” lines will make part of the containers persistent. With them, you will have the /opt/drupal/web/sites, /opt/drupal/web/modules, and /var/lib/mysql data safely stored in your Raspberry PI’s storage and reachable inside two folders created into the “farmos” directory. This will allow you to save your data even after the containers are stopped and recreated. The persistent data volumes will be available at the /var/lib/docker/volumes path, accessible only with root permissions.
The “ports” line will make the farmOS web service available from remote browser sessions outside the Raspberry PI, by using your board’s IP address, by mapping the external port 80 to the web container’s port 80.
The “restart” directive, set to “unless-stopped”, will make the containers run even after your Raspberry PI’s reboots, unless you manually stop the containers.
The “environment” lines will create the MariaDB database with the proper permissions for the database, so that you don’t need to enter the database to manually specify the database name and credentials.
Now, from the “farmos” folder, please issue the following command:
docker compose up -dThis command will download the required images from the Docker Hub registry and install the specified services from the docker-compose.yml file available in the same folder where the command is run.
Please wait for the terminal prompt to be back. This will happen after you’ll see the network and containers created and started like in the following:
[+] Running 5/5
 ✔ Volume "farmos_sites"        Created    0.1s
 ✔ Volume "farmos_modules"      Created    0.0s
 ✔ Volume "farmos_db"           Created    6.6s
 ✔ Container farmos-database-1  Started    24.3s
 ✔ Container farmos-web-1       Started    24.3s
After this step. before proceeding with the following setup wizard please wait for the MariaDB service to be running and initialized. You can check it with the following command:
docker logs farmos-database-1From the result, please wait to get something like the following line:
2025-02-23 12:46:37 0 [Note] mariadbd: ready for connections.FarmOS Setup Wizard
At this point, you can proceed with the farmOS setup from a remote browser, by using your Raspberry PI’S IP address as URL. In my case, mine one is 192.168.7.106. You will be automatically redirected to the setup wizard, beginning with the database setup:
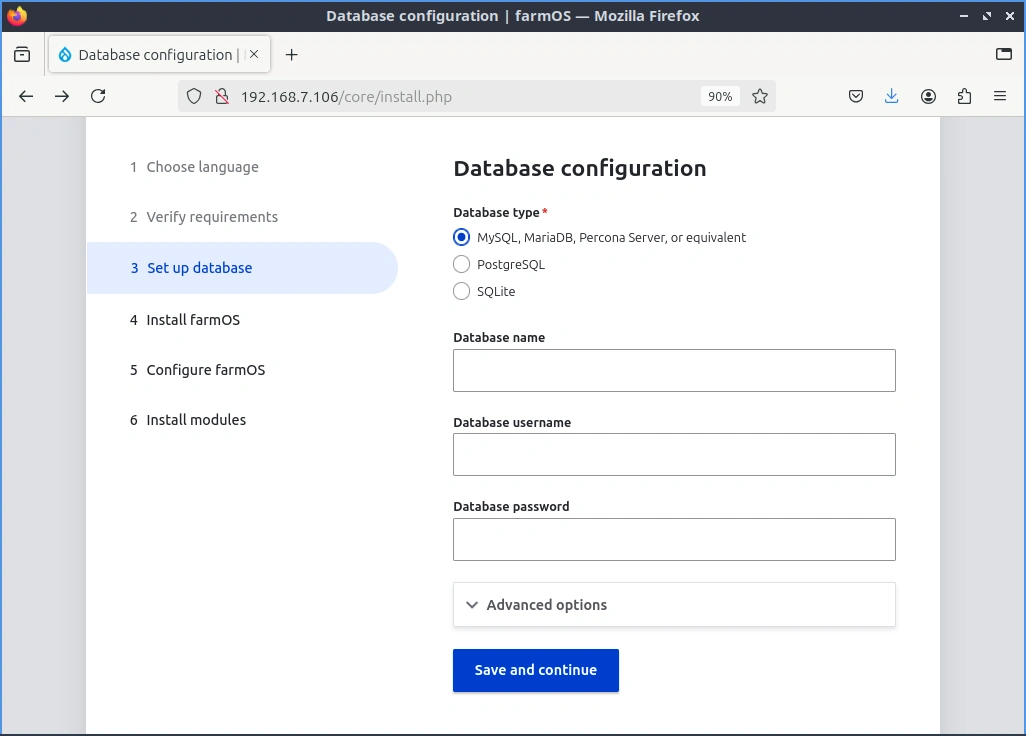
Please fill the forms with your database name and credentials used in the docker compose file. Before proceeding with the next step, please open the “Advanced options” section and change the database host from “localhost” with “database” (the name of the service as set in our docker compose file):
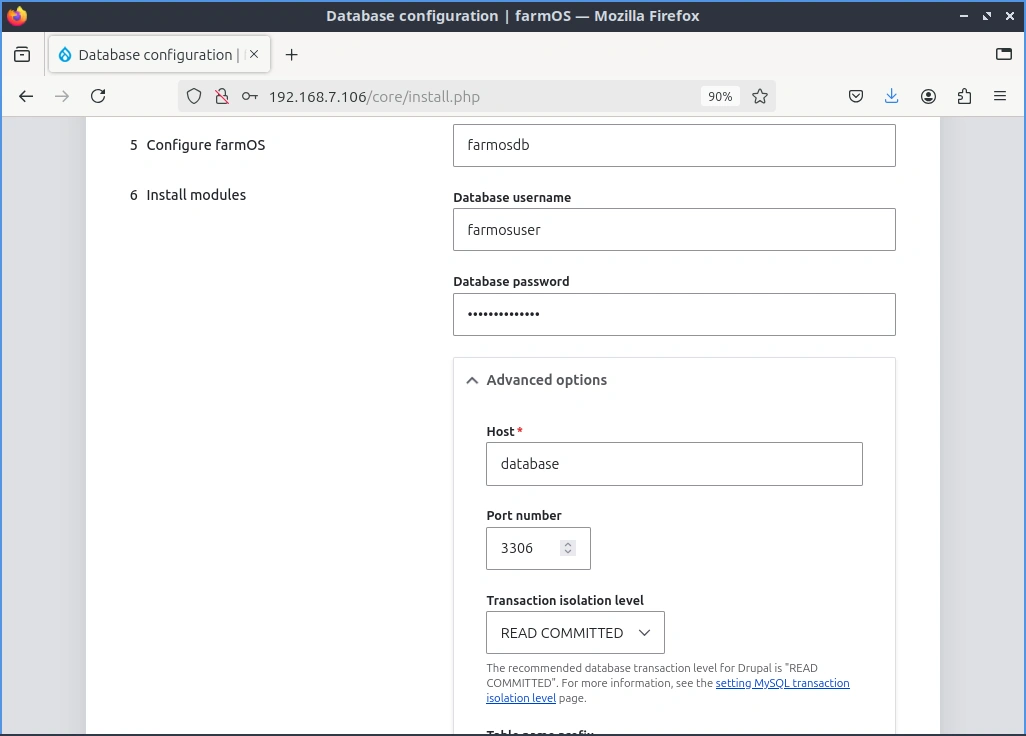
Then click the “Save and Continue” button at the bottom part of this page.
The installation process will begin. At the end, you will get the site configuration page. Here you can set the fields to customize your site name and create a site maintenance account (administrator):
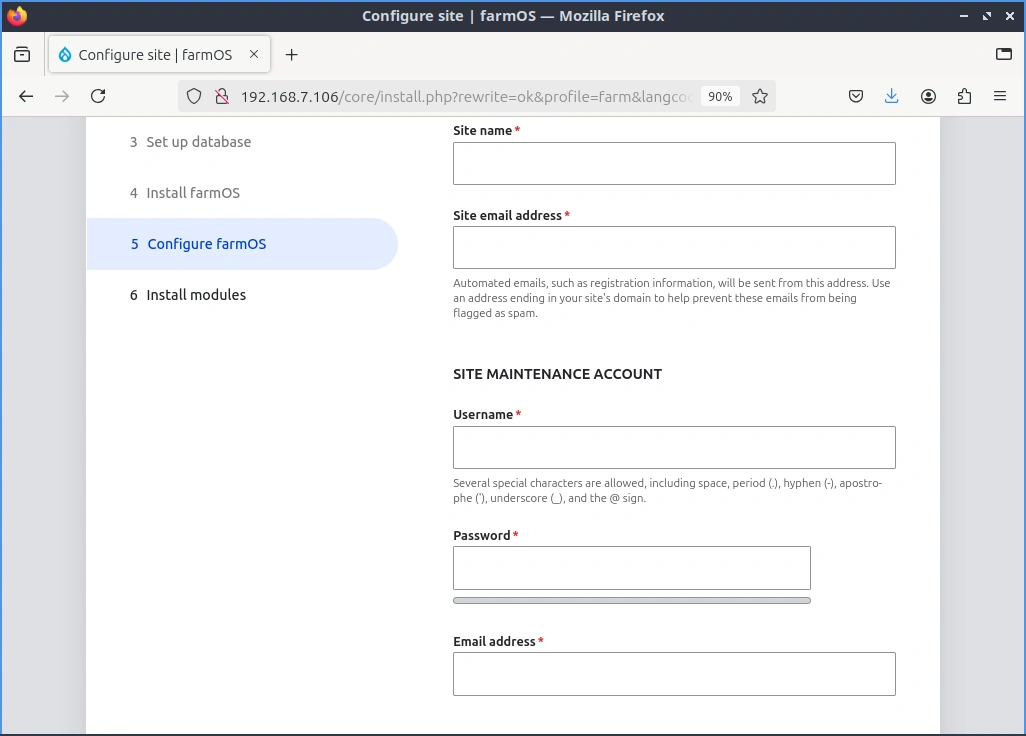
Please compile the form at your choice, scroll down the page, and click “save and Continue”.
The last page in this setup wizard will allow you to choose the modules to install.
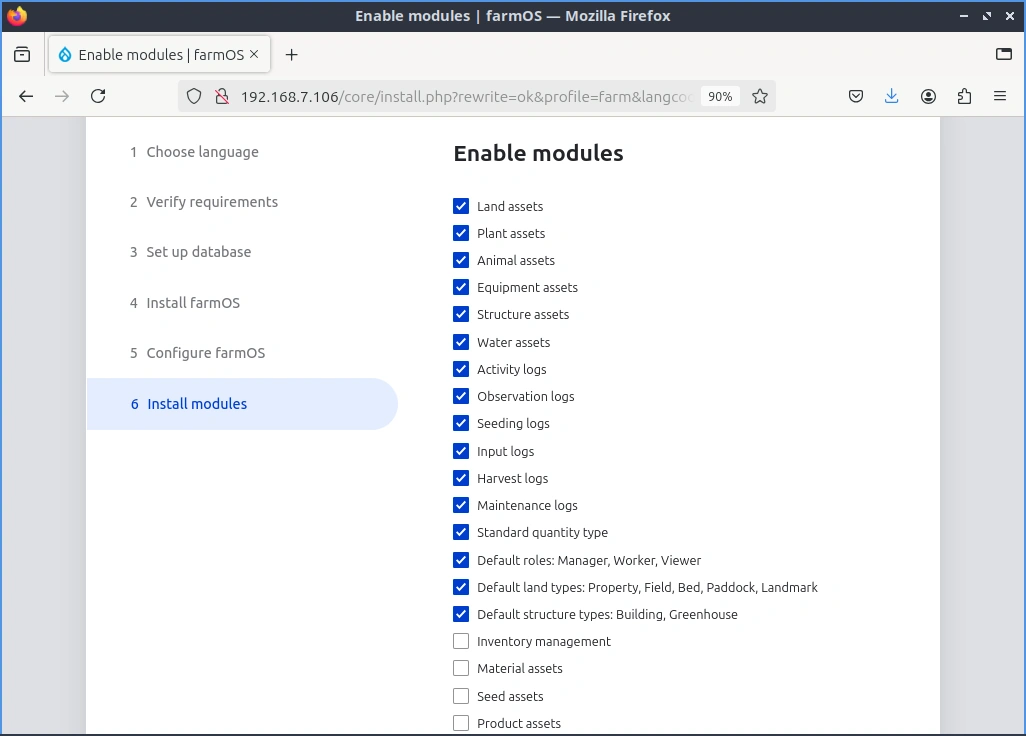
Please select your preferred ones and click the “Save and Continue” button.
This last step will install all the selected modules.
The Dashboard of FarmOS from Raspberry PI
At the end of the modules installation, you will reach the farmOS dashboard:
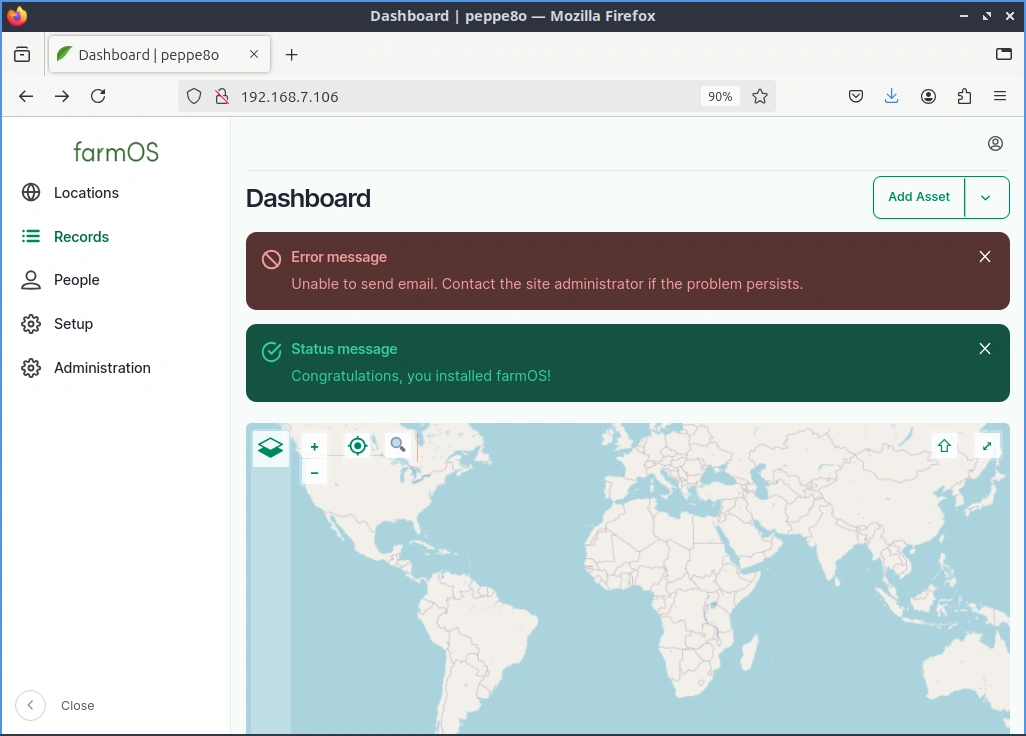
As you can read from the warning message, the default farmOS installation with Docker doesn’t include the Drupal SMTP module to send email. You can refer the https://farmos.org/hosting/email/ article to enable the related module. By using the docker-compose.yml file of this tutorial, you will be able to download the plugin directly into the /var/lib/docker/volumes/farmos_modules/_data folder, which is mapped to the modules folder of farmOS.
Official Guide for FarmOS
From here, please refer to the official farmos guide.
What’s Next
If you want to discover many other projects for your Raspberry PI, you can take a look at peppe8o Raspberry PI tutorials.
Enjoy!

Open source and Raspberry PI lover, writes tutorials for beginners since 2019. He's an ICT expert, with a strong experience in supporting medium to big companies and public administrations to manage their ICT infrastructures. He's supporting the Italian public administration in digital transformation projects.
![]()
![]()
![]()
![]()
![]()
![]()
![]()


