
In this tutorial, I’ll show you how to set up a Docker on Raspberry PI, by showing you some of the main commands to use containers.
Docker containers are the new trend in deploying microservices without duplicating OS jobs on the host machine. They are also fast and allow quick development techniques unavailable in classic development. It is possible (and useful) to install Docker on Raspberry PI computer boards, getting container advantages in our powerful single-board, credit-sized computer
Main Docker Concepts
With the open-source docker engine, you can use docker containers up with the single-line command “docker run”. You can also use base images to customize your services with the “docker build” command and very simple dockerfiles. Moreover, the “docker compose” command enables you to deploy complete services defined in simple “docker-compose.yml” files. Finally, the “docker swarm” command will simplify Raspberry PI cluster creation to distribute the load between different physical boards.
All the most used images come from the Docker Hub, where you can pick microservices ready for use by checking that these are available for ARM architecture: Raspberry PI has arm processors, so only those docker images compiled for ARM can be run on it. Sometimes also processor version can also be crucial: for example, some docker images are compiled to run only with armv6, and they will run only in older Raspberry PI computer models. As we’ll see in the following chapters, we’ll get our current Raspberry PI processor architecture with the docker version command.
This procedure has been tested on many Raspberry Pi computer models (Zero W, PI 3 Model A+, PI 3 Model B/B+, PI 4 model B, PI 5 model B), so it should work with any Raspberry PI computer board with internet connectivity.
What We Need
As usual, I suggest adding from now to your favourite e-commerce shopping cart all the needed hardware, so that at the end you will be able to evaluate overall costs and decide if to continue with the project or remove them from the shopping cart. So, hardware will be only:
- Raspberry PI Computer Board (including proper power supply or using a smartphone micro USB charger with at least 3A)
- high speed micro SD card (at least 16 GB, at least class 10)

Step-by-Step Procedure
Prepare the Operating System
The first step is installing the Raspberry PI OS Lite (I suggest the 64-bit version, for boards supporting it) to get a fast and light operating system (headless). If you need a desktop environment, you can also use the Raspberry PI OS Desktop, in this case working from its terminal app. Please find the differences between the 2 OS versions in my Raspberry PI OS Lite vs Desktop article.
Please make sure that your OS is up to date. From your terminal, use the following command::
sudo apt update -y && sudo apt full-upgrade -yInstall Docker on Raspberry PI
The default (and suggested) docker installation comes with the “convenience” script, a simplified bash installation script that makes all the work for you. This adds the required repositories to your “apt” file, downloads and installs the dependencies and the latest Docker engine version. Type the following commands from the terminal:
curl -fsSL https://get.docker.com -o get-docker.sh
sudo sh get-docker.sh
The second command will take a few minutes as it will download all the required packages for your Raspberry PI architecture and install them.
At the prompt, you can test it by typing the following docker command:
sudo docker versionIt will return all the main info of your Docker version, such as the architecture (“Arch” variable), similarly to the following:
pi@raspberrypi:~ $ sudo docker version
Client: Docker Engine - Community
 Version:           26.1.4
 API version:       1.45
 Go version:        go1.21.11
 Git commit:        5650f9b
 Built:             Wed Jun  5 11:29:12 2024
 OS/Arch:           linux/arm64
 Context:           default

Server: Docker Engine - Community
 Engine:
  Version:          26.1.4
  API version:      1.45 (minimum version 1.24)
  Go version:       go1.21.11
  Git commit:       de5c9cf
  Built:            Wed Jun  5 11:29:12 2024
  OS/Arch:          linux/arm64
  Experimental:     false
 containerd:
  Version:          1.6.33
  GitCommit:        d2d58213f83a351ca8f528a95fbd145f5654e957
 runc:
  Version:          1.1.12
  GitCommit:        v1.1.12-0-g51d5e94
 docker-init:
  Version:          0.19.0
  GitCommit:        de40ad0
If you would like to use Docker as a non-root user, I suggest you considering to add your user to the “docker” group. To accomplish it for the classic “pi” user:
sudo usermod -aG docker piYou will need to reboot (or, at least logout and login) to make it work:
sudo rebootAt the Raspberry PI’s reboot, you will be ready to test the main Docker commands as in the following paragraphs.
Docker Run Command
The first command to learn to use Docker with Raspberry PI is the “docker run” command. It checks if the required image is available locally in your Raspberry PI’s storage. If not, it will download the image from the Docker Hub and execute it. Everything in one command line!
The “docker run” command requires only 1 mandatory variable: the image name. With it, you can set a specific version by adding it after the image name, separated with a colon. If you don’t specify it, docker will automatically set the version value to “latest” and use the latest version. Let’s look at it with an example.
As the first test, we’ll use the “hello-world” docker image. From the Docker Hub, at the hello-world tag page, we can see that it supports quite all the architectures and includes our one (mine is arm64). Please note that the following screenshot is for the version tagged as “latest” (top-right side of the picture):
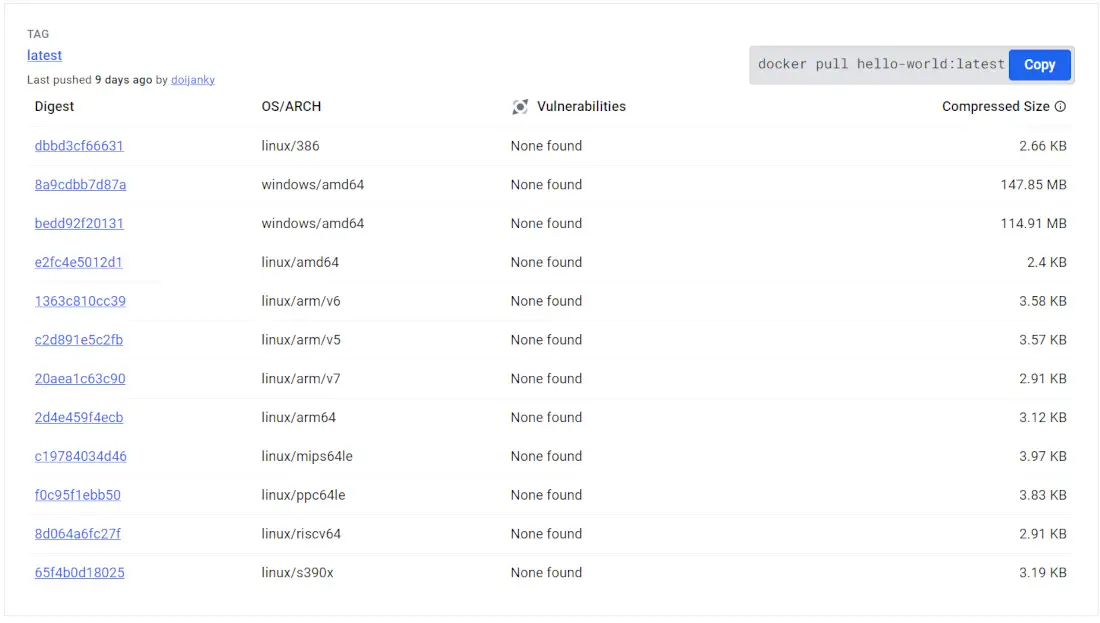
This container will print something like a welcome message. The command will be docker run hello-world (which equals to docker run hello-world:latest). The result of this command is available below:
pi@raspberrypi:~ $ docker run hello-world
Unable to find image 'hello-world:latest' locally
latest: Pulling from library/hello-world
478afc919002: Pull complete
Digest: sha256:d1b0b5888fbb59111dbf2b3ed698489c41046cb9d6d61743e37ef8d9f3dda06f
Status: Downloaded newer image for hello-world:latest

Hello from Docker!
This message shows that your installation appears to be working correctly.

To generate this message, Docker took the following steps:
 1. The Docker client contacted the Docker daemon.
 2. The Docker daemon pulled the "hello-world" image from the Docker Hub.
    (arm64v8)
 3. The Docker daemon created a new container from that image which runs the
    executable that produces the output you are currently reading.
 4. The Docker daemon streamed that output to the Docker client, which sent it
    to your terminal.

To try something more ambitious, you can run an Ubuntu container with:
 $ docker run -it ubuntu bash

Share images, automate workflows, and more with a free Docker ID:
 https://hub.docker.com/

For more examples and ideas, visit:
 https://docs.docker.com/get-started/
At the end of this execution, the docker container will stop executing. You can get a list of your containers with the following command:
docker ps -aThe “-a” option will show you both the active and the stopped containers. The result will be similar to the following:
pi@raspberrypi:~ $ docker ps -a
CONTAINER ID   IMAGE         COMMAND    CREATED       STATUS                   PORTS     NAMES
51f2700426f1   hello-world   "/hello"   4 hours ago   Exited (0) 4 hours ago             bold_mcclintock
In this result:
- the CONTAINER ID is a random identifier associated to every container. You can’t change it.
- the IMAGE is the name of the image on which the container is based.
- the COMMAND is the main command running in the container. Inside the hello-world there’s a script named “hello” which prints the message and ends. At the end of the main command, the container will stop running.
- the STATUS shows if the container is running or closed (or other available states). “Exited (0)” means that the container finished the script and exited with an exit code = 0 (this code means that it has run correctly). Different exit codes mean that the end is caused by errors.
- the PORTS columns show if some of the container ports are mapped in your Raspberry PI network.
- the final NAMES columns show a mnemonic name for every container. This name is set with a random name unless the user sets it to a specific value in the docker run command.
The “docker run” command allows you to add a large number of options to fit your needs. The following paragraphs will show you the main ones. All of these options must be set between the “docker run” and the image name of your command.
The -d option equals to --detach. This option runs a container without the need to keep a terminal session active with the container. The container will run as a daemon in your Raspberry PI, even if you close your terminal.
The -it option is an alternative to “-d” and equals to 2 options: --interactive and --tty. Interactive means that the container will run with an interactive shell which expects your commands to make anything, while the tty will create this interactive session in your terminal shell. With these 2 options, you will be prompted inside the container, in a way similar to a virtual machine. But the container will stop running once you will exit from this session. It is important to note that if you need to store any data inside your container, the proper way is by mapping a volume between the container and your Raspberry PI storage (see later) and you shouldn’t rely on keeping data inside a stopped container.
The -p option equals to --publish. This command allows you to use one of the host (Raspberry PI) network ports to expose a container service/port. This means that a user can query the container services from the Raspberry PI ports instead of entering the docker internal network. For example, the following command (working only with 64-bit Raspberry PI OS):
docker run -d -p 7000:8080 bitnami/apache:latestWill use an Apache image managed by VMware. By default, the container exposes its service (a simple web page) at port 8080, but the docker run command maps this port to the 7000 of the Raspberry PI. So, you can see the result from a remote computer, by using the Raspberry PI’s IP address followed by the specified Raspberry PI port. In my case, as my Raspberry PI has IP address 192.168.1.218, my URL will be http://192.168.1.218:7000 and the result will be the following:
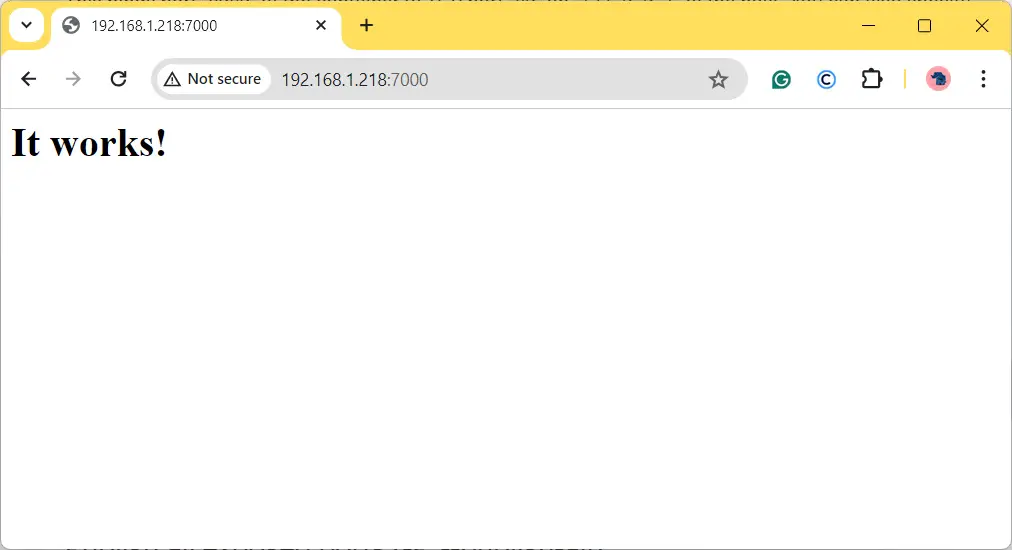
Of course, for beginners, it is important to note that you can’t expose more than one service on 1 Raspberry PI port. Nevertheless, with the -p option you can use quite any free Raspberry PI port for services.
The -v option equals to --volume. It enables you to map a Raspberry PI’s folder into the container file system. For example, if you run the command:
docker run -it -v ./ubuntu_home:/home ubuntu:latestIt will create an interactive ubuntu container. In the Raspberry PI’s current folder, a new subfolder named “ubuntu_home” will be created (if not exists). This will include all the files of “/home” in the ubuntu container. By running a second terminal session in your Raspberry PI, you will be able to see that any new file stored in “ubuntu_home” will be immediately available also in the “/home” inside the container. Volumes are really useful with containers as they are persistent even if the container is stopped and removed. From the ubuntu container shell, you can exit by running the exit command.
The --name option allows you to set a custom container name. For example, the following command:
docker run --name my_hello hello-worldThis will execute the same hello-world container, but the name will be a set as set in our docker run command:
pi@raspberrypi:~ $ docker ps -a
CONTAINER ID   IMAGE                   COMMAND                  CREATED             STATUS                      PORTS                                                 NAMES
37b8181622b7   hello-world             "/hello"                 27 minutes ago      Exited (0) 27 minutes ago                                                         my_hello
The --restart option allows you to set a restart policy for your containers. It has the following possible values:
- no – the container desn’t automatically restart after an exit
- on-failure[:max-retries] – the container will restart (optionally up to the max-retries value) only on failures, that means exit with code different from 0
- unless-stopped – the container will always restart unless the user doesn’t explicitly stops it (with a “docker stop” command)
- always – the container will always restart
The default restart policy is set to “no”, which means that the container will not restart, for example, after a Raspberry PI reboot. For this option, I usually adopt the “unless-stopped” policy, so that I can keep control of restarts and all my containers will be live even after my Raspberry PI’s reboot.
Main Commands to Control Docker
There are also some main commands to control your Docker on Raspberry PI and see what’s happening.
We have already seen the docker ps command, which allows you to see the running containers. With the “-a” option, you will be able to see also the exited containers.
With the docker image ls command, you will be able to list the docker images already downloaded in your Raspberry PI. The following shows an example from my docker environment:
pi@raspberrypi:~ $ docker image ls
REPOSITORY               TAG       IMAGE ID       CREATED         SIZE
bitnami/apache           latest    8468ba16c5bb   9 days ago      241MB
ubuntu                   latest    ffb64c9b7e8b   2 weeks ago     101MB
hello-world              latest    ee301c921b8a   13 months ago   9.14kB
You can also manage your images, removing those not in use with the docker image rm <<image_name>>. the name, in this case, is composed of the repository and the tag, separated from a colon (for example “hello-world:latest”).
Something similar for the volumes. You can list them with the docker volume ls and remove them with the docker volume rm <<volume name>> command. Please note that removing a volume will delete all the data inside the volume.
Finally, the docker container ls will give you an output similar to the “docker ps” command. But “docker container” allows you to manage containers with more functions like:
docker container start <<container name>>: to start an exited containerdocker container stop <<container name>>: to stop a running containerdocker container rm <<container name>>: to remove an exited containerdocker container logs <<container name>>: to see the internal logs of the containerdocker container rm <<container name>>: to remove an exited container
With these commands, you can use both the CONTAINER ID or the name you set with the option “–name” as container name.
Docker Compose
It has been included in the docker installation from 2024 and now you don’t need to install it separately. You can verify your docker-compose installation by typing:
docker compose versionDocker compose enables your Docker environment to use yaml files to compose and quickly boot complete service infrastructures. With docker compose, you can define all the required images, settings, connections, dependencies, volumes, and so on in a single file, named “docker-compose.yaml”. I suggest creating this file into a dedicated folder, as docker compose will use the folder’s name as prefix for all the container names and for the network name.
Once you have a valid docker compose file, you can build the whole infrastructure with the command:
docker compose up -dHere the “-d” option still means “–detached” as previously seen.
You can remove the whole infrastructure with the command:
docker compose downPlease note that at the infrastructure remotion (with the docker compose down command), only the files in your mapped volumes will be kept.
Install Portainer
A graceful web GUI helping in managing containers is portainer. In our case, we need to install an arm-compatible version and then launch it with the docker run command:
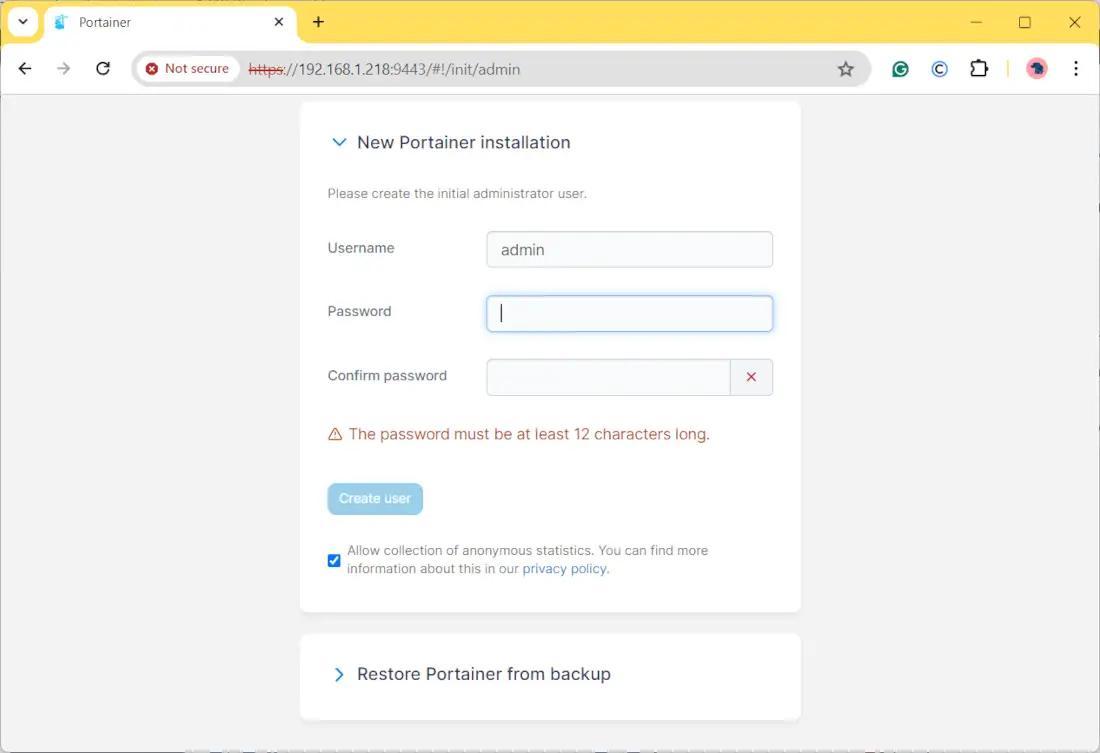
docker run -d -p 8000:8000 -p 9443:9443 --name portainer --restart=always -v /var/run/docker.sock:/var/run/docker.sock -v portainer_data:/data portainer/portainer-ce:latestIt will download and install the latest available container version for your Raspberry PI and OS. After this, you can reach your docker server with a browser, just connecting to https://<<RaspberryIpAddress>>:9443. Please remember to use https and not http! Depending on your browser, you may be warned about the insecure certificate. As we’re in a local environment and you’re sure that you’re connecting to your Raspberry PI, you can proceed.
In your very first connection to Portainer, you will be required to set your default password for the admin user:
Moreover, you will be asked if you want to control only your local docker environment or connect an existing environment with multiple devices. Please select the first option:
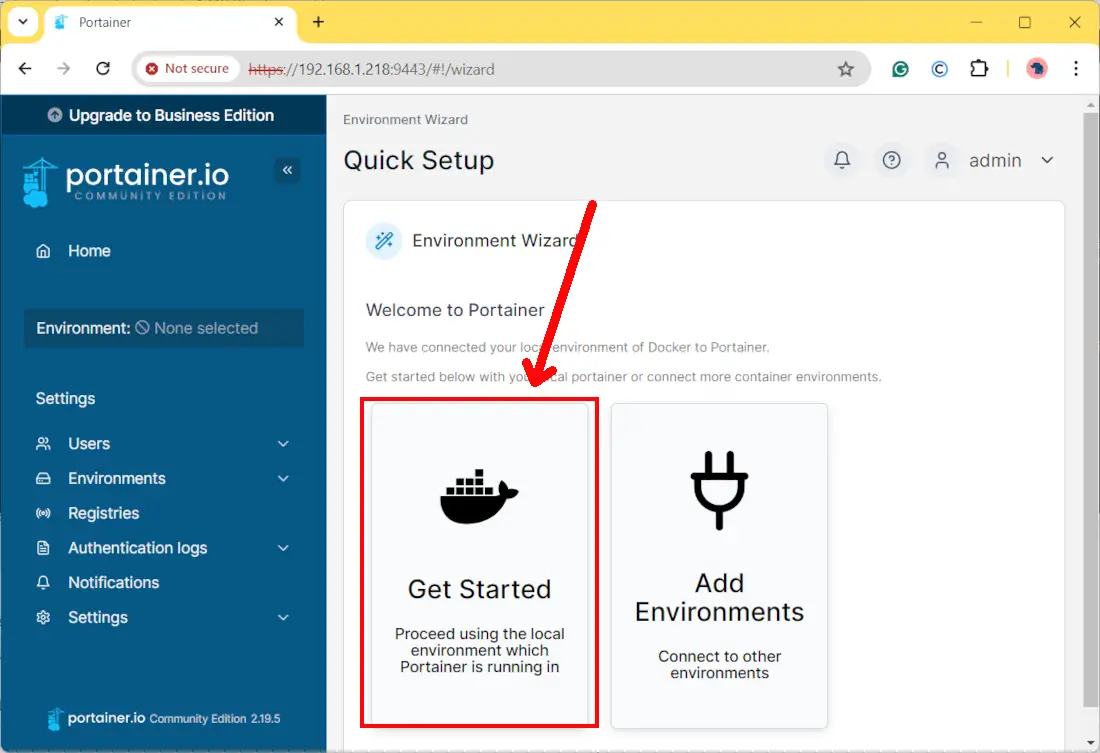
Then you will be prompted to the Portainer GUI, which will give you a visual control of your docker host and containers:

What’s Next
Want to know more about cool projects to do with Raspberry PI computer boards? In this case, the right resource for you is my Raspberry PI tutorials pages.
Enjoy Docker with Raspberry PI!

Open source and Raspberry PI lover, writes tutorials for beginners since 2019. He's an ICT expert, with a strong experience in supporting medium to big companies and public administrations to manage their ICT infrastructures. He's supporting the Italian public administration in digital transformation projects.
![]()
![]()
![]()
![]()
![]()
![]()
![]()


Hello
running “sudo sh get-docker.sh”
I got the following error message:
E: Sub-process /usr/bin/dpkg returned an error code (1)
I’m using a pure
Raspberry Pi OS Lite
Release date: August 20th 2020
Kernel version: 5.4
tiedexen
Hi tiedexen,
What Raspberry PI model are you using?
I ran into the same thing trying to install on my Pi 4 Model B+
I found that we need to add
“cgroup_enable=memory cgroup_memory=1 swapaccount=1”
to the command line arguments for the kernel in /boot/cmdline.txt
I found this from
Thank you Ashley.
I wasn’t able to reproduce, but I added your note as warning after installation script row.
Thanks, Ashley!
This worked on my Pi3 Model B, too.
Thanks for this guide!
I really prefer the idea of the apt install over pip. However, the apt docker-compose package was version 1.21.0. Which according to the docker page https://docs.docker.com/compose/release-notes/ is from 2018!
I followed the pip instructions at https://dev.to/rohansawant/installing-docker-and-docker-compose-on-the-raspberry-pi-in-5-simple-steps-3mgl and got v1.27.4
Also, there’s a typo above 🙂 wirking should be working.
Hi Tyler,
thank you for your typo note, corrected.
Regarding docker-compose installation, my previous tutorial version was using pip (as you correctly noted), but in some periods (also during new minor releases in Raspberry PI OS) it sometimes resulted not working. Instead of frustrating users with something they couldn’t explain why their installation failed, I preferred a more stable way with default package manager for RPI OS. You are also correct noting that compose version could have some years of delay, but how many of these new features could be useful to RPI users? I think very very few.
Hello peppe80, thanks for an amazing guide, i was able to run the HA container on port 8125, but when i logged out, it turned off the container i couldn’t get it to work, can you please share solutions. Also, i’m unable to see the HA supervisor, any thing i’m missing?
Hi yshariff,
I suppose you are writing about http://peppe8o.com/install-home-assistant-in-raspberry-pi-with-docker/ and your container stopped is the test one.
When you log-in again, you can restart your container with “docker start homeAssTest”. You can also check your stopped container with “docker ps -a”.
Consider that Test container (as defined in my post) is set to run as a test environment and only with terminal attached. To run it detached from terminal you have to add “-d” option on docker run command. To make it starting again after reboots you have to add the restart policy on docker run command (for example –restart unless-stopped).
Please refer to Production container references later on same post (http://peppe8o.com/install-home-assistant-in-raspberry-pi-with-docker/)
Hi,
After running this:
docker run -d -p 9000:9000 -v /var/run/docker.sock:/var/run/docker.sock -v portainer_data:/data portainer/portainer:linux-arm
I get this as response:
$ The requested image’s platform (linux/amd64) does not match the detected host platform (linux/arm/v7)
I am currently running pi os 32bit. I have seen one similar message on github with some foggy replies. Am I the only one? Eveything is standard here, pi is 8GB (not that this matters)
rgds
rl
Hi Robert,
I used your command in my RPI3 and RPI4 and it works in my boards (standard RPI OS too). From what I’ve now checked in docker hub, I’m afraid that some confusion arised around the new “portainer-ce” container (with final “-ce” added): I can see that they still taggeg their image “linux-arm”, but OS/ARCH results amd64. So, if you previously pulled portainer-ce you could suffer this problem. Solution should be removing image (“docker image rm portainer/portainer-ce:linux-arm”) and then using their “portainer/portainer-ce:alpine” (but this evening I can’t download it, seems that there are problems on remote servers) or old image “portainer/portainer:linux-arm” (which works correctly for the moment).
As said,I’ve just tested old image (without “-ce”) and it currently works. As ce image will be available again, I will test this too.
Hi,
Thanks for your efforts! This was all done for the first time so I guess the problem is on their end. However, since this is just a pet project (and there are locked up holidays ahead) I’ll wipe everything and start over again. Self education…
If I have any success I’ll let you know here!
Hi,
So I did it again (w/o uups), this time using the commands from the portainer site:
docker volume create portainer_data
docker run -d -p 8000:8000 -p 9000:9000 –name=portainer –restart=always -v /var/run/docker.sock:/var/run/docker.sock -v portainer_data:/data portainer/portainer-ce
and there was the exact same error message. However, I tried to run it nevertheless and it worked. So it might well be that it would have worked yesterday as well but I simply gave up after the error…
Hi,
After running this:
docker run -d -p 9000:9000 -v
I get this as response:
flag needs an argument: ‘v’ in -v
Any idea?
Hi Teodoro,
Plese copy an use the entire row from “docker run” to “linux-arm”
well, I am not able to get Odoo docker Image on Rasperrypi, with or without portainer. there is always errores. I wonder if Rancher can handle the issue. keep in mind that install Odoo on Ubuntu without Docker works fine. I hope you can help with new experiment to be able to install odoo docker image on rasberrypi Ubuntu or maybe Rancher. Thank you
Hi Tarek. Currently Odoo doesn’t releases docker containers for ARM (you can check in OS/ARCH column from tag section in docker hub, https://hub.docker.com/_/odoo?tab=tags&page=1&ordering=last_updated). For this reason, if you want Odoo into a container you have to build it from scratch or from a ubuntu/debian base image