Ultrasonic Sensor is great for all kind of projects that need distance measurements, avoiding obstacles as examples. The HC-SR04 is inexpensive and easy to use and can be easily connected with a Raspberry PI
Ultrasonic sensor module HC-SR04 provides 2cm-400cm non-contact measurement function, the ranging accuracy can reach to 3mm. The basic principle of work:
So, distance = (high level ingress duration × speed of sound (34300cm/s) / 2.
The final bivision by is because we have a feedback for roundtrip, distance is the half.
The Timing diagram is shown below:
Voltage levels must be kept in consideration. HC-SR04 module works with 5V current (except from trigger, which can be lower) and outputs a 5V signal on echo. Echo goes back to Raspberry PI for duration measurement on GPIOs. Raspberry PI GPIO reading should be at 3,3V to avoid circuit failure, so we need to implement a simple voltage reduction circuit with resistors. A good solution can be found from learningaboutelectronics.com: How to Reduce Voltage with Resistors. Our voltage circuit will follow this phisical diagram:
Calculations are according to following formulas:
So, once defined:
We choose R1 and derive R2 from following:
In my kits, I have 100 Ohm resistors, so I use it for R1. From last equation I need to supply a 194,12 Ohm from R2, but I have only 100 Ohm and 220 Ohm resistors. Instead of using a 220 Ohm resistor with 10% of error margin, I use for R2 two 100 Ohm resistors in series, so that resulting value is returned by their sum (200 Ohm). Final voltage reduction circuit is:
Now we can start our project.
In this article we’ll control our HC-SR04 ultrasonic distance sensor from a Raspberry PI Zero W. This article applies also to newer Raspberry PI boards.
As usual, I suggest adding from now to your favourite e-commerce shopping cart all the needed hardware, so that at the end you will be able to evaluate overall costs and decide if to continue with the project or remove them from the shopping cart. So, hardware will be only:
Many of listed hardware (except from Raspberry PI Zero W and micro SD Card) can be bought alone or can be also found in the useful Elegoo starter kit.
Check hardware prices with following links:
Prepare cabling according to following wiring diagram:
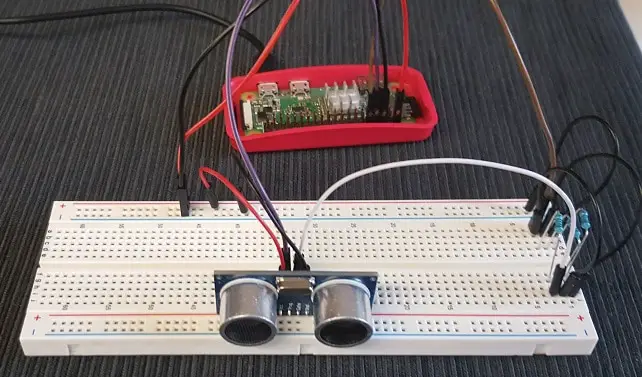
Please find below the overall picture:
Start with OS installation using install Raspberry PI OS Lite guide. This procedure also works with Raspberry PI OS Desktop, using its internal terminal.
Make your OS up-to-date:
sudo apt update
sudo apt upgradeRPI.GPIO should be already installed (otherwise, you can get it installed with the command “sudo apt install python3-rpi.gpio”).
Get from my download area ultrasonic-hcsr04.py script:
wget https://peppe8o.com/download/python/ultrasonic-hcsr04.pyIn this script version I also added a code portion managin occasional HC-SR04 freezes occurring during measurament.
This script can be used by simply calling from terminal:
python3 ultrasonic-hcsr04.pyIt will start measuring objects distance showing it in cm.
To stop the program, just press CTRL+C
First of all, required libraries are imported:
import RPi.GPIO as GPIO
import time
Then we configure GPIO pins we are going to use. We’ll use BCM GPIO naming. Please refer to Raspberry PI Pinout for more info.
No need to set Vcc and Ground, so only trigger pin (output) and echo pin (input) will be used:
echoPIN = 15
triggerPIN = 14
GPIO.setmode(GPIO.BCM)
GPIO.setup(echoPIN,GPIO.IN)
GPIO.setup(triggerPIN,GPIO.OUT)
“Distance()” function makes all the work. It starts setting defaults to 0 for distance and duration variables. Also counter and new_reading variables are set, to manage freezes:
def distance ():
 new_reading = False
 counter = 0
 distance = 0
 duration = 0
Now, it triggers from triggerPIN to send ultrasonic signal:
GPIO.output(triggerPIN, 0)
time.sleep(0.000002)
GPIO.output(triggerPIN, 1) # here the trigger is put on
time.sleep(0.000010) # 10us of trigger duration
GPIO.output(triggerPIN, 0) # now trigger is put off
time.sleep(0.000002) # this time delay to avoid interference between trigger and echo
As described in timing diagram, we must measure feedback duration to calculate distance. So we set a “startT” time variable when echo goes to high and a “feedbackT” time variable when echo goes back to low. While cycles with “pass” does nothing but waiting that conditions change. If statements are to manage and avoid freezes:
while GPIO.input(echoPIN) == 0:
  pass
  counter += 1
  if counter == 5000:
      new_reading = True
      break

if new_reading:
    return False
startT = time.time()

while GPIO.input(echoPIN) == 1: pass
feedbackT = time.time()
Distance is calculated based on feedback duration as already explained. A small “if” check is done to avoid possible strange conditions. This can be used in future for addictional checks on failures.
if feedbackT == startT:
 distance = "N/A"
else:
 duration = feedbackT - startT
 soundSpeed = 34300 # cm/s
 distance = duration * soundSpeed / 2
 distance = round(distance, 1)
Finally, “distance()” function returns distance above calculated as result:
return distanceGoing to main loop, the simple print command is enriched to write results always on same terminal line:
try:
 print (" Distance: " + str(distance())+ " ", end='\r')
Users can terminate this script by pressing CTRL+C. This prints a courtesy message of “interrupted!” and cleans GPIO status:
except KeyboardInterrupt:
 print('interrupted!')
 GPIO.cleanup()
Enjoy!
In this tutorial, we will use two Arduino Uno to demonstrate the Serial Peripheral Interface…
In this tutorial, we will be making an automatic irrigation system (AIS) with Arduino and…
This tutorial will show you how to use Python Virtual Environment with Raspberry PI computer…
This tutorial will show you how to get betting odds with Raspberry PI by using…
This tutorial will show you how to perform the backup of Raspberry PI (computer board)…
This tutorial will show you how to install Honeygain on a Raspberry PI computer board…


View Comments
Hi peppe8o,
Thanks for the tutorial. Just a heads up that the code downloaded from http://peppe8o.com/download/python/ultrasonic-hcsr04.py uses GPIOs 20,21 whereas your circuit shows GPIOs 14, 15 connected. With the following GPIO assignments the code works with the circuit you show.
echoPIN = 15
triggerPIN = 14
Thank you for your feedback, Hank. Your note is correct.
Script updated according to wiring image.
Hi peppe, the output I should see is the distance message? Once i run the code nothings happens, not even an error but I can't see any message of programm working. :(
Hi Juan,
you should must seeing a number which measures the distance of first object in front of HC-SR04.
Please recheck cabling and verify that echoPIN and triggerPIN variables correctly matches your wiring. Also try changing PINs on Raspberry PI: sometimes a wrong soldering could intake your results. If still nothing happens, please send me at giuseppe@peppe8o.com a few pictures from your cabling and a copy of your code (the .py) with your variables setting.
I'm not seeing that output, I think that cabling is wrong, cause I add prints to code and it reacts only when I disconnect VCC cable and that not make sense for me.
I'm very novice in electronics so probabbly my connections are wrong, cause pins are working correctly. I'm going to send a mail to you begging for your help haha. I'm very grateful for your time =)
Sure, no problems ;)
Hi peppe80,
Running this code and it works. Thank you for the clear tutorial.
Quick question. How can I run this to do say 10 readings and then stop, instead of an infinite loop ?
Hope you can give me a hint.
Hi. Thank you for your feedback.
for the limited readings, it's quite simple. Just change the final "while True" loop with:
x = 0
while x < 10: print (" Distance: " + str(distance())+ " ", end='\r') x += 1 (please add spaces before the last 2 rows to honour the micropython indenting rules as html comments are trimming the spaces before text)
Hi peppe80,
Thank you so much for the reply! What I'm trying to accomplish is to have ten readings written out to a text file, so that I can parse the data and work out an average. Will try what you said.
Regards
Hi again,
Thank you so much for the reply! What I'm trying to accomplish is to do 10 readings and output
them to a text file, each reading on a seperate line.
Tried to add what you said, but I'm missing something. Here's what I have :
# --------------------------------------------------------------------
# MAIN LOOP
# --------------------------------------------------------------------
try:
while True:
x = 0
while x < 10: print (" Distance: " + str(distance())+ " ", end='\r') x += 1
except KeyboardInterrupt:
print('interrupted!')
GPIO.cleanup()
My apologies,
Here is the the code:
https://pastebin.com/RN52Nw2Y
and the error I get :
https://pastebin.com/WxxjGKbR
Please move x+=1 into a new line, with the same indentation of the print statement
...and remove the "while True:" line from your code
It works, gives me the distance , beet it keeps on running infinitely, printing the reading in the same line.
Here is what I have :https://pastebin.com/FvTTCXcX
The pastebin is about the new code.
I didn't understand if it stopped or not after the 10 runnings. Please can you share the print output?
I let it run for more than 5 minutes :
The ouput is :
Distance: 287.5 - and this fluctuates, but hasn't stopped.
Ah, ok.
The print statement must stay in a different row from while one. It has also to be indented compared to the while line.
The x+=1 line has to be indented as the print statement
Thank you - here is the new code :https://pastebin.com/paZ6bX8J
It prints the distance reading for a couple of seconds ( 4-5 ) seconds, then stops. So it's not infinite anymore.
Now I need to figure out how to get 10 readings, each one on a new line, so that I can print that to a text file.The 10 readings fluctuate, but to fast to capture all ten different ones.
Any input would be most welcome.
Ok, please remove this part from the print statement:
+ " ", end='\r'
At the end, it should work as required
Got it working ! Thank you again!
Regards
Hi again, just a little mistake I noticed. At the top where it says "otherwise, you can get it installed with the command “sudo apt-install python3-rpi.gpio”, that needs to be sudo apt-get install or sudo apt install, for those that are new to linux :)
Argh... You are right!
Thank you for your note, corrected