
Last Updated on 9th November 2024 by peppe8o
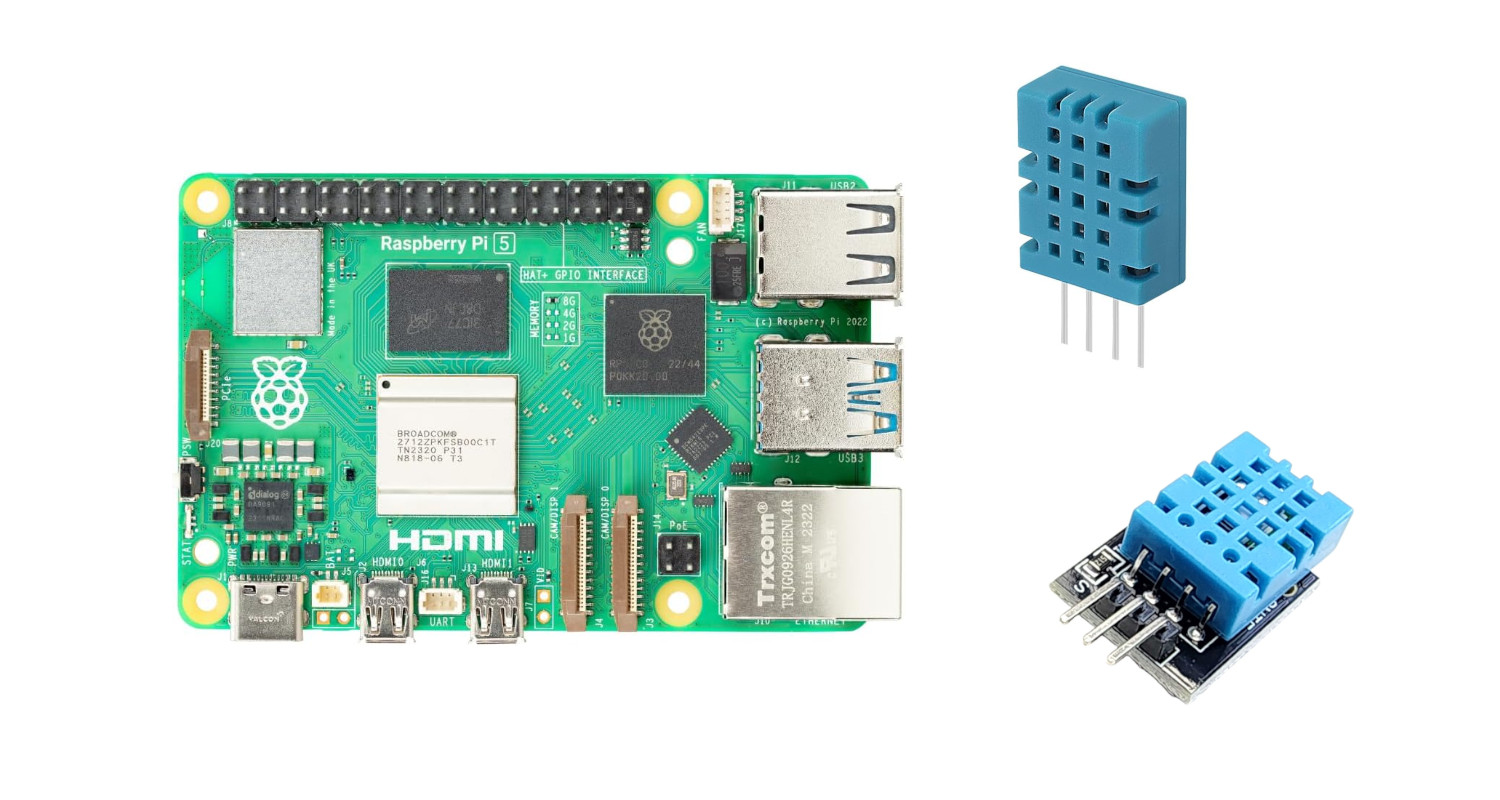
I will show you how to interface a Raspberry PI with a DHT11 Sensor using Python in this article.
Getting environmental conditions is the first and simplest task required to create more complex electronic automations. Raspberry PI with DHT11 sensor can get temperature and humidity values with cheap pieces.
What is a DHT11
The DHT11 Sensor, which acronym stands for “Digital Humidity and Temperature”, is a cheap solution to measure indoor Temperature and Humidity (it is not indicated for outdoor uses). It’s really common in environment check projects as it can be used both with Raspberry PI (computer boards, as well as Pico microcontroller) and Arduino, usually in Weather Station projects or similar.
It can be found in the market with 2 different configurations. One comes with the DHT11 sensor alone and the other brings a small base:
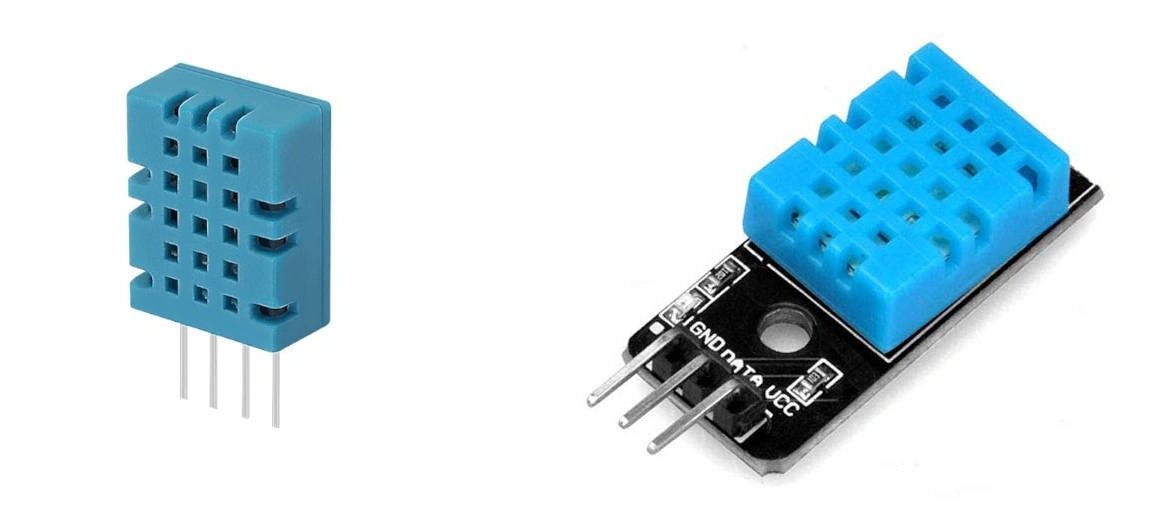
The one with only the azure block, the “sensor” (on the right side of the previous image), requires you to buy a 10k Ohm resistor, while the one with the base, the “module” (on the left side of the previous image) has the 10k Ohm resistor already integrated. We’ll see later in this post how to use the resistor.
Another difference is the number of PINs, as the sensor has 4 PINs and the module has only 3 PINs.
Another common sensor, with a similar name, is the DHT22. The difference between DHT11 and DHT22 is that the DHT22 is the more expensive version, but allows a better humidity measuring range (from 0 to 100% with 2-5% accuracy), while the DHT11 real humidity range is from 20 to 80% with 5% accuracy.
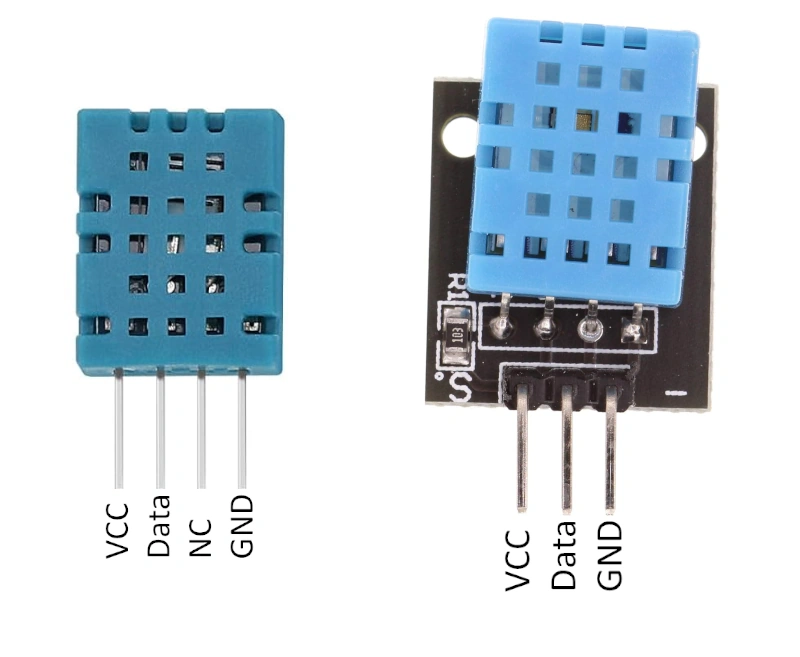
DHT11 Pinout
The DHT11 sensor has 4 PINS, from left to right:
| PIN | Description |
|---|---|
| VCC | Power supply (3.3V or 5V) |
| Data | Digital input/output |
| NC | Not Connected |
| GND | Ground |
As you can see, there’s a PIN not connected. Usually, in the DHT11 module you will find only the 3 effective PINs without the NC. The Data PIN from the DHT11 sensor requires a pull-UP resistor (connected to the VCC), which is the integrated resistor in the module version.
I’ll use a Raspberry PI 5 computer board for this article, but this tutorial also applies to other Raspberry PI computer board models.
What We Need
As usual, I suggest adding from now to your favourite e-commerce shopping cart all the needed hardware, so that at the end you will be able to evaluate overall costs and decide if to continue with the project or remove them from the shopping cart. So, hardware will be only:
- Raspberry PI Computer Board (including proper power supply or using a smartphone micro USB charger with at least 3A)
- high speed micro SD card (at least 16 GB, at least class 10)
- Dupont wirings
- Breadboard (optional)
- DHT11 sensor or module

You may also find it useful to evaluate a sensor kit which is a cost-saving solution if you want to test many sensors for different purposes.
Step-by-Step Procedure
Raspberry PI and DHT11 Wiring Diagram
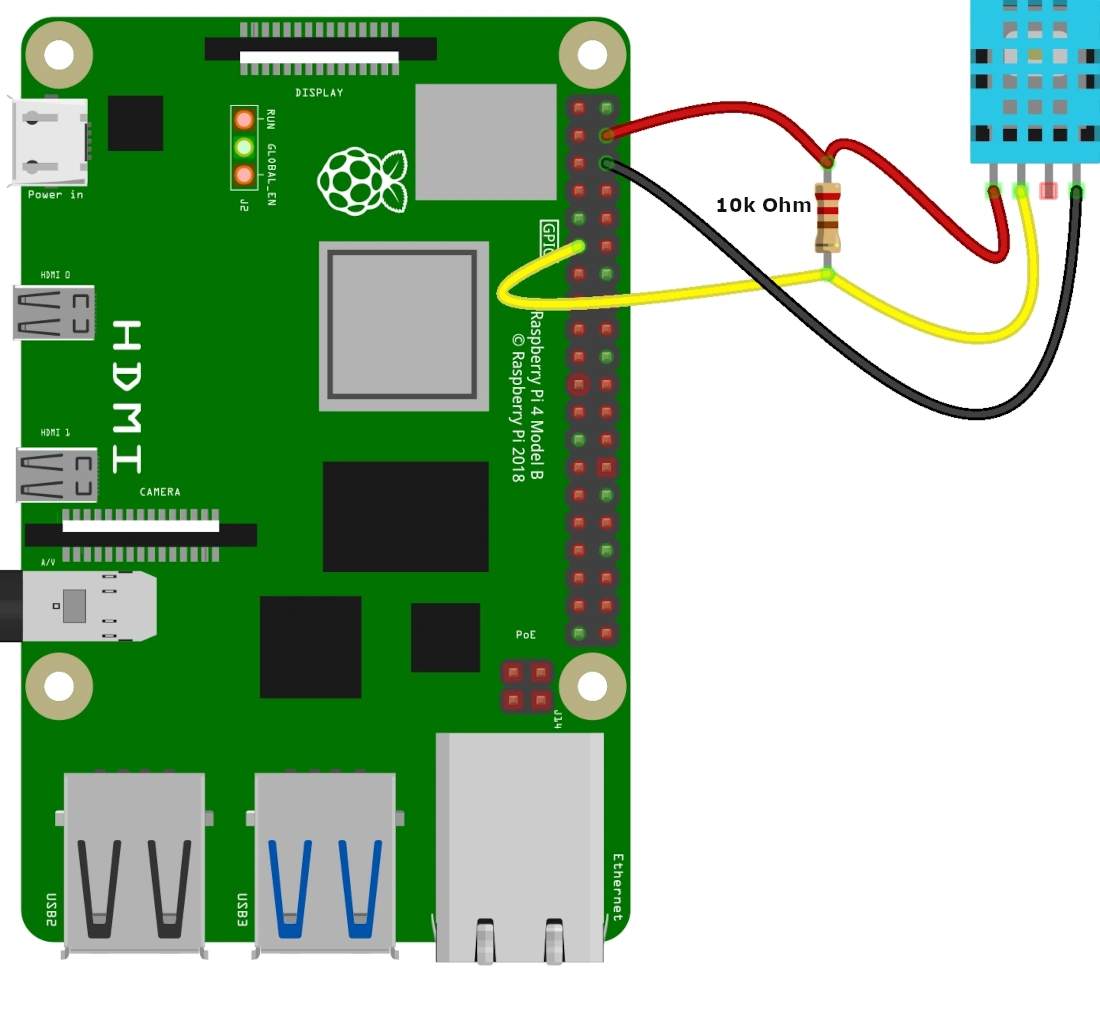
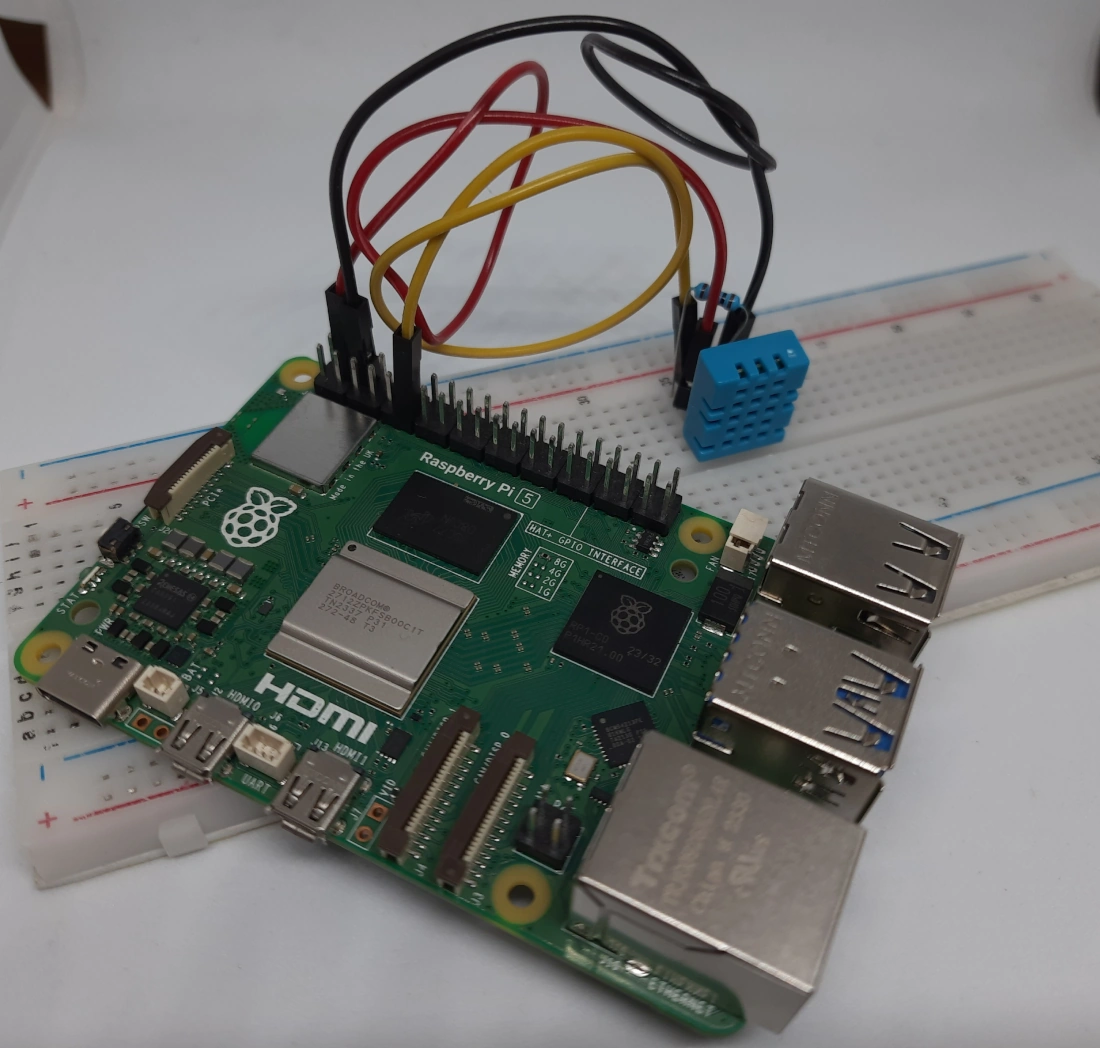
To configure the DHT11 humidity module sensor with a Raspberry PI computer board, you need to connect the VCC and GND pins to +5V (or 3.3V) and GND from Raspberry Pi and the Data Pin of DHT11 to the GPIO PIN 17 of the Raspberry PI, according to the following wiring diagram.
Note that the following procedure will work only with GPIO 17.
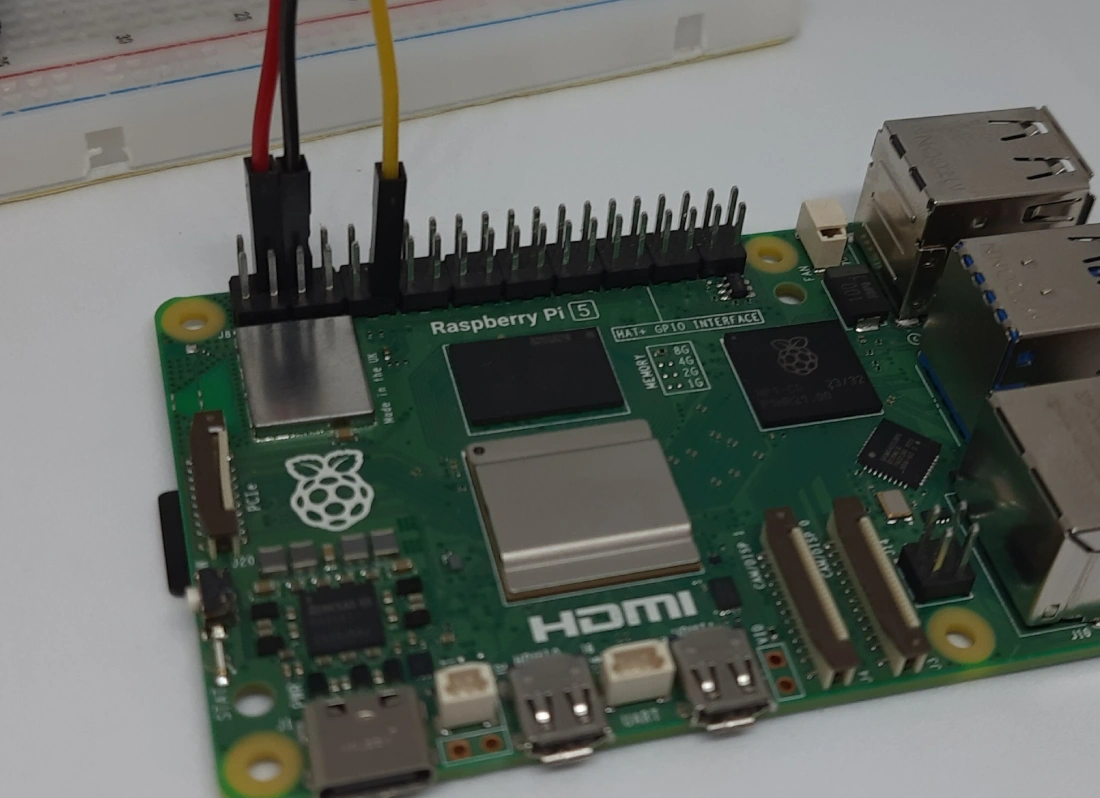
Please refer to the following picture for wiring, according to the Raspberry PI pinout:

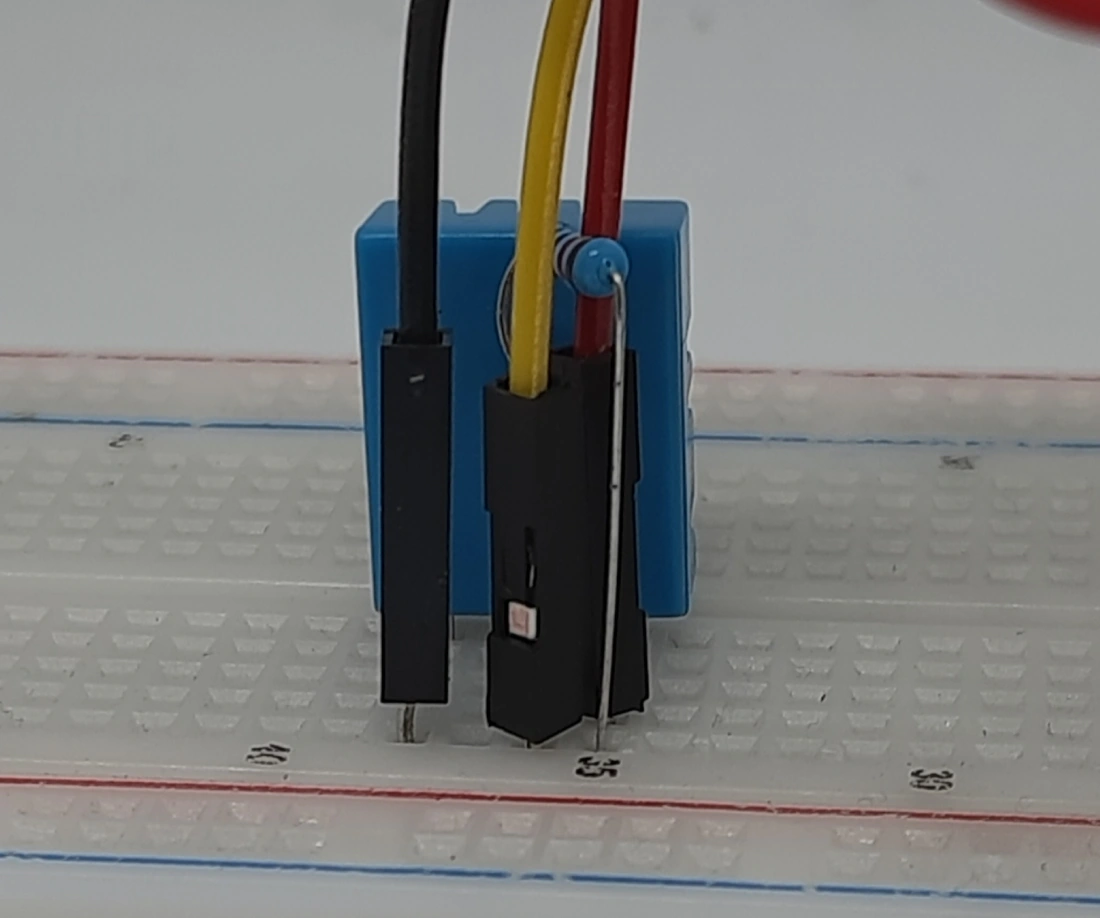
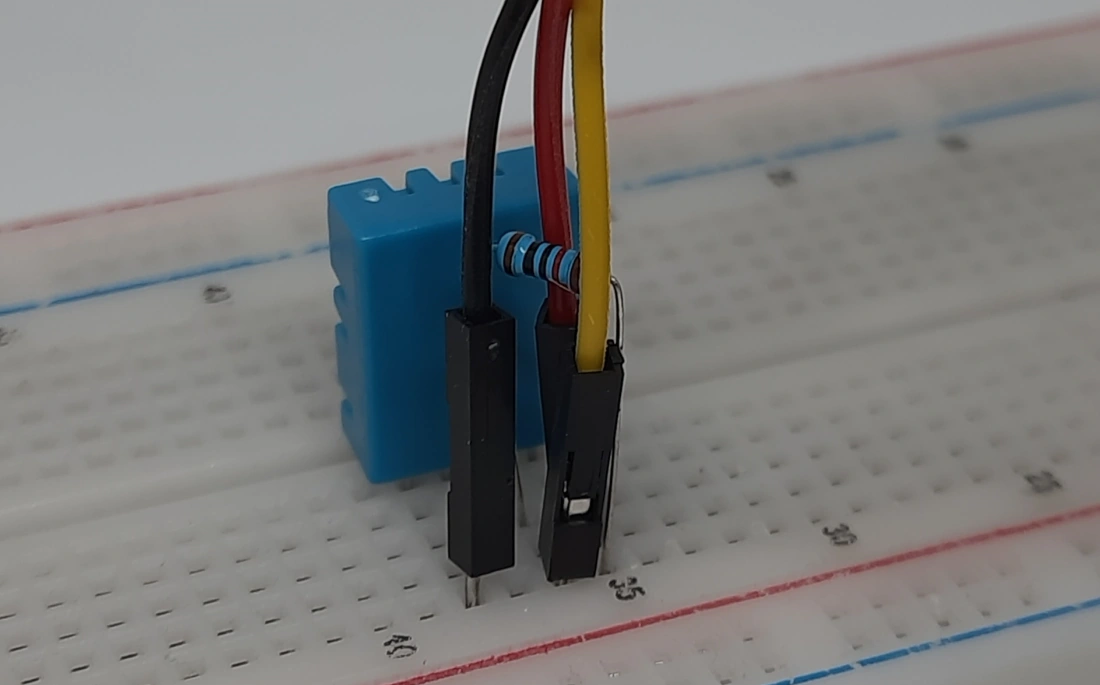
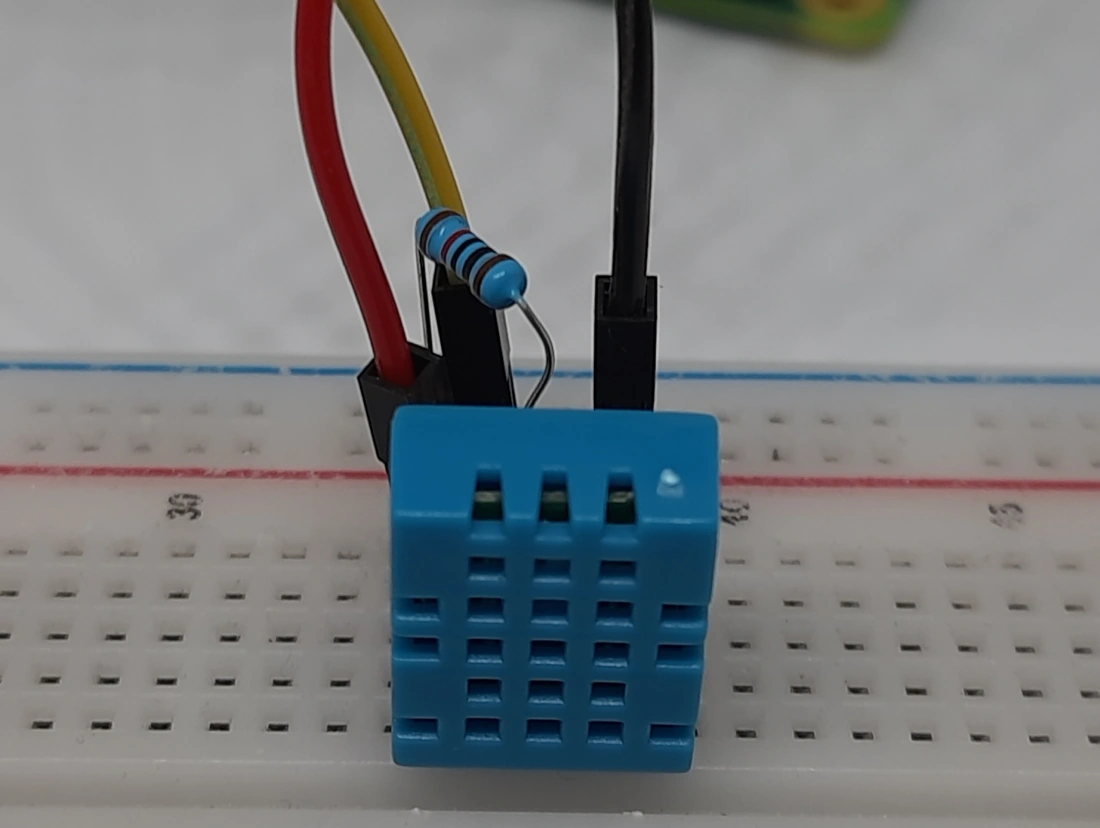
In case you have a DHT11 sensor, you must add the 10k Ohm pull-up resistor between the data cable and the VCC cable, as shown in the following picture:
Please find below some pictures from my home lab:
Install OS (Raspberry PI OS Lite)
Start preparing your Operating System. You can install the fast Raspberry PI OS Lite (without a Desktop environment) or opt for Raspberry PI OS Desktop, using its internal terminal.
Make sure your OS is up to date with the following commands:
sudo apt update -y && sudo apt upgrade -yConfigure DHT11 Overlay
With the newer Raspberry PI OS kernels we don’t need anymore to use python libraries to use the DHT11 sensor, as it is already supported by the kernel. We just need to edit the config.txt file:
sudo nano /boot/firmware/config.txtand append the following line at the end of the file:
dtoverlay=dht11,gpiopin=17Save and close.
We finally need to reboot the Raspberry PI so that we can have the the changes working:
sudo reboot nowAfter our Raspberry PI reboots, we can check if the DHT11 is correctly working. It should be mapped by the kernel at the “device0” of the “iio” folder, so you should be able to read the temperature with the following cat command:
cat /sys/bus/iio/devices/iio:device0/in_temp_inputThis will give you the temperature in Celsius degrees multiplied by 1000, as in the following output of my board:
pi@raspberrypi:~ $ cat /sys/bus/iio/devices/iio:device0/in_temp_input
20100
From this example you can have the correct temperature value by dividing the result by 1000, so in my case, it’s 20.1°C.
IMPORTANT NOTE:
If you get an error similar to the following:
pi@raspberrypi:~ $ cat /sys/bus/iio/devices/iio\:device0/in_temp_input
cat: '/sys/bus/iio/devices/iio:device0/in_temp_input': Input/output error
Then you can fix it by updating your Raspberry PI firmware to a specific firmware pull which makes the DHT11 sensor to work. It worked with my Raspberry PI 5 model B and Raspberry PI 3 model A+, so this should work with any newer computer board. For older ones, please check that the new firmware will not negatively affect your computer board by asking the Raspberry PI forum or support.
You can do this operation with the following command, then rebooting:
sudo rpi-update pulls/6454
sudo reboot
Similarly, you can get the relative humidity value, again multiplied by 1000, with the following command:
cat /sys/bus/iio/devices/iio:device0/in_humidityrelative_inputIn my case, I get the following output:
pi@raspberrypi:~ $ cat /sys/bus/iio/devices/iio:device0/in_humidityrelative_input
71800
The correct way to read this value is by dividing it by 1000 and considering the result as a humidity percentage, so my value is 71.8%.
Use Raspberry PI and DHT11 Temperature and Humidity in Python Projects
To use the sensor in your Raspberry PI and DHT11 projects with Python, you just need to read from the Python program the file values, also correctly handling the errors which could arise.
You can get directly in your Raspberry PI from my download area the small script I’ve prepared:
wget https://peppe8o.com/download/python/dht11/dht11.pyThe following will explain the script line by line.
We don’t need any specific library to read the values. We’ll import only the sleep function from the Python time library in order to give a few time between each reading. Without this time, the DHT11 readings could be too much fast and the sensor could not answer properly:
from time import sleepTo make our script as simple and easy to read as possible, we’ll define 2 custom functions. The read_bus() function will open any file for reading and read a single line of it. Used with the DHT11 overlay, it will return the values as previously seen with the Linux cat function. So, basically it opens a file (which path is expected as input, reads the value, closes the file and returns the read value:
def read_bus(file):
    f = open(file,"rt")
    value = int(f.readline())
    f.close
    return value
The following dht11_val() custom function will try to read the temperature and humidity values, returning them already divided by 1000.
It initializes the “t” and “v” variables to zero.
Then, the try: .... except statements will try to execute the code lines within the try part. This section just uses the read_bus() functions to read the in_temp_input and in_humidityrelative_input files, assigning them to the related variables. If the values are read correctly, it mover to the final return statement. If any error occurs in one of these readings, the except statement will manage the error by printing the error message and setting to “N/A” both the temperature and humidity values.
At the end of this custom function, the return statement will give us back the temperature and humidity measurements:
def dht11_val():
    t = h = 0
    try:
        t = read_bus("/sys/bus/iio/devices/iio:device0/in_temp_input")/1000
        h = read_bus("/sys/bus/iio/devices/iio:device0/in_humidityrelative_input")/1000
    except Exception as e:
        print(e)
        t = h = "N/A"
    return t, h
So, at the end of the dht11_val() execution we’ll have as result “N/A” if an error occurred or the required values.
With these custom functions, our program becomes really easy. For this test, we’ll execute an infinite loop with the while True: line. At each loop, the first action is reading the temperature and humidity values:
while True:
    (temp, hum) = dht11_val()
After reading the values, if there were no reading errors (which means that both temperature and humidity are different from “N/A”), then we’ll print them in our Raspberry PI terminal console:
    if temp != "N/A" and hum != "N/A":
        print("Temperature %(t)0.2f°C, Humidity: %(h)0.2f%%" % {"t": temp, "h": hum})
The final sleep(1) assures that every check of the DHT11 sensor values will have at least 1 second of interval:
sleep(1)Test the dht11.py script
You can test the script by issuing the following command from your terminal:
python3 dht11.pyThen you should get the Raspberry PI readings of DHT11 temperature and humidity like in the following output:
pi@raspberrypi:~ $ python3 dht11.py
Temperature 20.30°C, Humidity: 71.30%
Temperature 20.30°C, Humidity: 71.30%
Temperature 20.30°C, Humidity: 71.30%
Temperature 20.30°C, Humidity: 71.30%
Temperature 20.30°C, Humidity: 71.30%
Temperature 20.30°C, Humidity: 71.30%
Temperature 20.30°C, Humidity: 71.30%
At any time you can stop the script from running by using the CTRL+C keys of your keyboard.
What’s Next
Interested in more cool ways to use your Raspberry PI computer board? Take a look at peppe8o Raspberry PI computer tutorials!
Enjoy!

Open source and Raspberry PI lover, writes tutorials for beginners since 2019. He's an ICT expert, with a strong experience in supporting medium to big companies and public administrations to manage their ICT infrastructures. He's supporting the Italian public administration in digital transformation projects.
![]()
![]()
![]()
![]()
![]()
![]()
![]()


Hi
Simple starter project, works great, except.!
Program copied using Thony, Ok
Run 1st time no problem,
Stop program using Crtl C, to make change to program.
Program will not rerun without rebooting pi
Gives error “unable to set line 17 to input”
Any ideas.
Thanks for taking time to put up your projects, appreciated
Hi Stephen,
thank you for your feedback. differently from some other python script, as before referenced this is an adafruit code. Before reporting what is my supposed solution, please find below some considerations.
When you use GPIO library, at code starting you usually set PIN working state with GPIO.setup(). This function tells Raspberry PI if each PIN will be used as input or output. This function also marks the PIN as “in use” and every successive attempt to reuse the same PIN will warn user that the PIN is already “marked” untill you reboot or clean GPIOs status. Surely adafruit set PIN in their imported libraries but final cleaning is missing.
A solution to this problem should be adding an exception which catches keyboard interrupt (CTRL+C) and cleans GPIO PIN when before script exit. New code should include the following (change only from while statement and keep previous lines):
except KeyboardInterrupt:
print(‘interrupted!’)
GPIO.cleanup()
Please get new code from your Raspberry PI with following command:
wget http://peppe8o.com/download/python/dht_test.py
I added this to a download file because wordpress comments cut spaces, which are really important in python code…
Please, also let me know it this works, so that I can update my post code accordingly.
Thank you very much.
Hi m8
I got the error as sho´n below here?
Python 3.7.3 (/usr/bin/python3)
>>> %Run dht_test.py
Traceback (most recent call last):
File “/usr/lib/python3.7/ast.py”, line 35, in parse
return compile(source, filename, mode, PyCF_ONLY_AST)
File “/home/pi/Desktop/dht_test.py”, line 14
except RuntimeError as error: # Errors happen fairly often, DHT’s are hard to read, just keep going
^
IndentationError: unindent does not match any outer indentation level
Kind regard
-Jens
Hi Jens,
try removing 1 space char before “try:”. It appears a banal indenting error and Python is rigid on indentation…
Please let me know if it works.
Dammmm you are good m8.
Thx, its working just fine now.
-Jens, Denmark
Hi again…
Now I got this error:
>>> %Run dht_test.py
Unable to set line 17 to input
after restart of the program.
-Jens
Same error as Stephen (a few comments above).
Try this script:
wget http://peppe8o.com/download/python/dht_test.py
where I addded “except KeyboardInterrupt:” exception management which cleans GPIOs on CTRL+C interruption.
Please let me know if this works, so that I can publish this version instead of old.
Many thanks!
import time
import board
import adafruit_dht
from datetime import datetime
#Initial the dht device, with data pin connected to:
dhtDevice = adafruit_dht.DHT11(board.D17)
while True:
try:
# Print the values to the serial port
temperature_c = dhtDevice.temperature
temperature_f = temperature_c * (9 / 5) + 32
humidity = dhtDevice.humidity
now = datetime.now()
current_time = now.strftime(“%H:%M:%S”)
print (“Ny læsning: “)
print(“Current Time =”, current_time)
print(“Temp: {:.1f} F / {:.1f} C Humidity: {}% “.format(temperature_f, temperature_c, humidity))
print (“———-“)
time.sleep(2.5)
except RuntimeError as error: # Errors happen fairly often, DHT’s are hard to read, just keep going
print(error.args[0])
print (“Fejl i læsning af pin”)
except KeyboardInterrupt:
print(‘interrupted!’)
GPIO.cleanup()
As u Can see I already did that
Same issue reported at https://github.com/adafruit/Adafruit_CircuitPython_DHT/issues/27.
This is definitely an Adafruit CirtuiPython bug. In that thread, some user refer they solved by:
– changing “dhtDevice = adafruit_dht.DHT11(board.D17)” with “dhtDevice = adafruit_dht.DHT11(board.D17,False)”
– changing “GPIO.cleanup()” with “dhtDevice.exit()”
Please can you test these changes?
Yep, coming here:
With “False” i got this error: “NameError: name “false” is not defined.
Without, i get this one 2nd run of the program: Unable to set line 17 to input
Kind regards Jens
I need to cable again my RPI with DHT11 and make some more tests. Please give me a few days
Super m8
-Jens
Hi Jens, just a question: when you get “Unable to set line 17 to input”, what do you get from this command:
ps -ef | grep dht
Ps command lists all running processes in your RPI, while grep filters to output only those having *dht* in process name (supposing that you have left script name including dht string).
I wasn’t able to reproduce your error terminating script execution with CTRL+C, while I had your same error “pausing” script output with “CTRL+Z”.
Hi,
I’m getting this error how to fix it
unsupported operand type(s) for *: ‘NoneType’ and ‘float’
Where are you getting this error? Please can you provide the full error lines?
hi guys i have tried everything on this page lol and im still getting “Unable to set line 17 to input” do we have any other ideas
However idk if its worth noting im doing this with a raspberry pi4
I cant send to u here, due to this fail on your homepage:
Not Acceptable!
An appropriate representation of the requested resource could not be found on this server. This error was generated by Mod_Security.
Below here, is the last part of a hole lot of words.
DBUS_SESSION_BUS_ADDRESS=unix:path=/run/user/1000/bus TEXTDOMAIN=Linux-PAM _=/usr/bin/grep
-Jens
Thanks for the great directions. I followed them and the code worked first time.
hi,
how to fix this error
temperature_f = temperature_c * (9/5)+32
TypeError: unsupported operand type(s) for *: ‘NoneType’ and ‘float’
OK, this seems an error coming from your DHT sensor not giving back any reading.
Please, firstly check that connections are correctly wired.
If all the wiring is ok, then try changing following code:
temperature_f = temperature_c * (9 / 5) + 32humidity = dhtDevice.humidity
print("Temp: {:.1f} F / {:.1f} C Humidity: {}% ".format(temperature_f, temperature_c, humidity))
with this:
humidity = dhtDevice.humidity

if temperature_c is not None and humidity is not None

temperature_f = temperature_c * (9 / 5) + 32

print("Temp: {:.1f} F / {:.1f} C    Humidity: {}% ".format(temperature_f, temperature_c, humidity))

else

print("Reading Error")
Please note that in this comment area I can’t write tabulations, so you need to add tab (or space) before 2nd, 3rd and 5th row.
In case of any problem, please write to me at giuseppe@peppe8o.com
I avoid the “unable to set line to input”, by getting the GPIO to reset by killing, in my case, the libgpiod_pulsein64 linux process, which was still running after a ctrl-c/break.
Hi John, your suggestion makes me think that starting the python script with a check at the running processes and killing the concurrent could improve the script’s reliability. I’ll try it in the following weeks. In the meanwhile, thank you for your feedback!
Pi 3B OK, thank you
Works fine, exzellent.
Is this also working with DHT22 ?
Regards!
Hi Marc. I can’t check as I don’t have a DHT22 to test. For sure, you must use the proper dtoverlay parameter for dht22. Please let me know if works
Hello PEPPE,
DHT22 works without modification of the config.txt
Best regards
Marc
Great, many thanks for your feedback!
Best regards,
Giuseppe
Thanks,
I got it to work on a Zero and a 3A+.
Thank you for your feedback, Neil!