
Last Updated on 13th October 2023 by peppe8o
In this tutorial, I will show you examples in Raspberry PI Pico of print() usage with MicroPython.
This will show you how to use advanced options and formatting techniques, as I’ve found that the MicroPython official pages lack this kind of info.
Even if you can use the print() function to show sensor values, for the tests of this tutorial you don’t need to connect anything to your Raspberry PI Pico Pinout.
The Print() function
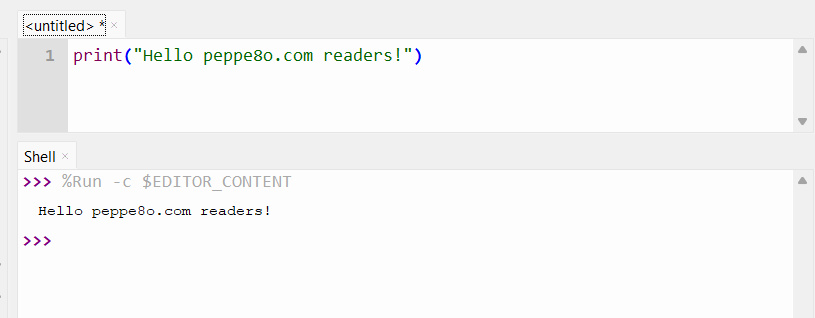
In MicroPython, this function lets the user show a customized text in the current shell. If you’re using an IDE (like Thonny), this will appear in the related shell area:
If you’re running the Pico alone, the print() function also allows you to write logs.
A common usage of the print() function is to debug your code: when you’re writing a new program, showing the value of your variables at certain points will make you sure that these variables are getting the right value and the program is flowing as expected.
What We Need
As usual, I suggest adding from now to your favourite e-commerce shopping cart all the needed hardware, so that at the end you will be able to evaluate overall costs and decide if to continue with the project or remove them from the shopping cart. So, hardware will be only:
- A common computer (maybe with Windows, Linux or Mac). It can also be a Raspberry PI Computer board
- Raspberry PI Pico microcontroller, both with or without WiFi (with a common micro USB cable)
First Step: Install MicroPython on Raspberry PI Pico
Connect your Raspberry PI Pico to Thonny and install MicroPython. For the very first steps and to install MicroPython, you can refer to my tutorial about the First steps with Raspberry PI Pico.
The print() function is already available in the MicroPython firmware without the need to import any module.
Concatenating and Formatting the Print() Output
Printing static text on the shell may be of very little help unless you use it just to see where the program execution currently is. A more useful use case is printing the value of your variables so that you can see what’s really happening in your program. Here comes one of the most common errors in the first stages of your Raspberry PI Pico programs. You concatenate the text and your variables (in MicroPython, text concatenation can be achieved with the “+” operator), and you get a “TypeError: can’t convert ‘int’ object to str implicitly” error:
>>> a = 0.9
>>> print("The variable is equal to " + a)
    Traceback (most recent call last):
      File "<stdin>", line 1, in <module>
    TypeError: can't convert 'int' object to str implicitly
Yes, differently from many programming languages, in (Micro)Python the print function doesn’t accept concatenation between text and numbers. So, you can concatenate text strings or you can print a number.
Let’s look at the different solutions to this need and what are the advantages of each one.
Solution 1: Transforming Numbers in Strings
The very first solution is using the str() function inside the print() function to convert numbers into strings and concatenate them inside the print argument. The previous example becomes:
>>> a = 0.9
>>> print("The variable is equal to " + str(a))
The variable is equal to 0.9
In this way, you can concatenate any number of text and variables in your print() statement, by adding more concatenation operators (“+”) and all the required parts of your print statement.
It is important to note that if you want to print brachets, you must use the escape character (“\”) before them:
>>> a = 0.9
>>> print("The variable is equal to \"" + str(a) + "\"")
The variable is equal to "0.9"
This solution can be very easy to write and your print() line will be very easy to read. But it doesn’t allow you to give specific formatting to your numbers. For example, if you want to print the “a” variable as a percentage (0.9 means 90%), you must manipulate the variable inside the str() statement:
>>> a = 0.9
>>> print("The variable is equal to " + str(a*100) + "%")
The variable is equal to 90.0%
Solution 2: Using multiple print() arguments
Not everyone knows that, in MicroPython, the print() function accepts multiple arguments, separated by commas. Our example becomes as follows:
>>> a = 0.9
>>> print("The variable is equal to", a)
The variable is equal to 0.9
Please note that, by default, the print() function adds a space as separator between the different arguments. If you want to change it to a specific character, you can use the following “sep” option:
>>> a = 0.9
>>> print("The variable is equal to", a, sep = ": ")
The variable is equal to: 0.9
Please note that the “sep” option, as well as any other MicroPython print() option, must be included after the list of objects to print.
This solution lets you avoid using the str() function inside the print statement, but it doesn’t make it simpler to give a specific number formatting unless you manipulate the variable value inside the print statements. Moreover, please note that if you set the “sep” option it will be applied between every print argument in your line, so bringing sometimes into unwanted output like the following:
>>> a = 0.9
>>> print("The variable is equal to", a*100, "%", sep = ": ")
The variable is equal to: 90.0: %
Solution 3: Using the Modulo Operator and String Interpolation
The Modulo operator (the % character) is also an arithmetic operator which can help you to show numbers and add variables in your print argument.
This works by referencing the variables in your print statement with a string interpolation notation built as follows:
%[width][.precision][format]
Where:
- [width] is the number of total characters for the number string (it adds spaces before the number if there are no significative values
- [.precision] is the number of floating characters after the dot sign
- [format] identifies the format type to give to your variable
The also Modulo operator requires that you provide the variable at the end of the string after a “%” sign.
A practical example will make it more clear.
>>> a = 0.9
>>> print("The variable is equal to %0.3f" %a)
The variable is equal to 0.900
Here we provide the “0.3f” string interpolation which means:
- 0 -> no minimum padding required
- .3 -> at least 3 characters for the floating value
- f -> this is a floating number
It is also important to understand what the “width” means in the string interpolation. For this, let’s look at a new example:
>>> a = 0.9
>>> print("The variable is equal to:%12.3f" %a)
The variable is equal to:       0.900
In the output line, after the “equal to:” there are 7 spaces + 5 characters composing the floating number (including the dot) so that the output has exactly 7+5=12 characters in total.
It is important to note that if you want to print the percentage sign as char in your output, you must write it 2 times:
>>> a = 90
>>> print("The variable is equal to: %0.2f %%" %a)
The variable is equal to: 90.00 %
You can add multiple variables to your string by aggregating them into a list object after the modulo operator:
>>> a = 0.9
>>> b = "variable"
>>> print("The %s is equal to: %0.2f" %(b, a))
The variable is equal to: 0.90
In the case just shown, the modulo operator will use the same appearing order to address the variables in the print string (the first % occurrence will use the first variable in the list).
If you need to add a reference in order to use your variables with a more flexible schema, you can name them and use this name in the print argument as follows:
>>> a = 0.9
>>> b = "variable"
>>> print("The %(name)s is equal to: %(value)0.2f" % {"value": a, "name": b})
The variable is equal to: 0.90
Another interesting feature of this formatting technique is that we can also use the modulo operator in order to achieve common formats that usually would require more complicated transformation tasks. Please find below some examples:
>>> a = 76
>>> print("Lowercase exponent: %0.2e" % a)
Lowercase exponent: 7.60e+01
>>> print("Lowercase hexadecimal: %0.2x" % a)
Lowercase hexadecimal: 4c
>>> print("Converting to Char: %c" % a)
Converting to Char: L
Solution 4: Using the str.format() Method
Similarly to the string interpolation just seen, the format() method allows you to automatically convert string parts (placeholders) with variables into a string. The placeholders are identified by curly brackets.
Let’s look at an example:
>>> a = 13
>>> print("The variable is equal to: {}".format(a))
The variable is equal to: 13
You can also use multiple placeholders/variables, by providing them in 3 different ways:
- an ordered list
- addressing the placeholders with the list position of the variable (starting from zero)
- using keys
>>> a = 13
>>> name = "variable"
>>> print("The {} is equal to: {}".format(name, a))
The variable is equal to: 13
>>> print("The {1} is equal to: {0}".format(a, name))
The variable is equal to: 13
>>> print("The {record} is equal to: {value}".format(value = a, record = name))
The variable is equal to: 13
Similarly to the previous solution, you can use string interpolation in order to achieve a specific format for your numbers. In this case, you must use a colon to specify that the format string follows. You can optionally add the variable reference before the colon:
>>> a = 0.9
>>> print("The variable is equal to: {0:1.2f}".format(a))
The variable is equal to: 0.90
An important and useful case, the format() method also allows your Raspberry PI Pico to print integer numbers in binary strings with the “b” format type:
>>> a = 10
>>> print("The variable is equal to: {:b}".format(a))
The variable is equal to: 1010
It may appear useless, but this can be of great help when your Raspberry PI Pico is dealing with low-level communications.
Solution 5: Using the f-strings
F-strings work similarly to the format() method, but they provide a more concise writing expression. They directly use your external variable inside the string text (with curly brackets) and allow you to use the same string interpolation formats as the previous method, including the binary format.
F-strings are identified by a text string preceded by a “f” symbol:
>>> a = 0.9
>>> print(f"The variable is equal to: {a}")
The variable is equal to: 0.9
>>> print(f"The variable is equal to: {a:0.3f}")
The variable is equal to: 0.900
>>> a = 26
>>> print(f"The variable is equal to: {a:b}")
The variable is equal to: 11010
Differences between the previous solutions
Regarding the writing practice, it is up to you to find the string formatting solution that better fits your needs and makes you more comfortable.
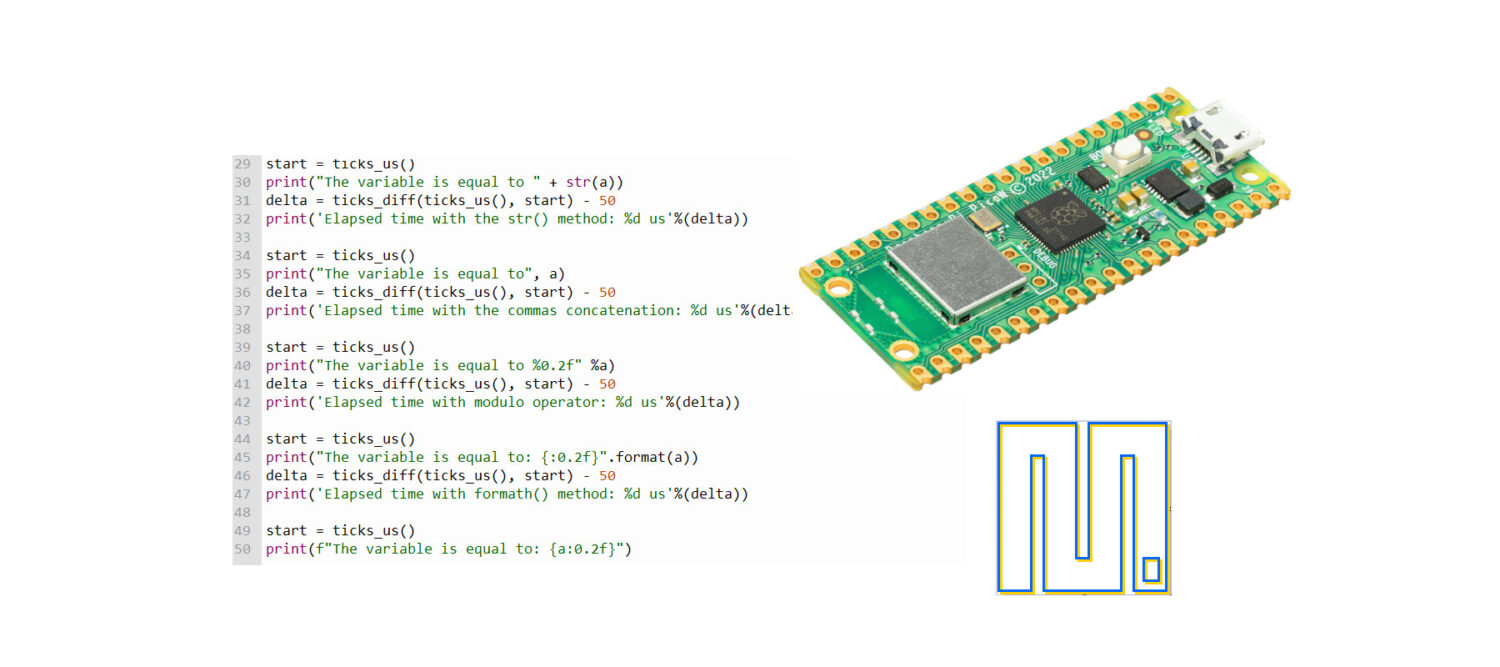
But the different formatting methods also give you different performances. I will use the following MicroPython lines in order to check and compare these performances, by checking the elapsed microseconds:
from utime import ticks_us, sleep, ticks_diff

start = ticks_us()
# actions to be measured must stay here
delta = ticks_diff(ticks_us(), start)

print('Elapsed time: %d us'%(delta))
Please note that this performance measuring method also adds around 50 microseconds to the computing tasks inserted at the “# actions to be measured must stay here” line. So a more precise calculation would subtract “50” to the delta time:
from utime import ticks_us, sleep, ticks_diff

start = ticks_us()
# actions to be measured must stay here
delta = ticks_diff(ticks_us(), start) - 50

print('Elapsed time: %d us'%(delta))
You can also get the full performance comparison code of these Raspberry PI Pico print() techniques with the following MicroPython script:
print-performance-comparison.py
The results performance are shown in the following chart, where lower time is better:
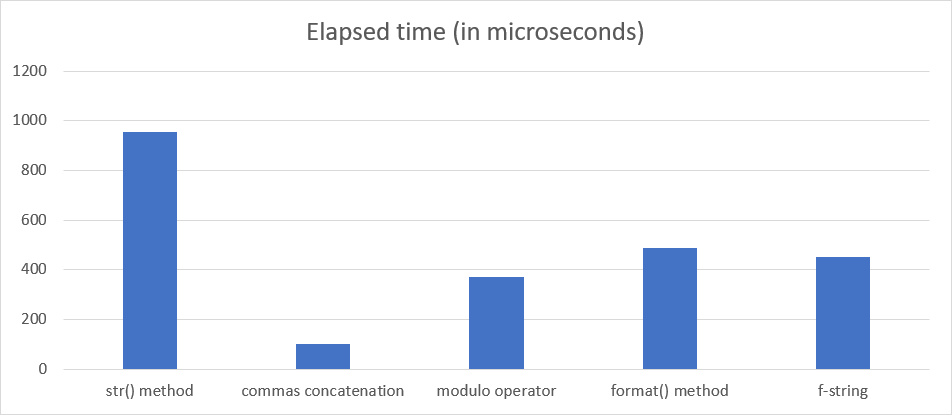
Here we can see that concatenating with commas provides the best performances, but there’s no way to control the values formatting. The modulo operator gives the best performance when a formatting task is required. The str() concatenation requires about the double of effort (and time elapsed) compared to the other formatting techniques. F-string has performance comparable with the modulo operator but provides a composition method that could make it more comfortable for many people.
File Option with Print()
The Raspberry PI Pico print() function can also add information to files saved in your Pico storage. This is really useful when you need to keep logs about how things are going when your microcontroller isn’t connected to an IDE.
The following shows you the classic code lines to open a file, write in it and close the file:
filename = "log.txt"
with open(filename, 'w') as f:
    print('Hello world', file=f)
Here, you can note 2 important options:
- In the “open()” function, the “w” option stands for “write”. At every run of this open method, the content of the file will be cleared before writing the new content. As alternative, you can use the “a” (which stands for “append”) in order to append your new content after the existing instead of clearing. Both options will create a new file if it doesn’t exist.
- In the print() options, the “file = f” will tell the print function to write the output to the file object instead of showing it in the shell.
If you’re writing a new file in your Raspberry PI Pico storage from an IDE like Thonny, the first time you write the file you may require a refresh to see the file in your microcontroller (CTRL+F2 in Thonny to restart the backend).
It is important also to know that when using commas concatenation for the text the print() requires that the options come at the end of the arguments.
End Option with Print()
Usually, when you print whatever string (both on shell and files), the following line will go into a new line. This is because the print() function in MicroPython appends, by default, a “\n” at the end of the print output. The “\” is call “escape character” and enables you to add to your text some “invisible” characters with special functions. For example, the “\n” means to go to a new line.
You can control this by using the “end” option. Let’s look at some examples.
Our test case will be the following print statements:
print('Hello from peppe8o.com')
print('Hello world')
These will generate the following output:
Hello from peppe8o.com
Hello world
They have the same output as explicating the “\n” end option:
print('Hello from peppe8o.com', end="\n")
print('Hello world', end="\n")
You can also inline the two output lines by changing the end option with a different character 8or even with nothing) as follows:
print('Hello from peppe8o.com', end=";")
print('Hello world', end=";")
Thaw will give you the following result:
Hello from peppe8o.com;Hello world;But there are also funny ways to use the escape characters as end option in your print. For example, the “\t” adds a horizontal tab, making the text aligning at the tabs positions:
print('Hello from peppe8o.com', end="\t")
print('Hello world')
resulting in:
Hello from peppe8o.com Hello worldThe “\r” (Carriage Return) will move the virtual cursor of your print statement at the beginning of the line, allowing you to overwrite the previous text. This is a cool effect for MicroPython applications running on shell, in order to make the shell output seem “animated”. Try this code:
from time import sleep
print('Hello', end="\r")
sleep(0.4)
print('      from', end="\r")
sleep(0.4)
print('           peppe8o.com', end="\r")
sleep(0.4)
print('Hello from peppe8o.com')
It is important to note that the carriage return will not clear the line. So, if your previous print statement has more characters compared to the next one then part of the old message will remain visible. Look at this test:
print('Hello from peppe8o.com', end="\r")
print('Hello World!')
Resulting in:
Hello World!eppe8o.comHere, the blue part comes from the first print statement, while the red part comes from the second print statement.
Sep Option with Print()
The last option of this tutorial about Raspberry PI Pico print() options with MicroPython has been already touched in the previous examples. The “sep” option allows you to specify the separator character between multiple print inputs. This is useful, for example, when generating files to be analyzed from CSV (Comma Separated Values) readers like MS Excel.
Let’s look at the following example:
Name = "Giuseppe"
blog = "peppe8o"
a = 13
b = 100

print(Name, blog, a, b, sep=";")
That will give you the following output:
Giuseppe;peppe8o;13;100What’s Next
Interested in doing more projects with your Raspberry PI Pico? Try to look at my Raspberry PI Pico tutorials for useful and funny tutorials!
Enjoy!

Open source and Raspberry PI lover, writes tutorials for beginners since 2019. He's an ICT expert, with a strong experience in supporting medium to big companies and public administrations to manage their ICT infrastructures. He's supporting the Italian public administration in digital transformation projects.
![]()
![]()
![]()
![]()
![]()
![]()
![]()


