

Last Updated on 16th October 2024 by peppe8o
This tutorial will show you how to install a TOR proxy in your Raspberry PI. You can use this guide with any Raspberry PI computer board, but you can’t do it with a Raspberry PI Pico (as this is a microcontroller, not a computer).
What Are Proxy Servers And Why Use Them
Following Wikipedia’s description, “a proxy server is a server (a computer system or an application) that acts as an intermediary for requests from clients seeking resources from other servers. A client connects to the proxy server, requesting some service, such as a file, connection, web page, or other resource available from a different server and the proxy server evaluates the request as a way to simplify and control its complexity“. A descriptive picture is also shown on the same page:

Proxy servers are useful in many contexts:
- in Office context: to control internet traffic by blocking some websites or some keywords, to manage contact with external internet from a single point or to optimize internet bandwidth usage by caching pages at the proxy level
- in Home context: for example to control family internet access to block dangerous websites for children
- in Personal use context: for example to use an anonymous connection or to bypass network ISP blocks
What Is Tor Project
Also for this description Wikipedia comes to help us in Tor (anonymity network) Wikipedia page:
“Tor is free and open-source software for enabling anonymous communication. The name is derived from an acronym for the original software project name “The Onion Router”. Tor directs Internet traffic through a free, worldwide, volunteer overlay network consisting of more than seven thousand relays to conceal a user’s location and usage from anyone conducting network surveillance or traffic analysis. Using Tor makes it more difficult to trace Internet activity to the user: this includes “visits to Web sites, online posts, instant messages, and other communication forms”. Tor’s intended use is to protect the personal privacy of its users, as well as their freedom and ability to conduct confidential communication by keeping their Internet activities from being monitored.“
Tor Project is a nonprofit association which currently develops software to make easy use of the Tor Network.
Do I Need A Tor Proxy Or Alternative Way To Use Tor Network?
You can find a simple answer to this question with a few checks:
- If you need a way to use the TOR network with your current browser or you need to connect a number of computers maintaining their current browsers, then you would opt for a Proxy
- If can use a different browser within a single computer, then you could also evaluate the Tor Browser installation
TOR Proxy can be installed in a cheap Raspberry PI with the following steps in this article.
On the other hand, a TOR Browser is a browser that can be installed on your PC and allows you to browse the web with a TOR network. People needing a TOR Browser can get it from TOR Browser Download Page.
What We Need
As usual, I suggest adding from now to your favourite e-commerce shopping cart all the needed hardware, so that at the end you will be able to evaluate overall costs and decide if to continue with the project or remove them from the shopping cart. So, hardware will be only:
- Raspberry PI Computer Board (including proper power supply or using a smartphone micro USB charger with at least 3A)
- high speed micro SD card (at least 16 GB, at least class 10)

Step-By-Step Procedure
In this guide, we are going to use the Raspberry PI OS Lite as the Operating System. Then we’ll install Tor from the Raspberry PI OS repository and apply a very simple configuration to use it as a Socks proxy.
I’ll configure Tor proxy to manage access for all clients on a 192.168.1.0/24 private network to the internet. You will need to modify this network depending on your needs and networking configurations.
Prepare the Raspberry PI Operating System
The first step is installing the Raspberry PI OS Lite (I suggest the 64-bit version, for boards supporting it) to get a fast and light operating system (headless). This is the best solution for this project as the missing desktop environment means that more resources will be focused on running your programs. If you need a desktop environment, you can also use the Raspberry PI OS Desktop, in this case working from its terminal app. Please find the differences between the 2 OS versions in my Raspberry PI OS Lite vs Desktop article.
Please make sure that your OS is up to date. From your terminal, use the following command:
sudo apt update -y && sudo apt upgrade -yFrom here, we can install our TOR proxy in Raspberry PI in 2 different (alternative) ways:
- with the classic aptitude package manager (APT), so getting it running inside the Raspberry PI OS. This method is suggested for people wishing to keep TOR running in their Raspberry PI. I suggest this method for beginners without any knowledge about Docker containers
- with Docker, so getting it running in a container (that you can install and remove without any changes in your Raspberry PI OS). This method is suggested for people wishing to try TOR, feeling free to remove it without the risk of having unused packages and files in their Raspberry PI OS. Please note that you can keep the TOR proxy running also with Docker containers.
I’ll show you both the ways in the following 2 chapters, please note that you must use only one of the following.
Install TOR proxy in Raspberry PI
Method 1: Install TOR with APT
With the aptitude package manager, you can install Tor by using the following terminal command:
sudo apt install torAt the installation end, you will have 2 services running as tor: “tor.service” and “tor@default.service“
The first one is a dummy service, which appears to the user as active but in exited status. In fact, a simple check:
sudo systemctl status tor.servicewill give the following result:
● tor.service - Anonymizing overlay network for TCP (multi-instance-master)
     Loaded: loaded (/lib/systemd/system/tor.service; enabled; preset: enabled)
     Active: active (exited) since Tue 2024-10-15 14:56:00 CEST; 16s ago
    Process: 5352 ExecStart=/bin/true (code=exited, status=0/SUCCESS)
   Main PID: 5352 (code=exited, status=0/SUCCESS)
        CPU: 1ms
…which is normal. The real service to check if Tor is running is the second one:
sudo systemctl status tor@default.serviceshould give a more familiar result:
● tor@default.service - Anonymizing overlay network for TCP
     Loaded: loaded (/lib/systemd/system/tor@default.service; enabled-runtime; preset: enabled)
     Active: active (running) since Tue 2024-10-15 14:56:00 CEST; 1min 7s ago
    Process: 5353 ExecStartPre=/usr/bin/install -Z -m 02755 -o debian-tor -g debian-tor -d /run/tor (code=exited, status=0/SUC>
    Process: 5354 ExecStartPre=/usr/bin/tor --defaults-torrc /usr/share/tor/tor-service-defaults-torrc -f /etc/tor/torrc --Run>
   Main PID: 5355 (tor)
      Tasks: 1 (limit: 9259)
        CPU: 1.698s
     CGroup: /system.slice/system-tor.slice/tor@default.service
             └─5355 /usr/bin/tor --defaults-torrc /usr/share/tor/tor-service-defaults-torrc -f /etc/tor/torrc --RunAsDaemon 0
Configure TOR
Tor’s main configuration file is named “torrc”. Before editing, create a backup copy:
sudo cp /etc/tor/torrc /etc/tor/torrc.backupA very simple configuration will expose the TOR Socks proxy service on the default TOR port (9050) and will accept connections only from the local LAN (192.168.1.0/24 in my case). It will run as a daemon so that we’ll not need to call it each time we’ll use it. Finally, it will store data in the default directory (/var/lib/tor/).
Edit configuration file:
sudo nano /etc/tor/torrcand make it include only the following lines (please remember to change “192.168.1.218” with your Raspberry PI’s IP address and “192.168.1.0/24” with your home LAN):
SocksPort 192.168.1.218:9050
SocksPolicy accept 192.168.1.0/24
RunAsDaemon 1
DataDirectory /var/lib/tor
Close and save the file. Restart the TOR service:
sudo systemctl restart tor@default.serviceCheck the TOR service restart to be sure that the service restarted without errors with the following command:
sudo systemctl status tor@default.serviceIf everything is ok, you should find something like the following line at the end of the service’s boot:
Oct 15 17:07:28 raspberrypi Tor[851]: Bootstrapped 100% (done): DoneAt this point, you can move to the “Configure Your Client To Use Proxy Server” chapter.
Method 2: Install TOR with Docker
Docker containers are a great way to get services isolated from your Raspberry PI: when you remove a container, you will be sure that no files will remain in your Raspberry PI. Using docker may appear more complicated at first time, but it assures a far better manageability of services even if the user must pay attention with data by using volumes as the internal files of your container will be destroyed at the container stop.
For this method, you must have Docker installed. If not, please refer to my tutorial to install docker in Raspberry PI (the Portainer section of the guide is not strictly required).
Please create a folder named at your choice (I will name it “tor”) and enter it:
mkdir tor
cd tor
As TOR doesn’t offer any official image from the Docker hub (the official Docker repository where you can download service images for free), we must build it from an Alpine container, then creating the TOR service with a Docker compose command. So, we need to create 2 files:
- “Dockerfile”: which will include all the instructions to create a TOR image
- “docker-compose.yaml”: which will tell to the docker compose command how to start the service
Let’s create the first file:
nano DockerfileAdd the following lines to the file:
FROM alpine:latest
RUN apk add --no-cache tor && \
    cp /etc/tor/torrc.sample /etc/tor/torrc
USER tor
CMD ["tor"]
Save and close the file. Now let’s create the second file:
nano docker-compose.yamlAnd add the following lines (please note that it is important to keep the indentation):
services:
  tor:
    build:
      context: .
    container_name: my_tor
    network_mode: "host"
    restart: unless-stopped
    volumes:
      - tor_conf:/etc/tor
      - tor_data:/var/lib/tor
volumes:
  tor_conf:
  tor_data:
Save and close.
Now, you need to issue the following command:
docker compose up -dAccording to the instructions in the previous 2 files, this command will:
- Download a base image (based on alpine, an ultra-lightweight base image)
- Install TOR inside the image
- Copy the configuration file from the sample for the “torrc” file
- Launch the TOR service
- create 2 persistent volumes for the configuration files and data files
In a very few time, the image should be up, as you can see from the docker ps -a command, at the “STATUS” column:
pi@raspberrypi:~/tor $ docker ps -a
CONTAINER ID   IMAGE     COMMAND   CREATED         STATUS         PORTS     NAMES
08d28522fcec   tor-tor   "tor"     2 minutes ago   Up 2 minutes             my_tor
As you can see, we named the container “my_tor”, so we can check the logs of this container with the docker logs command, followed by the container name:
pi@raspberrypi:~/tor $ docker logs my_tor
Oct 15 17:00:13.106 [notice] Tor 0.4.8.12 running on Linux with Libevent 2.1.12-stable, OpenSSL 3.3.2, Zlib 1.3.1, Liblzma 5.6.2, Libzstd 1.5.6 and Unknown N/A as libc.
Oct 15 17:00:13.106 [notice] Tor can't help you if you use it wrong! Learn how to be safe at https://support.torproject.org/faq/staying-anonymous/
Oct 15 17:00:13.106 [notice] Read configuration file "/etc/tor/torrc".
Oct 15 17:00:13.108 [notice] Opening Socks listener on 127.0.0.1:9050
Oct 15 17:00:13.108 [notice] Opened Socks listener connection (ready) on 127.0.0.1:9050
As you can see, the service is ready to listen for incoming connections from your devices wanting to use the TOR proxy in your Raspberry PI.
Before using it, we must set the “torrc” configuration file properly, so we must enter the volumes.
We created the docker-compose file in the “tor” folder (inside the user home) and we named the volumes “tor_conf” and “tor_data”. In this case, docker merges the folder name and the container name to ensure that each volume is unique in a name as “<folder>_<volume_name>”. So, for example, the tor_conf volume created inside the tor folder will be named “tor_tor_conf”.
Let’s look at the created volumes with the docker volume ls command:
pi@raspberrypi:~/tor $ docker volume ls
DRIVER    VOLUME NAME
local     tor_tor_conf
local     tor_tor_data
According to our volumes mapping in the “docker-compose.yaml” file, the torrc file should be inside the tor_tor_conf. You can get the current position of this volume by inspecting it with the docker inspect command, by looking for the “Mountpoint”:
pi@raspberrypi:~/tor $ docker inspect tor_tor_conf
[
    {
        "CreatedAt": "2024-10-15T19:00:12+02:00",
        "Driver": "local",
        "Labels": {
            "com.docker.compose.project": "tor",
            "com.docker.compose.version": "2.29.7",
            "com.docker.compose.volume": "tor_conf"
        },
        "Mountpoint": "/var/lib/docker/volumes/tor_tor_conf/_data",
        "Name": "tor_tor_conf",
        "Options": null,
        "Scope": "local"
    }
]
The volume mount point will be always owned by the root user of your Raspberry PI OS, so we can edit the files only with the sudo command or by using the root user. Let’s look at what is inside the volume:
sudo ls -la /var/lib/docker/volumes/tor_tor_conf/_dataYou should find something like the following, with our torrc file ready for editing:
total 32
drwxr-xr-x 2 root root  4096 Oct 15 19:00 .
drwx-----x 3 root root  4096 Oct 15 19:00 ..
-rw-r--r-- 1 root root 11595 Oct 15 13:36 torrc
-rw-r--r-- 1 root root 11595 Jun  8 22:00 torrc.sample
Please edit the torrc file
sudo nano /var/lib/docker/volumes/tor_tor_conf/_data/torrcMake it as the following (changing the IP addresses with yours):
SocksPort 192.168.1.218:9050
SocksPolicy accept 192.168.1.0/24
DataDirectory /var/lib/tor
Please note that the only difference with the APT method: the “RunAsDaemon 1” line is not required here as our container will live by running the main TOR process as the only service inside the container.
Save the file and close. Please restart the container:
docker restart my_torAnd check that it is working correctly with the command:
docker logs my_torConfigure Your Client To Use TOR Proxy from Raspberry PI
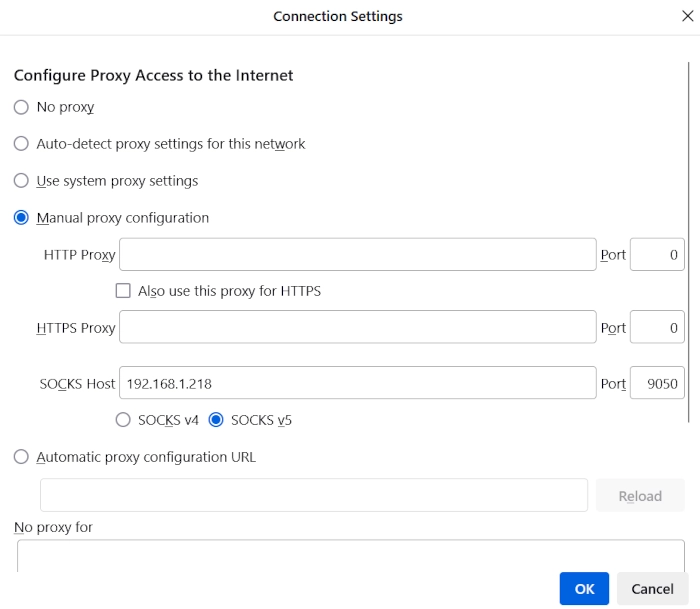
Now you need to configure your client to use the Socks proxy server for internet connections. You have to check this depending on your client’s browser. Surely Mozilla Firefox can use a Socks proxy and can be configured in the Settings (General tab) -> Network Settings -> Settings button. In the following window, select “Manual Proxy Configuration”, insert the Raspberry PI IP address in the SOCKS Host field, insert 9050 in the related port and make sure the “SOCKS v5” flag is active. You should have a configuration like the following picture:
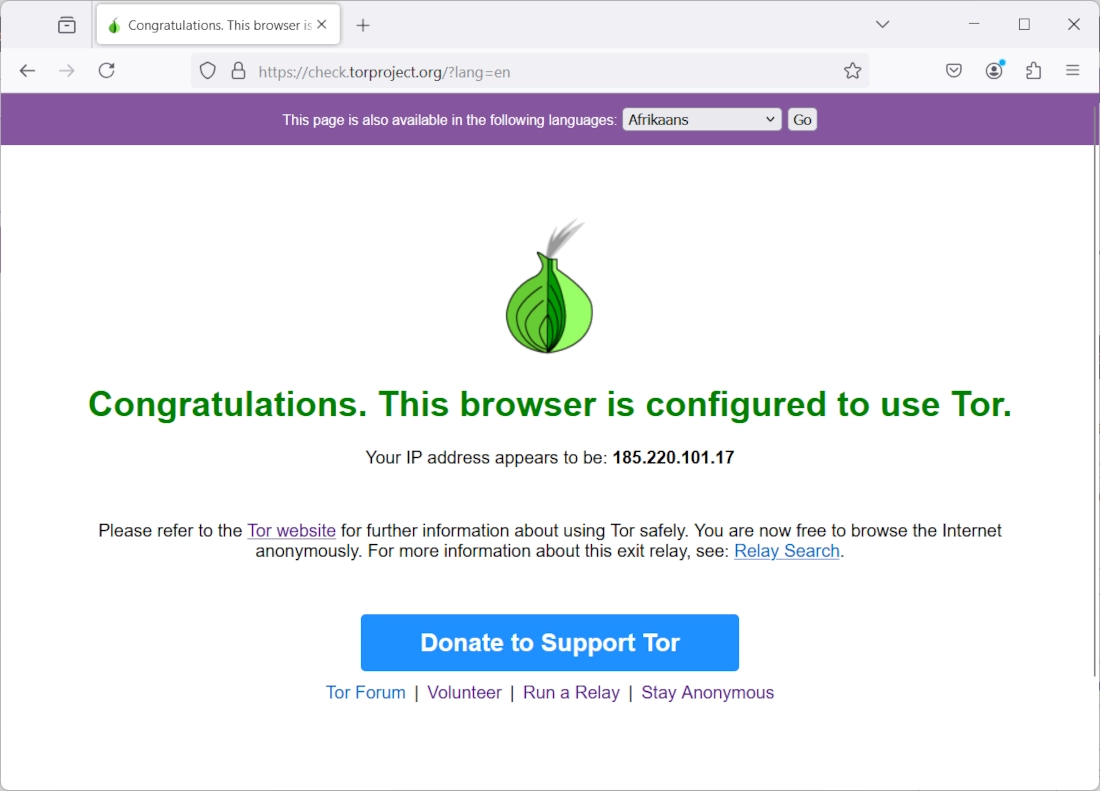
Close and open again your browser. Now you are using your Tor network in your browser. You can verify it by browsing the URL https://check.torproject.org/?lang=en:
Enjoy!

Open source and Raspberry PI lover, writes tutorials for beginners since 2019. He's an ICT expert, with a strong experience in supporting medium to big companies and public administrations to manage their ICT infrastructures. He's supporting the Italian public administration in digital transformation projects.
![]()
![]()
![]()
![]()
![]()
![]()
![]()


Thanks for the info and walk-through. I was able to set this up on my RP3
Thank you for your feedback, hope you enjoy also other projects published!
Onion urls don’t work. Is there something I need to add to the config file
Hi Asa,
to reach also “.onion” urls you need to incapsutate also dns queries in your Tor connection. In Firefox, you can find this option in proxy config page
I have followed various methods for installing TOR and I had it running perfectly for a while. However, using the RPi internal wifi was too weak and couldn’t be reached from various locations around the house. I thought perhaps an external wifi adapter would give me better range, so I purchased a Panda Wireless USB adapter. When I do
ip a
the panda adapter shows up as wlan1
I edited the install_tor.sh file to point to wlan1 instead of wlan0, ran the installer, but nonetheless, it installs on wlan0
Any suggestions?
Hi David,
I don’t know what your install_tor.sh file makes. However, this tutorial uses RPI as TOR proxy and you browse web from any external device. In this configuration, you can leave your Raspberry PI in any position able to communicate with your home router. It will be enought for all devices using your router to get TOR proxy services and you don’t need to take RPI with you around home
Nach Englisch (US)
Hi, thanks for the tutorial. Is there a way to route only external requests through Tor and simply pass internal IP addresses (e.g. routers) directly to the local network?
Many greetings
Hi Kai. This tutorial is to create a direct proxy: this means that you are using this server only for requests to the external world. I suspect you need to create a published service on TOR network, which is a different project. Am I wrong?
Great tuotrial.
I just have an issue.
All is perfect and I can use the proxy-Tor but when I reboot the Pi-4 Tor fails to start.
Any idea, maybe permissions ???
Thanks
Hi Frank,
Please, can you check tor log files (by default should be /var/log/tor) to see what is the error? Also check what “sudo systemctl status tor.service” returns
Here is the status of tor.service
pi@rasPROXY:~ $ sudo systemctl status tor.service
● tor.service – Anonymizing overlay network for TCP (multi-instance-master)
Loaded: loaded (/lib/systemd/system/tor.service; enabled; vendor preset: enabled)
Active: active (exited) since Sun 2022-01-23 01:04:42 GMT; 56s ago
Process: 457 ExecStart=/bin/true (code=exited, status=0/SUCCESS)
Main PID: 457 (code=exited, status=0/SUCCESS)
CPU: 10ms
Jan 23 01:04:42 rasPROXY systemd[1]: Starting Anonymizing overlay network for TCP (multi-instance-master)…
Jan 23 01:04:42 rasPROXY systemd[1]: Finished Anonymizing overlay network for TCP (multi-instance-master).
Here is status of tor@default.service
pi@rasPROXY:/var/log/tor $ sudo systemctl status tor@default.service
● tor@default.service – Anonymizing overlay network for TCP
Loaded: loaded (/lib/systemd/system/tor@default.service; enabled-runtime; vendor preset: enabled)
Active: failed (Result: exit-code) since Sun 2022-01-23 01:04:46 GMT; 1min 40s ago
Process: 583 ExecStartPre=/usr/bin/install -Z -m 02755 -o debian-tor -g debian-tor -d /run/tor (code=exited, status>
Process: 584 ExecStartPre=/usr/bin/tor –defaults-torrc /usr/share/tor/tor-service-defaults-torrc -f /etc/tor/torrc>
Process: 585 ExecStart=/usr/bin/tor –defaults-torrc /usr/share/tor/tor-service-defaults-torrc -f /etc/tor/torrc –>
Main PID: 585 (code=exited, status=1/FAILURE)
CPU: 137ms
On the BOOT SCREEN
[FAILED] Failed to start Anonymizing overlay network for TCP.
see ‘systemctl sttus tor@default.service‘ for details.
log folder is empty !!!
Thanks
Please try the following debugging command:
journalctl -xe | grep torThis will be more verbose on errors, filtering whatever line includes the “tor” word (by the grep command after pipe). Let me know if you see something particularly strange, or send it to me at giuseppe@peppe8o.com
Also, check that your Raspberry PI has still the same IP address configured on SocksPort in your /etc/tor/torrc file. If, for whatever reason, you use DHCP and the router assigned a new IP address to your RPI after the reboot, this error could occurr.
here is something :
Jan 23 14:44:19 rasPROXY tor[556]: Jan 23 14:44:19.334 [notice] Read configuration file “/etc/tor/torrc”.
Jan 23 14:44:19 rasPROXY tor[556]: Jan 23 14:44:19.339 [notice] You configured a non-loopback address ‘10.25.25.20:9050’ for SocksPort. This allows everybody on your local network to use your machine as a proxy. Make sure this is what you wanted.
Jan 23 14:44:19 rasPROXY tor[556]: Jan 23 14:44:19.339 [notice] Opening Socks listener on 10.25.25.20:9050
Jan 23 14:44:19 rasPROXY tor[556]: Jan 23 14:44:19.339 [warn] Could not bind to 10.25.25.20:9050: Cannot assign requested address
Jan 23 14:44:19 rasPROXY tor[556]: Jan 23 14:44:19.339 [warn] Failed to parse/validate config: Failed to bind one of the listener ports.
Jan 23 14:44:19 rasPROXY tor[556]: Jan 23 14:44:19.339 [err] Reading config failed–see warnings above.
Jan 23 14:44:19 rasPROXY systemd[1]: tor@default.service: Main process exited, code=exited, status=1/FAILURE
IP is STATIC and good
Contents of torrc
SocksPort 10.25.25.20:9050
SocksPolicy accept 10.25.25.0/24
RunAsDaemon 1
DataDirectory /var/lib/tor
And your
ifconfig?