Last Updated on 6th February 2022 by peppe8o
Email communication remained one of most used media even with raising of social networks and instant messaging services. It is free, it is unlimited and it can be configured to send complex messages. An addictional usage is with IoT devices, sending mails when defined thresholds are triggered. Quite everyone owns an email address and can reveive emails.
In this tutorial I’m going to show you how to configure Raspberry PI OS to send email from terminal with Exim4, also showing usage examples. I’m going to use a Raspberry PI Zero W with Raspberry PI OS Lite, but this tutorial applies also to newer Raspberry PI boards and with desktop OS distribution.
What is Exim

Exim is a Mail Transfer Agent (MTA). Explaining Email service parts will simplify its job description. A basic (but complete) private mail solution includes (at least) the following features:
- Email Storage Server: it is where your emails are phisically stored. It can be both an advanced database or a simple system folder.
- MTA (Mail Transfer Agent): is the feature that allows you transferring mail to/from external world
- MDA (Mail Delivery Agent): is what allows you to deliver mails from server where they are stored to your client. This service exposes the well known IMAP / POP3 protocols
- Web Interface (optional): to access your emails also without having a client installed
Exim (distributed under GNU General Public License) aims to give flexibility to route emails and can be used in place of classic Sendmail or more complex Postfix.
The configuration is done through a (typically single) configuration file, which must include the main section with generic settings and variables, as well as the following optional sections:
- the access control list (ACL) section which defines behaviour during the SMTP sessions,
- the routers section which includes a number of processing elements which operate on addresses (the delivery logic), each tried in turn,
- the transports section which includes processing elements which transmit actual messages to destinations,
- the retry section where policy on retrying messages that fail to get delivered at the first attempt is defined,
- the rewrite section, defining if and how the mail system will rewrite addresses on incoming e-mails
- the authenticators’ section with settings for SMTP AUTH, a rule per auth mechanism.
The configuration file permits inclusion of other files, which leads to two different configuration styles. (ref. Exim Wikipedia page)
What We Need
As usual, I suggest adding from now to your favourite e-commerce shopping cart all the needed hardware, so that at the end you will be able to evaluate overall costs and decide if to continue with the project or remove them from the shopping cart. So, hardware will be only:
- Raspberry PI Zero W (including proper power supply or using a smartphone micro usb charger with at least 3A) or newer Raspberry PI Board
- high speed micro SD card (at least 16 GB, at least class 10)
Check hardware prices with following links:
Step-by-Step Procedure
Before starting, you have to consider two main (general) concerns using a simple MTA to deliver emails, both linked to recipients email spam services filtering.
The first concern regards controls on sender IP address. Some email providers check sender reliability based on math between sender domain name (domain for name@example.com is “example.com”) and its IP address. Regardless of sender you configure sending email, your MTA must be configured to deliver email from an IP address and domain which match on internet DNSs (Domain Name Servers). This can be achieved by registering a free NoIP account and configuring NoIP DUC.
The second concern regards sender domain age/reliability. Some email provider use internal lists/criteria to move received emails in Spam folder if it is retained suspect. To avoid this issue, Recipients must configure sender email address as trusted (usually by adding this address in its contacts list in its email contacts list).
A good test plan should include also different recipients email providers to verifiy specific behavior.
Prepare Operating System
First step, prepare your OS. Install Raspberry PI OS Lite (or Raspberry PI OS Desktop) and update it, from terminal:
sudo apt update -y && sudo apt upgrade -y
Install and Configure Exim4
Also Exim installation is very simple with aptitude package manager. From terminal:
sudo apt install exim4
After completing exim installation, a pre-configuration is required to make exim working. From terminal, type:
sudo dpkg-reconfigure exim4-config
This will start exim configuration wizard. For each window, press Return to confirm and move on next page. After finish, you can also reconfigure Exim by repeating with above command.
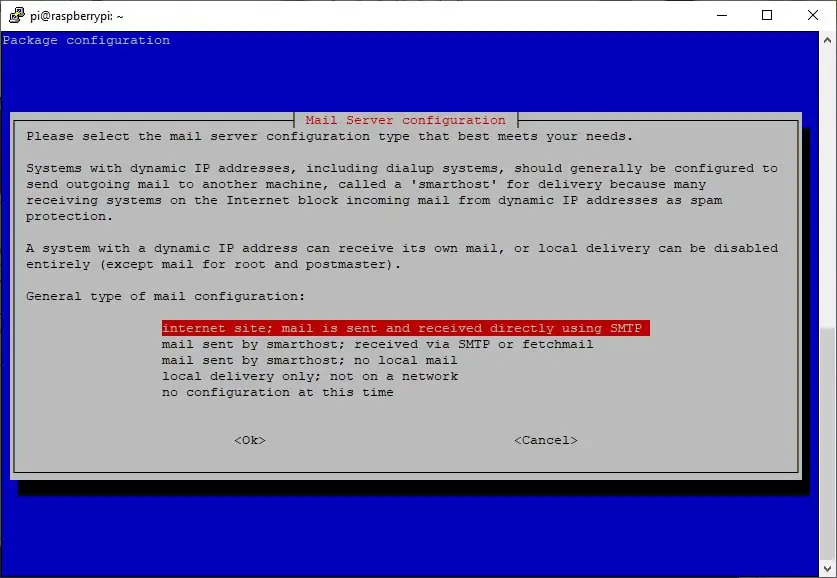
First screen will ask to define what type of service you want to configure. Routing email to/from internet will require selecting “Internet Site”:
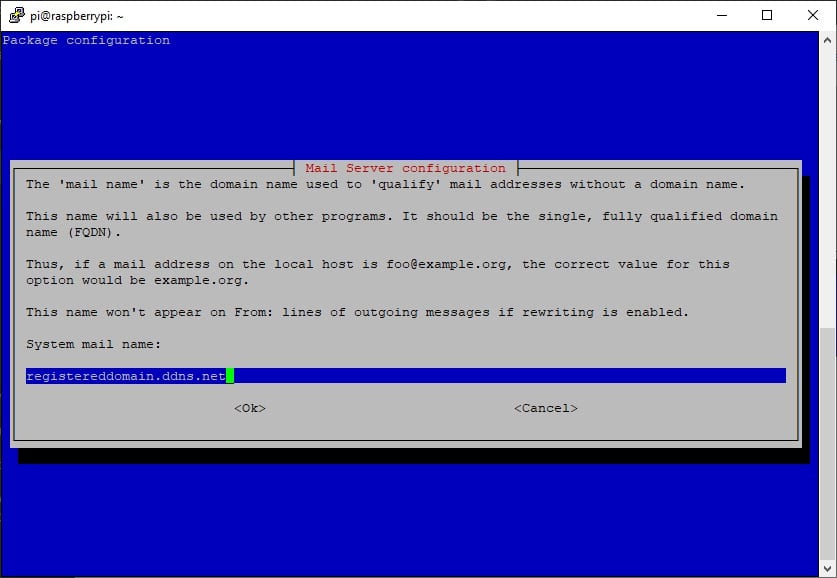
Second screen will ask domain to relay for. This solves one of concerns previously mentioned. If you registered a free domain (or own a public one), use it in this screen (instead of my “registereddomain.ddns.net” label). Or you can leave “raspberrypi” default value:
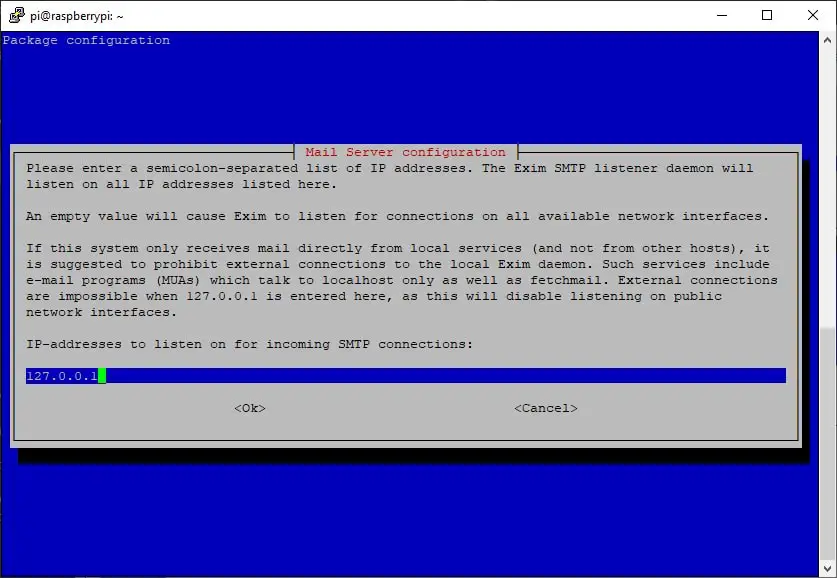
Next screen will ask for IP addresses where to listen if you want use exim also to receive mail (separated by a “,” semicolumn). If you want only to send, you can leave defaul (I only suggest to remove IPv6 address to avoid IP problems):
Next screen show domais for which Exim should accept email received for local storage. If you want to use exim only to send emails, you can leave default:
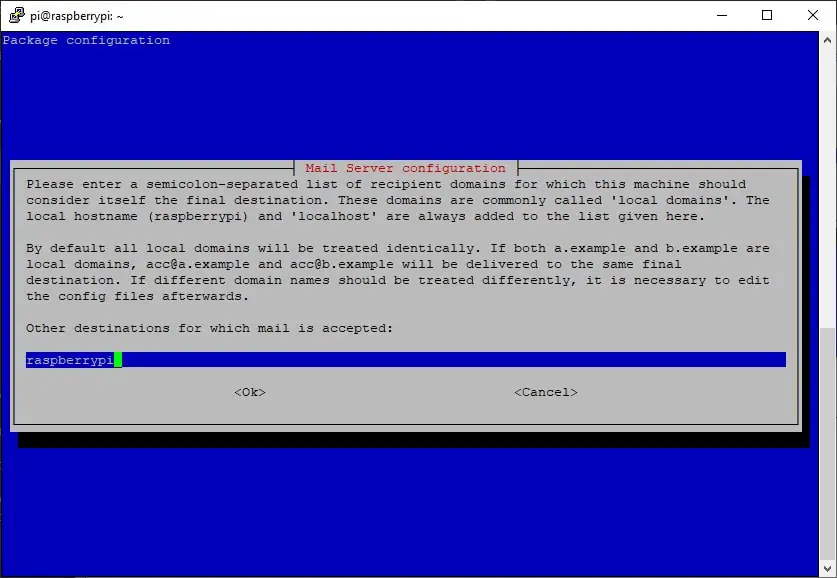
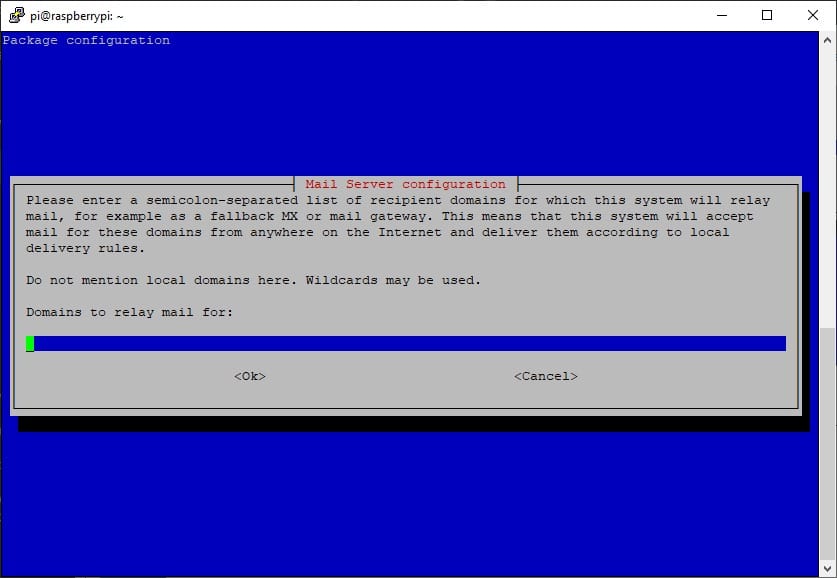
Next screen will ask domains for which exim should receive emails and forward to external email systems. Again, you can leave it default:
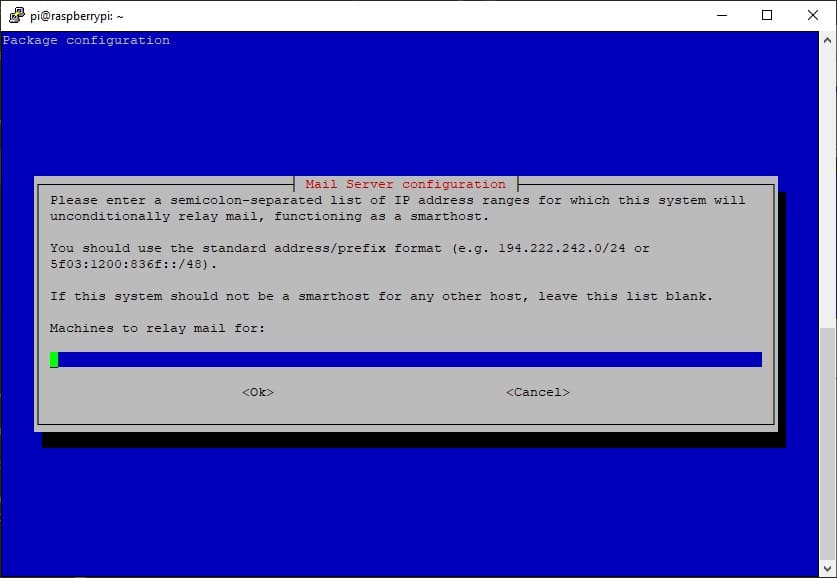
Next screen asks for IP addresses from which Exim will route traffic unconditionally (smarthost). You can leave as default:
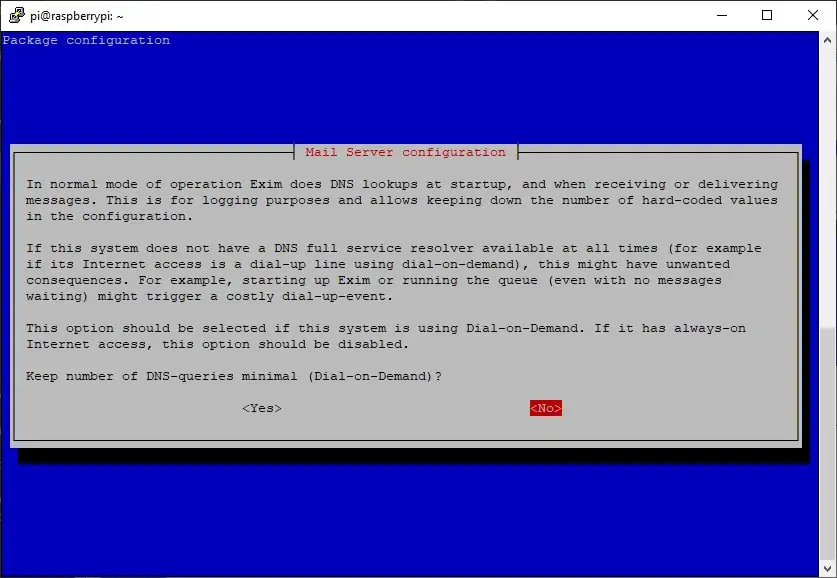
Next page will ask if exim should minimize DNS traffic by reducing ns-loockup queries. You can leave default value (NO):
Next screen will ask format to adopt for locally stored emails. You can leave default:
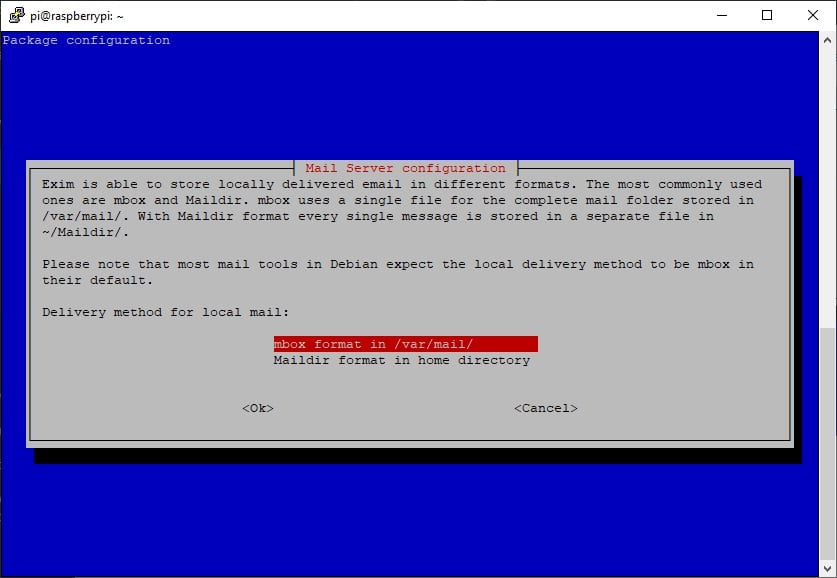
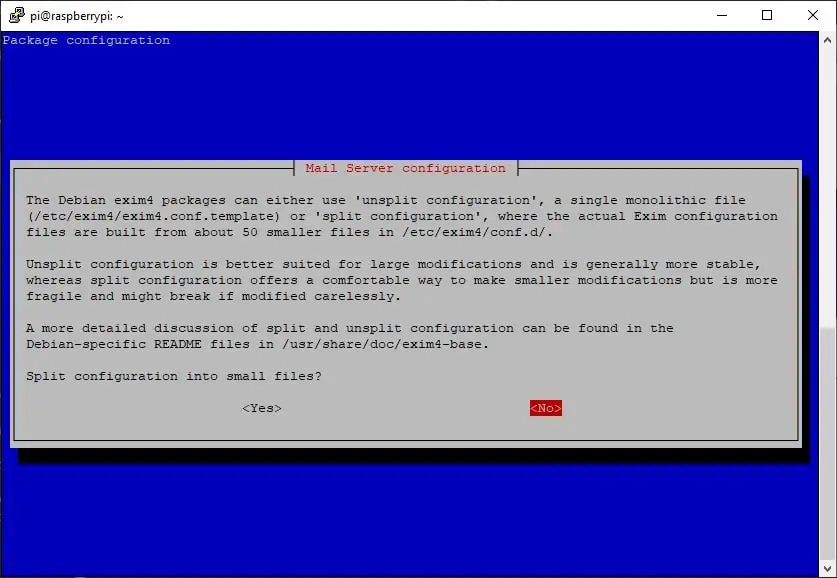
In next question, you can decide to split exim configuration in smaller config files. This is useful for complex configurations, but it isn’t our case. You can leave default (NO):
Last screen will ask for a default postmaster address. Also here you can leave default value (empty):
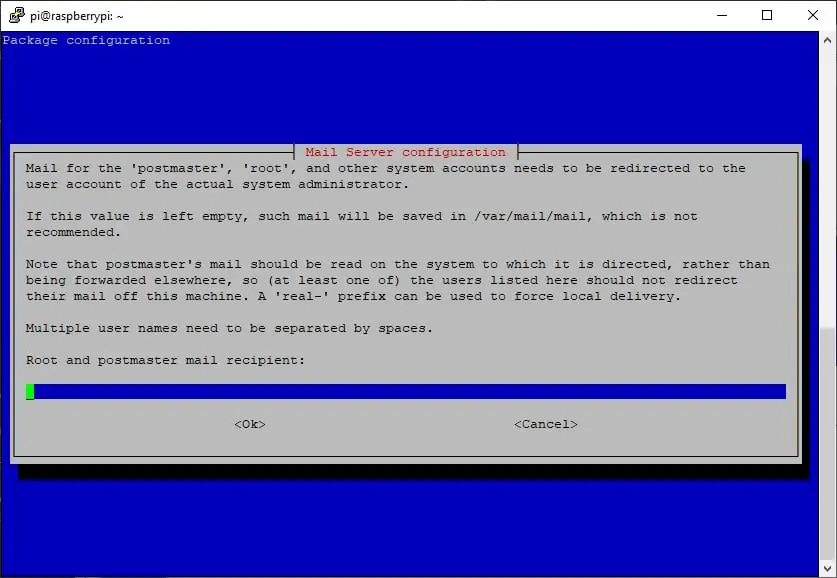
Exim configuration ended. It may take a very few seconds to automatic service restart and then you will have back your prompt for sending email from terminal.
Exim Email Sending Examples
Email sending process from terminal is very simple, but requires following little knowledge.
Terminal command “exim” can be used with many options:
- “-v”: in this mode, sending log will be showed on standard out (showed on terminal). This is useful to directly check sending process, but I experienced problems with cc recipients not receiving email.
- “-t”: in this mode, exim will not show sending log (storing them in log files if somthing goes wrong). With this mode, on the other side, you can correctly configure recipients (to, cc, bcc) with more success.
Using “-v” option, you will need to specify recipient address from first command. With “-t” option, you can specify it within email setup.
When you type on terminal exim command (with required options), you will enter an interactive mode where email preparation will be performed row by row (each row being defined with a final ENTER key pressing). Parameters (like to, cc subject and other) will be setup followed by columns (“:”) and their value. Email body will not require declaring a parameter.
When you finish email preparation, CTRL+D will send email.
Let’s start with a few usage examples. I will use “user@example.com” recipients that you will substitute with your ones.
Exim example 1 – Plain Text With Verbose Output
In this example, you will send a simple plain text email to 1 recipient. You will also set exim to show sending logs.
From terminal (press ENTER key after each row):
pi@raspberrypi:~ $ exim -v recipientTo@example.com
From:sender@example.com
Subject:Test Mail 1
Exim example 1 - Plain Text With Verbose Output
After last row, press CTRL+D to send. Check recipient mailbox (also Spam Folder).
Exim example 2 – Plain Text With Multiple Recipients
In this example, you will send a simple plain text email to multiple recipients. You will not have terminal logs, using “-t” option.
From terminal (press ENTER key after each row):
pi@raspberrypi:~ $ exim -t
To:recipientTo_1@example.com, recipientTo_2@example.com
From:sender@example.com
Subject:Test Mail 2
Exim example 2 - Plain Text With Multiple Recipients
After last row, press CTRL+D to send. Check recipients mailbox.
Exim example 3 – Plain Text With Multiple Recipients and cc
In this example, you will send a simple plain text email to multiple recipients. You will not have terminal logs, using “-t” option.
From terminal (press ENTER key after each row):
pi@raspberrypi:~ $ exim -t
To:recipientTo_1@example.com, recipientTo_2@example.com
From:sender@example.com
Cc:recipientTo_3@example.com
Subject:Test Mail 3
Exim example 3 - Plain Text With Multiple Recipients and cc
After last row, press CTRL+D to send. Check recipients mailbox.
Exim example 4 – Html Text With Multiple Recipients and cc
In this example, you will send a simple plain text email to multiple recipients. You will not have terminal logs, using “-t” option.
From terminal (press ENTER key after each row):
pi@raspberrypi:~ $ exim -t
To:recipientTo_1@example.com, recipientTo_2@example.com
From:sender@example.com
Cc:recipientTo_3@example.com
Content-type:text/html
Subject:Test Mail 4
Exim example 4 - Html Text With Multiple Recipients and cc
After last row, press CTRL+D to send. Check recipients mailbox.
Enjoy!

Open source and Raspberry PI lover, writes tutorials for beginners since 2019. He's an ICT expert, with a strong experience in supporting medium to big companies and public administrations to manage their ICT infrastructures. He's supporting the Italian public administration in digital transformation projects.

