
Last Updated on 13th April 2024 by peppe8o
In this tutorial, the fingerprint sensor interfaced with Arduino Uno, dealing with finger enrollment and utilization for attendance. This tutorial provides the coding, wiring diagram and component list.
To deal with the attendance system finger is more effective than card reading technology. In this work, the fingerprint sensor with Arduino performs enrollment and recognition of attendance
Fingerprint Introduction
As we are moving toward advanced technology, security features are increasing and affecting daily life. In the start, the method used for the security was a password which comes in the category of less security due to the information. Then key and cards introduce which has the physical existence, here comes the issue of stolen. With advances now, we have the technology of fingerprint detection. For this the person himself existence is necessary, without his presence it’s impossible to unlock the device.
| Sr# | Situation | Technology |
| 1. | Know | Password, PIN |
| 2. | Have | Key, Smart Card |
| 3. | Are | Fingerprint, Face, Iris |
The fingerprint sensor operates by scanning the user’s finger and translating it into the voltage. Common uses are for security purposes to have a check on the authorized person. Without the availability of the authorized person, unlocking is not possible.

Working Principle of FPM10A Finger Print Sensor
Fingerprint sensors work on voltage measurements. A person places the finger in its shape at various points to create a defined voltage. This voltage compares with the stored voltages to recognize the person. Most of the time, the thumb of the person is unique and can’t be the same for different people. For females, it’s the right-hand thumb while for males it’s the left thumb that has the capability of unmatching with any human in the world.
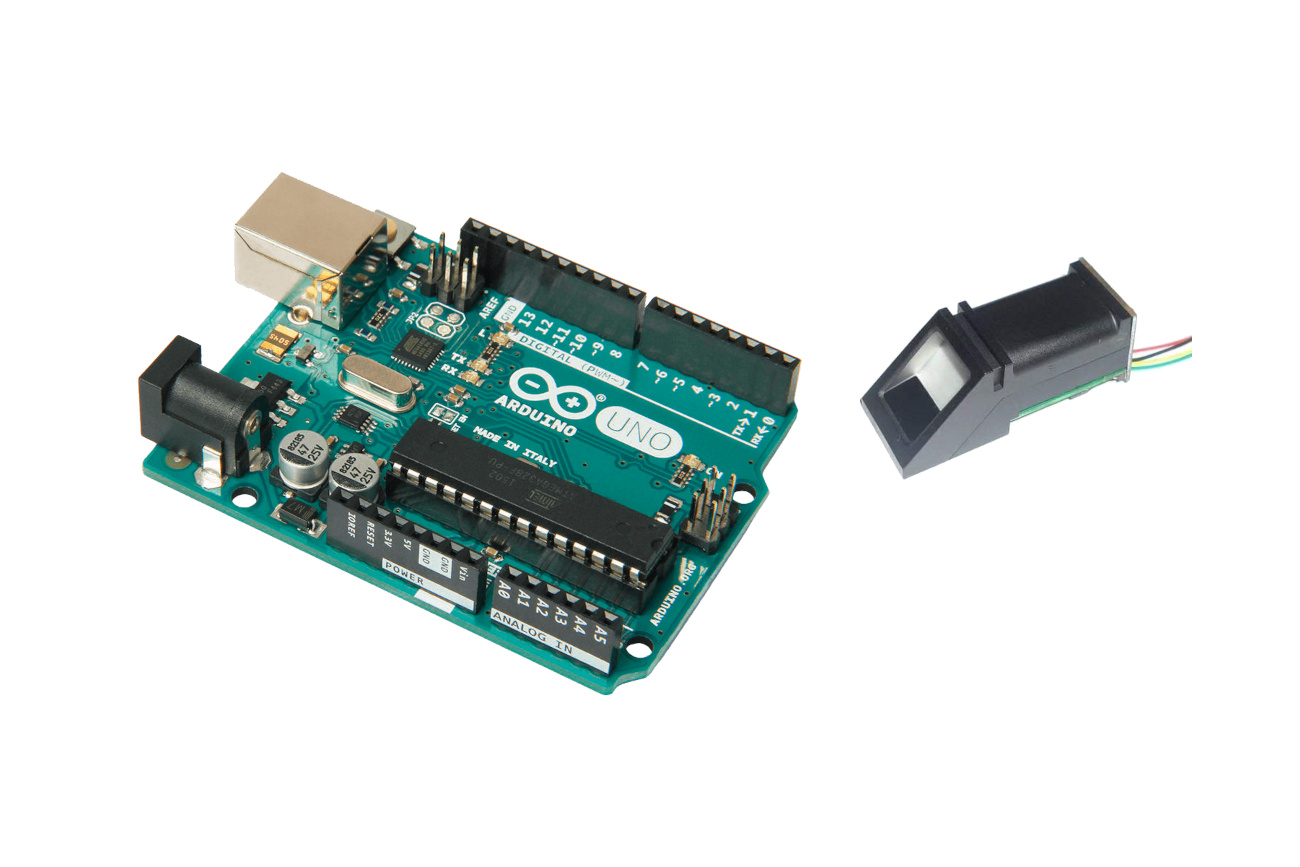
What We Need

As usual, I suggest adding from now to your favourite e-commerce shopping cart all the needed hardware, so that at the end you will be able to evaluate overall costs and decide if to continue with the project or remove them from the shopping cart. So, hardware will be only:
NOTE: Fingerprint sensor RS-301, FM10A, FPM10A, FPM11A, FPM12, and FPM20 all have this same tutorial to follow. The same working and code apply to them.
NOTE 2: For 6 pins fingerprint sensor two pins are Sens1 and Sens2 they remain NOT CONNECTED (NC).
Check hardware prices with the following links:


Step-by-Step Procedure
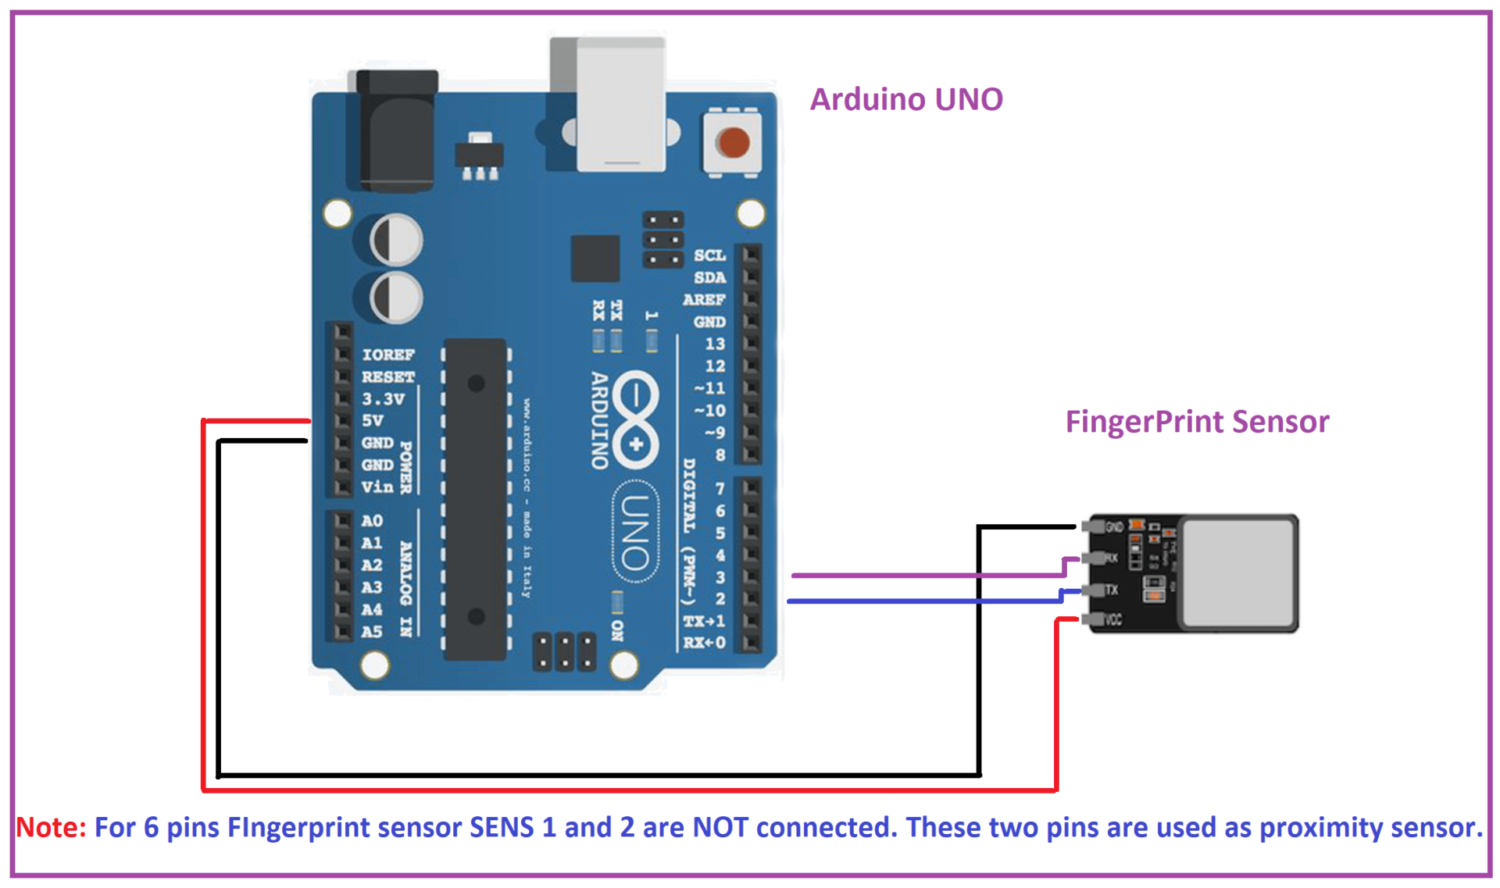
Wiring Diagram of Fingerprint sensor with Arduino
As shown in the image below, the module connects with Arduino Uno. Please follow the wiring shown in the picture, according to Arduino Uno Pinout.
| Sensor pin name | Arduino pin name |
| GND | GND |
| VCC | 5V |
| TX | 2 |
| RX | 3 |
Get fingerprint.ino, library and Code Explanation
Connect your PC to Arduino and open Arduino IDE. For the very first steps, you can refer to Connecting Windows PC with Arduino tutorial. You can get the code file and library from my download area with the following link:
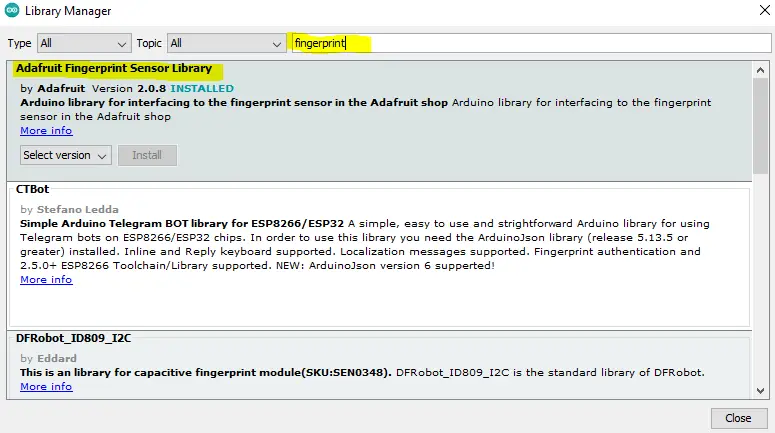
To install the Adafruit library, please refer to Install Arduino Libraries: methods to add libraries with Arduino IDE tutorial.
You can find the Adafruit library can also from Arduino IDE library manager, by using the search field and installing it instead of the previous download.
Code Explanation Section
The Fingerprint Enrollment Code
Section 1: In this section, a library fingerprint sensor is added, a board is selected, and a software serial library is added along with it RX and TX pins are defined. In the Setup serial monitor is opened at a baud rate of 9600. The serial monitor will be displaying the information about the fingerprint enrollment. The fingerprint sensor is initialized at the baud rate of 57600. Parameters of the serial monitor are displayed on the Monitor.
#include <Adafruit_Fingerprint.h>
#if (defined(__AVR__) || defined(ESP8266)) && !defined(__AVR_ATmega2560__)
// pin #2 is IN from sensor (GREEN wire)
// pin #3 is OUT from arduino  (WHITE wire)
SoftwareSerial mySerial(2, 3);
#else
#define mySerial Serial1
#endif
Adafruit_Fingerprint finger = Adafruit_Fingerprint(&mySerial);
uint8_t id;
void setup()
{
  Serial.begin(9600);
  while (!Serial);  // For Yun/Leo/Micro/Zero/...
  delay(100);
  Serial.println("\n\nAdafruit Fingerprint sensor enrollment");
  finger.begin(57600);
  if (finger.verifyPassword()) {
    Serial.println("Found fingerprint sensor!");
  } else {
    Serial.println("Did not find fingerprint sensor :(");
    while (1) {
      delay(1);
    }
  }
  Serial.println(F("Reading sensor parameters"));
  finger.getParameters();
  Serial.print(F("Status: 0x")); Serial.println(finger.status_reg, HEX);
  Serial.print(F("Sys ID: 0x")); Serial.println(finger.system_id, HEX);
  Serial.print(F("Capacity: ")); Serial.println(finger.capacity);
  Serial.print(F("Security level: ")); Serial.println(finger.security_level);
  Serial.print(F("Device address: ")); Serial.println(finger.device_addr, HEX);
  Serial.print(F("Packet len: ")); Serial.println(finger.packet_len);
  Serial.print(F("Baud rate: ")); Serial.println(finger.baud_rate);
}

uint8_t readnumber(void) {
  uint8_t num = 0;
  while (num == 0) {
    while (! Serial.available());
    num = Serial.parseInt();
  }
  return num;
}
Section 2: In the loop section data of the finger is taken, if the finger is detected then it comes out of the while loop and we assign it a number from 1 to 127. This Fingerprint sensor can save up to 1000 fingerprints but to avoid the complexity 127 numbers are set here. In most of the codes, the number set starts from 0 to 127. Which contributes to 128 sets of fingers. While it depends on how much we want.
void loop()
{
  Serial.println("Ready to enroll a fingerprint!");
  Serial.println("Please type in the ID # (from 1 to 127) you want to save this finger as...");
  id = readnumber();
  if (id == 0) {
    return;
  }
  Serial.print("Enrolling ID #");
  Serial.println(id);
  while (!  getFingerprintEnroll() );
}
Section 3: This function is called the loop function, this function is acquiring the data from the fingerprint sensor. This fingerprint sensor checks if it’s a finger or not, by checking the defined points on the finger. If that points are close to the value of the universal values then consider it as a finger otherwise reject it by the message given.
uint8_t getFingerprintEnroll() {
  int p = -1;
  Serial.print("Waiting for valid finger to enroll as #"); Serial.println(id);
  while (p != FINGERPRINT_OK) {
    p = finger.getImage();
    switch (p) {
      case FINGERPRINT_OK:
        Serial.println("Image taken");
        break;
      case FINGERPRINT_NOFINGER:
        Serial.println(".");
        break;
      case FINGERPRINT_PACKETRECIEVEERR:
        Serial.println("Communication error");
        break;
      case FINGERPRINT_IMAGEFAIL:
        Serial.println("Imaging error");
        break;
      default:
        Serial.println("Unknown error");
        break;
    }
  }
Section 4: Convert the data to tz data type and based on the conversion display the message about the finger.
p = finger.image2Tz(1);
  switch (p) {
    case FINGERPRINT_OK:
      Serial.println("Image converted");
      break;
    case FINGERPRINT_IMAGEMESS:
      Serial.println("Image too messy");
      return p;
    case FINGERPRINT_PACKETRECIEVEERR:
      Serial.println("Communication error");
      return p;
    case FINGERPRINT_FEATUREFAIL:
      Serial.println("Could not find fingerprint features");
      return p;
    case FINGERPRINT_INVALIDIMAGE:
      Serial.println("Could not find fingerprint features");
      return p;
    default:
      Serial.println("Unknown error");
      return p;
  }
Section 5: Second-time detection of the finger after a delay of two seconds. If still, the match goes to the saving of the data.
Serial.println("Remove finger");
  delay(2000);
  p = 0;
  while (p != FINGERPRINT_NOFINGER) {
    p = finger.getImage();
  }
  Serial.print("ID "); Serial.println(id);
  p = -1;
  Serial.println("Place same finger again");
  while (p != FINGERPRINT_OK) {
    p = finger.getImage();
    switch (p) {
      case FINGERPRINT_OK:
        Serial.println("Image taken");
        break;
      case FINGERPRINT_NOFINGER:
        Serial.print(".");
        break;
      case FINGERPRINT_PACKETRECIEVEERR:
        Serial.println("Communication error");
        break;
      case FINGERPRINT_IMAGEFAIL:
        Serial.println("Imaging error");
        break;
      default:
        Serial.println("Unknown error");
        break;
    }
  }
Section 6: it converts the fingerprint sensor data to tz datatype to save it in the memory of the sensor.
// OK success!
  p = finger.image2Tz(2);
  switch (p) {
    case FINGERPRINT_OK:
      Serial.println("Image converted");
      break;
    case FINGERPRINT_IMAGEMESS:
      Serial.println("Image too messy");
      return p;
    case FINGERPRINT_PACKETRECIEVEERR:
      Serial.println("Communication error");
      return p;
    case FINGERPRINT_FEATUREFAIL:
      Serial.println("Could not find fingerprint features");
      return p;
    case FINGERPRINT_INVALIDIMAGE:
      Serial.println("Could not find fingerprint features");
      return p;
    default:
      Serial.println("Unknown error");
      return p;
  }
Section 7: This is used to check the finger data when the second-time finger is placed. After both are matched it saves the fingerprint.
  // OK converted!
  Serial.print("Creating model for #");  Serial.println(id);

  p = finger.createModel();
  if (p == FINGERPRINT_OK) {
    Serial.println("Prints matched!");
  } else if (p == FINGERPRINT_PACKETRECIEVEERR) {
    Serial.println("Communication error");
    return p;
  } else if (p == FINGERPRINT_ENROLLMISMATCH) {
    Serial.println("Fingerprints did not match");
    return p;
  } else {
    Serial.println("Unknown error");
    return p;
  }
  Serial.print("ID "); Serial.println(id);
  p = finger.storeModel(id);
  if (p == FINGERPRINT_OK) {
    Serial.println("Stored!");
  } else if (p == FINGERPRINT_PACKETRECIEVEERR) {
    Serial.println("Communication error");
    return p;
  } else if (p == FINGERPRINT_BADLOCATION) {
    Serial.println("Could not store in that location");
    return p;
  } else if (p == FINGERPRINT_FLASHERR) {
    Serial.println("Error writing to flash");
    return p;
  } else {
    Serial.println("Unknown error");
    return p;
  }
  return true;
}
The Fingerprint Match Code
Section 1: Already been discussed in the enrollment section.
#include <Adafruit_Fingerprint.h>
#if (defined(__AVR__) || defined(ESP8266)) && !defined(__AVR_ATmega2560__)
// pin #2 is IN from sensor (GREEN wire)
// pin #3 is OUT from arduino  (WHITE wire)
SoftwareSerial mySerial(2, 3);
#else
#define mySerial Serial1
#endif
Adafruit_Fingerprint finger = Adafruit_Fingerprint(&mySerial);
Section 2: Already discussed in the enrolled section. Here is just an addition that it checks if any finger is saved or not.
void setup()
{
  Serial.begin(9600);
  while (!Serial);  // For Yun/Leo/Micro/Zero/...
  delay(100);
  Serial.println("\n\nAdafruit finger detect test");
  finger.begin(57600);   // set the data rate for the sensor serial port
  delay(5);
  if (finger.verifyPassword()) {
    Serial.println("Found fingerprint sensor!");
  } else {
    Serial.println("Did not find fingerprint sensor :(");
    while (1) { delay(1); }
  }
  Serial.println(F("Reading sensor parameters"));
  finger.getParameters();
  Serial.print(F("Status: 0x")); Serial.println(finger.status_reg, HEX);
  Serial.print(F("Sys ID: 0x")); Serial.println(finger.system_id, HEX);
  Serial.print(F("Capacity: ")); Serial.println(finger.capacity);
  Serial.print(F("Security level: ")); Serial.println(finger.security_level);
  Serial.print(F("Device address: ")); Serial.println(finger.device_addr, HEX);
  Serial.print(F("Packet len: ")); Serial.println(finger.packet_len);
  Serial.print(F("Baud rate: ")); Serial.println(finger.baud_rate);

  finger.getTemplateCount();
  if (finger.templateCount == 0) {
    Serial.print("Sensor doesn't contain any fingerprint data. Please run the 'enroll' example.");
  }
  else {
    Serial.println("Waiting for valid finger...");
      Serial.print("Sensor contains "); Serial.print(finger.templateCount); Serial.println(" templates");
  }
}
Section 3: Responsible for matching the finger and providing access.
void loop()                     // run over and over again
{
  getFingerprintID();
  delay(50);            //don't ned to run this at full speed.
}

uint8_t getFingerprintID() {
  uint8_t p = finger.getImage();
  switch (p) {
    case FINGERPRINT_OK:
      Serial.println("Image taken");
      break;
    case FINGERPRINT_NOFINGER:
      Serial.println("No finger detected");
      return p;
    case FINGERPRINT_PACKETRECIEVEERR:
      Serial.println("Communication error");
      return p;
    case FINGERPRINT_IMAGEFAIL:
      Serial.println("Imaging error");
      return p;
    default:
      Serial.println("Unknown error");
      return p;
  }

  // OK success!

  p = finger.image2Tz();
  switch (p) {
    case FINGERPRINT_OK:
      Serial.println("Image converted");
      break;
    case FINGERPRINT_IMAGEMESS:
      Serial.println("Image too messy");
      return p;
    case FINGERPRINT_PACKETRECIEVEERR:
      Serial.println("Communication error");
      return p;
    case FINGERPRINT_FEATUREFAIL:
      Serial.println("Could not find fingerprint features");
      return p;
    case FINGERPRINT_INVALIDIMAGE:
      Serial.println("Could not find fingerprint features");
      return p;
    default:
      Serial.println("Unknown error");
      return p;
  }

  // OK converted!
  p = finger.fingerSearch();
  if (p == FINGERPRINT_OK) {
    Serial.println("Found a print match!");
  } else if (p == FINGERPRINT_PACKETRECIEVEERR) {
    Serial.println("Communication error");
    return p;
  } else if (p == FINGERPRINT_NOTFOUND) {
    Serial.println("Did not find a match");
    return p;
  } else {
    Serial.println("Unknown error");
    return p;
  }
  // found a match!
  Serial.print("Found ID #"); Serial.print(finger.fingerID);
  Serial.print(" with confidence of "); Serial.println(finger.confidence);

  return finger.fingerID;
}
// returns -1 if failed, otherwise returns ID #
int getFingerprintIDez() {
  uint8_t p = finger.getImage();
  if (p != FINGERPRINT_OK)  return -1;

  p = finger.image2Tz();
  if (p != FINGERPRINT_OK)  return -1;

  p = finger.fingerFastSearch();
  if (p != FINGERPRINT_OK)  return -1;

  // found a match!
  Serial.print("Found ID #"); Serial.print(finger.fingerID);
  Serial.print(" with confidence of "); Serial.println(finger.confidence);
  return finger.fingerID;
}
Use the Fingerprint with Arduino
Steps for Enrolling
Before starting to use the sensor to check the fingerprints, you need to save an authorized fingerprint to store for comparison. For this task, please use the following:
- Upload the enrol example.
- Open the Serial Monitor.
- Select the baud rate to be 9600.
- Enter the FingerPrint ID number when the serial monitor prompts to enter the fingerprint id number.
- Place the finger you need to enrol on the sensor.
- Place the finger again on the sensor once prompted by the serial monitor.
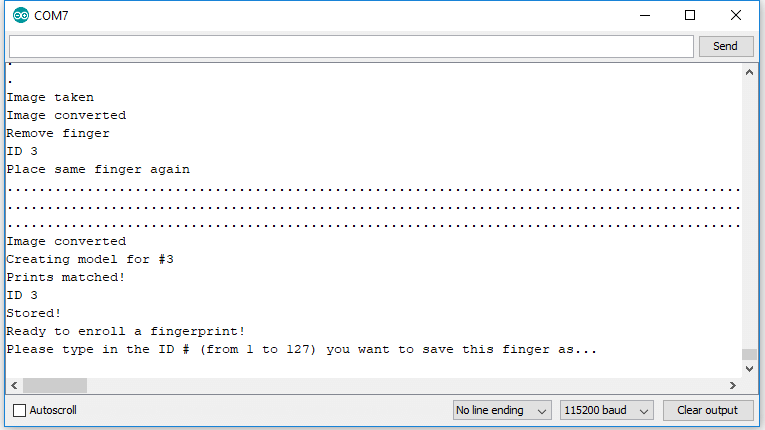
Data of enrollment is displayed on this finger. When the finger is placed it is detected, and it asks for placing the finger again to verify. If both match, then it asks for the number from 1 to 127. So for the first, you can assign number 1. For setting the number we use send button after writing 1 on the serial input.
Steps for Attendance
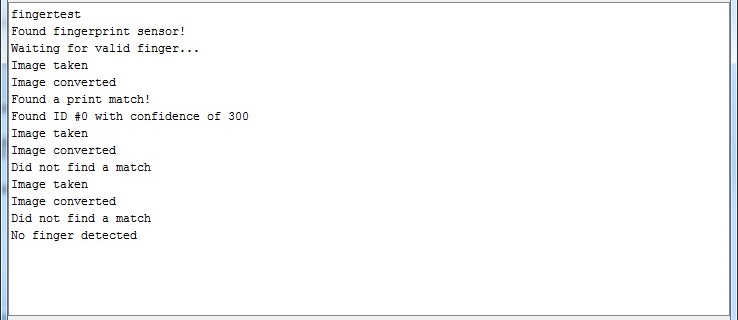
The fingerprint.ino code, on the other hand, checks if the fingerprint just read from the sensor matches the stored ones, while it also shares the confidence of the finger. Confidence is the number of quantities around which saved and placed a finger match.
Drawbacks of fingerprint Sensing Technology
- If an injury happens to the finger, then access is denied even to the authorized person.
- Due to continuous attendance, it will contain germs which are a risk for health due to transmitting diseases such as COVID’19.
What’s Next
Please find more tutorials on Arduino in peppe8o Arduino archives.
Enjoy!
Umar Jamil
For any queries and help for work, please contact me at:
Whatsapp: +92-346-661-7017
Email: umarjamil0007@gmail.com

I'm an Electronic Engineer, well-skilled to solve the issues of hardware and software. I do have laboratory which contains unlimited sensors and modules for testing the working. Also, I am experienced in Arduino programming, Android mobile application, microcontroller programming, IOTs and embedded projects. I provide services to control, realize the sensor data in the Mobile Application. For any queries and help for work Contact: Whatsapp:+92-346-661-7017 Email: umarjamil0007@gmail.com
![]()


