
Last Updated on 3rd October 2025 by peppe8o
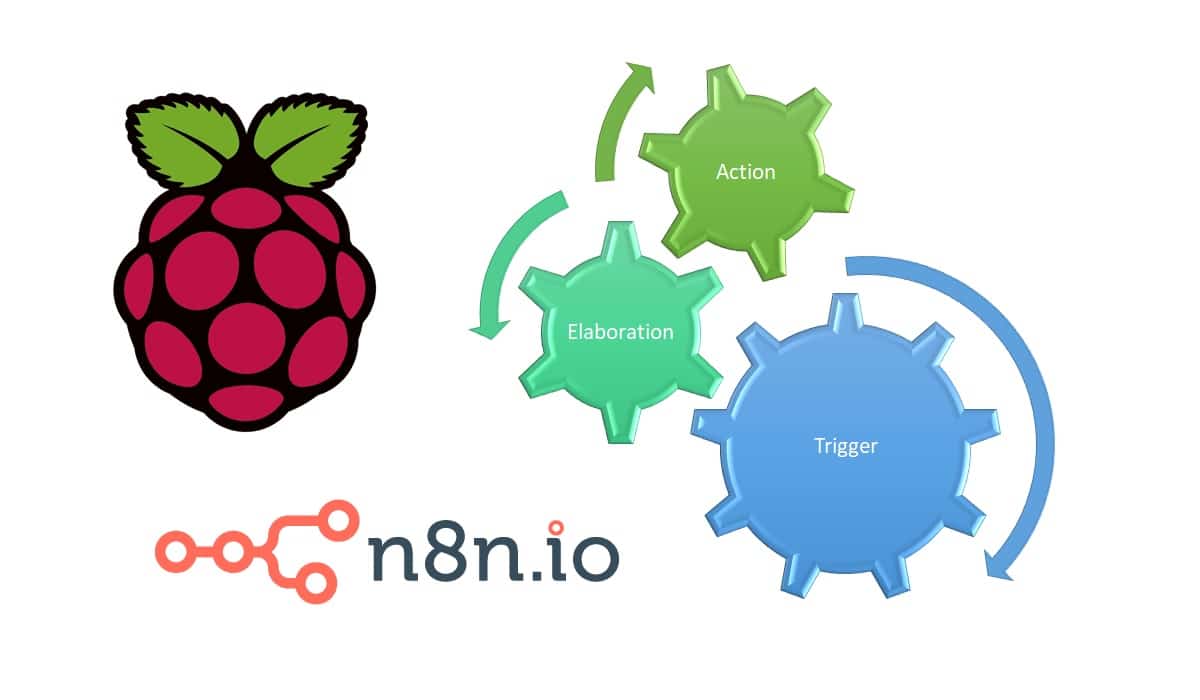
This tutorial will show you how to install and use n8n with Raspberry PI computer boards to get a powerful tool for workflow automation.
Using a Raspberry PI as a workflow server can satisfy the need to manage a wide number of triggers, enabling many automation workflows. It may be a GPIO external condition, a system internal state, or a web trigger enabling notifications, code execution or more complex workflows.
About N8N
N8n is a great open source tool which simplifies managing workflows and API interactions. It comes with an intuitive graphical interface and can also run on very low-capacity hardware.
It can run both locally and in the cloud, allowing for the management of access grants. It aims to make it easy to incorporate custom functions and apps with minimal engineering effort. N8n’s node-based editor lets you map anything to everything and go beyond basic ETL. Its home page reports the following main features:
- Sync data between 90+ apps – Move and transform data between different apps and databases without getting caught up in API docs and troubleshooting CORS errors.
- Design powerful workflows – Go beyond ETL: start with simple no-code flows and add JavaScript functions, conditional logic, or custom HTTP requests in a snap.
- Create custom integrations – Design bespoke nodes for a proprietary CRM, endpoints for your product, or any other software, and empower your marketing and ops teams to create their own workflows.
In this guide, I’ll show you how to install n8n in a Raspberry PI 4 Model B, but the following procedure should also work with any Raspberry PI computer board capable of running the 64-bit OS.
I’ll also show you how to create your very first simple workflow, which checks the Raspberry PI’s internal temperature and sends email warnings if it exceeds a defined threshold.
What Do You Need
As usual, I suggest adding from now to your favourite e-commerce shopping cart all the needed hardware, so that at the end you will be able to evaluate overall costs and decide if to continue with the project or remove them from the shopping cart. So, hardware will be only:
- Raspberry PI Computer Board (including proper power supply or using a smartphone micro USB charger with at least 3A)
- high speed micro SD card (at least 16 GB, at least class 10)

Step-by-Step Procedure
Prepare the Raspberry PI Operating System
The first step is to install the Raspberry PI OS Lite (we need the 64-bit version) to get a fast and lightweight operating system (headless). If you need a desktop environment, you can also use the Raspberry PI OS Desktop, in which case will work from its terminal app. Please find the differences between the 2 OS versions in my Raspberry PI OS Lite vs Desktop article. For low RAM Raspberry PI computer models, the Lite OS is strongly suggested.
For this test, I will use a Raspberry PI OS Lite headless installation. However, a Desktop installation also works by using the terminal.
Please make sure that your OS is up to date. From your terminal, use the following command:
sudo apt update -y && sudo apt full-upgrade -yWe also need Docker. For this task, please refer to my Beginner’s Guide to Install and Use Docker with Raspberry PI tutorial.
Install n8n
With Docker installed, getting n8n wot work on Raspberry PI is a straightforward job. Before proceeding with the installation, I advice you that my procedure creates a folder including the persistent volume for n8n: this will allow you to easily backup this folder to safely store your data.
So, let’s create a folder which will include all the data for n8n:
mkdir n8n_dataNow, we can get n8n running with the following terminal command:
docker run -d \
 --name n8n \
 --restart unless-stopped \
 -p 5678:5678 \
 -e N8N_ENFORCE_SETTINGS_FILE_PERMISSIONS=true \
 -e N8N_SECURE_COOKIE=false \
 -v ./n8n_data:/home/node/.n8n \
 docker.n8n.io/n8nio/n8n
This command will take a while to download the required packages to run. The used options has the following meaning:
- run -d: the -d option makes the container run as a daemon. This means that you don’t need to keep the terminal session active to leave it running
- –name n8n: this option gives the running container a mnemonic name (“n8n”). You can use whatever name for your container in this part
- –restart unless-stopped: this allows the container to restart automatically after any Raspberry PI reboot. At any time, you can stop the container with the
docker stop n8ncommand - -p 5678:5678: this option exposes the container port “5678” on the host port “5678”. This means that you will be able to reach the container from any client outside the Raspberry PI and running in the same local network
- -e N8N_ENFORCE_SETTINGS_FILE_PERMISSIONS=true: sets the correct grantings to the data in the persistent volume to avoid getting too-large file permissions
- -e N8N_SECURE_COOKIE=false: this option enables your n8n instance to run even in insecure mode (HTTP without the final S). For a local installation reachable from a local network (for example a home network) it can be enought.
- -v ./n8n_data:/home/node/.n8n: in the folder where you run the docker command, this option maps the subfolder named “n8n_data” in your Raspberry PI storage to the “/home/node/.n8n” folder inside the docker container
- docker.n8n.io/n8nio/n8n: this final option selects the n8n image from the Docker Hub.
At any time, you can see the installation progress by checking the container’s logs:
docker logs n8nN8n will be ready once you see the following lines:
Editor is now accessible via:
http://localhost:5678
Access the N8N Dashboard
Now we’re ready to use n8n on Raspberry PI. Please use your favourite browser to reach the URL “http://<<YourRaspberryPiAddress>>:5678”. Of course, change the “<<YourRaspberryPiAddress>>” string with your Raspberry PI’s IP address. In my case, for example, as my IP is 192.168.1.14, my URL will be http://192.168.1.14:5678. You will a page to register your first n8n user:
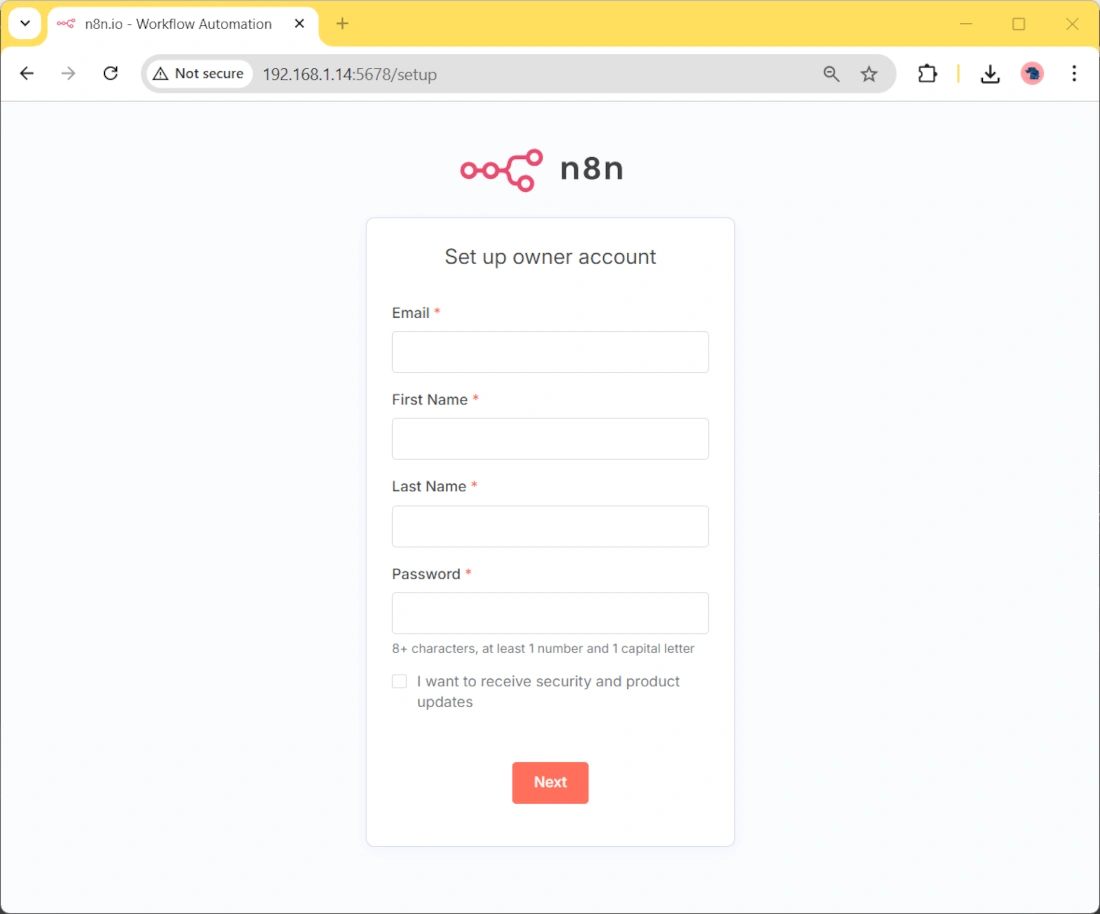
Please fill in the form and press the “Next” button.
The following page will allow you to add more customisations to the general system. You are free to fill it as you like:

At the end, please click “Get started”.
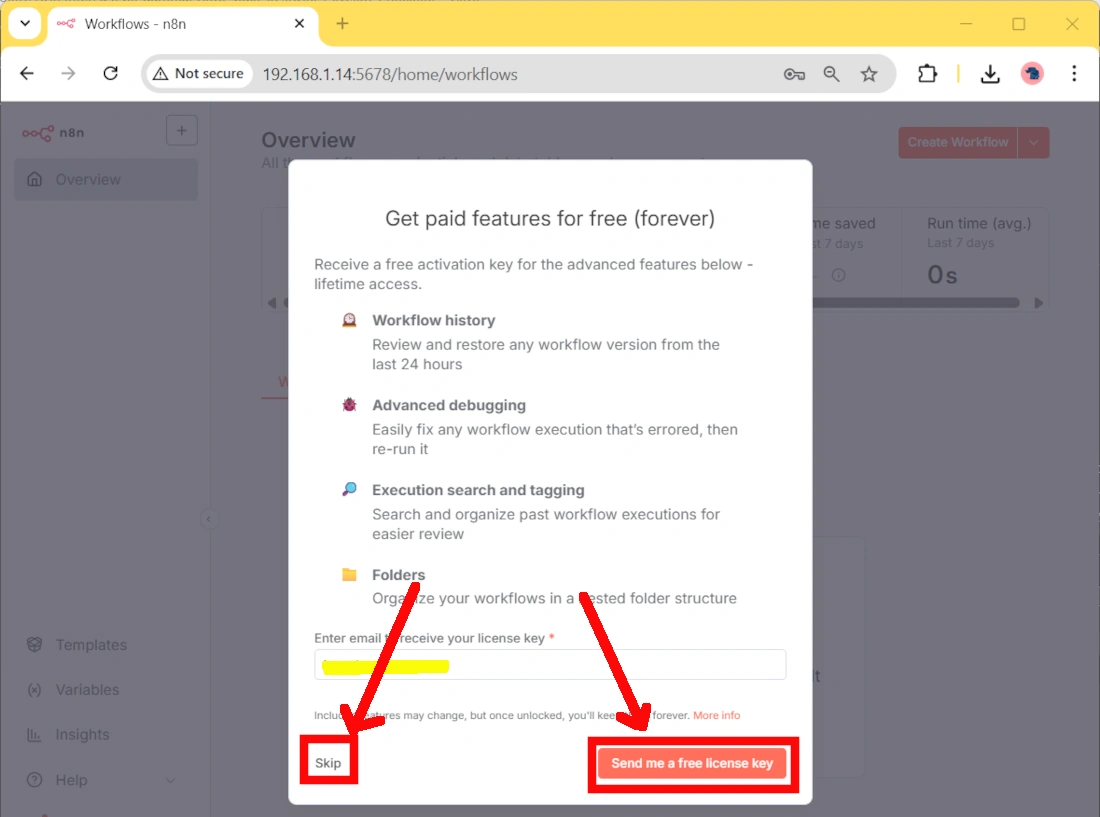
The following page allows you to sign up for free additional features. You are free to opt in or skip this stage:
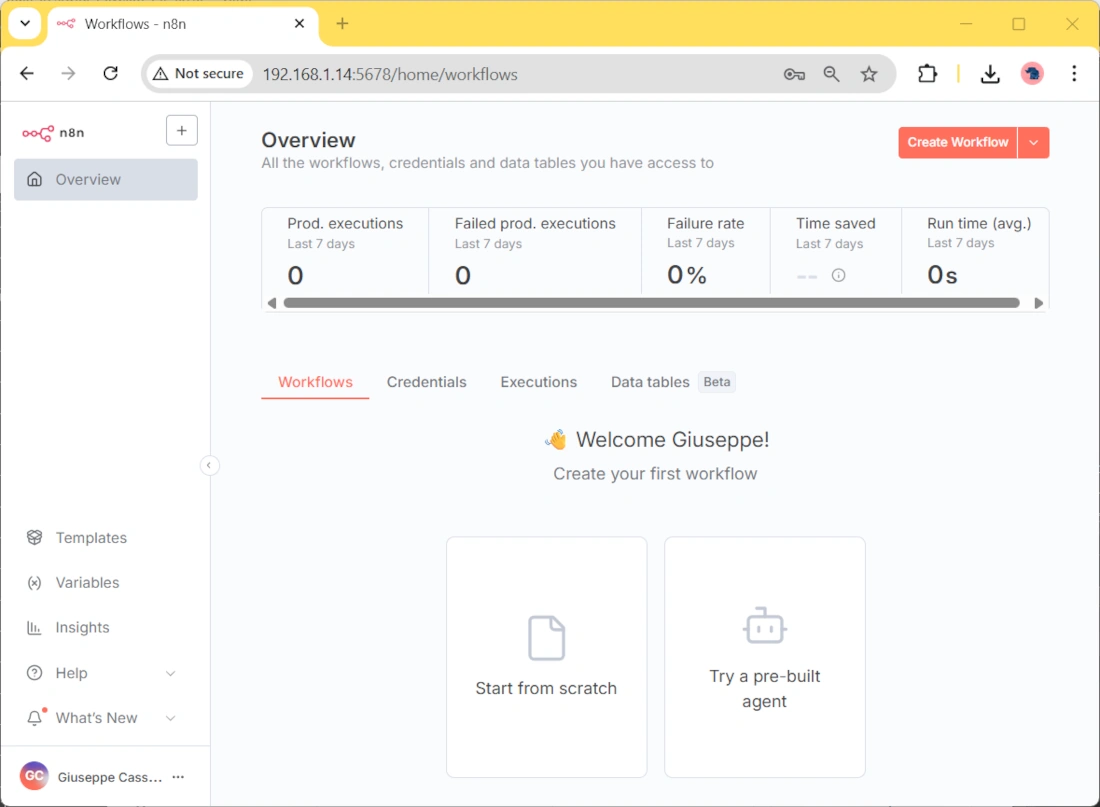
Finally, you will reach your n8n dashboard:
Setup N8n Credentials
Before moving to the creation of a basic workflow, it is useful to prepare the credentials that you may require to run some nodes. An example of this need is when your workflow involves sending an email: instead of setting up the SMTP configuration when creating the workflow, we can prepare the SMTP settings.
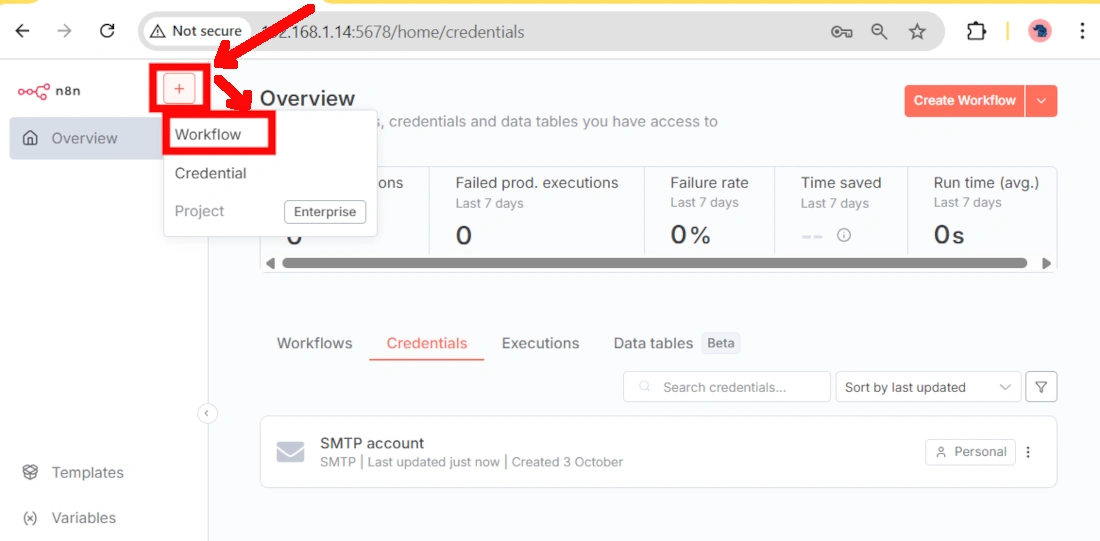
From the dashboard, please click the “+” button hichlighted in the following picture and then click “Credential”:
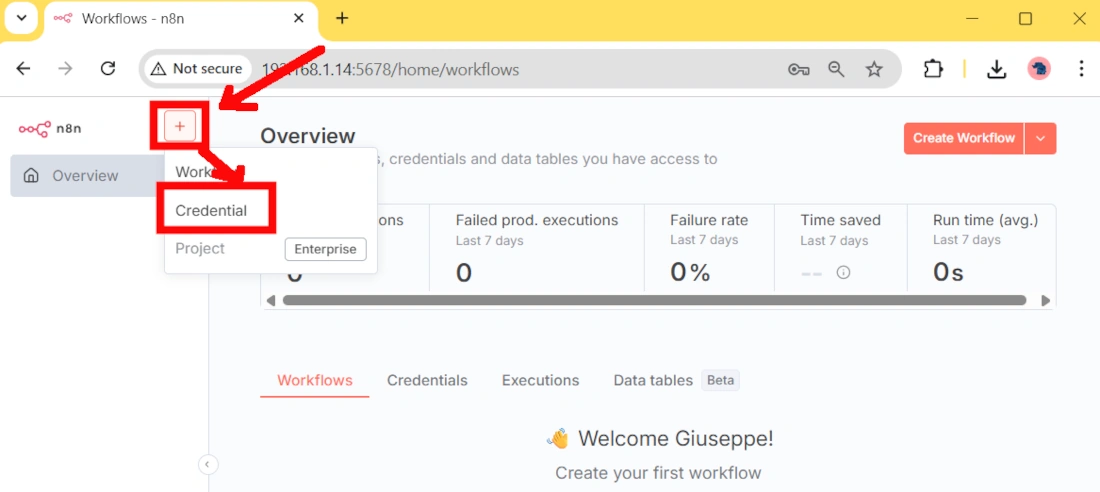
This will open a mask where you can choose what kind of credential you want to add. Please scroll to find the “SMTP”:
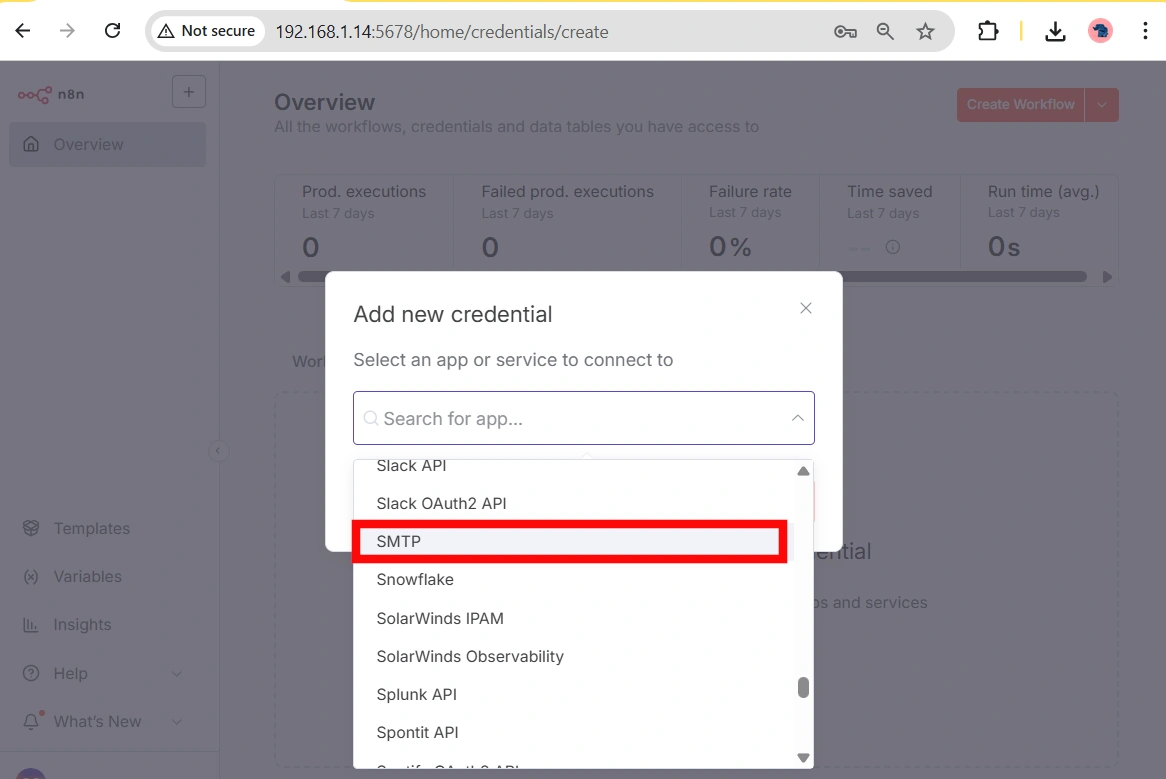
Click on it and then click the “Continue” button.
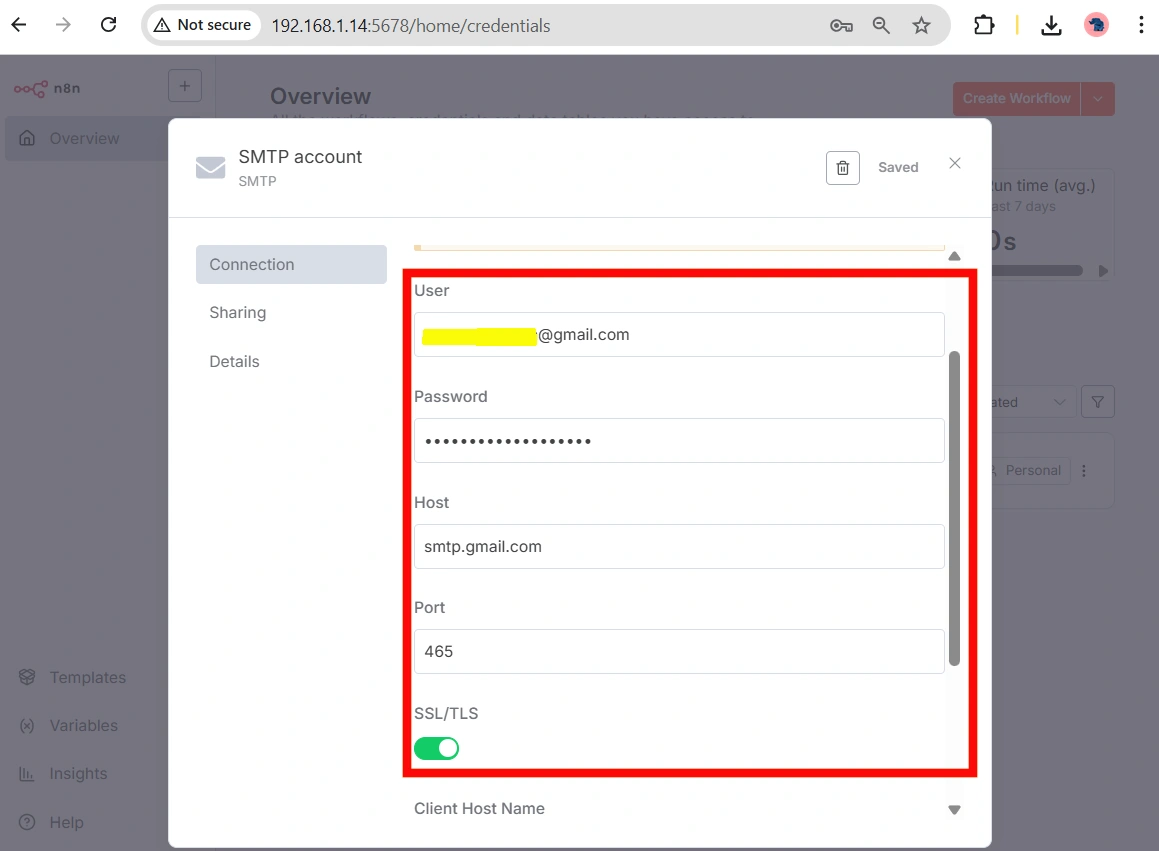
In the following form, please fill in the required info. Usually, these SMTP settings are available from your email service provider and can change from provider to provider. Moreover, some providers (like Gmail) can require registering a secure password for apps with specific procedures (this link shows the Gmail case). User, password, host, and port are the only mandatory fields in this form. Once compiled, you can close it with the “X” on the top-right of the form as n8n will automatically save your edits:
Create a Simple Temperature Check Workflow with N8N and Raspberry PI
Our workflow will perform a simple check on Raspberry PI temperature, compare the read value with a threshold and send a warning email only if this value is higher.
Please find below the overall workflow:
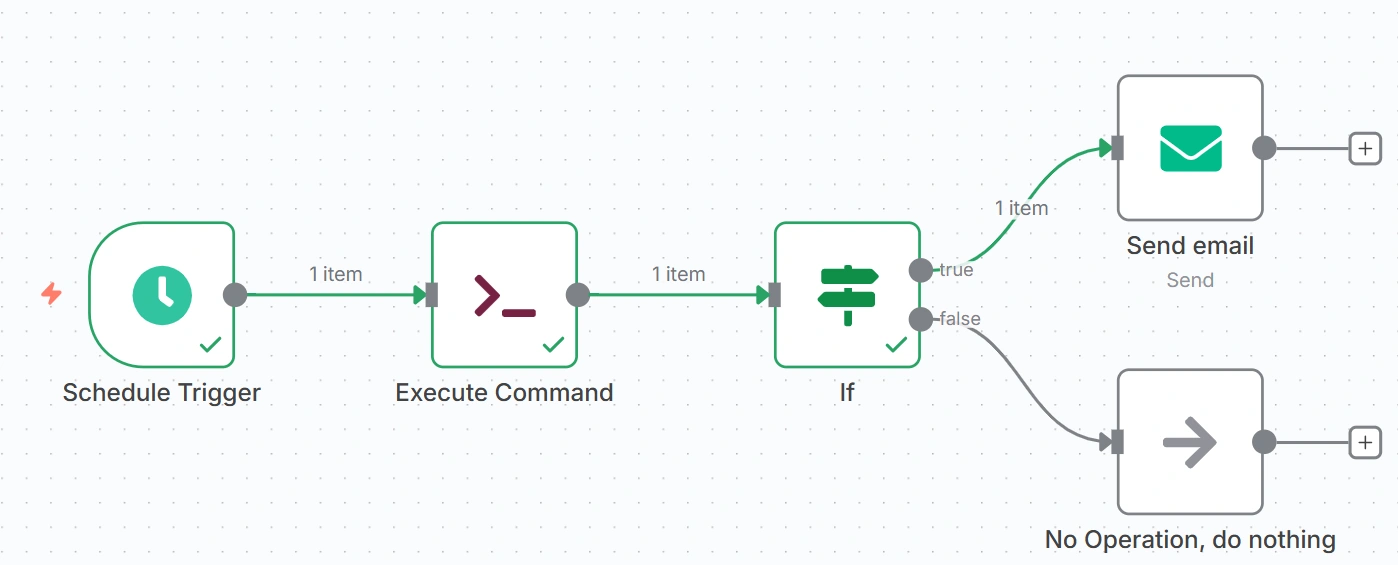
This simple flow will be composed of:
- 1 Cron node which triggers the workflow start at a defined frequency
- 1 Command Execution node (renamed to Temp check), which will execute a command in your host to get the Raspberry PI temperature
- 1 IF node, which will compare the read temperature with a defined threshold
- When the IF condition is true (the reading is higher than the threshold), the Send Email node will deliver a warning email, and the workflow ends
- When the IF condition is false (the reading is lower than the threshold), no operations will be executed and the workflow ends
Create the Workflow Object
Please create a new workflow by clicking the “+” button and then the “Workflow” link as shown in the following picture:
This will show an empty canvas.
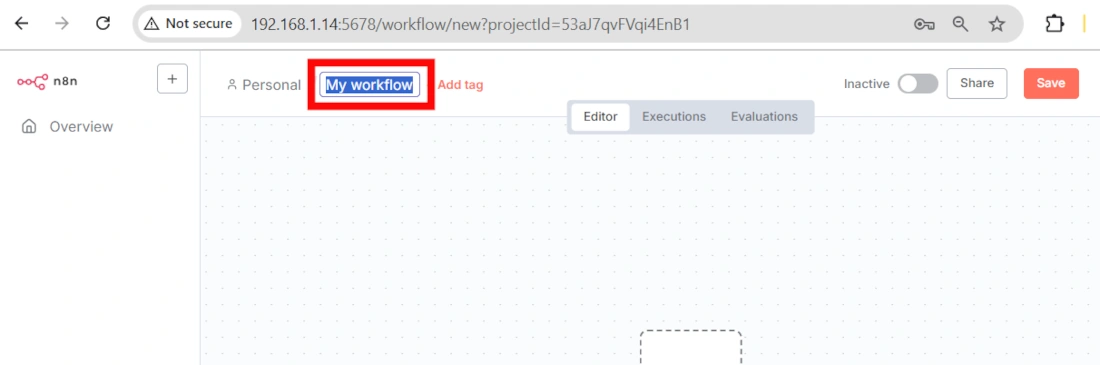
Before adding the nodes, you can customise the workflow name by clicking on the canvas title:
Create a Schedule Trigger
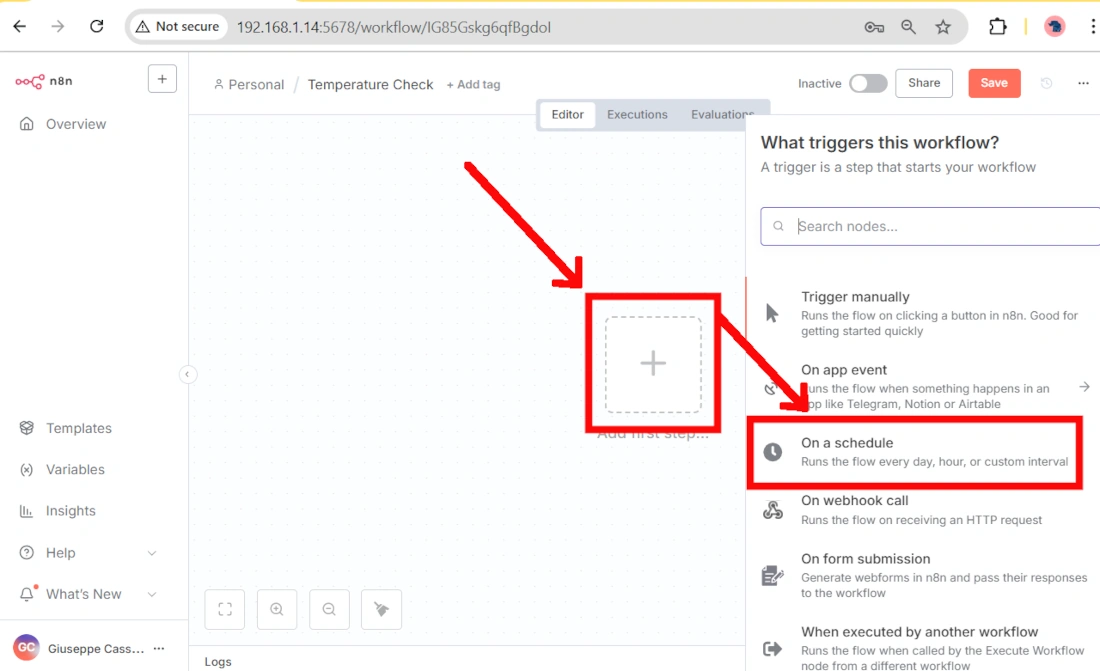
The first node of any Workflow is a trigger, whose condition starts the workflow execution. There are different kinds of triggers, but the easiest can be a simple “Schedule” which runs at a defined time frequency. By clicking the “+” button in the centre of the canvas, you can select it from the resulting trigger menu:
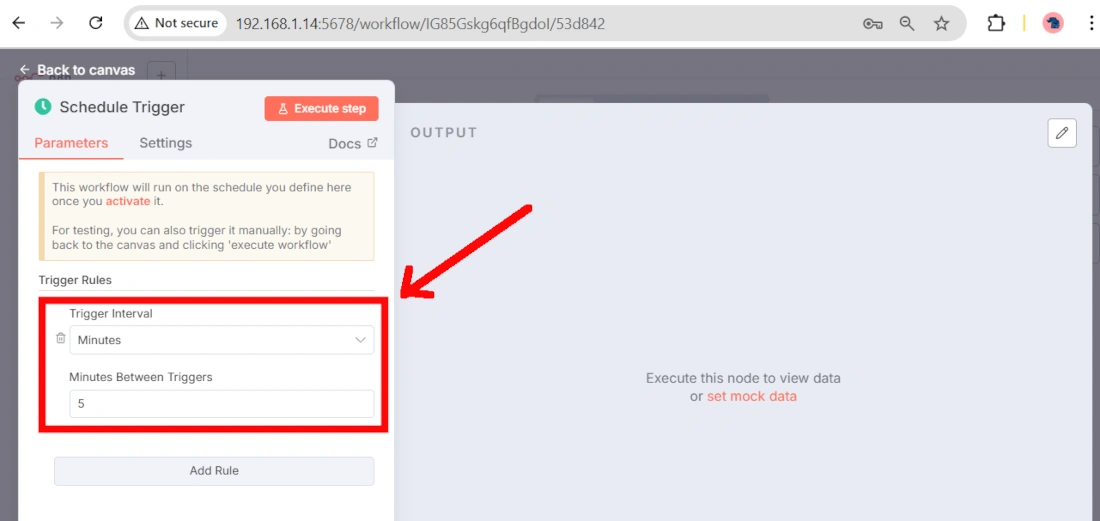
The following window will allow you to set the schedule at the frequency you need. For this tutorial, I’ve set the schedule to run every 5 minutes:
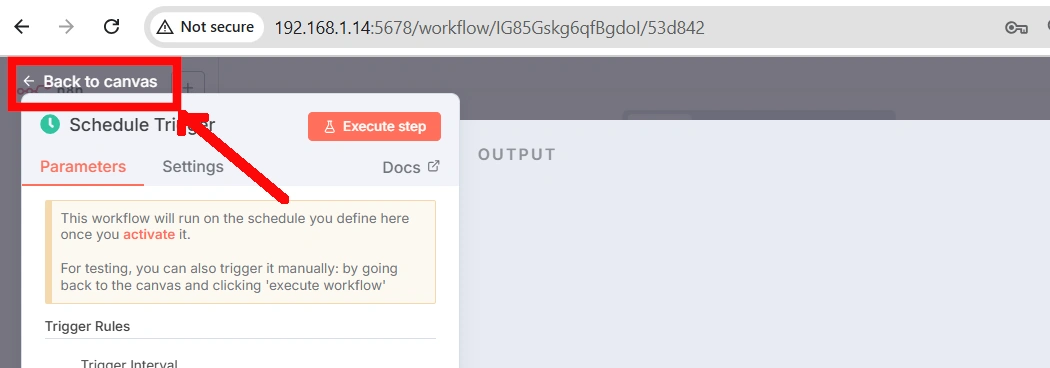
At any time, you can go back to the general canvas by clicking the “Back to canvas” link:
Going back to the canvas we can see the general workflow picture. Every node which has at least one output will show you a “+” button. With this button, you can attach more nodes to which will follow the parent one and which will get data from it:
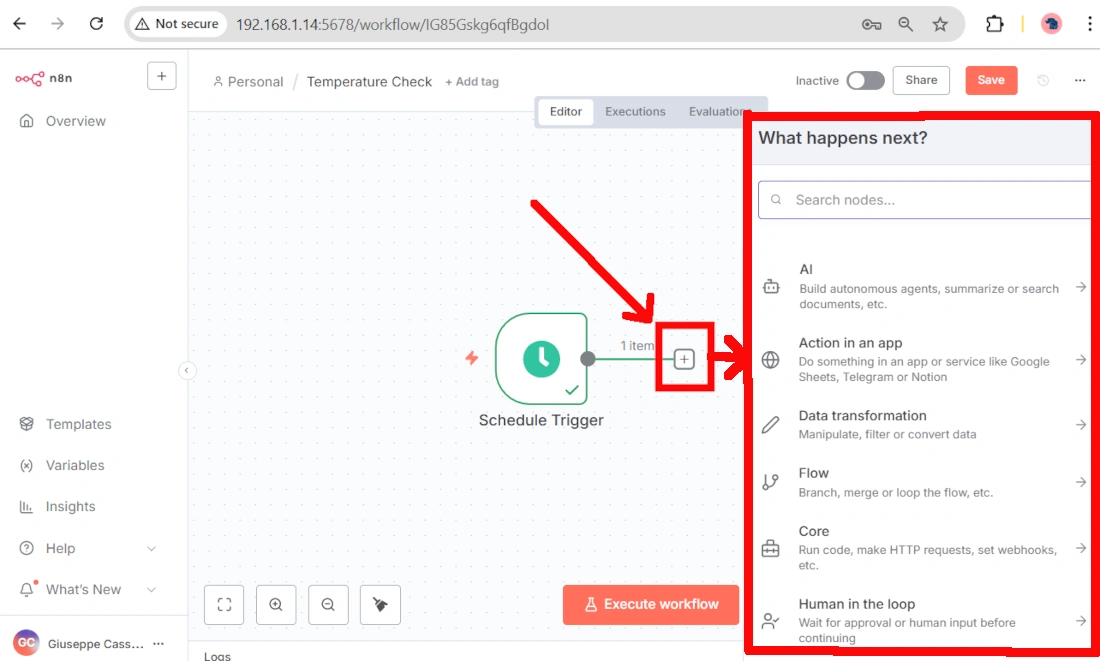
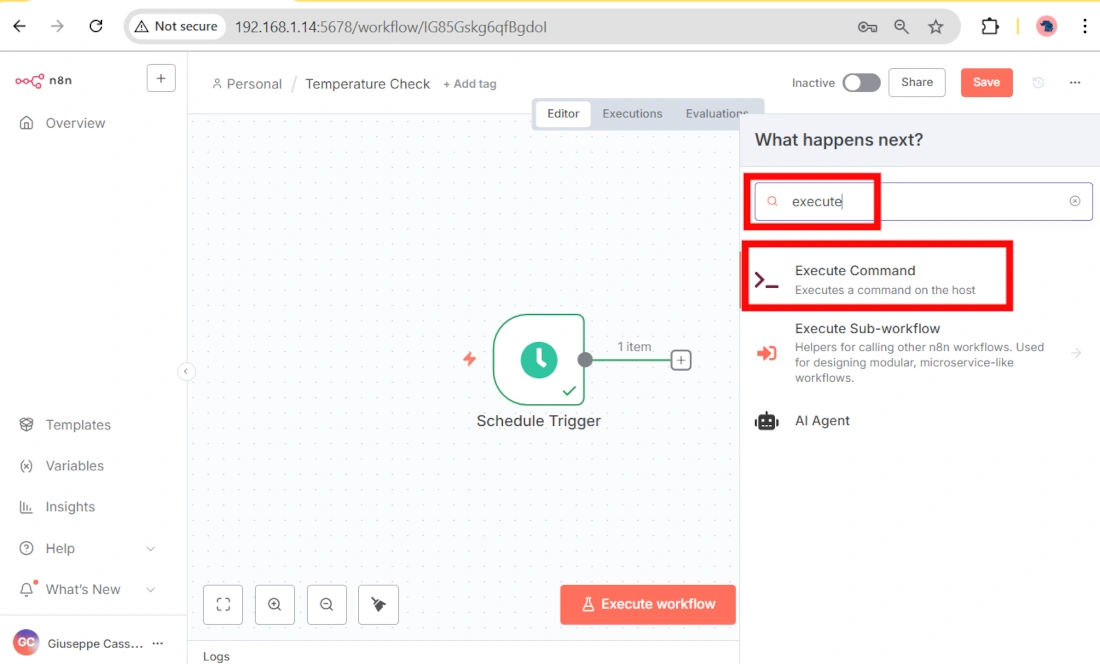
The resulting panel on the right will also allow you to get your nodes with a search field, where you can write what you’re looking for.
Create an Execute Command Node
Even if there aren’t specific nodes to get the Raspberry PI internal temperature, we can get it from a terminal command:
echo $(($(cat /sys/class/thermal/thermal_zone0/temp)/1000))We can use the “Execute Command” node to retrieve values from the execution of terminal commands. :
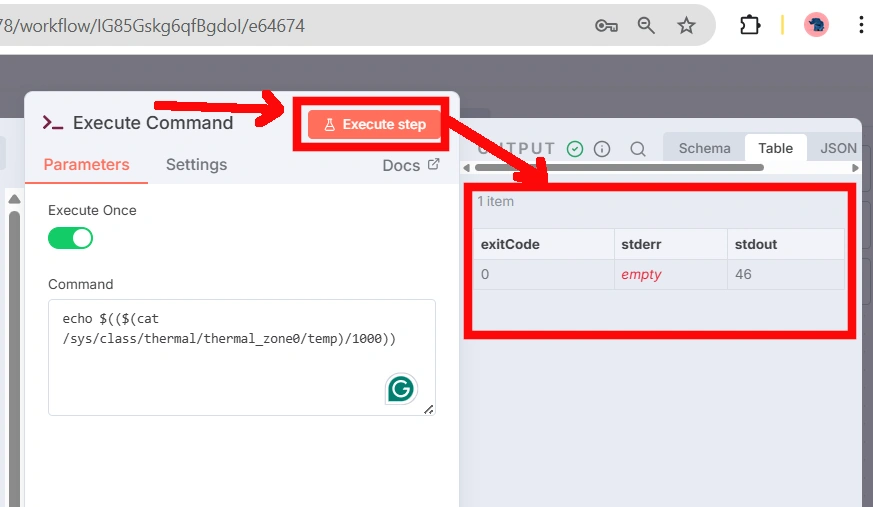
The following window shows us another important feature of the n8n GUI: in any node, you can see:
- at the center panel: the settings for the current node;
- in the left panel: the inputs coming from the previous node;
- in the right panel: the output of the current node (which will become input for the following node)
In our case, we can paste the terminal command to get the temperature value in the text field highlighted in the following picture:

By clicking the “execute step” button, we’ll run the node and get a preview of the resulting output:
Create an IF Node
As seen in the previous steps, please go back to the canvas and append a new “IF” node to the “Execute Command” node. The new node will offer you a way to create one or more conditions based on the values of the previous node. Like in many other nodes, you can drag and drop the values coming from the previous node to the new one, as shown in the following picture:
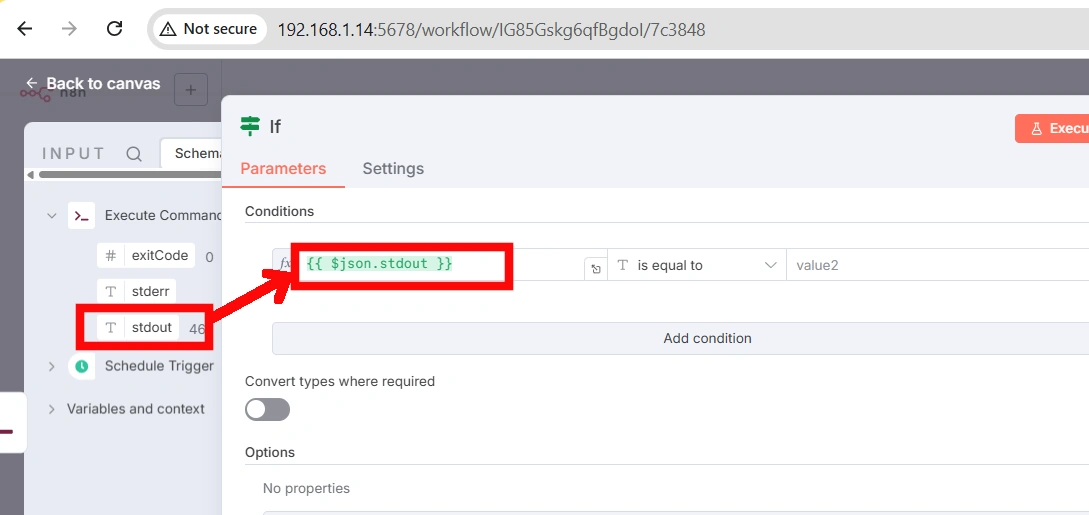
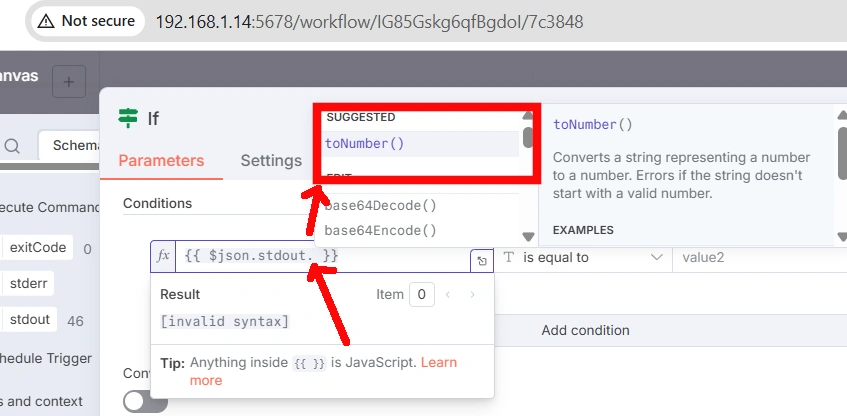
Now, let’s look at a particular thing. The “T” symbol near the “stdout” input from the previous node shows us that the value is a “Text” (string). As we need to consider the temperature value as a number and compare it with a defined threshold, we need to convert it to a number. You can do this convertion by appending a “.” (dot) at the end of the “$json.stdout” variable in the function. This will open a new menu where you can select the “toNumber()” function to apply to the input value:
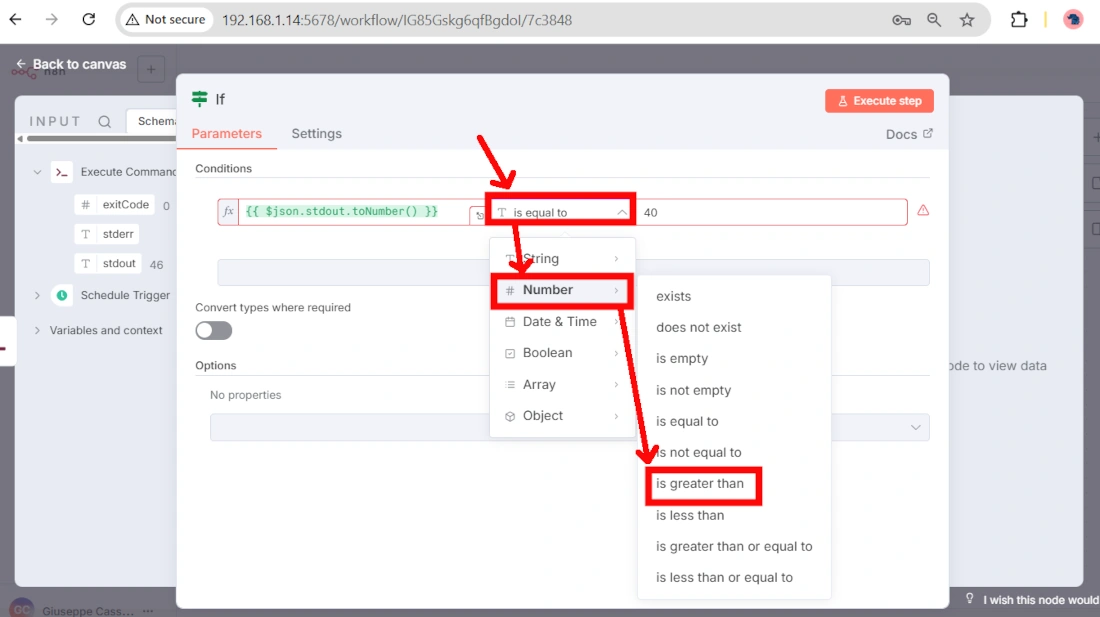
Finally, please select the comparison field and select “is greater then” option from the “Number” options. Moreover, please add a threshold in the following field, where I set “40” to make it sure that the temperature will execute the following command (in a real context, a temperature warning for Raspberry PI should be set at 70 degrees Celsius):
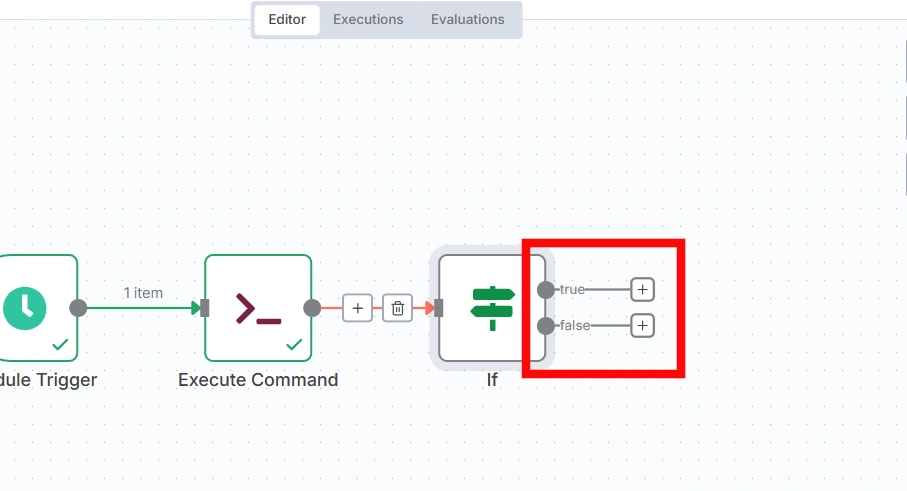
Back to the canvas, we can see that the IF node has a particular output. It will allow you to append 2 possible nodes, depending on the result of the IF operation: a child node for the True and a different child node for the False:
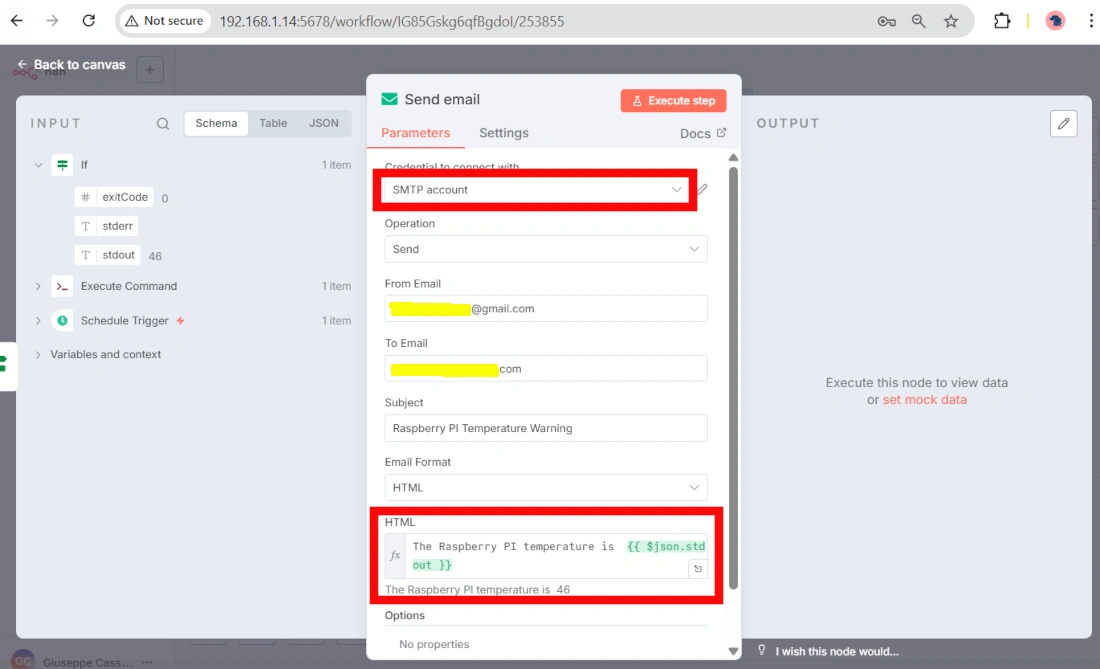
Create a Send Email Node
According to the goal of this workflow, it will send a warning email every time the temperature is detected as greater than the threshold. So, please append a “Send email” node to the “True” output from the IF node.
The settings for this kind of node are still simple. The important thing is that we can use the SMTP Credential already provided in the previous steps. Another funny thing is that you can prepare the HTML code for the email message body by dragging and dropping fields from the previous inputs. So, your settings will be similar to the following:
Create a NoOp node
Back to the canvas, we can see that the IF node has no child on the “False” result. Optionally, you can use the “NoOP” node, which does… nothing.
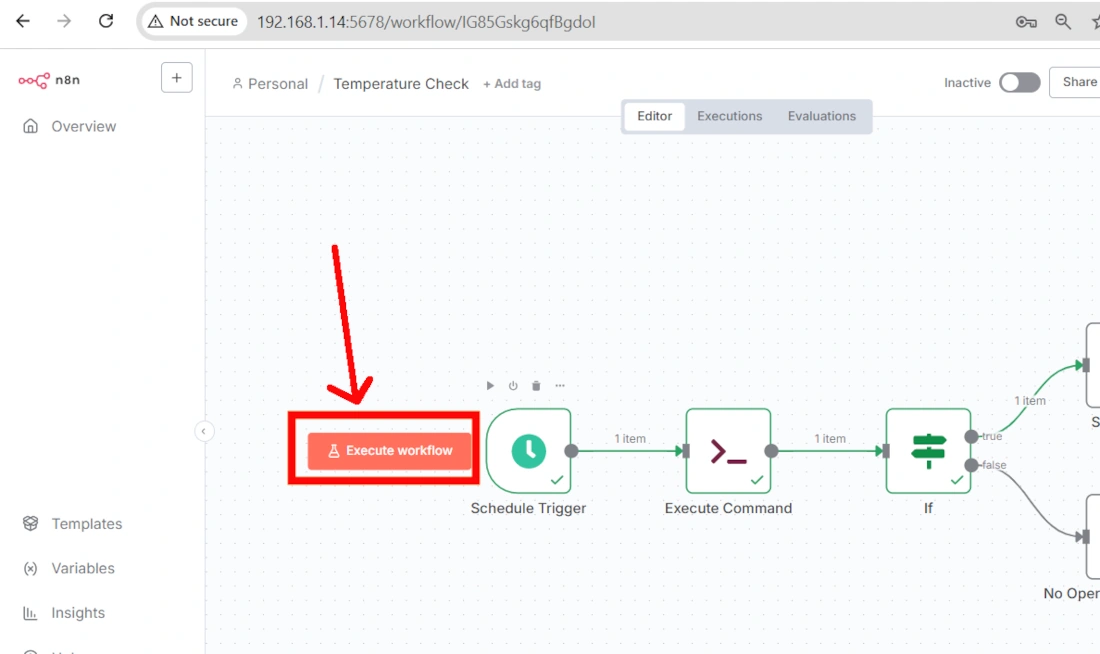
Run the N8n Workflow
At this point, the workflow is complete. To test it, you can click the “Execute Workflow” in the lower part of the canvas. Moreover, you can also see this button by moving the mouse on the trigger node:
N8N Docs
Please refer to n8n documentation pages for more usage info.
What’s Next
If you want to discover many other projects for your Raspberry PI, you can take a look at peppe8o Raspberry PI tutorials.
Enjoy!

Open source and Raspberry PI lover, writes tutorials for beginners since 2019. He's an ICT expert, with a strong experience in supporting medium to big companies and public administrations to manage their ICT infrastructures. He's supporting the Italian public administration in digital transformation projects.
![]()
![]()
![]()
![]()
![]()
![]()
![]()


I’m stuck at installing n8n with npm. At about 30-40% of progress it throws bunch of “Unsupported engine” warnings and than it freezes for 10-15 minutes untill it compleatly breaks and looses SSH connection.
Could you please update your tutorial and check if installing n8n on pi zero 2w is possible now days?
Hi Tom,
With RPI Zero 2W you should be able to use the docker installation (please use the 64-bit OS for your Raspberry PI). Please, can you try this way?