
Last Updated on 29th November 2025 by peppe8o
This tutorial will show you how to use the Raspberry PI Imager tool to prepare your Raspberry PI computer board for your projects. Please note that this tutorial applies to all Raspberry PI computer boards, as the Raspberry PI Pico is a microcontroller (not a computer). Therefore, you should start with First steps with Raspberry PI Pico for Beginners.
Every Raspberry Pi project starts with installing the Operating System by flashing the storage (usually a micro-SD card, but it can also be a different storage medium). There are several ways to flash an OS image for Raspberry Pis, as using Balena Etcher or Win32DiskImager. In 2022, the Raspberry PI company released its own Raspberry PI Imager to prepare the storage.
Trying it is a must for Raspberry PI lovers.
What We Need
As usual, I suggest adding from now to your favourite e-commerce shopping cart all the needed hardware, so that at the end you will be able to evaluate overall costs and decide if to continue with the project or remove them from the shopping cart. So, hardware will be only:
- Raspberry PI Computer Board (including proper power supply or using a smartphone micro USB charger with at least 3A)
- high speed micro SD card (at least 16 GB, at least class 10) or any compatible storage
- A common computer (maybe with Windows, Linux or Mac). It can also be a second Raspberry PI Computer board with Raspberry PI OS already installed.

Install the Raspberry PI Imager
To prepare a Raspberry PI’s Operating System, you need an external computer to install and run the Raspberry PI Imager. I will refer to this external computer as “remote computer”.
Raspberry Pi Imager is available for 3 Platforms: Windows, macOS and Linux. Please download the software installer from the Raspberry Pi download page and install it according to the OS.
With this software installed, you will be able to prepare the storage for your Raspberry PI computer board, where you will flash your preferred OS image.
Raspberry PI Imager Usage
Using the Raspberry PI Imager is very simple and intuitive.
After the software installation completes, please run the Raspberry PI Imager from your remote computer. You will get the default screen, already translated into your language according to your remote computer language settings. Please note that if you want to run it in a different language, you must change the language settings for your remote computer system-wide.
The home page will appear first:

During the setup steps, the program will help you select the relevant options to get your OS in line with your needs.
Device Filtering
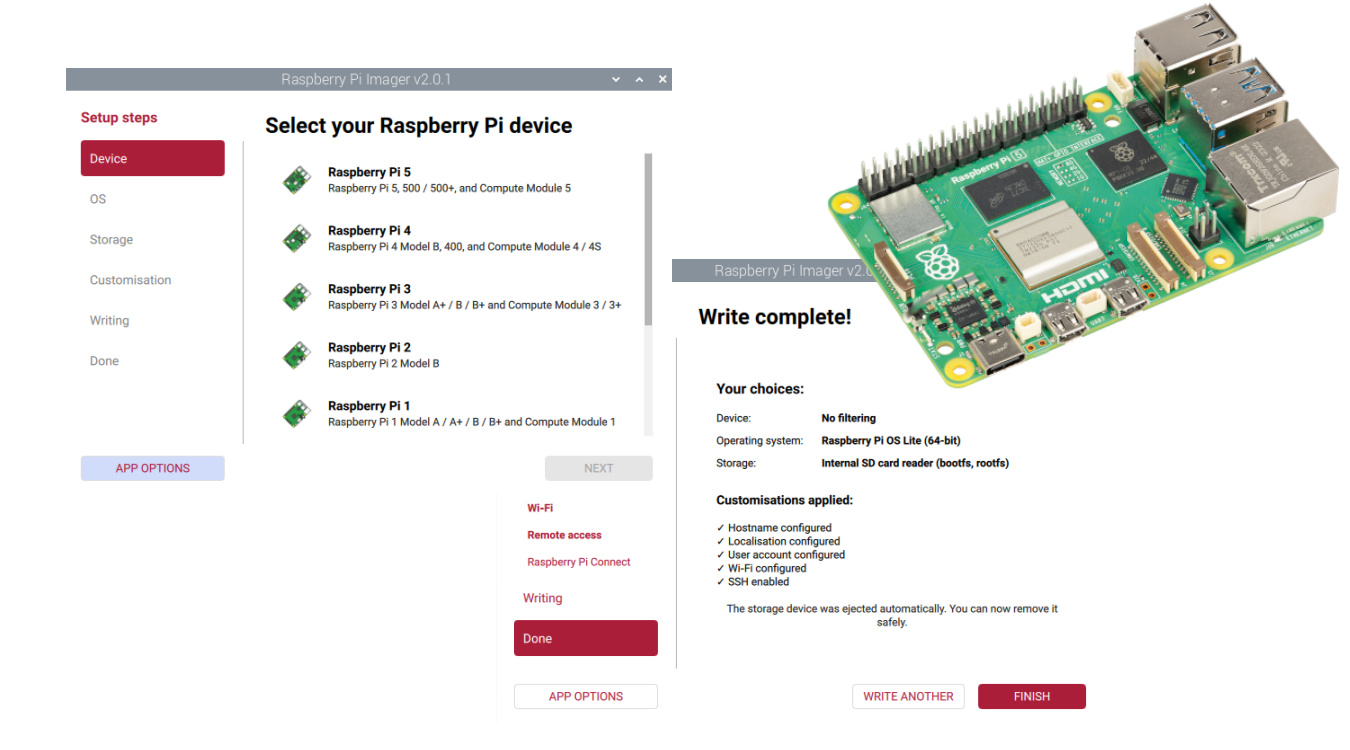
The first step allows you to filter the available Operating Systems to install by selecting the Raspberry PI computer model you have. By clicking the “CHOOSE DEVICE” button, the Raspberry PI imager will show you the list of all the Raspberry PI computer models, where you can easily select your one.
Usually, it is important to select OSes which support the CPU architecture of your computer model, as the oldest Raspberry Pi models integrate old ARM versions. With the latest Raspberry PI models, you can also select the “No Filtering” option as they should support all the OS Images. You will find this option at the bottom of the list.

After you select your relevant option, please click the “NEXT” button at the bottom of this window.
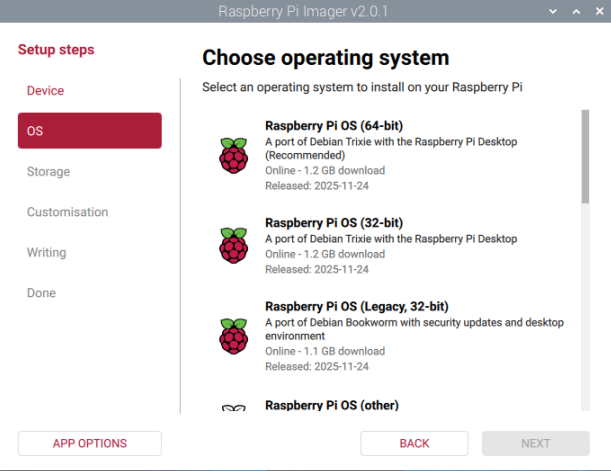
Select the Operating System
With the second step, you can select from a wide number of options offered by the Raspberry PI.
Raspberry PI OS Options
At the beginning of the list, you will find the official Raspberry PI OS, which is the Raspberry PI OS with a Desktop environment and a restricted set of applications already installed. This is what you can find in my Install Raspberry PI OS Desktop (with optional Remote Desktop) tutorial.
NOTE: For each Raspberry PI OS, you will find the 64-bit, the 32-bit, and the legacy version.
The 64-bit and 32-bit are built on the latest Debian distribution (Bookworm at the date of this post), while the Legacy is built on the previous Debian distribution (Bullseye at the date of this post). The legacy version is intended for those people requiring it for compatibility issues with specific problems, so in most cases, you can opt for the latest version.
After these first options, you will have a list of sub-menus where you can select more specific Operating Systems.
The “Raspberry PI OS (other)” option will enable you to install the Raspberry PI OS Lite ot the Raspberry PI OS Full. You can check the difference between Raspberry PI OS Lite, Raspberry PI OS and Raspberry PI OS Full in my Raspberry PI OS Lite vs Desktop: Comparison Between the Distributions article.

If you are interested in trying Operating Systems different from the official Raspberry PI OS, the Raspberry PI Imager gives you many options.
Other Operating Systems
The “Other General-Purpose OS” folder shows you other Operating Systems, usually with Desktop environments, available for you and compatible with Raspberry PI computer boards. This list includes, for example, Ubuntu, Risck OS, and Alpine Linux.

Specific OS
By scrolling through the other options, you will discover that you can find additional sub-menus to easily run:
- Media Player OS: to create a powerful media centre
- Emulation OS: for emulating ancient gaming consoles
- Specific Purpose OS: like Home Automation, remote learning hub, and 3-D printing software

I like the idea of having an OS ready for use (out of the box), which is a great help for people at their very first approach with Raspberry PI computers. But I prefer to install this software by myself on top of a Raspberry PI OS Lite, as this allows me to have more services running from a single Raspberry PI computer board, as you can find in my Raspberry PI Tutorials.
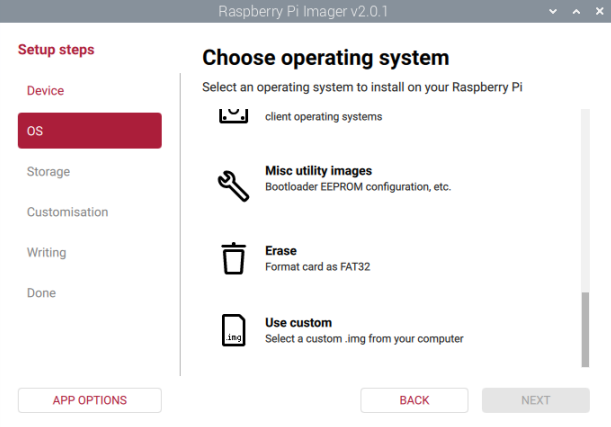
Useful Tools
At the end of this list, you will also find a few useful tools.
- The “Misc utility images” allows you to write special images for your Raspberry PI computer to change the bootloader options (by changing the media order where to check the boot files).
- The “Erase” option will make you sure that the storage is completely erased (useful when an attempt to write an OS gives you failing results).
- The “Use Custom” option enables you to use a custom (raw) image file that you downloaded from the web, and you want to flash for your Raspberry PI.
When you choose your favourite OS, please click the “NEXT” button.
Select the Storage
Before proceeding to the next step, please plug in the storage in your remote computer. You will see it listed in the following window:

You can just click on it to select it and move to the next step.
Customize Raspberry PI OS Settings
The OS customisation options allow you to prepare the Raspberry PI OS with some settings pre-configured from the first boot. This is a great help to get your OS ready to use, and to avoid performing some annoying tasks common to any OS installation from scratch (like giving it the first user, setting up the WiFi network, changing the keyboard layout, and so on).
Different from previous Raspberry PI Imager versions, from the 2.0 it became an explicit part of the main wizard. At any step of the customisation process, you will also see a “Skip Customisation” button, used when you don’t want to set the pre-configured options. I strongly suggest using these settings when you setup the official Raspberry PI OS. On the other hand, you can skip them when using a different OS.
Hostname
The first customisation step proposes that you set the hostname. It is a value which allows you to identify the machine in a network. The only rule is to set it without any spaces in the string.
In many cases, for beginners, it doesn’t impact the result of your project, so you can set it to whatever you prefer, like “raspberrypi” or “mycompyter”.

Localisation
Having the correct language and keyboard layout helps you prevent the resulting installation from using a different character set from your keyboard. In the following step, you can select the timezone and the keyboard layout (both suggested):

Username and Password
When you access your Raspberry PI, you will need to use your credentials. This step is where you can create it, so that the new user will be ready at your first login:

WiFi
When you boot the Raspberry PI for the first time, if you perform a headless installation and you want to remotely connect to it from a WiFi network, it’s vital to get the PI already connected to it. This step will allow you to pre-configure the wireless connection so that the OS will be ready out of the box.

Remote SSH Access
This is another vital step for headless setups. SSH access allows you to control the Raspberry PI terminal from a remote computer with SSH software like Putty. In this case, please turn it on as shown in the following screenshot:

Raspberry PI Connect
The latest customisation step allows you to enable the Raspberry PI Connect. This is a software form the Raspberry PI which allows you to remotely control your Raspberry PI (both terminal or desktop) from a web browser. You can find more info in the above-linked tutorial. You can select (or not) it at your choice, you can also change this setting after you boot the Raspberry PI OS:

App Options
Before writing the image, you can also use the “App Options” button at the end of the sidebar menu on the left side of the Raspberry PI window. This button allows you to set a few additional settings. Besides the others, you can set the “Eject media when finished” option to ensure that the storage will be safely unmounted from the computer at the end of the writing process:

Final Raspberry PI Imager Operations
After the last customisation step, the Raspberry PI Imager will show you a summary of the resulting image we’re going to write:

You can click the “Write” button to move on to the next step.
Before proceeding to flash the OS image on the storage, the Raspberry PI Imager will warn you that all the data currently saved in the storage will be erased.

At this point, you can still abort the installation if you need to save files from the storage card. Otherwise, please click YES to proceed with the OS installation.
The software will start downloading the required OS image (if not available in cache) and write it to the storage:

After the write process ends, it will also perform a verification to check if the image has been written correctly:

After this, your storage is ready to be used. You can now remove it from the remote computer and use it with your Raspberry PI.
What If Raspberry PI Imager Ends With an Error?
If the image flashing process ended with a fail warning, you can do some checks.
In my experience, the first attempt is to run the Raspberry PI Imager with Administration / elevated privileges. This can fix some hidden errors when the software can’t fully access the storage resources.
Another attempt is simply to retry the writing process.
Moreover, you can fully erase the storage with the erase tool (from the CHOOSE OS options) before writing the image, as shown in the previous steps.
The last attempt is to change the storage with a different one from a different producer: some (very cheap) micro-SD cards could not be suitable for installing an OS image (a very rare case). It’s a really rare case, but it’s a possible case.
What’s next
If you are interested in more Raspberry PI projects (both with Lite and Desktop OS), take a look at my Raspberry PI Tutorials.
Enjoy!

Open source and Raspberry PI lover, writes tutorials for beginners since 2019. He's an ICT expert, with a strong experience in supporting medium to big companies and public administrations to manage their ICT infrastructures. He's supporting the Italian public administration in digital transformation projects.
![]()
![]()
![]()
![]()
![]()
![]()
![]()
rpi-imager does not see sd card on cgrome os 104, AR
rpi imager does not see sd card on chrome os release 104 ARM device.
I read a comment that indicates it does not work on ARM devices.
m
Hi Lawrence,
I can assure that it works on Raspberry PI OS (that is ARM and has it pre-installed, if I remember correctly) and Windows. That’s where I use it. I don’t know about different OSes as I can’t test it. In the tutorial I referred the official download page where you can find the supported platform and OSes, as it depends also on RPI Foundation updates. If you need a different platform, maybe the best way could be asking them if they plan to release a new supported platform