Raspberry PI Zero Pinout
Last Updated on 2nd September 2023 by peppe8o
In this article, I’m going to explain the Raspberry PI Zero pinout schema, also valid for other currently available RPI models. This is useful when we plan to interface RPI with the external world. A simple example is Controlling a stepper motor with Raspberry Pi Zero W.
Raspberry PI can interact with the external world with a number of PINs available on all RPI boards. Raspberry PI Zero pinout shows their arrangement and functions.
What Are Raspberry Pi GPIO
GPIOs (General Purpose Input/Output) are physical pins that you can use to acquire states or information from external devices. GPIO can also control external devices.
From the electrical point of view, each Raspberry PI has a number of PINS connected to ground (0V) and a number of pins connected to 5V power supply. You can configure all other pins both to receive or provide a tension value which can be 0V (low) or 3,3 V (high). You can manage these settings via Python programs, C/C++, Scratch, or Processing3.
With Python, it is also possible to map in your terminal the pinout configuration by using the GPIOZero library. Raspberry PI OS Desktop already includes this library. In Raspberry PI OS Lite you must install it by typing, from terminal:
sudo apt install python3-gpiozero
Once this library is available, use the command
pinout
to have a graphical map. For more info, please refer to Raspberrypi GPIO Documentation.
However, during wiring preparation, it is useful to see pins map.
40-pin Schema
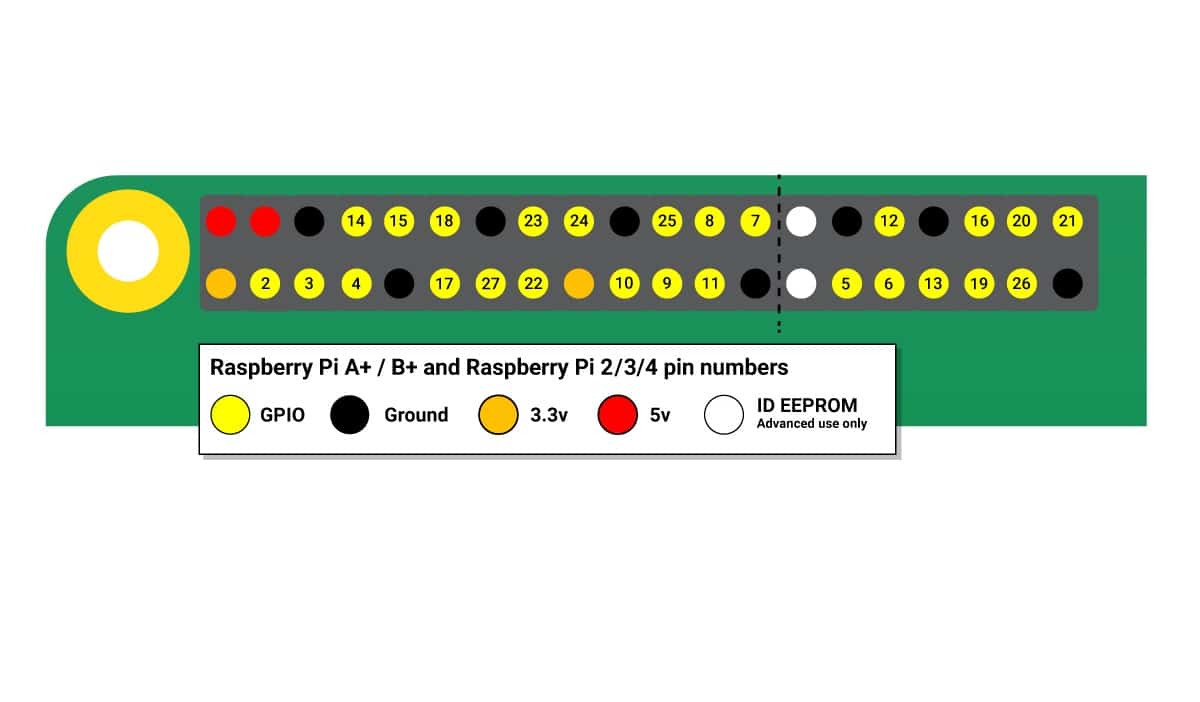
Following schema shows classic Raspberry PI Zero pinout schema:
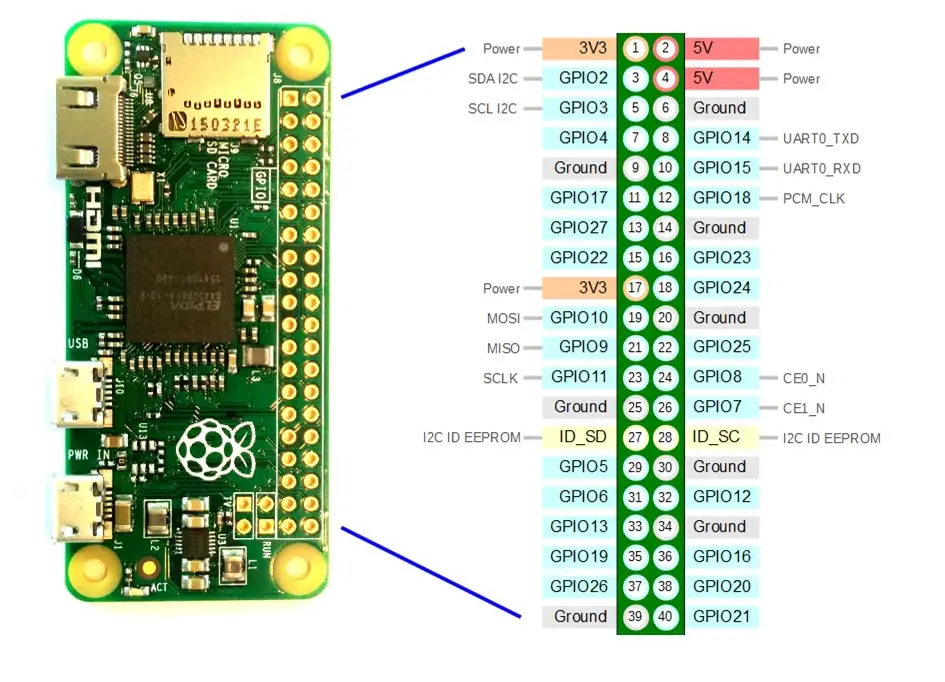
Ground and power pin labels identify their voltage reference. 3V3 and 5V provide different voltages (3,3 Volt and 5 Volt). You will use one voltage or the other based on your external device’s specs.
External labels (from GPIO2 to GPIO27) refer to Broadcom (BCM) naming convention. This is the most used one when programming with Python libraries.
Internal labels (from 1 to 40) refer to the board naming convention. This is used with some programming libraries when BCM is not supported or when managing numbers results being more comfortable.
Some pins can be both used as common ones, but they are capable also of special uses.
I2C can be used to communicate with devices compatible with Inter-Integrated Circuit (a low-speed two wire serial protocol). This communication standard requires master-slave roles between the two parts. I2C has two connections: SDA and SCL. They work by sending data to and from the SDA connection, with the speed controlled via the SCL pin.
SPI (Serial Peripheral Interface) is another protocol for RPI with devices in master-slave communication. You can use it for short distances communications. Data is synchronized using a clock (SCLK at GPIO11) from the master (RPi) and the data is sent from the Pi to our SPI component using the MOSI (Master Out Slave In) pin. If the component needs to reply to our Pi, then it will send data back using the MISO (Master In Slave Out) pin.
Commonly known as “Serial,” the UART (Universal Asynchronous Receiver / Transmitter) pins provide a console/terminal login for alternative headless setup. TX and RX stand for transmission and reception.
Difference with Raspberry PI Zero WH Pinout
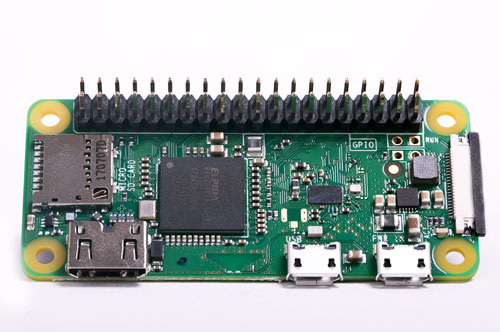
Consider that Raspberry Pi Zero and Zero W have an unpopulated pin area. This means that you must solder pins element (usually inside Pi Zero kit or sold alone). Raspberry Pi Zero WH, on the other hand, has GPIO pins already present like all other models. All pinout remains as above explained.
Enjoy!
Check hardware prices with the following links:
