
Last Updated on 8th December 2023 by peppe8o
This tutorial will show you how to connect and control a Neopixel from Raspberry PI Pico, to be able to create fancy LED effects for your home. I will use MicroPython, because of its simplicity, especially for beginners.
About Neopixel LEDs
Neopixels are RGB LED strips composed of WS2812B chips. They can have different forms, the most common are rings and flexible strips. They can be composed of a variable number of chips (each one includes 1 LED).
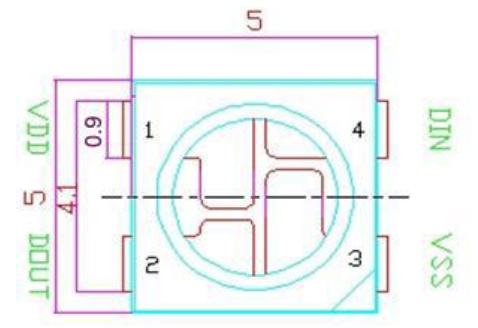
Each WS2812B controls a single LED light source, with a package including a 5050 LED. Each chip ha 4 main ports:
- VDD (or 5V): power supply
- VSS (or GND): ground
- DI (or DIN): Data INput
- DO (or DOUT): Data OUTput
The chip also enables the LEDs to be controlled individually with a NZR communication. The following picture shows the timing charts for this communication, with 3 main data: 1, 0, and reset:
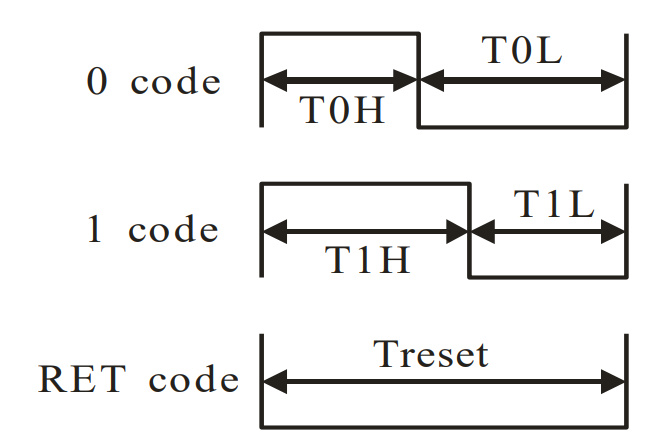
Simplifying the communication flow, after the reset signal the first pixel collects the initial 24-bit data from its DIN port and sends it to the internal data latch. The data previously stored are sent to the next cascade chip through the DOUT port.
Neopixel Pinout
Usually, Neopixel modules include the same 4 PINS as the internal chip: DO, DI, Vdd (or Vcc), and VSS (or GND).
You can use the DO PIN to connect more Neopixel modules in cascade, so getting a longer pixel strip or rings. In this case, take care to change the code (that we’ll see later), as your overall pixel quantity will be the sum of your sub-modules pixels.
WS2812B Specs
The following table shows a typical WS2821b specs list:
| Spec | Suggested | Limits |
|---|---|---|
| Power supply voltage (VDD) | 4.5~5.5V | +3.5~+5.3 |
| Operation temperature | -25~+80 °C | |
| Input voltage level (high level) | Min: 0.7 Vdd | |
| Input voltage level (low level) | Max: 0.3 Vdd | |
| Input current | ±1 µA |
What We Need
As usual, I suggest adding from now to your favourite e-commerce shopping cart all the needed hardware, so that at the end you will be able to evaluate overall costs and decide if to continue with the project or remove them from the shopping cart. So, hardware will be only:
- A common computer (maybe with Windows, Linux or Mac). It can also be a Raspberry PI Computer board
- Raspberry PI Pico microcontroller (with a common micro USB cable)
- a NeoPixel module
- Dupont wirings
- Breadboard (optional)
Step-by-Step Procedure
NeoPixel and Raspberry PI Pico Wiring Diagram
Please note that the NeoPixel could come without soldered connectors. In this case, you may need to solder the wires to connect it to your Raspberry PI Pico.
Arrange the wiring as shown in the following picture, according to Raspberry PI Pico Pinout:
The following table shows the connections to prepare:
| Raspberry PI Pico | NeoPixel |
|---|---|
| VBUS (PIN 40) | Vdd |
| GND (PIN 38) | Vss (GND) |
| GP28 | DI |
Please find below some pictures of my cabling in my home lab.
Also note that my GND connection at the NeoPixel ring hasn’t worked, so broking the connector and creating a short circuit between the VCC and the GND. I fixed this by using one of the WS2812B pins (a Vss), so that I was able to recover my LED ring 🙂
Here’s the very very ugly soldering:
And there’s how I fixed it, by recovering the ground connection from one of the WS2812B chips:
Install MicroPython on Raspberry PI Pico
Connect your Raspberry PI Pico to Thonny and install MicroPython. For the very first steps and to install MicroPython, you can refer to my tutorial about the First steps with Raspberry PI Pico.
Please note that there’s no need to download specific libraries, as MicroPhython already includes the required one.
Test NeoPixel with Raspberry PI Pico
The first test will be the simpler. We’ll check that everything works by powering on a single LED to red colour.
So, with your favourite MicroPyhton IDe (I use Thonny) use the following code:
import machine, neopixel

num_pixels = 12
neo_di = machine.Pin(28)
np = neopixel.NeoPixel(neo_di, num_pixels)

np[0] = (255,0,0)
np.write()
As you can see, there’s a need for very few lines for a basic usage of NeoPixel modules. Once imported the 2 required libraries we set (for code cleaning) 2 variables: the number of pixels from our NeoPixel hardware and a “neo_di” variable, which mean the number of the GP port where the Data IN is connected. With these variables, we can easily initialize a “np” NeoPixel object.
Every LED can be addressed with its position, where 0 is the very first LED.
At the end, data are really transferred to the NeoPixel with the np.write() line.
Run it (with the button similar to “Play” on Thonny or the F5 key) and you should immediately see one LED becoming red, as in the following picture:
The Neopixel Demo from MicroPython
Micropython already includes a basic demo play with cool effects. To get it working you can download the code directly on your PC from my download area with the following link:
Run it into your Raspberry PI Pico with your MicroPython IDE and you will get something link the following video:
The Adafruit Rainbow Test
You can also get effect ideas from many internet sources.
If you are a little able to basis programming with Python, a great web resource is the Adafruit website. But they usually write code with their CircuitPython code, instead of MicroPython. Many codes can be easily adapted between the 2 languages. For example, I grabbed a fancy rainbow effect from https://learn.adafruit.com/circuitpython-essentials/circuitpython-neopixel, where I cut a part strictly related to the rainbow effect and changed the “np.show()”, which would be the CircuitPython code to send data to NeoPixel, to “np.write()”, coming for MicroPython. The resulting code for MicroPython is the following:
Run it with Thonny. The final effect follows (even if live is more cool):
Using NeoPixel Without a Computer
Please note we have performed the tests made till now with a computer attached to our Raspberry PI Pico. In order to get them running with Raspberry PI Pico without the need to plug it into a computer, you must save the code you want to execute in your Raspberry PI Pico, renaming the file to “main.py”. At every boot, the Raspberry PI Pico (with MicroPython firmware) looks for this file and, if exists, it immediately starts running it.
Sharing New Effects
For anyone wishing to share their code for cool effects, please send the code to me at giuseppe@peppe8o.com. You can also send a link to a YouTube video in order to show how your effects appear. If they work, they will be published in this page.
What’s Next
Interested in doing more with your Raspberry PI Pico? Try to look at my Raspberry PI Pico tutorials for useful and funny projects!
Enjoy!

Open source and Raspberry PI lover, writes tutorials for beginners since 2019. He's an ICT expert, with a strong experience in supporting medium to big companies and public administrations to manage their ICT infrastructures. He's supporting the Italian public administration in digital transformation projects.
![]()
![]()
![]()
![]()
![]()
![]()
![]()


