

This tutorial will show you how to install Squid in Raspberry PI and get your private proxy server.
What Are Proxy Servers
Following Wikipedia’s description, “a proxy server is a server (a computer system or an application) that acts as an intermediary for requests from clients seeking resources from other servers. A client connects to the proxy server, requesting some service, such as a file, connection, web page, or other resource available from a different server. The proxy server evaluates the request as a way to simplify and control its complexity”. A descriptive picture is also shown on the same page:

About Squid
Squid is the most popular open-source software to create a proxy in your self-hosted Linux server. It can reduce your home network traffic and improve response times.
It supports several web protocols like HTTP, HTTPS, and FTP.
There are several people supporting and improving Squid both individuals and Internet communities:
- The Squid Software Foundation, which provides also representation and oversight of the Squid Project
- The core team and main contributors list
- many code contributors (they are listed in the CONTRIBUTORS file within each copy of published sources)
Also, it can be used in chains with Privoxy to add network security.
Why Should I Use Proxyes?
Proxy servers are useful in many contexts:
- Offices: to control internet traffic by blocking some websites or some keywords, to manage contact with external internet from a single point or to optimize internet bandwidth usage by caching pages at the proxy level
- Home: for example, to control family internet access and block dangerous websites for kids
- Personal use: for example, to use an anonymous connection or to bypass network ISP blocks
Once setup, proxy servers can be configured in client machines both at the web browser level (so that only the browser will use your proxy) or at the system level (in this case, all browsers and terminal commands will use your proxy).
In this tutorial, we are going to setup a proxy server with Raspberry Pi Zero 2 W, but this procedure applies also to newer Raspberry Pi models.
What We Need
As usual, I suggest adding from now to your favourite e-commerce shopping cart all the needed hardware, so that at the end you will be able to evaluate overall costs and decide if to continue with the project or remove them from the shopping cart. So, hardware will be only:

- Raspberry PI Computer Board (including proper power supply or using a smartphone micro USB charger with at least 3A)
- high speed micro SD card (at least 16 GB, at least class 10)
Step-By-Step Procedure
I’ll configure Squid to manage access for all clients on a 192.168.1.0/24 private network to internet. You will need to modify this network depending on your needs and networking configurations (like our home router).
Prepare the Raspberry PI Operating System
The first step is installing the Raspberry PI OS. Please note that for my test I’m using the 64-bit version. You have 2 options:
- Raspberry PI OS Lite: This is a lightweight OS for Raspberry PI computer boards, without a Desktop environment (headless). Suggested for low-power Raspberry PI computers (like the RPI Zero 2 W), but also for newer computer models to get the full computing power working for your service.
- Raspberry PI OS Desktop: This is a less-performing OS (compared to the lite version), but it runs well on many Raspberry PI computer boards. I suggest this only if you need a desktop environment. In this case, you will work from its internal terminal.
You can check the difference between the 2 operating systems with my Raspberry PI OS Lite vs Desktop: comparison between the 2 distributions article.
After installing the OS, please make it up-to-date. From the Raspberry PI SSH session (or terminal):
sudo apt update -y && sudo apt upgrade -yIn this guide, I will use Raspberry PI OS Lite as Operating System. Then I’ll install Squid and configure it.
Install Squid in Raspberry PI
Install Squid by using the Raspberry PI OS repository with the following command:
sudo apt install squid -yAt the installation end, check that the Squid service is active:
sudo systemctl status squid.serviceand you should see the following:
pi@raspberrypi:~ $ sudo systemctl status squid.service
● squid.service - Squid Web Proxy Server
     Loaded: loaded (/lib/systemd/system/squid.service; enabled; preset: enabled)
     Active: active (running) since Fri 2023-12-15 15:46:17 CET; 39s ago
       Docs: man:squid(8)
    Process: 1016 ExecStartPre=/usr/sbin/squid --foreground -z (code=exited, status=0/SUCCESS)
   Main PID: 1019 (squid)
      Tasks: 4 (limit: 176)
        CPU: 1.417s
     CGroup: /system.slice/squid.service
             ├─1019 /usr/sbin/squid --foreground -sYC
             ├─1021 "(squid-1)" --kid squid-1 --foreground -sYC
             ├─1022 "(logfile-daemon)" /var/log/squid/access.log
             └─1024 "(pinger)"
The “active (running)” means that installation completed successfully and Squid is already running.
Configure Squid
There are a few important file and locations you should be aware of for managing Squid:
- Squid configuration file: /etc/squid/squid.conf
- Squid Access log: /var/log/squid/access.log
- Squid Cache log: /var/log/squid/cache.log
Before customizing the settings, I will create a backup copy of my squid.conf file and then I will open it for editing:
sudo cp /etc/squid/squid.conf /etc/squid/squid.conf.backup
sudo nano /etc/squid/squid.conf
In this file, I’ll leave the default port used by clients to use the proxy. If you want to change it, identify and edit the following line (you can do a search in nano text editor with CTRL+W):
http_port 3128To restrict networks allowed to use squid proxy, I will comment all the lines starting with “acl localnet src” just by adding an ashtag (#) at the start of the line. I’m going to allow my only my local network by typing the following configuration line:
acl localnet src 192.168.1.0/24Identify the line where localnet is commented out from the file:
#http_access allow localnetand uncomment it in order to have your local IPs enabled to use Squid:
http_access allow localnetClose and save the file.
Restart the Squid service:
sudo systemctl restart squid.serviceConfigure Your Client To Use Proxy Server
Back to your remote computer, now you need to configure it to use Squid and Raspberry PI as proxy server for internet connections.
You can apply the proxy configuration both at system-wide OR at the browser level of your client. If you do it at the system level, this will mean that any application on your computer will use the proxy server. At the the browser level, on the other hand, you will use the proxy only with that browser and the remaining applications of your computer will continue going to the internet directly.
In both cases, you will have to use your Raspberry PI’s IP address as proxy address, and “3128” as port (unless you changed the Squid port in your squid.conf file.
For the system-wide configuration, you have to check this depending on your client’s OS. For example, in Windows clients, you should go to Settings -> Network & Internet -> Proxy and there you can find the button to configure your proxy.
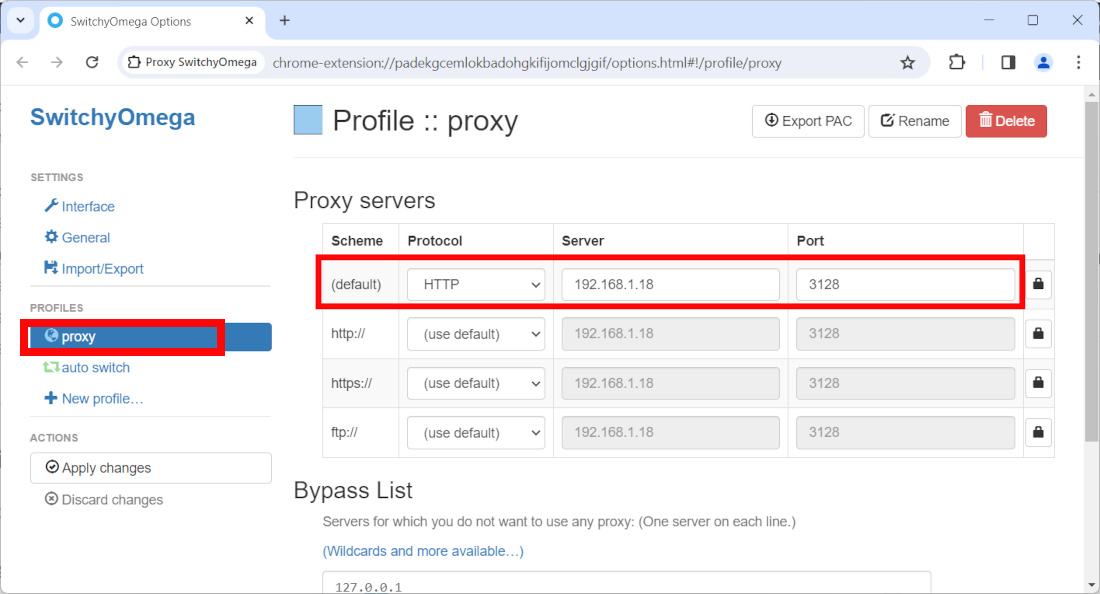
With browsers, usually, the proxy can be configured from the browser’s settings page. The only exception comes with Chrome, which doesn’t allow you to set the proxy at the browser level unless you don’t use chrome extensions or alternative tricks. I’ve found that there is a Chrome extension which makes the job simple: this is the Proxy SwitchyOmega. It’s free and it has a lot of very good reviews. Once installed the extension, you can set the proxy for Chrome browser by opening the SwitchyOmega options and setting the first line of your proxy list as follows (where 192.168.1.18 is my Raspberry PI’s IP address):
Then, use the “Apply changes” button from the left-side menu.
Finally, please open the extension shortcut and select “proxy” to start navigating using the proxy configurations previously set:
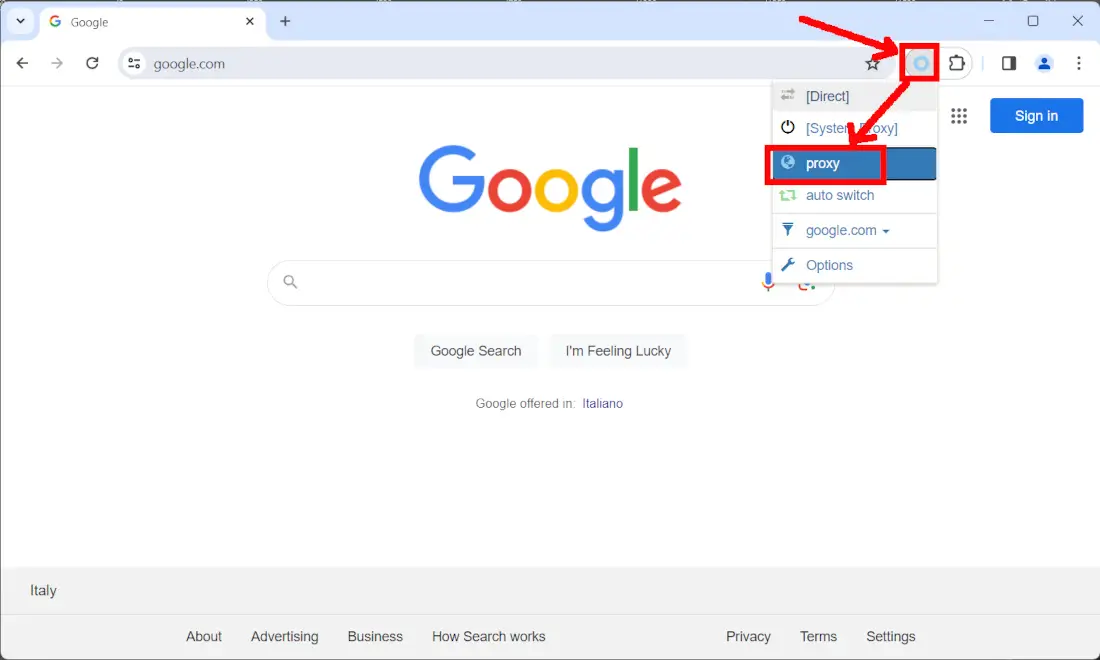
Now, you are using your Squid proxy.
Domains Blacklist
With Squid and Raspberry PI, you can also create your blacklist in order to deny access to some specific domains. For example, I’ll show you how to block a specific domain (let’s assume, for example, yahoo.com). Before starting, please check that you can reach the domain:

Open again your squid.conf file for editing:
sudo nano /etc/squid/squid.confAnd identify the final deny all line:
http_access deny all
Add the following lines BEFORE the “http_access allow localnet” line:
acl domain_blacklist dstdomain "/etc/squid/domain_blacklist.txt"
http_access deny all domain_blacklist
So, it should appear like the following:
...
include /etc/squid/conf.d/*.conf

acl domain_blacklist dstdomain "/etc/squid/domain_blacklist.txt"
http_access deny all domain_blacklist

# Example rule allowing access from your local networks.
# Adapt localnet in the ACL section to list your (internal) IP networks
# from where browsing should be allowed
http_access allow localnet
...
Close and save the file. Create a new file named “domain_blacklist.txt”, which will include all the domains you will block (one for each line):
sudo nano /etc/squid/domain_blacklist.txtLet’s add our example domain. Please note that there must be a dot (“.”) before the domain in order to block all the subdomains:
.yahoo.com
Close and save the file. Then restart the Squid service
sudo systemctl restart squid.serviceAfter the service has finished restarting, from your browser you will see an error page when trying to navigate the blocked domains:
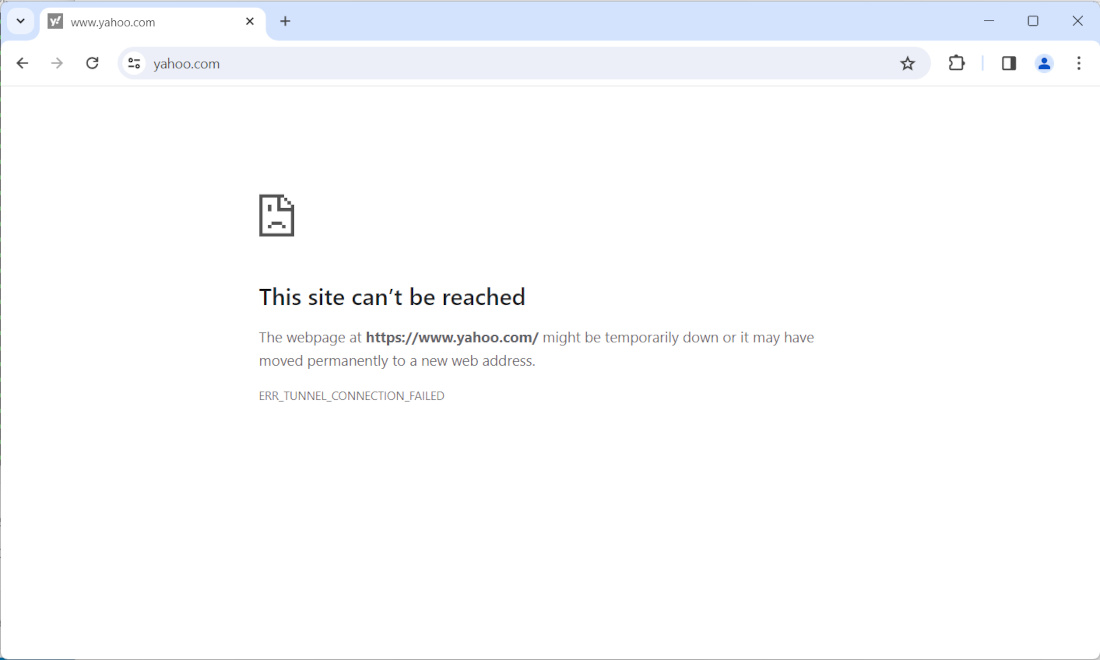
The other websites will work correctly.
You can now remove the yahoo.com domain from this list and change it with your custom lists. Please note that every list change will require a Squid service restart.
Squid Documentation
For more info and advanced settings, please refer to Squid official documentation.
What’s Next
Interested in more cool ways to use your RPI? Take a look at peppe8o Raspberry PI computer tutorials!
Enjoy!

Open source and Raspberry PI lover, writes tutorials for beginners since 2019. He's an ICT expert, with a strong experience in supporting medium to big companies and public administrations to manage their ICT infrastructures. He's supporting the Italian public administration in digital transformation projects.
![]()
![]()
![]()
![]()
![]()
![]()
![]()


Thanks for the guide for Squid on to the Rpi, I have installed it on my rpi4,
Do you have a guide for turning the Squid cache into transparent cache.
Thank you,
Hi Dave,
from my searches with google, it appears that transparent mode can be enbled just by setting “http_port 3128 transparent” in your squid.conf
How does one set a Password for the http Proxy?
A good tutorial on adding authentication is available from https://gist.github.com/jackblk/fdac4c744ddf2a0533278a38888f3caf.
Still not tried, but I will in near future. Please let me know if it works
Many thanks for this very helpful Howto !
I want a html page (/var/www/html/block.html) to be loaded instead of blocked sites, like a 404 error page.
How could I write it in squid.conf file ? In the ‘acl’ section ?
Thanks,
Chris
Hi Chris,
thank you for yuor feedback. With Squid you can change the blocked sites with custom HTML pages or images. These images/html should be already published from a web server (it can be also the same Rasberry PI by installing Apache (see the Apache part of this tutorial) or from a remote server.
You can integrate it in your squid.conf file by using the
deny_infodirective. More info about this can be found in the Squid docs.For example, your configuration line can be similar to the following (which uses my logo published from my website):
deny_info https://peppe8o.com/wp-content/uploads/2024/03/cropped-Logo2D_512x512_2.png acl