Last Updated on 2nd September 2023 by peppe8o
In this tutorial, I’m going to show you how to use an I2C OLED display (SSD1306) with Raspberry PI Pico. Please note that, if you have an LCD display, you must refer to my Using I2C LCD display With Raspberry PI Pico and MicroPython tutorial.
OLED displays with Raspberry PI Pico allow a cool way to show your program’s data and present them with a more flexible device.
OLED Display Features
OLED (organic light-emitting diode) displays are low power consumption output devices able to show text and images by controlling every single pixel. They usually require only a 0.04W power that can be supplied without problems from Raspberry PI Pico VCC output.
They usually can work in a wide range of operating temperatures, spacing from -40°C to 85°C.
The most common size is 128×64 pixels (0.96 inches), but also the 128×32 pixels (0.91 inches) is available from e-stores. Their screens are usually mono-color or bi-color. The mono-color ones are made of blue or white pixels, while the bi-color models usually have an upper part yellow and the lower one blue. In this tutorial, I’m going to use the bi-color model, but this applies also to the mono-color ones.
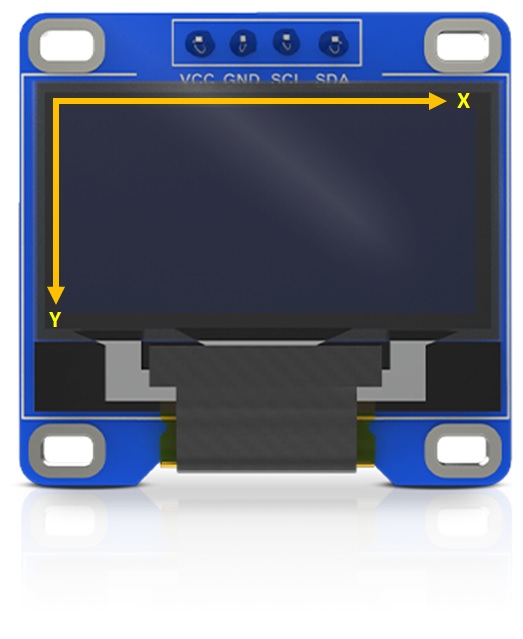
The pixels are indexed by a cartesian spacial reference, with the x-axis moving on the horizontal side and the y-axis moving on the vertical one. Both coordinates start from their 0 on top-left side of the screen:
The datasheet can be found on Adafruit pages.
SSD1306 OLED Pinout
The I2C version pins are defined according to the following table:
| PIN Label | Description |
| VCC | This PIN goes to the positive power source |
| GND | This PIN goes to the ground reference |
| SCL (or SCK) | This PIN is the clock reference for I2C communication |
| SDA | This PIN is used for data transferring according to I2C protocol |
What We Need
As usual, I suggest adding from now to your favourite e-commerce shopping cart all the needed hardware, so that at the end you will be able to evaluate overall costs and decide if to continue with the project or remove them from the shopping cart. So, hardware will be only:
- Raspberry PI Pico microcontroller (with a common micro USB cable)
- SSD1306 I2C OLED display
- dupont wirings
- breadboard (optional)
Check hardware prices with the following links:


Step-by-Step Procedure
Wiring Diagram
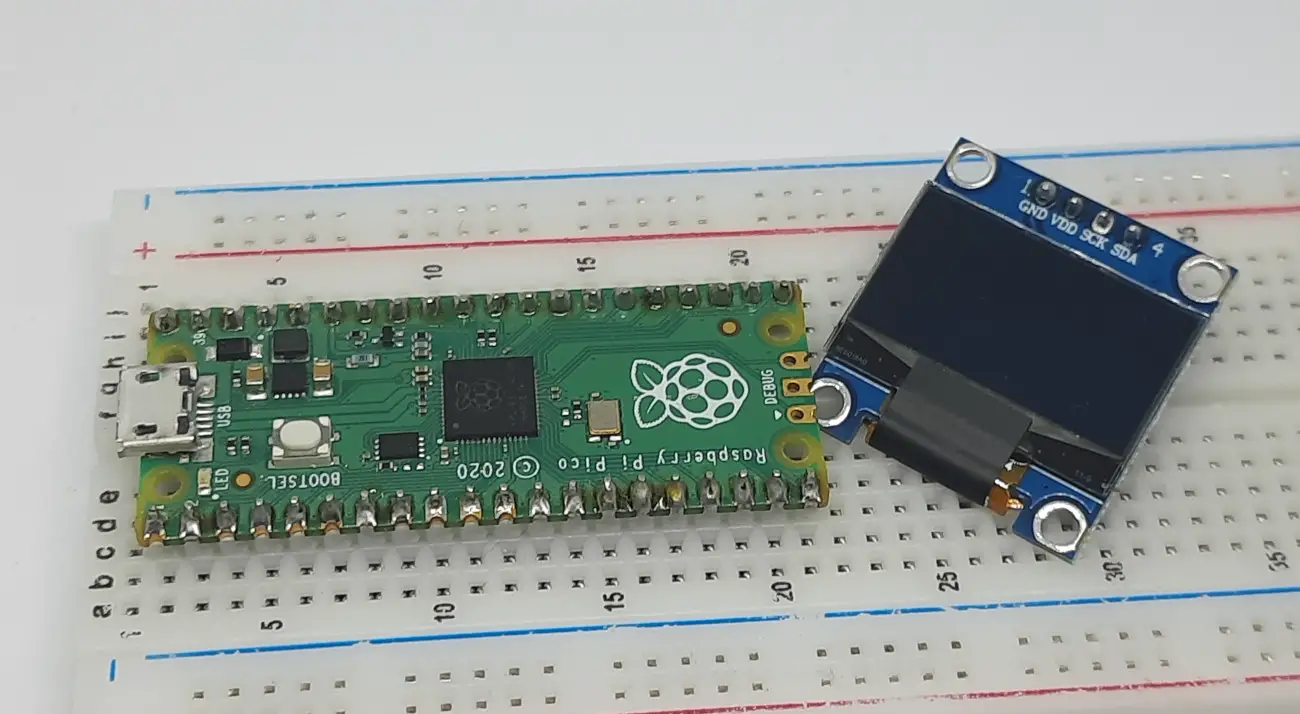
Please arrange cabling according to the following picture, according to Raspberry PI Pico pinout. Please note that in some displays the SCL may be named SCK.
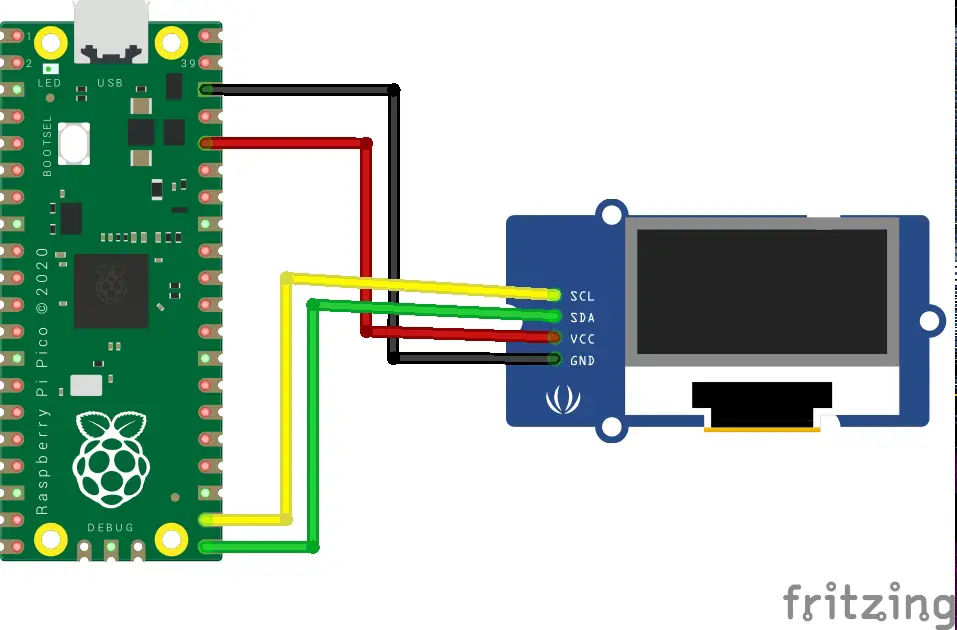
Please find below some pictures from my test lab:


Get my the OLED library and my Oled Code for Raspberry PI Pico
Connect RPI Pico to Thonny (you can refer to my tutorial about First steps with Raspberry PI Pico).
Please download and add the SSD1306.py library in your Raspberry PI Pico root folder, according to Adding external modules to MicroPython with Raspberry PI Pico tutorial. You can get it from the official MicroPython github page or from my download area with the following link:
Download my pico-oled-peppe8o.py script on your computer and open it with Thonny.
Please remember that when you’ll need to execute it without a computer plugged into RPI Pico, you will need to keep the code saved in Raspberry PI Pico as “main.py”.
The following paragraphs will describe my code line by line. In the end, you will find the script expected results.
pico-oled-peppe8o.py Code
Having the ssd1306 library in our Raspberry PI Pico makes the code really simple to understand and use.
We firstly import the required libraries, including the ssd1306 saved in your Raspberry PI Pico root folder (or one of the paths allowed for importing modules):
from machine import Pin, I2C
import ssd1306
Then, we setup the I2C connection with the SSD1306 OLED display. According to the previous wiring diagram, it will be as the following:
i2c = I2C(0, sda=Pin(16), scl=Pin(17))
display = ssd1306.SSD1306_I2C(128, 64, i2c)
The simpler property allows you to write text in your display, also setting the row and column with the display.text(text_string, x, y). You can pre-set as many text statements as you want and the related position. The text will be displayed only with the final display.show() statement which sends the data to the OLED display.
display.text('Hello,', 0, 0)
display.text('peppe8o.com', 0, 16)
display.text('readers!', 0, 32)

display.show()
The result will be the following:

Please consider that once the script finishes its run, the display will keep the memory of what was shown until it will receive a new show() command or until it will be powered off.
Another interesting command, is the display.fill() statement. It will set to 1 (on) or to 0 (off) all the Oled pixels:
- display.fill(0) -> off
- display.fill(1) -> on
Of course, also this requires a following display.show() line to correctly appear in your display.
SSD1306 with Raspberry PI Pico Examples
In this section, I will show you a number of examples with the related results available from the screen. In the following code, I will show only the display statements to set, you will keep in your script the initial setup part and the final display.show() to get it working.
Display Invert
It allows you to set what to show in your OLED display and then invert the pixel status. The following code:
display.text('Hello,', 0, 0)
display.text('peppe8o.com', 0, 16)
display.text('readers!', 0, 32)
display.invert(1)
This will result in the following picture. Please note that the following picture has flickering problems due to my smartphone camera not filtering the different framerate compared with the display, but the real result will show a clear image:

Display Rotate
It allows rotating the display by 180 degrees. The code:
display.text('Hello,', 0, 0)
display.text('peppe8o.com', 0, 16)
display.text('readers!', 0, 32)
display.rotate(False)
This will result in the following:

Display Pixel
It allows you to control a single pixel at a defined position (for example x=0 and y=10, with color set to 1)
display.pixel(0, 10, 1)
Display Hline (and Display Vline)
These statements allow you to draw a horizontal (or vertical) line in your display. Again, the first 2 variables set the position (x=0, y=8). Then we set the width (60 means that our line will be 60px large) and the final 1 set the color:
display.hline(0, 8, 60, 1)
Display Rect
This will draw a rectangle in your display. This statement requires the x,y starting position for your rectangle and then the x,y end position. The final “1” will set, as usual, the color:
display.rect(10, 10, 107, 43, 1)
Display Fill_rect
Similar to the previous command, it will also make the rectangle filled with all the internal pixels powered on:
display.fill_rect(10, 10, 60, 50, 1)Again, please excuse me for the flickering on my picture… 🙁 :

Display Line
This creates a simple generic line, again specifying the start position (x,y) and the end position (x,y):
display.line(0, 30, 100, 50, 1)
Micropython Logo
By mixing the previous commands, you can create also complex images, as the example referenced in MicroPython ssd1306 page:
display.fill(0)
display.fill_rect(0, 0, 32, 32, 1)
display.fill_rect(2, 2, 28, 28, 0)
display.vline(9, 8, 22, 1)
display.vline(16, 2, 22, 1)
display.vline(23, 8, 22, 1)
display.fill_rect(26, 24, 2, 4, 1)
display.text('MicroPython', 40, 0, 1)
display.text('SSD1306', 40, 12, 1)
display.text('OLED 128x64', 40, 24, 1)
display.show()
Custom Pictures
With SSD1306 OLED display we can also print custom images. As example, we’ll transform the peppe8o.com logo from jpg to a PBM file, in order to get the file shown in our SSD1306 OLED display.
The following file transformation will be performed with GIMP, the open source photo editor. But you can do it also with other professional software.
My starting file is the following:
Open this file with GIMP and resize it to the desired size (limited by your Oled display, that is 128×64 in our case. I will resize my logo to 60×61 with the GIMP function available from the Image menu -> Scale Image. The result is the following:

When there are parts with light colors, they may not appear correctly in your display, so managing the color curves to get a more dark picture is a good idea (in GIMP, Colors -> Curves and the move the curve to get a higher contrast). The following is the result:

Now, we’ll use the GIMP function Image -> Mode -> Indexed function to convert the image colors indexed with black/white palette. The following are the settings to use:
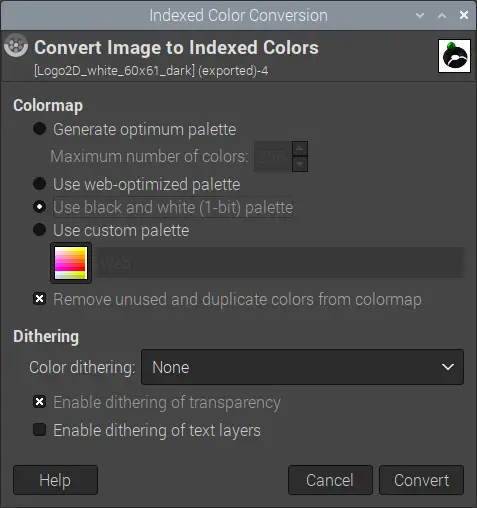
And this will be the result:

Now you can export this image to the PBM format with GIMP File -> Export by setting the correct file extension.
Upload the resulting image into your Raspberry PI Pico storage (my file is named “Logo2D_white.pbm”) and use the following code:
with open('Logo2D_white.pbm', 'rb') as f:
    f.readline() # The first 3 lines of PBM files are info not related to the image
    f.readline() # the 3 readlines remove these lines
    f.readline() # You can check this by opening the PBM file with a notepad
    data = bytearray(f.read())
fbuf = framebuf.FrameBuffer(data, 60, 61, framebuf.MONO_HLSB)
display.blit(fbuf, 0, 12, 0)
Please note that in the “framebuf.FrameBuffer(data, 60, 61, framebuf.MONO_HLSB)” line I’ve used the dimensions of my scaled image (60×61). The “display.blit(fbuf, 0, 12, 0)” will add our image starting from x=0 and y=12 position. You will get the following result. Again, sorry for the flickering effect. I promise that the real result will be better.

What’s Next
Interested to do more with your Raspberry PI Pico? Try to look at my Raspberry PI Pico tutorials for useful and funny projects!
Enjoy!

Open source and Raspberry PI lover, writes tutorials for beginners since 2019. He's an ICT expert, with a strong experience in supporting medium to big companies and public administrations to manage their ICT infrastructures. He's supporting the Italian public administration in digital transformation projects.
![]()
![]()
![]()
![]()
![]()
![]()
![]()


Hello,
from time to time I visit the website here for the pico W topic.
But since june when I found the side with this OLED project nothing seems to have happened, no new project and for some reason I went into the other categories to check if there had been any updates till I realized that your main category IS NOT SORTED BY DATE, and even more that there are new pico W articles and projects sorted somewhere below where I had not looked for those.
Might be a lot more usefull to add a chronical sort order with the newest projects first for each section or at least add a selector option for chronical and maybe the current one where I did not get the sort order in the very first moment.
Do not get me wrong: i really like your stuff, the way how you start a project and describe it from the very beginning but I had been here quite often in the particular pico section without any update – as I had thought till today. I have not checked why or what sort order it might be but it is not beneficial for the viewer count when a viewer has to look through the whole long page to find the new ones between the old ones.
After a few visits I had the luck to find out that I was not right that there are no new projects but that was by accidant I guess.
Great site , great projects, super documentation how to achieve the goal step by step with a tons of pictures – therefore I love this site.
Thank you for your appreciation, Wolfgang.
By the time, I need to update some posts that become not working because of software updates (quite all the time on Raspberry PI computer boards) or because I add some content for whatever reason. in these cases, WordPress (the CMS I use) sorts automatically the posts based on last update date.
If you want to look only at Raspberry PI Pico tutorials, you can anyway check on the Pico category from peppe8o.com menu (that means the following link -> https://peppe8o.com/category/raspberrypi/pico/). Or you can both subscribe my newsletter (where I notify only the last posts).
In the meanwhile, I’ll look for a plugin or something similar to highlight new posts in order to get them more visible.
Nevertheless, thank you for your suggestions, I really appreciated them.
Hi.
I’m getting the following errors when trying your example, what might be the problem, Thanks
Traceback (most recent call last):
File “main.py”, line 30, in
File “ssd1306.py”, line 118, in __init__
File “ssd1306.py”, line 37, in __init__
File “ssd1306.py”, line 76, in init_display
File “ssd1306.py”, line 109, in show
File “ssd1306.py”, line 127, in write_data
OSError: [Errno 110] ETIMEDOUT
Hi Diwakar, please double check your wiring. Sometimes a wire not performing a good contact may create communication problems. Also check that the Raspberry PI Pico heading is soldered correctly (without bridges and without PINs physically moving). If the wiring is ok, you should see the OLED address from an I2C scan (refer to this post for the I2C scan instructions: )
Peppe80, thanks for this. I was able to eventually get this to work from Pico H to my OLED display
But I am a bit confused, though I am new to all this
So the code says
# setup the I2C communication
i2c = I2C(0, sda=Pin(16), scl=Pin(17))
display = ssd1306.SSD1306_I2C(128, 64, i2c)
But I seem to be using Pins 21 and 22 as in the diagram.
Just curious as to why is says i2c = I2C(0, sda=Pin(16), scl=Pin(17)) but not i2c = I2C(0, sda=Pin(21), scl=Pin(22)) or even i2c = I2C(0, sda=Pin(22), scl=Pin(21))
Hi Douglas,
your doubt is common to many people at their first approach with Raspberry PI boards and sometimes it can confuse people. If you look at the Raspberry PI Pico pinout you can see that every PIN has 2 numbering systems: the physical one (where you see the 21 and 22) and the “GP” one (which are the numbers used when coding, where you will find 16 and 17).
Hope you will find this more comprehensive with this
Thanks peppe80, yes I see that now. Thanks for clarifying
peppe80, thanks for your page.
Uasing Raspberry PI Pico with MicroPython.
Your code examples work fine.
I tried to create custom pictures with Gimp following exactly your description. The result is always several vertical lines and no picture. Any idea what’s wrong?
Hi Hans, thank you for your feedbck. Please can you share with me your GIMP file (.pbm) and a screenshot of what you get from your OLED display? You can send them to me at giuseppe@peppe8o.com
Hi my name is NInh
I just want to know which command to turn off the display ? I tried clear() or cleanup() but these two commands do not work. I used poweroff() but this just turn the power off ( put the oled to sleep) . I just want to clean the screen for the next display
Hi Nihn,
if the clear statement doesn’t work, you could try the display.fill(0) statement as workaround, or you can try to fill the whole display with a display.fill_rect with color set to 0.
Please can you give me a feedback if one of these tests works?