
Last Updated on 10th September 2023 by peppe8o
This tutorial will show you how to use a Raspberry PI as email header analyzer with Python.
It will help you to analyze email files (stored as “.eml” files) and get the hostname and IP address from any server where the message passed through.
It has been created and tested on Raspberry PI computer boards, but the scripts should work on any computer with Python.
What is an Email Header Analyzer
The delivery of Email messages is a process that involves one or more servers, usually talking via the Internet. Every time an email message is sent from a sender to a recipient, every involved server adds a record on the message header with logs about the server hostname, IP address, and timestamp.
Email header analysis is useful for many system administrators for troubleshooting message delivery, as well as it can be a powerful knowledge to fight spam services and notify the owner of the spam server of what is happening.
One of the most famous online services offering free email header analysis is mxtoolbox.com, but you have to extract the header from the email and paste it one by one for each email you want to analyze.
With this tutorial, our Raspberry PI Email Header Analyzer will enable you to perform bulk analysis and get a report including all the fields you need.
Please note that this script works only with “.eml” files. Usually, many service providers (including Microsoft Outlook) allow you to download the message as “.eml” file from their webmail interface (by the “Save as” option).
What We Need
As usual, I suggest adding from now to your favourite e-commerce shopping cart all the needed hardware, so that at the end you will be able to evaluate overall costs and decide if to continue with the project or remove them from the shopping cart. So, hardware will be only:
- Raspberry PI Computer Board (including proper power supply or using a smartphone micro USB charger with at least 3A)
- high speed micro SD card (at least 16 GB, at least class 10)
Step-by-Step Procedure
Prepare the Raspberry PI Operating System
Please start installing the Raspberry PI OS. Here, we have 2 options (with the links for installation instructions):
- Raspberry PI OS Lite: This is a lightweight OS for Raspberry PI computer boards, without a Desktop environment (headless)
- Raspberry PI OS Desktop: This is a less-performing OS (compared to the lite version), but it runs really well on Raspberry PI computer boards
You can check the difference between the 2 operating systems with my Raspberry PI OS Lite vs Desktop: comparison between the 2 distributions article.
After installing the OS, please make it up-to-date. From the Raspberry PI SSH session (or terminal):
sudo apt update -y && sudo apt upgrade -yInstall the Required Packages
We need some packages to make the script work. So, we need to install pip3 and then the required packages:
sudo apt install python3-pip
pip3 install pandas tabulate python-whois
During the installation of the Python packages with pip3, you can get some warnings like the following:
  WARNING: The scripts f2py, f2py3 and f2py3.9 are installed in '/home/pi/.local/bin' which is not on PATH.
  Consider adding this directory to PATH or, if you prefer to suppress this warning, use --no-warn-script-location.
You can fix this warning by opening for editing your bashrc file:
nano ~/.bashrcAnd append the following line at the end of this file:
export PATH="$HOME/.local/bin:$PATH"Save and exit. You can reload the bashrc with the following terminal command without the need to logout or reboot:
source ~/.bashrcGet my Module and email-analyzer.py Script
In order to make the script run, we need my “p8o_header_patterns.py” module which brings some functions that analyze the email header depending on the service provider of the recipient address. From your Raspberry PI terminal:
wget https://peppe8o.com/download/python/email-analyzer/p8o_header_patterns.pyI will add soon the module to my GitHub space, in order to make it available for users to edit and add more providers.
You can also get the complete “email-analyzer.py” Python script from my download area:
wget https://peppe8o.com/download/python/email-analyzer/email-analyzer.pyThe following part of this chapter will explain the “email-analyzer.py” code line by line.
At the beginning, we start by importing the required libraries and modules:
import email, whois, os
from tabulate import tabulate
from email.header import decode_header, make_header
import p8o_header_patterns
We have to set only two variables: the “output_file” and the “provider”.
The “output_file” will name the output report file and you can set it according to your preferences or you can leave it as is. The provider variable will use specific string manipulation formulas depending on the provider of the recipient address. For example, if you received an email in your Outlook (or Hotmail) inbox, you can set it to “outlook” in order to use the proper functions. You can also set it to “auto”, in order to find the first formula not giving errors, as well as you can set it to “raw” in order to get the server routes from your email header leaving the record as is. Moreover, the “raw” provider is also the fallback solution if one of the previous resulted in an error (the python shell will notify you about):
output_file="email report.txt"
provider = 'auto'
The “generate_report()” custom function gets as input:
- the email filename (as stored in our Raspberry PI)
- the provider
- the name of the output report file
It starts opening the email file and “loading” it into the raw_email variable:
def generate_report(mail_file_name, provider_option, output):
    with open(mail_file_name, 'rb') as fp: raw_mail = fp.read()
From here, it creates an email object (named “mail”) and passes it to the get_email_path() function from the p8o_header_patterns module, in order to get back the path of our message delivery and the sending domain:
    mail = email.message_from_bytes(raw_mail)
    (path, sending_domain) = p8o_header_patterns.get_email_path(provider_option, mail)
In order to make our report more complete, we’ll track some additional information from our message:
- “from_addr”: the sender’s email address
- “dest_addr”: the recipient’s email address
- “sending_server”: the server where the message delivery has been originated
- “sending_server_ip”: the originating server IP address
- “sending_time”: the timestamp of the originating server
- “subject”: the email’s subject
All of those values are easy to get from the email message and from the path DataFrame already populated:
    from_addr = str(make_header(decode_header(mail['From'])))
    dest_addr = mail['To']
    sending_server = path.loc[len(path)-1]['from_hostname']
    sending_server_ip = path.loc[len(path)-1]['from_ip']
    sending_time = str(path.loc[len(path)-1]['timestamp'])
    subject = str(make_header(decode_header(mail['Subject'])))
Before closing the report, I just added some details by using the whois services from the web. The whois service gives users deep information about domains, including where the domain has been registered and additional addresses for abuse or problem notifications. A use case is to notify the domain owner (and/or the registrar) for a domain sending spam.
Usually, the first sending server comes in the form of a domain, so we can easily get the domain contacts with the python-whois package. The if statement here fixes the problem that in some cases you can get a list of addresses or only 1 address from the whois service. With this approach, you will always get a list object saved in your “contacts” variable:
    w = whois.whois(sending_domain)
    if type(w['emails']) is list:
        contacts=w['emails']
    else:
        contacts=[w['emails']]
The final part of this custom function just prints the results to the output file. It is important to note that we open the file with the “a” (append) attribute. This means that we’ll append our content to the existing file (or create it if doesn’t exist):
    with open(output, "a", encoding="utf-8") as f:
        print("Email sender: " + from_addr,file=f)
        print("Destination: " + dest_addr,file=f)
        print("Subject: " + subject,file=f)
        print("Sending server: " + sending_server + ", with IP Address: " + sending_server_ip,file=f)
        print("Timestamp: " + sending_time,file=f)
        print("",file=f)
        print("Sending domain: " + sending_domain,file=f)
        print("Domain contacts: ",file=f)
        if len(contacts)>0:
            for c in contacts: print("  " + str(c),file=f)
        print("",file=f)
        print("Email hops:",file=f)
        print("",file=f)
        print(tabulate(path,headers=path.columns),file=f)
        print("",file=f)
        print(" ------ EMAIL ANALYSIS END -----",file=f)
        print("",file=f)
The Main Program
With these custom functions defined, the main program has to care only to pass the output file name and the email file name. For this tutorial, I’ve also included a loop to check (into the folder where the Python script is stored) for all the “.eml” files, so that it can also work with many email files at once.
Before starting, the code checks if the report already exists. If so, it removes the existing file:
if os.path.exists(output_file): os.remove(output_file)Then, we get the list of filenames available in the script folder:
files = os.listdir()The following loop will look for each filename. If it ends with “.eml” then we generate the report about that email file. the print statements here are just giving information to the user shell:
for file in files:
    if file.endswith(".eml"):
        print("Working on "+file)
        generate_report(file,output_file)

print("Report generated")
Running the Raspberry PI Email Header Analyzer Script
With this script saved into your Raspberry PI storage and one or more email files (“.eml”) saved in the same folder, you can use this script by running the following terminal command:
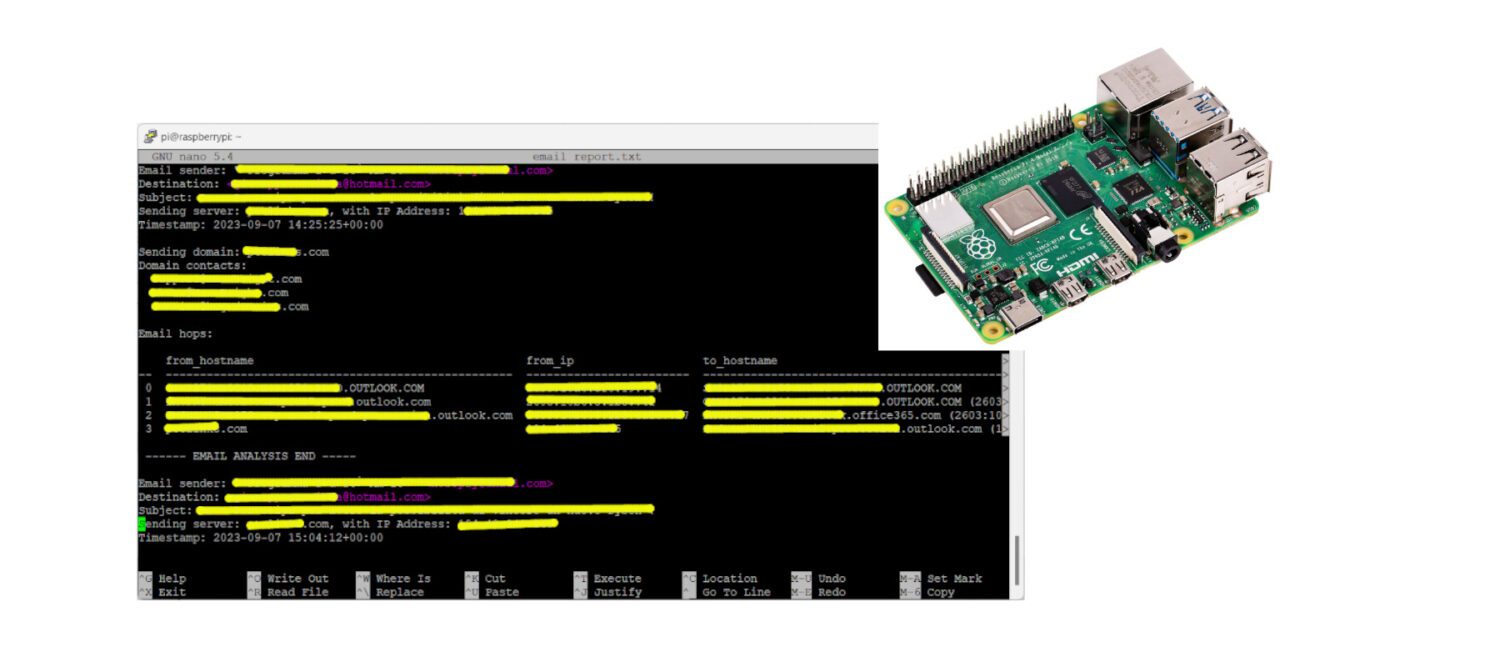
python3 email-analyzer.pyThe script execution will notify you of the program’s progress. The following is from an analysis of 3 emails of mine from my Hotmail address (with the messages hidden for privacy):
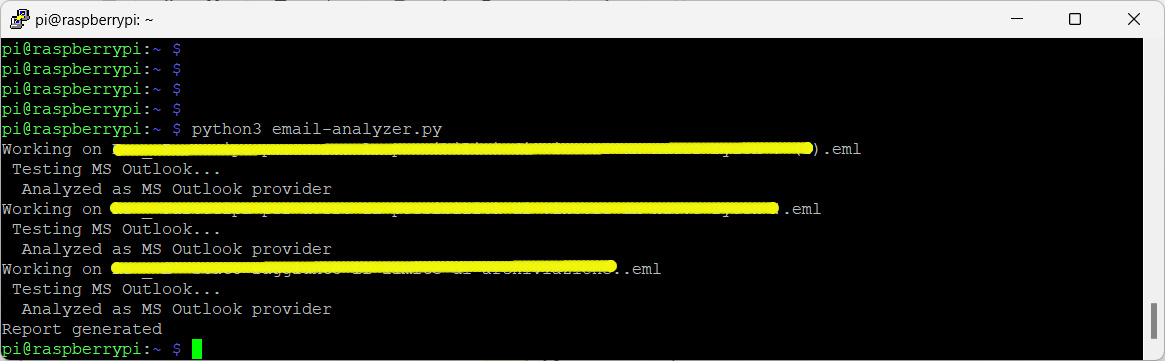
As you can see in the last line from the terminal, the “Report generated” notifies that the report is ready. With the nano (or your preferred text tool), you can open the resulting file:
nano 'email report.txt'You will find the following result (please disable the automatic carriage return if the format doesn’t appear correct to you), where details have been hidden, again, for privacy):
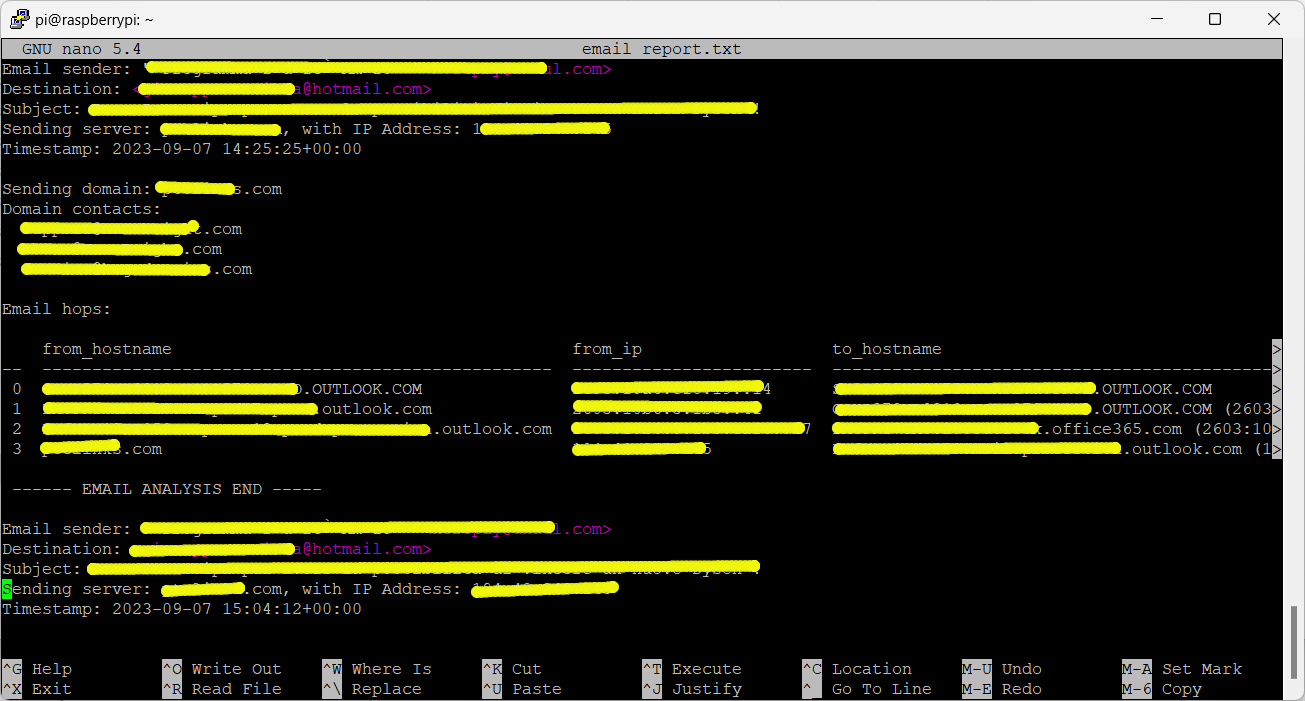
Please note that the “raw” provider will put all the route strings in the “from_hostname” column.
Every email message will have its report section and you can identify it clearly from the sender/recipient/subject. Moreover, you can customize the generate_report() custom function to add more details in your report in order to better fit your needs.
Final Considerations about Raspberry PI Email Header Analyzer
I’ve made this Python script having in mind a way to fight against Spam emails. With this script, you can easily analyze any spam message, identifying the real source domain and notifying the contacts that their server is actually sending spam emails. Usually, the contacts are the technical address of the domain owner and the abuse address of the registrar. You should send a message to the technical owner first, then notify the registrar only if the owner doesn’t answer or doesn’t want to cooperate.
At the end of the job, the script can also help technical engineers to troubleshoot email delivery problems or to monitor any email aspect.
Next Steps
Interested in more projects with your RPI? Try to look at my Raspberry PI computer tutorial pages.
Enjoy!

Open source and Raspberry PI lover, writes tutorials for beginners since 2019. He's an ICT expert, with a strong experience in supporting medium to big companies and public administrations to manage their ICT infrastructures. He's supporting the Italian public administration in digital transformation projects.
![]()
![]()
![]()
![]()
![]()
![]()
![]()


