
Last Updated on 13th April 2024 by peppe8o
In this tutorial, we’ll connect and use an SG90 servo motor with Arduino Uno. This tutorial provides the coding, wiring diagram and component list. We’ll learn how to use the servo motor to perform 0 to 180 degrees movement by using Arduino programming.
To control a motion within specified degrees, such as turning a robot, the SG90 servo motor is a widely used device with Arduino, as this motor can rotate up to 180 degrees
Servo Motor Introduction
The SG90 servo motor is a geared motor that can only rotate in a 180 degrees range. Electrical pulses, from your Arduino Uno board, can control it to the desired position. These pulses instruct the servo to move to a specific place. Servo motors are used to precisely regulate the position of things. They are compact and can be immediately connected to an Arduino due to the built-in electronics that control their movement.
Working on the Servo Motor
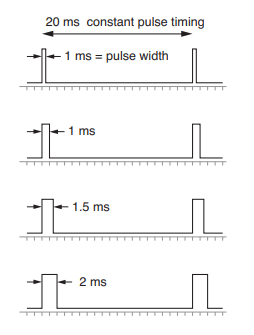
The Arduino Uno board transmits a PWM signal to the servo motor, which processes it by an IC on the circuit board to compute the rotation direction to drive the motor. Then, the circuit passes the position to the swing arm through a reduction gear. At the same time, the position detector provides a location signal to determine whether or not the set location has been reached.
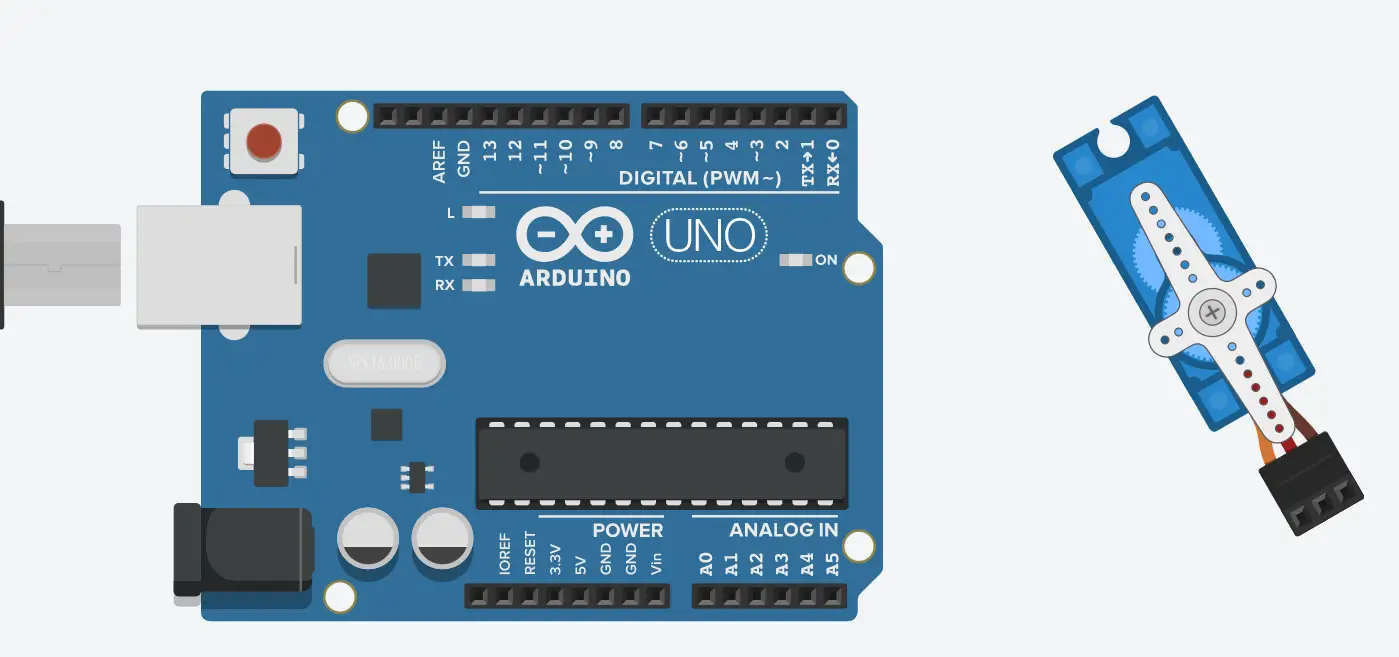
What We Need

As usual, I suggest adding from now to your favourite e-commerce shopping cart all the needed hardware, so that at the end you will be able to evaluate overall costs and decide if to continue with the project or remove them from the shopping cart. So, hardware will be only:
Check hardware prices with the following links:


Step-by-Step Procedure
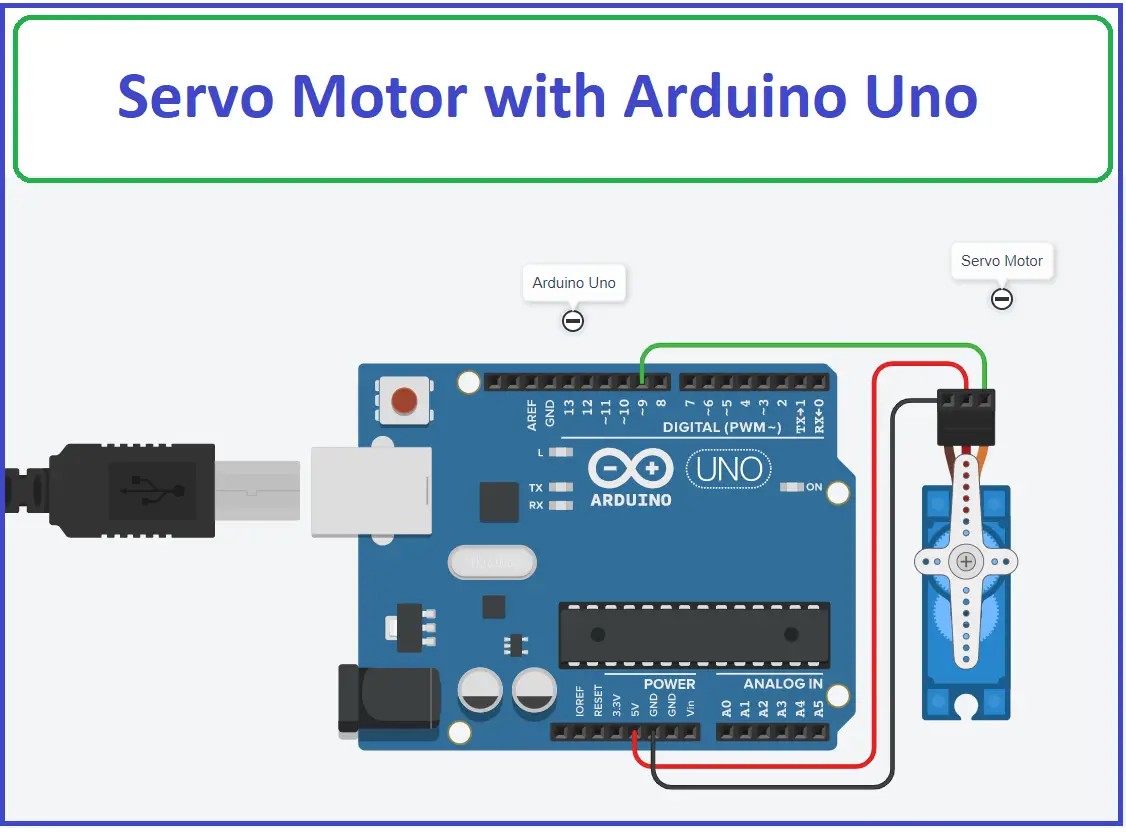
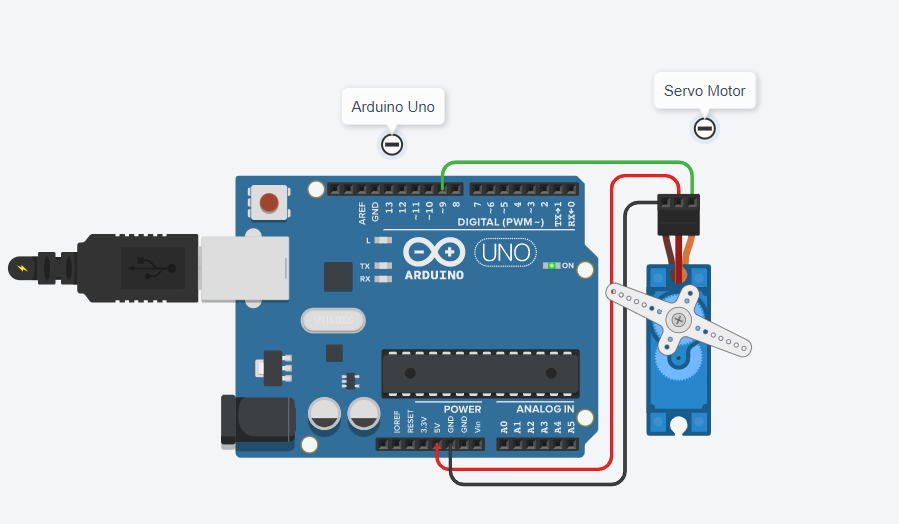
Wiring Diagram of Servo with Arduino
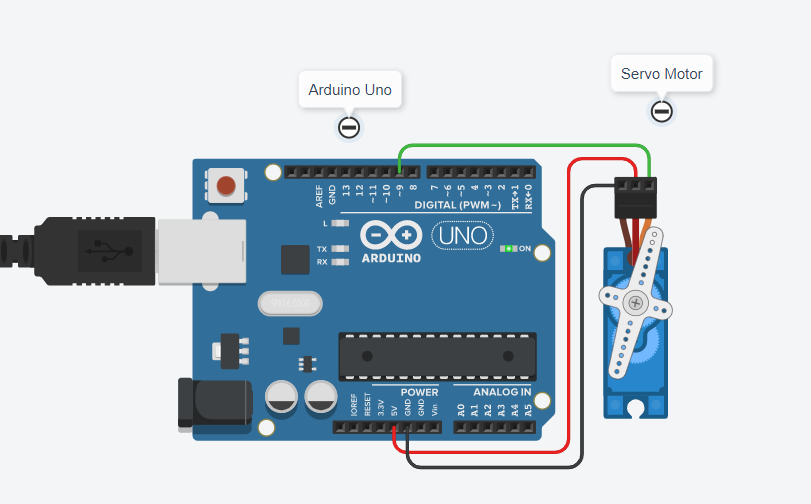
There are 3 pins of the servo motor, VCC connects to the +5V, Ground Connect with the GND and Signal connects with the pin 9 of the Arduino Uno. The signal pin must connect to any pulse width modulation (PWM) pin of the Arduino Uno. Because of the position of the servo control through the duty cycle of the pulse. As shown in the image below, the module connects with Arduino Uno. Please follow the wiring that presents in the picture, according to Arduino Uno Pinout:
| Sr. | Servo Pin name | Arduino Pin name |
| 1 | GND | GND |
| 2 | VCC | 5V |
| 3 | Signal | Pin 9 |
Get the Servo code and Library
Connect your PC to Arduino and open Arduino IDE. For the very first steps, you can refer to Connecting Windows PC with Arduino tutorial. You can get the .ino code and libraries from my download area with the following link:
You also need to install the following library, according to my Install Arduino Libraries: methods to add libraries with Arduino IDE tutorial. Please get the zip files from the following link or add them from the available libraries in your Arduino IDE.
Code Explanation
We start adding the library for the servo and the initial position (which is zero). We create a servo object with the name servo_9.
#include <Servo.h>
int pos = 0;
Servo servo_9;
In the setup section, we define the pin where the servo signal is connected as the first variable in the attach function, containing “(9, 500, 2500)”. Here, 500 is the pulse width applied to the servo signal pin to reach zero degrees and 2500 matches the 180 degrees.
void setup()
{
  servo_9.attach(9, 500, 2500);
}
In the loop section, we create (as test) a continuous sweep from 0 to 180 degrees in steps of 1 degree. The variable ‘pos’ defines the required servo’s position.
The write(pos) line will manage the PWM modulation in order to get the required degrees position.
For every step, there is a wait for 15 milliseconds (s) so that it should reach that step. Firstly, it moves clockwise until reaches 180 degrees, while then moves counterclockwise to reach zero degrees. This clockwise and counterclockwise scenario continues.
void loop()
{
  for (pos = 0; pos <= 180; pos += 1) {
    servo_9.write(pos);
    delay(15);
  }
  for (pos = 180; pos >= 0; pos -= 1) {
    servo_9.write(pos);
    delay(15);
  }
}
Results
The servo motor will spin gently from 0 to 180 degrees, one degree at a time, when the program starts. When the motor has completed a 180-degree rotation, it will proceed to revolve in the inverse direction until it reaches the home position. For this code, the home position is zero degrees while 180 is the final position. As result, the servo will continuously move clockwise and counterclockwise.
What’s Next
Please find more tutorials on Arduino in peppe8o Arduino archives.
Enjoy!
Umar Jamil
For any queries and help for work, please contact me at:
Whatsapp: +92-346-661-7017/ Link
Email: umarjamil0007@gmail.com

I'm an Electronic Engineer, well-skilled to solve the issues of hardware and software. I do have laboratory which contains unlimited sensors and modules for testing the working. Also, I am experienced in Arduino programming, Android mobile application, microcontroller programming, IOTs and embedded projects. I provide services to control, realize the sensor data in the Mobile Application. For any queries and help for work Contact: Whatsapp:+92-346-661-7017 Email: umarjamil0007@gmail.com
![]()


