
Last Updated on 10th January 2026 by peppe8o
This tutorial will show you how to install and setup a Cloudflare tunnel with a Raspberry PI so that you can publish a local service running in your Raspberry PI computer board.
About Cloudflare Tunnels
A Cloudflare Tunnel is a secure way to publish a service running on your computer (like a website on a Raspberry Pi) to the internet without opening ports on your router.
Instead of accepting inbound connections, a small program called cloudflared makes an outbound, encrypted connection to Cloudflare.
When someone visits your domain, Cloudflare receives the request and forwards it through the tunnel to your local service. This reduces exposure of your home IP address and avoids port forwarding.
You can use it to expose web apps, SSH, and other services, often with HTTPS handled at Cloudflare.
IMPORTANT NOTE: If you want to use a Cloudflare tunnel, you must have your own public domain. You can buy your domain from any domain registrar or from Cloudflare. This tutorial will also show you a way to test a tunnel with the Cloudflare Quick Connect, which allows you to try it before going for a more stable setup.
What We Need
As usual, I suggest adding from now to your favourite e-commerce shopping cart all the needed hardware, so that at the end you will be able to evaluate overall costs and decide if to continue with the project or remove them from the shopping cart. So, hardware will be only:
- Raspberry PI Computer Board (including proper power supply or using a smartphone micro USB charger with at least 3A)
- high-speed micro SD card (at least 16 GB, at least class 10)

Step-by-Step Procedure
Prepare the Operating System
The first step is to install the Raspberry PI OS Lite to get a fast and lightweight operating system (headless). If you need a desktop environment, you can also use the Raspberry PI OS Desktop, in which case you will work from its terminal app. Please find the differences between the 2 OS versions in my Raspberry PI OS Lite vs Desktop article. For low RAM Raspberry PI computer models, the Lite OS is strongly suggested.
Please make sure that your OS is up to date. From your terminal, use the following command:
sudo apt update -y && sudo apt full-upgrade -yWe also need to install Docker. You can use my tutorial for this: Beginner’s Guide to Install and Use Docker with Raspberry PI.
We’ll make all of our tests from a folder where we’ll save all the (few) required files. Create and enter it. You can give the name you prefer to this folder:
mkdir cloudfl
cd cloudfl
As we’ll use a simple httpd service to expose a simple page in our tests, please create an “httpd_folder” with a simple index.html file. This file will include just a hello message:
mkdir httpd_folder
echo "Hello from peppe8o!" > httpd_folder/index.html
Test Cloudflare Quick Connect
The first test will allow us to quickly test if we have all the resources required to expose a service via Cloudflare tunnels. Please create a docker compose file:
nano docker-compose.yamlAnd fill it with the following content:
services:
  web_service:
    image: httpd:2.4
    container_name: httpd-test
    volumes:
      - ./httpd_folder:/usr/local/apache2/htdocs/:ro

  cloudflared:
    image: cloudflare/cloudflared:latest
    container_name: cloudflared-test
    command: tunnel --url http://web_service:80
    depends_on:
      - web_service
Save and close.
You can now create this infrastructure with the following command:
docker compose up -dThis command will download the required container images and run the infrastructure.
Please check the cloudflared logs with the following command:
docker logs cloudflared-testIn the resulting log, you will find a banner where you can find the link you can use in a browser to reach your web service:
+--------------------------------------------------------------------------------------------+
|  Your quick Tunnel has been created! Visit it at (it may take some time to be reachable):  |
|  https://******-*****-***-**********.trycloudflare.com                                     |
+--------------------------------------------------------------------------------------------+
Use the URL in a browser, and you should get something like the following page:
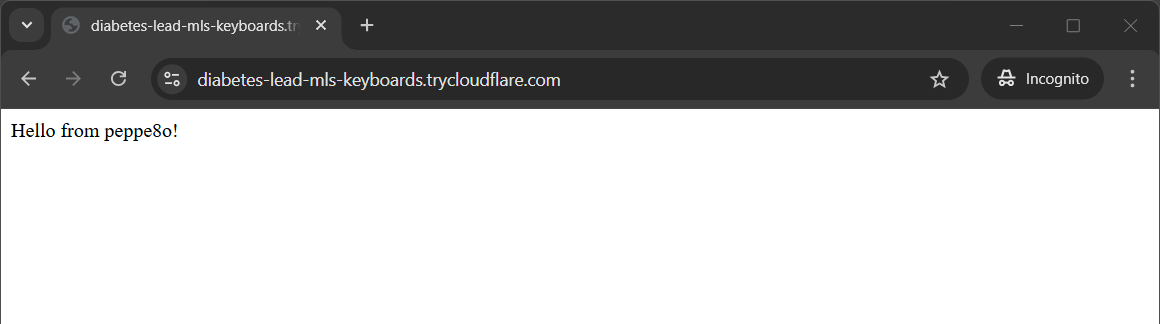
This means that your tunnel is working correctly.
You can’t use this tunnel for production as the link may change from time to time. For a persistent result, we’ll need to use a true domain.
We’ll see it in the following chapter. For the moment, please remove the infrastructure:
docker compose downCreate a Cloudflare Tunnel with Raspberry PI with Public Domain
In this example, we’ll create a Cloudflare tunnel able to run for production environments. For this task, you need to ensure that your public domain is already managed by Cloudflare. Please note that if you recently changed the nameservers, you may need a few hours to complete the move.
We need a new folder inside the one previously created. We also need to make this folder owned by the cloudflared user as follows:
mkdir cloudflared
sudo chown -R 65532:65532 cloudflared
Create the cert.pem Authentication File
The first step is creating an authentication certificate (cert.pem file). This file will allow our cloudflared system to directly authenticate with Cloudflare for any task.
Please use the following terminal command:
docker run --rm -it -v "$PWD/cloudflared:/home/nonroot/.cloudflared" cloudflare/cloudflared:latest tunnel loginIn this command, it is important to note that the Docker container is just running the final tunnel login command. We’ll use this strategy as it allows us to execute cloudflared commands without the need to install it in our Raspberry PI environment (as it runs only inside the container).
This command will return you a URL to use to confirm the login authentication, similar to the following:
Please open the following URL and log in with your Cloudflare account:

https://dash.cloudflare.com/argotunnel?aud=&callback=https%3A%2F%2Flogin.cloudflareaccess.org%******_*****************_***********************

Leave cloudflared running to download the cert automatically.
Copy the URL to your browser and complete the login process by selecting the connection and then authorising it:
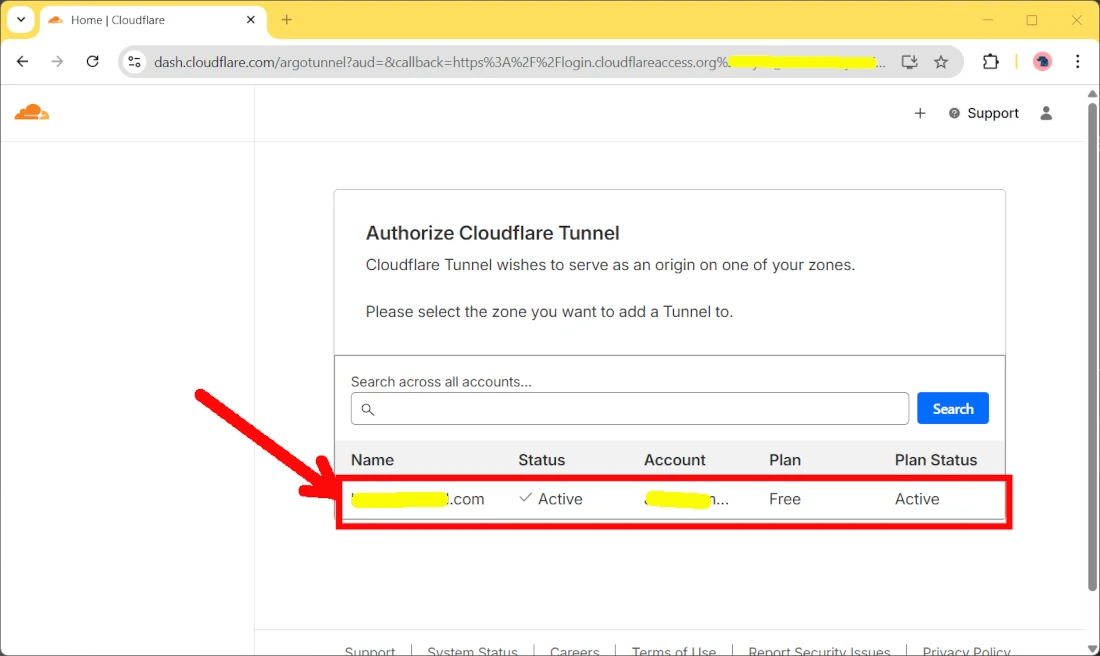
Back to the Raspberry PI terminal, after you complete the login process, you will find a new cert.pem file inside the cloudflared folder:
pi@raspberrypi:~/cloudfl $ ls -la cloudflared
total 12
drwxrwxr-x 2 65532 65532 4096 Jan  4 15:07 .
drwxrwxr-x 4 pi    pi    4096 Jan  4 14:50 ..
-rw------- 1 65532 65532  266 Jan  4 15:07 cert.pem
Create the Cloudflare Tunnel
We must now create the new tunnel. Similarly to the previous file, you can get it easily with the following command:
Please use the following command to create a new tunnel named my_tunnel (or whatever name you prefer for it):
docker run --rm -it -v "$PWD/cloudflared:/home/nonroot/.cloudflared" cloudflare/cloudflared:latest tunnel create my_tunnelThis will save the tunnel credentials in a file inside the cloudflared folder in your Raspberry PI (which is mapped to the /home/nonroot/.cloudflared/ folder in the container) and will give you the tunnel ID (here hidden for security reasons):
Tunnel credentials written to /home/nonroot/.cloudflared/********-****-****-****-************.json. cloudflared chose this file based on where your origin certificate was found. Keep this file secret. To revoke these credentials, delete the tunnel.

Created tunnel my_tunnel with id ********-****-****-****-************
Please take note of the tunnel ID, as we’ll need it in the following parts.
You can also check that the tunnel is configured, as well as any other tunnels if previously created, with the tunnel list command:
pi@raspberrypi:~/cloudfl $ docker run --rm -it -v "$PWD/cloudflared:/home/nonroot/.cloudflared" cloudflare/cloudflared:latest tunnel list

You can obtain more detailed information for each tunnel with `cloudflared tunnel info <name/uuid>`
ID                                   NAME           CREATED              CONNECTIONS
********-****-****-****-************ my_tunnel      2026-01-07T11:33:56Z
In any case, the tunnel create command generated a JSON file in our cloudflared folder where the cert.pem file was saved:
pi@raspberrypi:~/cloudfl $ ls -la cloudflared/
total 8
4 -r-------- 1 65532 65532 175 Jan  4 15:10 ********-****-****-****-************.json
4 -rw------- 1 65532 65532 266 Jan  4 15:07 cert.pem
Create a Route for the Cloudflare Tunnel
A route is a way to tell Cloudflare that all the incoming connections to our domain (or its subdomains) must be routed through the tunnel to our Raspberry PI. In this case, I’ll create a route for the root domain, but you can modify this command to route also subdomains.
For the following command, it is important to have your domain integrated with Cloudflare. I’ll use the domain “example.com” for the scope of this tutorial, but you will need to use your domain instead.
To create a simple route, please use the following command:
docker run --rm -it -v "$PWD/cloudflared:/home/nonroot/.cloudflared" cloudflare/cloudflared:latest tunnel route dns my_tunnel example.comThis command will be executed immediately, but it may take a few seconds to become effectively active as this will write a new DNS record for your domain.
Create the Docker Compose Files
In this last part, we’ll create a configuration file and a docker compose file to get all wrapped together. Let’s begin with the configuration file. Create it with the following command:
sudo nano cloudflared/config.ymlPlease fill this file with the following content, caring to change the bolded parts (tunnel name, tunnel ID/JSON and domain) with your ones:
tunnel: my_tunnel
credentials-file: /etc/cloudflared/********-****-****-****-************.json

ingress:
  - hostname: example.com
    service: http://web_service:80
  - service: http_status:404
Now, let’s change the docker compose file:
nano docker-compose.yamlAnd fill it as in the following:
services:
  web_service:
    image: httpd:2.4
    container_name: httpd-test
    volumes:
      - ./httpd_folder:/usr/local/apache2/htdocs/:ro
    restart: unless-stopped

  cloudflared:
    image: cloudflare/cloudflared:latest
    container_name: cloudflared-test
    command: tunnel --config /etc/cloudflared/config.yml run
    volumes:
      - ./cloudflared:/etc/cloudflared:ro
    depends_on:
      - web_service
    restart: unless-stopped
Run Cloudflared Tunnel with Raspberry PI
We can now run the tunnel. As a final check, you should now have the following folders/files:
└── cloudfl
├── cloudflared
│ ├── ********-****-****-****-************.json
│ ├── cert.pem
│ └── config.yml
├── docker-compose.yaml
└── httpd_folder
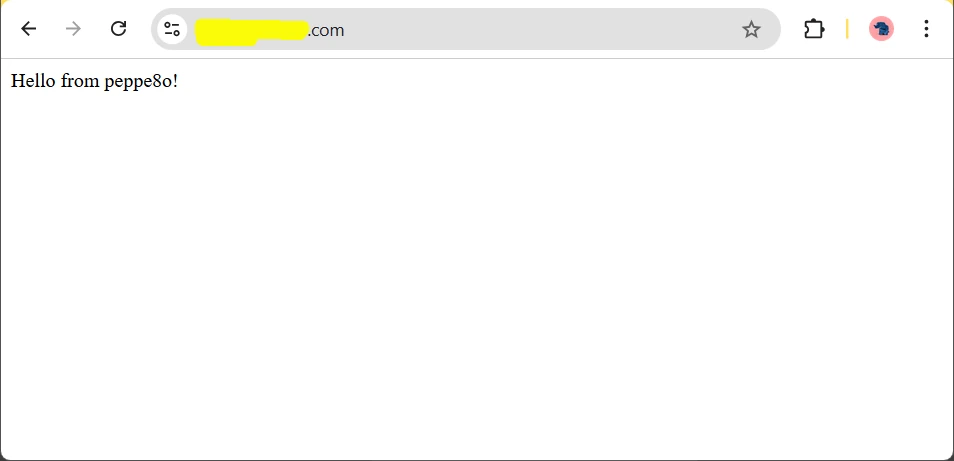
└── index.htmlYou can now run the tunnel with the following terminal command:
docker compose up -dAt any time, you can check the cloudflared logs with the following:
docker logs cloudflared-testPlease use your browser to reach your domain, which should give you something like the following:
Common Issues
If the browser gives you errors about insecure connections or TLS handshake, it may be useful to set the encryption mode to “Flexible” in the SSL/TLS encryption menu of your Cloudflare account. Sometimes, for domains with nameservers just been moved, it may be enough just to wait a few hours for Cloudflare to automatically issue a certificate for your domain.
Next Steps
Interested in more projects with your Raspberry PI? Take a look at peppe8o Raspberry PI computer tutorials pages.
Enjoy!
Resources
- https://hub.docker.com/r/cloudflare/cloudflared
- https://developers.cloudflare.com/cloudflare-one/networks/connectors/cloudflare-tunnel/get-started/create-remote-tunnel/
- https://developers.cloudflare.com/dns/zone-setups/full-setup/setup/

Open source and Raspberry PI lover, writes tutorials for beginners since 2019. He's an ICT expert, with a strong experience in supporting medium to big companies and public administrations to manage their ICT infrastructures. He's supporting the Italian public administration in digital transformation projects.
![]()
![]()
![]()
![]()
![]()
![]()
![]()


