
Last Updated on 13th April 2024 by peppe8o
In this tutorial, I’m going to show you how to install Node.js on a Raspberry PI computer board.
Built on Chrome’s JavaScript engine, Node.js is an open-source, cross-platform run-time environment for JavaScript that enables server-side execution of JavaScript code. Moreover, you can test Node.js with a Raspberry PI computer
What is Node.js
Node.js was introduced as a run-time environment for JS in 2009. Users can be instantly updated with pure JavaScript applications. It is not suitable for large-scale deployments since it lacks well-defined cryptographic parameters.
Node.js prohibits real-time web app development. Small apps that don’t need much encryption can also be made using it. But it begs a popular question of whether Node.js is a programming language. The answer is NO. It is not a programming language. Instead, JavaScript is run in this environment outside of the browser.
Node.js is not a framework either. The JavaScript run-time serves as the foundation for the Node.js run-time, which aids in the operation of frameworks. In conclusion, Node.js is an environment for programming languages and frameworks.
To manage several clients simultaneously, Node.js employs the “Single Threaded Event Loop” design. However, users must comprehend how multi-threaded concurrent clients are handled in languages like Java to comprehend how this differs from other run-times.
Multiple clients send requests in a multi-threaded request-response architecture, and the server processes each individually before delivering the response. Concurrent calls are processed using several threads, nevertheless.
Each time a request is received, one of these threads that are defined in a thread pool is given the task of handling it. Developers frequently believe that Node.js is solely used to create servers and is a backend framework. Contrary to popular belief, Node.js can be used on both the front and back end.
The event-driven, non-blocking nature of Node.js frameworks is one of the reasons they are a popular option for developers creating a flexible and scalable backend. However, front-end developers can also clearly see these advantages of Node.js in their work.
Now that we know the popularity & function of Node.js, it’s time to understand the beginner’s steps to get Node.js running on Raspberry Pi.
What We Need
As usual, I suggest adding from now to your favourite e-commerce shopping cart all the needed hardware, so that at the end you will be able to evaluate overall costs and decide if to continue with the project or remove them from the shopping cart. So, hardware will be only:

- Raspberry PI Computer board (including proper power supply or using a smartphone micro usb charger with at least 3A)
- high speed micro SD card (at least 16 GB, at least class 10)
Check hardware prices with following links:


Step-by-Step Procedure
Prepare your Operating System
Please start installing your OS. You can use Raspberry PI OS Lite (for a fast, headless OS), or you can use Raspberry PI OS Desktop (in this case working from its terminal).
Make your OS up to date. From terminal:
sudo apt update -y && sudo apt upgrade -yInstall Node.js
Once the Raspberry Pi is configured correctly, use the following command to download and install the most recent version of Node.js:
sudo apt install nodejsCheck installation and version name by running the command-
pi@raspberrypi:~ $ node -v
v12.22.12
Node.js Examples
In order to understand how Node.js works, it’s useful having some examples.
Hello World example
This example is the classic Hello World showing that your installation is working properly. Create a new file directly from the terminal console:
nano app.jsFill the file with the following lines:
const http = require('http');
const hostname = '192.168.1.177';
const port = 3000;

const server = http.createServer((req, res) => {
  res.statusCode = 200;
  res.setHeader('Content-Type', 'text/plain');
  res.end('Hello World');
});

server.listen(port, hostname, () => {
  console.log(`Server running at http://${hostname}:${port}/`);
});
Close and save. The following paragraphs will explain what this code does.
The first 3 lines set the main constants to set your web app. The http constant initializes an http server application. The hostname will set the IP address for which your node.js application is going to bind. This is the IP address you will use in your remote computer browser in order to get the web page result. In my case, this is my local Raspberry PI’s IP address. You should your RPI address instead of mine to get it working.
The port constant sets the port where the web app will be exposed. Together with the hostname, it will compose your app URL:
const http = require('http');
const hostname = '192.168.1.177';
const port = 3000;
The following part will prepare your web server application to run. It will set a simple server that will return to the browser a status code (200), meaning that the web server response is correct. The status code is not visible at the remote browser and usually is intended only for server logging.
The setHeader() will return a plain text response. Finally, the response text returns to the client a simple “Hello World” message:
const server = http.createServer((req, res) => {
  res.statusCode = 200;
  res.setHeader('Content-Type', 'text/plain');
  res.end('Hello World');
});
The last part will use the defined constants and the server object previously defined in order to make it run with the “.listen()” property. A console log will print in your server side (Raspberry PI) terminal that the server ti ready to accept remote connections and the related URL:
server.listen(port, hostname, () => {
console.log(`Server running at http://${hostname}:${port}/`);
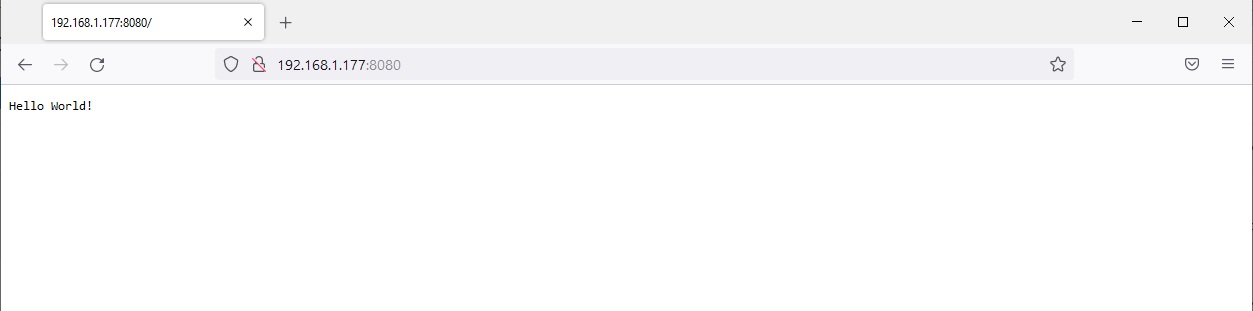
});From your Raspberry PI terminal, please run the app with the following:
node app.jsYour Raspberry PI’s terminal result will be like the following:
pi@raspberrypi:~ $ node app.js
Server running at http://192.168.1.177:3000/
From a remote PC, please use a web browser to check your node.js server response:
Run Python from Nodejs
In this example, we’ll execute a Python3 code and print the result from our Node.js web server. This may be an alternative to Flask.
Please start creating the simplest python3 script. From Raspberry PI terminal:
nano simple.pyUse the following to get 2 print() lines:
print('Hello World printed from Python')
print('-> from peppe8o.com')
Save and close.
Now, it’s time to edit our Nnode.js app. Create a new “.js” file:
nano app2.jsAnd use the following content (please remember to use your Raspberry PI’s IP address instead of mine:
const http = require('http'), exec = require("child_process").exec;
const hostname = '192.168.1.177';
const port = 3000;

const server = http.createServer((req, res) => {
  res.statusCode = 200;
  res.setHeader('Content-Type', 'text/plain');
  console.log("Request received.");
  res.writeHead(200, {"Content-Type": "text/plain"});
  exec('python3 simple.py', function (err, stdout, stderr) {
    if (err) handleError();
    console.log(stdout);
    console.log(stderr);
    res.write(stdout);
    res.end();
  });
});

server.listen(port, hostname, () => {
  console.log(`Server running at http://${hostname}:${port}/`);
});
What changes compared to the previous example is the call for the exec instance:
exec = require("child_process").exec;Moreover, within the http.createServer() function, the exec function will run the “python3 simple.py” shell command. After handling the errors (if any), it will return as response the result from stdout with the line “res.write(stdout)”;
exec('python3 simple.py', function (err, stdout, stderr) {
    if (err) handleError();
    console.log(stdout);
    console.log(stderr);
    res.write(stdout);
    res.end();
  });
From the remote browser, the result will be the following:

Final Thoughts
Congratulations! Now you have successfully installed Node.js on Raspberry Pi. You can begin creating your application now that Node.js is on your Raspberry Pi system. For more complex projects, you can hire dedicated nodejs developers to build creative applications in Raspberry Pi.
What’s Next
Are you interested in more cool projects for your Raspberry PI computer board? Take a look at peppe8o Raspberry PI tutorials.
Enjoy!

Open source and Raspberry PI lover, writes tutorials for beginners since 2019. He's an ICT expert, with a strong experience in supporting medium to big companies and public administrations to manage their ICT infrastructures. He's supporting the Italian public administration in digital transformation projects.
![]()
![]()
![]()
![]()
![]()
![]()
![]()


