
Last Updated on 13th April 2024 by peppe8o
This tutorial will show you how to create a very simple Raspberry PI Pico W web server exposing HTML pages together with javascript and css files, using MicroPython.
With the built-in WiFi chip, we can create a very cheap Raspberry PI Pico W web server running MicroPython, to host very simple HTML pages and create small and inexpensive websites
It is important to note that the Raspberry PI Pico W has a very low storage capacity (2MB for the whole firmware, programs and files). For this reason, I suggest using external storage services (like google drive or public resources) in order to add high-size static content to your pages and let your Web Server routing only the requests for HTML content. This kind of job can be performed with a little HTML coding and isn’t in the scope of this tutorial.
Web Server – Client Process
Before going to the code, it is important to note where the code is executed in a simple and classic web server – client communication process.
Our tutorial deals with a static content web server. This means that the files are stored in our Raspberry PI Pico W storage and served to clients as they are, without any interpretation. Our main web server program will perform the HTTP server process in the above picture, keeping files to be served from its internal storage (File System in the picture). The Clients will ask the server for its resources and the HTML code, JS (Javascript) code and CSS code will be executed on the client browser:
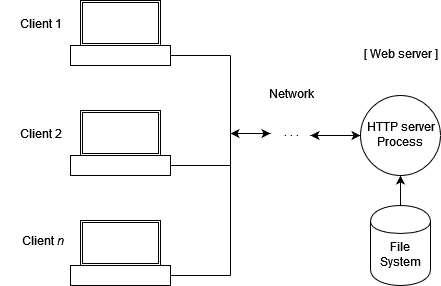
The code executed on Clients can also tell the browser to acquire more resources before presenting the whole site. Resources available from the same domain can be referred to by adding a link including only the subfolder path, while resources available from external domains have to be linked with the full “HTTP(s)://” path.
Exposing the Web Page to the Internet
This tutorial shows you how to get an HTML website available from the local LAN, which you can browse directly with the Raspberry PI Pico W IP address. If you need to expose the website to the internet, you may find my How to configure No-IP DUC service in your Raspberry PI tutorial useful, keeping in mind that that article is related to Raspberry PI computer boards (doesn’t apply to Raspberry PI Pico), but many modern routers can manage the No-IP address updates, so giving you free web domain.
What We Need
As usual, I suggest adding from now to your favourite e-commerce shopping cart all the needed hardware, so that at the end you will be able to evaluate overall costs and decide if to continue with the project or remove them from the shopping cart. So, hardware will be only:
- A common computer (maybe with Windows, Linux or Mac). It can also be a Raspberry PI Computer board
- Raspberry PI Pico W microcontroller (with a common micro USB cable)
Check hardware prices with the following links:


Step-by-Step Procedure
Prepare Raspberry PI Pico W
We must start preparing the Raspberry PI Pico W firmware. Please refer to my Getting Started with WiFi on Raspberry PI Pico W and MicroPython tutorial, as it also includes the basics for Pico W networking code and for using the socket module to serve HTML content (in the “Exposing HTML pages” chapter).
The following part will give you all the code needed to make our web server work, explaining the new lines added for better web page management.
Get Raspberry PI Pico W Web Server code
You can get the main MicroPython scripts that perform the Web Server process from the following links:
These 2 MicroPython scripts must stay in your Raspberry PI Pico W storage at the root folder.
The web server will publish the content from a folder named “public_html”, whose name can be changed. In this case, you will need to update the “public_folder” variable in pico-webserver.py script accordingly.
Moreover, I’ve created an example website with basic public_html content. you can get this example by downloading the following zip package:
Extract the zip content and upload it to your Raspberry PI Pico W storage so that the files tree appears like the following one:
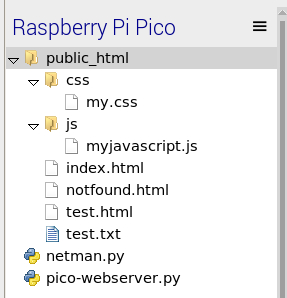
Please note that netman.py and pico-webserver.py are in the root folder, while the whole website content stays in the public_html folder.
The indeex.html will be the first page of our website, with our Raspberry PI Pico W web server redirecting the requests for the root URL to this page. The notfound.html page will notify the user when a requested page will not be available (the classic “Page not Found” error). The test.html is a second web page, that includes a link to a test.txt file for direct download. The my.css file is a simple stylesheet example, that changes the page’s background color. Finally, the myjavascript.js file is a simple javascript that changes an HTML div background color to red when the page loads.
From the MicroPython code, the netman.py can be positioned also in one of the library paths according to my Adding external modules to MicroPython with Raspberry PI Pico tutorial. I’m not going to explain here the netman.py script as it is already defined in my Getting Started with WiFi on Raspberry PI Pico W and MicroPython tutorial. The pico-webserver.py script runs the web server jobs. If you want it to run without the need to keep a computer attached, you can rename it to “main.py” (after you have checked that your customizations worked).
My code includes a few print statements in order to get you able for a basic overview of what’s happening from the Thonny shell (or whatever shell you are using). You can remove or add these print() statements or, better, save what’s happening into a log file that will be useful for debugging (take care that the log file will use storage space and we are in a very small storage environment).
All the scripts here used are also available from my GitHub repository: https://github.com/peppe8o/rpi-pico-peppe8o/tree/main/webserver for anyone wishing to contribute or improve the code.
Web Server Code Explanation
In the beginning, we import the required libraries. Compared to the simple WiFi server example of my previous post, I’ve added the os library. This will allow us to search the file system for the pages required from clients and check if the pages exist.
import netman
import os, socket
The following variables handle the WiFi connection and you have to change it according to your Country code and WiFi credentials:
country = 'IT'
ssid = 'MyWiFiAccessPoint'
password = 'MyWiFiPassword'
The following lines allow basic customization of your Raspberry PI Pico W web server. The “public_folder” is the folder where the web resources will be stored. All the published pages and web files must stay in this directory that must exist.
The index_page is the HTML page where the root request will be redirected. For example, my Raspberry PI Pico W has IP address “192.168.197.94”, so I will reach it by using its IP address in my browser. If you request a whatever page, let’s suppose for example the http://192.168.197.94/test.html, the RPI Pico W web server will look for the “test.html” file in your public folder and return it. But if the user just starts with the http://192.168.197.94/ address, it will not request any specific page and this variable sets a redirect to the default “index.html”.
The not_found_page is an HTML page that the web server will return when the required page can’t be found in our file system.
public_folder='/public_html'
index_page='/index.html'
not_found_page='/notfound.html'
The following line initializes the WiFi connection, as already described in my previous post:
wifi_connection = netman.connectWiFi(ssid,password,country)The following custom function extracts the requested resource path from the client query. When a client requests a page, the request brings a lot of information regarding the client that can be shown by adding a print(decoded_req) after the second line of this function. The scope of this function is returning a small array with 2 elements: the first one (path[0]) will be the requested folder (excluding the public_folder root) and the second element (path[1]) will be the requested filename.
def path(request):
    decoded_req = request.decode()
    get_req = decoded_req.partition('\n')[0]
    path = get_req.split(" ")[1]
    path=path.rsplit('/', 1) #path[0]->folder, path[1]->filename
    path[1]='/'+path[1]
    return path
Now, our script sets a socket object and starts listening for incoming connections. Differently from my previous tutorial, I’ve added the “s.setsockopt(socket.SOL_SOCKET, socket.SO_REUSEADDR, 1)” that avoids getting the Error for Address in use when stopping and running again the script (previously, the only way to get my Raspberry PI Pico W connected again was to run a machine restart).
addr = socket.getaddrinfo('0.0.0.0', 80)[0][-1]
s = socket.socket()
s.setsockopt(socket.SOL_SOCKET, socket.SO_REUSEADDR, 1)
s.bind(addr)
s.listen(1)
After a print() statement, that warns once the server is listening, the main try loop will start to accept any connection, printing client IP address details and storing the request details. Our custom function will get the resource path from this request.
print('listening on', addr)

while True:
  try:
    cl, addr = s.accept()
    print('client connected from', addr)
    request = cl.recv(1024)
    url=path(request)
Please mind that, according to our path() function, now the url[0] will mean the folder path, while the url[1] will identify the filename.
The first IF statement will check if the requested page is the root one. In this case, by forcing the url[1] to index.html we have performed a basic redirect. To say the truth, we should manage headers in order to return a redirect code to the browser. But in this tutorial, we’re just providing a very basic web server and this is enough to make things work. Any contribution to the code to make it more compliant with internet headers will be welcomed by the GitHub page hosting this project and already linked in the previous paragraph.
A print() statement will show on the console the requested resource after this redirect:
    if url[0]=="" and url[1]=="/": url[1] = index_page
    print(url)
The following IF statement checks if the requested page exists, by using the os.listdir() that scans the public folder concatenated with the resource path folder (url[0]).
The url[1][:1] removes from the filename the “/” char at the beginning. We need this operation to make the filename search compatible with the os.listdir() output format.
If the page doesn’t exist, we redirect the URL to the not_found_page (set at the code beginning) and set the response header to pass a 404 error code. The else statement means that the requested resource has been found. In this case, we set the header to notify the client browser that the resource has been correctly found (code 200).
    if url[1][1:] not in os.listdir(public_folder+url[0]):
        url[0]=''
        url[1]=not_found_page
        header='HTTP/1.0 404 Object Not Found\r\n\r\n'
    else:
        header='HTTP/1.0 200 OK\r\n\r\n'
At this point, we have a correct URL both in the case that the client was requiring a correct page as well as in the case that the client was requiring a wrong page (we redirected the last case to the not_found_page).
Here we just open the file served from our Raspberry PI Pico W and return the header and file content to the client. We also manage the file and connection closings:
    f = open(public_folder+url[0]+url[1], 'r')
    response = f.read()
    f.close()
    cl.send(header+response)
    cl.close()
The final EXCEPT statement will track and manage errors coming from the whole TRY loop:
  except OSError as e:
    cl.close()
    print('connection closed')
Run The Raspberry PI Pico W Web Server
From Thonny, run the pico-webserver.py script. You will get your web server IP and a listening message that will notify you that the server is ready to provide the requested pages:
MicroPython v1.19.1-88-g74e33e714 on 2022-06-30; Raspberry Pi Pico W with RP2040
Type "help()" for more information.
>>> %Run -c $EDITOR_CONTENT
waiting for connection...
waiting for connection...
waiting for connection...
waiting for connection...
waiting for connection...
connected
ip = 192.168.197.94
listening on ('0.0.0.0', 80)
From your favourite browser, please use the returned IP in order to connect to your home page:
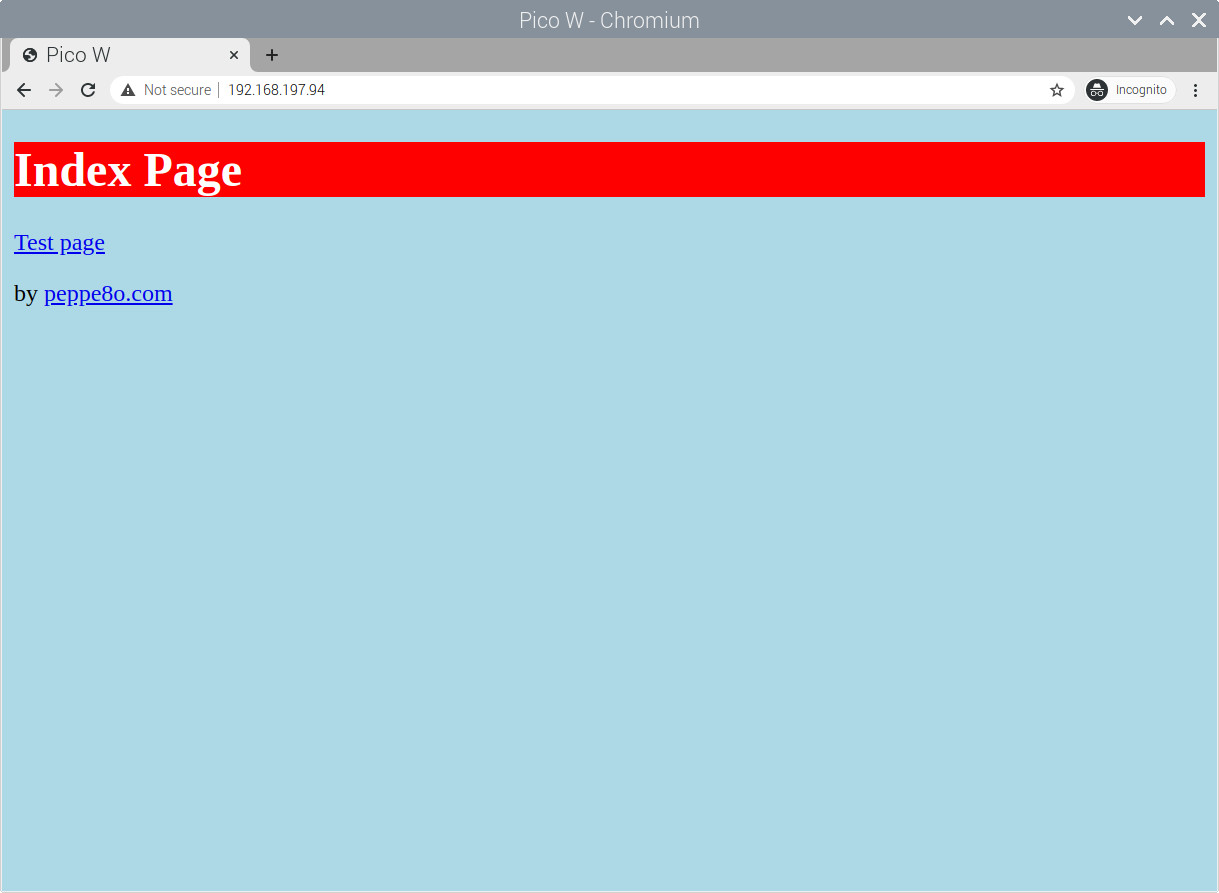
If you get this exact page with my public_folder package, you have already verified that the redirect, the page serving, the css and the javascript serving worked correctly. From the Thonny shell you will see the following requests:
connected
ip = 192.168.197.94
listening on ('0.0.0.0', 80)
client connected from ('192.168.197.212', 43318)
['', '/index.html']
client connected from ('192.168.197.212', 43322)
['/css', '/my.css']
client connected from ('192.168.197.212', 43320)
['/js', '/myjavascript.js']
client connected from ('192.168.197.212', 43326)
['', '/favicon.ico']
client connected from ('192.168.197.212', 43324)
It is correct that a single page request generated a list of 4 “sub-request”. The my.css and the myjavascript.js requests went as these files are part of our HTML code. The favicon.ico is a standard for many browsers (like Chrome/Chromium) that ask the icon to be put at the browser tab. This request will get back, from our web server, a page not found error, but it doesn’t affect our web server or our pages.
By clicking the test page you will reach a second page (similar to the previous one):
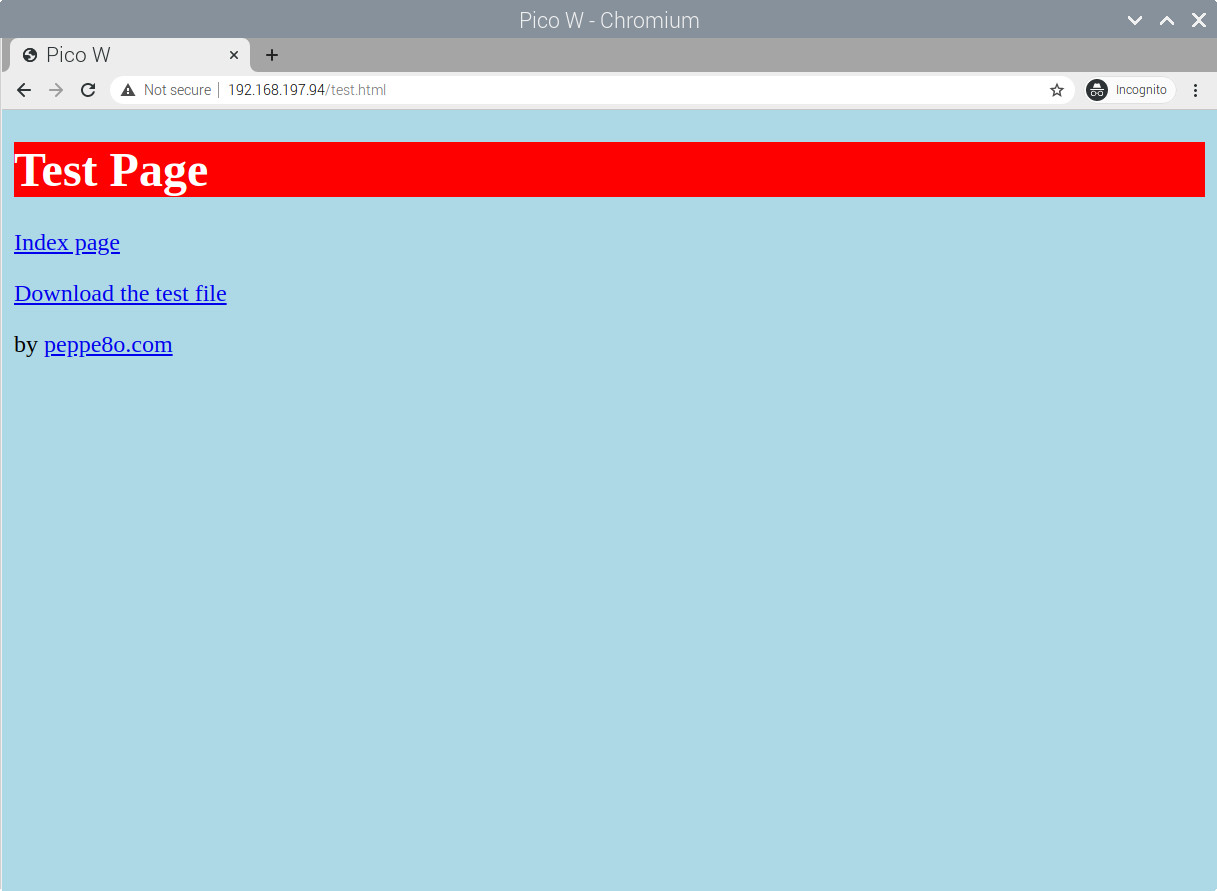
The “Download the test file” link will get you able to download the test.txt file in our file system (within the public folder). It can be a useful way to download any kind of file from a Raspberry PI Pico W (maybe logs or whatever stored file).
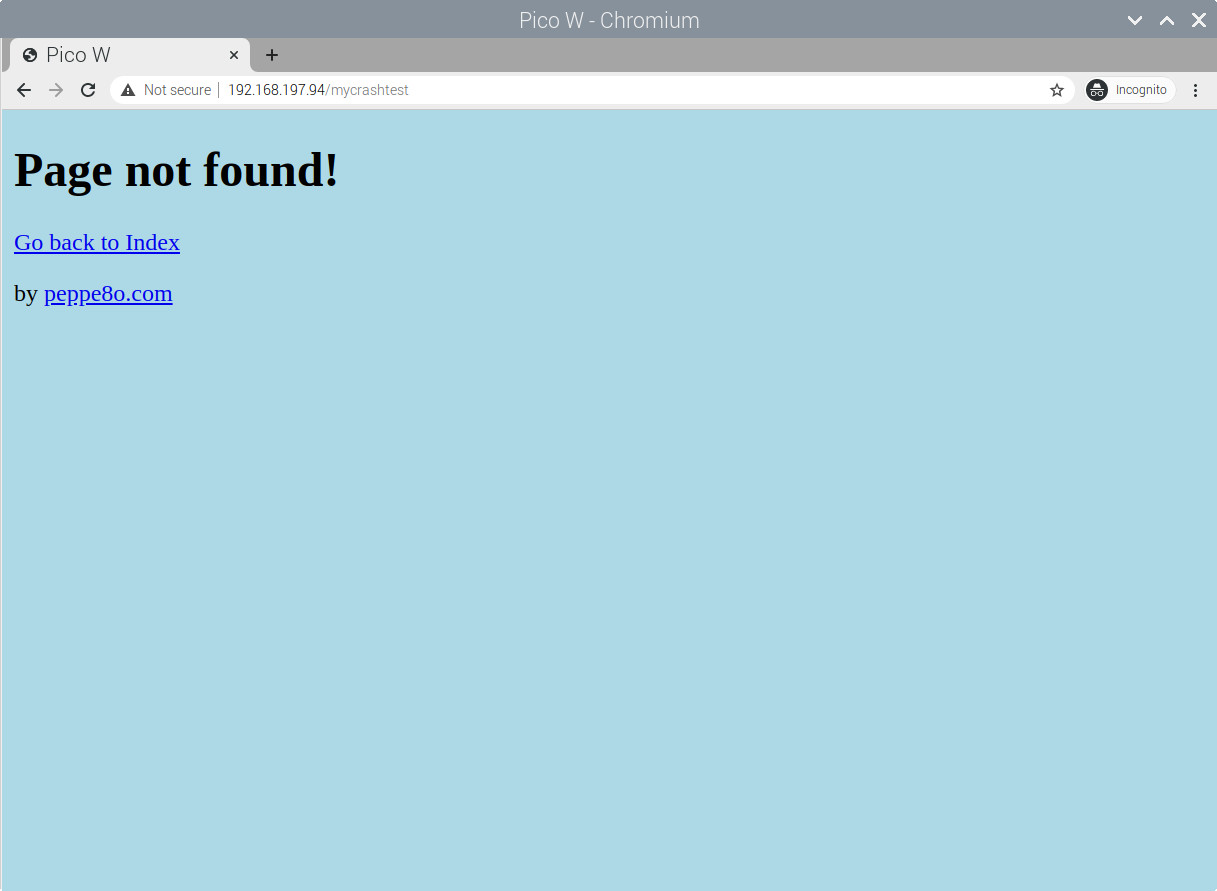
Finally, let’s test a case when the client requests a wrong page, by changing the URL address with a file name not stored in our RPI Pico W. The page not found will promptly warn the user and the page not found will give him a chance to go back to the index (instead of a server error that gives no way out invitations):
Known Issues
Some minor known issues are still present in this code and any help to solve them will be appreciated.
First of all, in order to make changes to the HTML code and test it, you will need to stop and start the Raspberry PI Pico W web server several times. I’ve experienced that after the first stop and start the RPI Pico w seems to connect correctly with the following console log:
MicroPython v1.19.1-88-g74e33e714 on 2022-06-30; Raspberry Pi Pico W with RP2040
Type "help()" for more information.
>>> %Run -c $EDITOR_CONTENT
connected
ip = 192.168.197.94
listening on ('0.0.0.0', 80)
So it seems to keep the connection alive but it doesn’t answer both to ping requests or to browser requests. To solve this problem you have to stop and start again a second time the RPI Pico W program. This will result in the “waiting for connection…” message before the connection confirmation and here the webserver will come back to work.
MicroPython v1.19.1-88-g74e33e714 on 2022-06-30; Raspberry Pi Pico W with RP2040
Type "help()" for more information.
>>> %Run -c $EDITOR_CONTENT
connected
ip = 192.168.197.94
listening on ('0.0.0.0', 80)
────────────────────────────────────────────────────────────────────────────────────────────────
MicroPython v1.19.1-88-g74e33e714 on 2022-06-30; Raspberry Pi Pico W with RP2040
Type "help()" for more information.
>>> %Run -c $EDITOR_CONTENT
waiting for connection...
waiting for connection...
waiting for connection...
connected
ip = 192.168.197.94
listening on ('0.0.0.0', 80)
Another issue is when the web server deals with images. In this case, I suppose that the file read() returns to the browser a wrong file type. To solve this issue, it’s better to include in our HTML code a link for images stored in external services instead of storing the images in our Raspberry PI Pico W file system. This is also because images usually take a lot of storage space compared with the Pico capacity.
Final Considerations
If you are going to use the Raspberry PI Pico W as a standalone web server you must rename the “pico-webserver.py” into “main.py”. I also suggest integrating the final EXCEPT statement with a log report for the error. Then, adding a “machine.reset()” command will auto-restart the Pico W coming back to a working state. Also periodically checking this log and then cleaning it will help in keeping the code working and the log size low.
What’s Next
Take a look at my Raspberry PI Pico tutorials for useful and funny projects with your Raspberry PI Pico!
Enjoy!

Open source and Raspberry PI lover, writes tutorials for beginners since 2019. He's an ICT expert, with a strong experience in supporting medium to big companies and public administrations to manage their ICT infrastructures. He's supporting the Italian public administration in digital transformation projects.
![]()
![]()
![]()
![]()
![]()
![]()
![]()


