
Last Updated on 27th March 2025 by peppe8o
In this tutorial, I’m going to show you how to install MediaWiki on a Raspberry PI computer.
Sharing knowledge was the very first scope of the Internet when it was born. The greatest expression of this is still Wikipedia, which lets people share what they know with the world. But you can get your knowledge portal identical to Wikipedia with the open-source MediaWiki on Raspberry PI.
What Is MediaWiki
MediaWiki is an open-source collaboration and documentation platform used to share knowledge between people across the Internet. It is the base of the famous Wikipedia website.
Licensed under the GNU General Public License (GPL), it is extremely powerful, scalable and feature-rich. MediaWiki uses PHP for its front end to display information to your browser and a number of database varieties (the most common being MySQL).
In this article, I’m going to show you how to create your personal wiki with a cheap and powerful Raspberry PI computer board. To simplify installation and setup, I’ll use Docker and docker-compose to deploy services with a single command line and a few configuration files. Instead of MySQL, our database will be built on MariaDB installation (fork of MySQL), which is performing better on Raspberry PI boards.
I will use a Raspberry Pi Zero 2W board. This is enough to test the installation of a MediaWiki portal, used by a very few users. For better performances and to serve multiple users I suggest you tu use a more powerful Raspberry PI computer model (supporting 64-bit OS), as this guide will work also with newer Raspberry PI boards.
What We Need
As usual, I suggest adding from now to your favourite e-commerce shopping cart all the needed hardware, so that at the end you will be able to evaluate overall costs and decide if to continue with the project or remove them from the shopping cart. So, hardware will be only:
- Raspberry PI Zero 2 W (including proper power supply or using a smartphone micro USB charger with at least 3A) or newer Raspberry PI Board
- high speed micro SD card (at least 16 GB, at least class 10)
Step-by-Step Procedure
Preparing the Raspberry PI Operating System
The first step is installing the Raspberry PI OS Lite (please note that we need the 64-bit version) to get a fast and light operating system (headless). In this case, you will need to work from a remote SSH terminal.
If you need a desktop environment, you can also use the Raspberry PI OS Desktop, in this case working from its terminal app. Please find the differences between the 2 OS versions in my Raspberry PI OS Lite vs Desktop article. NOTE: if you’re working with a low capabilities Raspberry PI (like a Raspberry PI Zero 2 W) you should use the OS Lite version.
Make sure that your system is up to date. Connect via SSH terminal and type the following command:
sudo apt update -y && sudo apt upgrade -yWe also need to install Docker. For this step, please refer to my Docker on Raspberry PI tutorial.
With low RAM (less than 1 GB) Raspberry PI devices I also suggest increasing the Swap memory to higher values than the default value, increasing it to 1000 MB. You can refer to my Set Raspberry PI Swap Memory tutorial to achieve this task.
With older Raspberry PI computer boards, you can also reduce the memory assigned to RAM (if you use the Raspberry PI OS Lite version) to the minimal value (16MB), giving more resources to the RAM. You can achieve this goal with my Manage Raspberry PI GPU Memory Split tutorial.
Installing MediaWiki on Raspberry PI
Using docker will result in a huge simplification of the installation procedure.
We’ll put the configuration files in a new folder named “mediawiki”. Consider that by default, docker compose will prepend to containers your directory name, even if you can easily edit it later. From terminal:
mkdir mediawiki
cd mediawiki
Please note that it is important to execute all the following commands inside this folder, so please enter it again every time you want to manage your installation of MediaWiki on Raspberry PI.
Preparing the Docker Compose File
Create a docker compose file:
nano docker-compose.ymland add the following code:
# MediaWiki with MariaDB
#
# Access via "http://localhost:8080"
#   (or "http://$(docker-machine ip):8080" if using docker-machine)
services:
  mediawiki:
    image: mediawiki
    restart: unless-stopped
    ports:
      - 8080:80
    links:
      - database
    volumes:
      - ./images:/var/www/html/images
      # After initial setup, download LocalSettings.php to the same directory as
      # this yaml and uncomment the following line and use compose to restart
      # the mediawiki service
      # - ./LocalSettings.php:/var/www/html/LocalSettings.php
  # This key also defines the name of the database host used during setup instead of the default "localhost"
  database:
    image: mariadb
    restart: unless-stopped
    environment:
      MYSQL_DATABASE: wikidb
      MYSQL_USER: wikiuser
      MYSQL_PASSWORD: wikipassword
      MYSQL_RANDOM_ROOT_PASSWORD: 'yes'
    volumes:
      - ./db:/var/lib/mysql
Differently from the official docker compose file available from the MediaWiki page on Docker Hub, here I preferred to set the restart policy to “unless-stopped” instead of “always”. This allows you to manually stop the MediaWiki containers without them restart automatically when unneeded (for example for development needs). When running, with the “unless-stopped” option the containers will keep running even after Raspberry PI’s reboots.
Moreover, the persistent volumes (“db” and “images”) are mounted locally in the same folder where you are running the commands and where the docker compose file is stored. This will allow you to have all the parts inside a single folder.
In this file, you can edit the MYSQL database name, user and password according to your preferences. I suggest you change them to make your installation more secure.
Save and close the file.
MediaWiki Service Creation with Docker Compose
With the previous file ready to be used, you will be able to install and have MediaWiki up with only the following command:
docker compose up -dThis process will require a while to download the container images.
Once your Raspberry PI finishes the Docker tasks (and you have back your prompt), you can use your favourite browser (from a remote PC) to setup your MediaWiki installation.
Browse url http://<<yourRaspberryIpAddress>>:8080 (in my case, my local Raspberry PI IP address is 192.168.7.106):
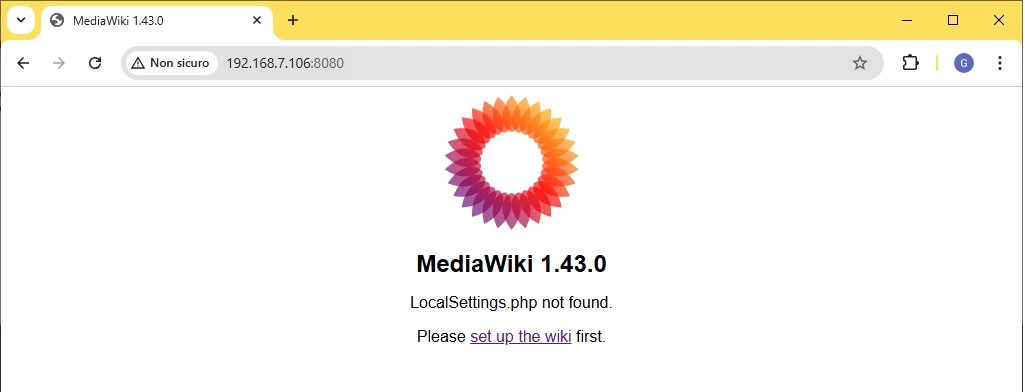
The first page notifies you that the settings file has not been found. The following steps will create it.
Click on the “set up the wiki” link, which will guide you through a web wizard.
The next page will ask you to choose your favourite language:
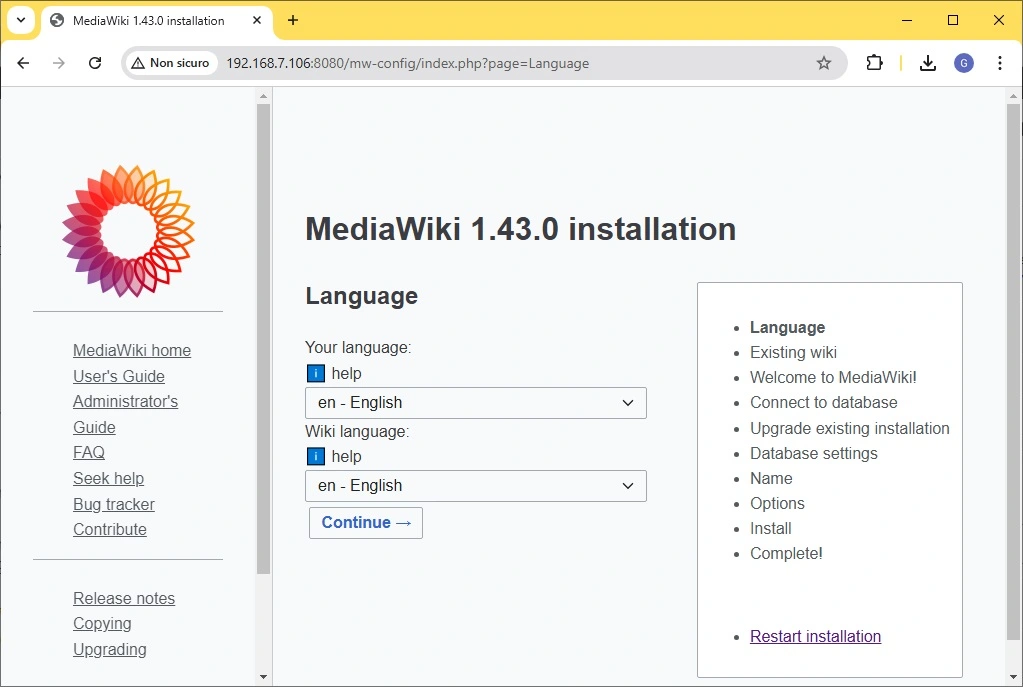
Choose it and click Continue.
The next page will warn you that some environmental checks will be performed. The most important part to see is the final verification highlighted in the following picture:
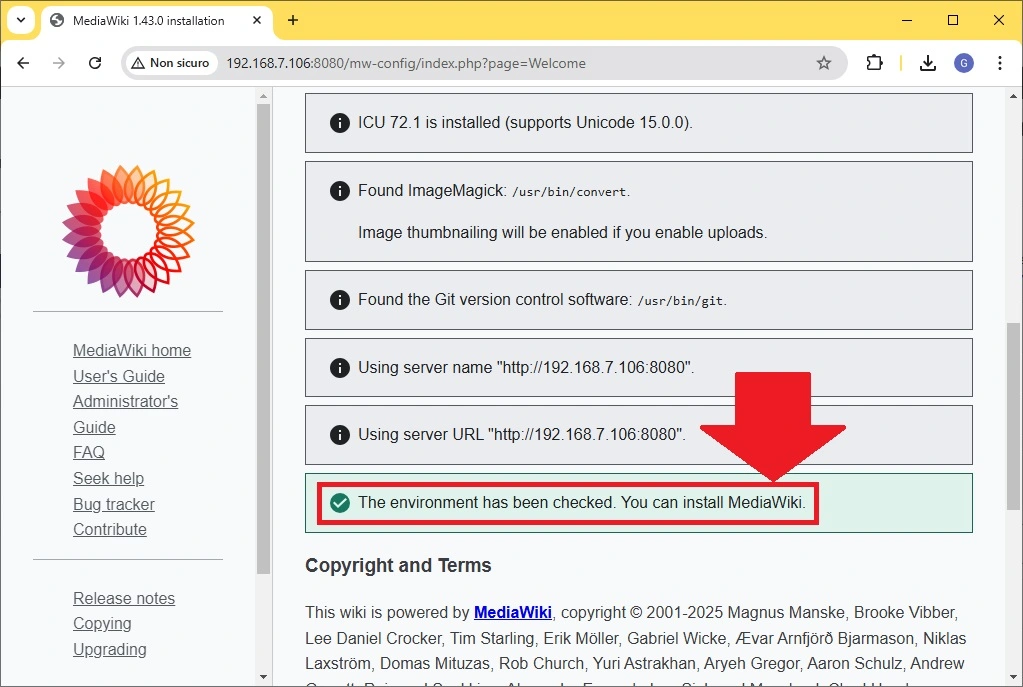
Scroll to the bottom and click “Continue”.
The next page will require database configuration. Scroll down to edit the database name, user and password according to what is configured in your docker-compose.yaml file. Also, change the Database host from the default “localhost” with the “database” string (as defined in the docker compose file as service name):
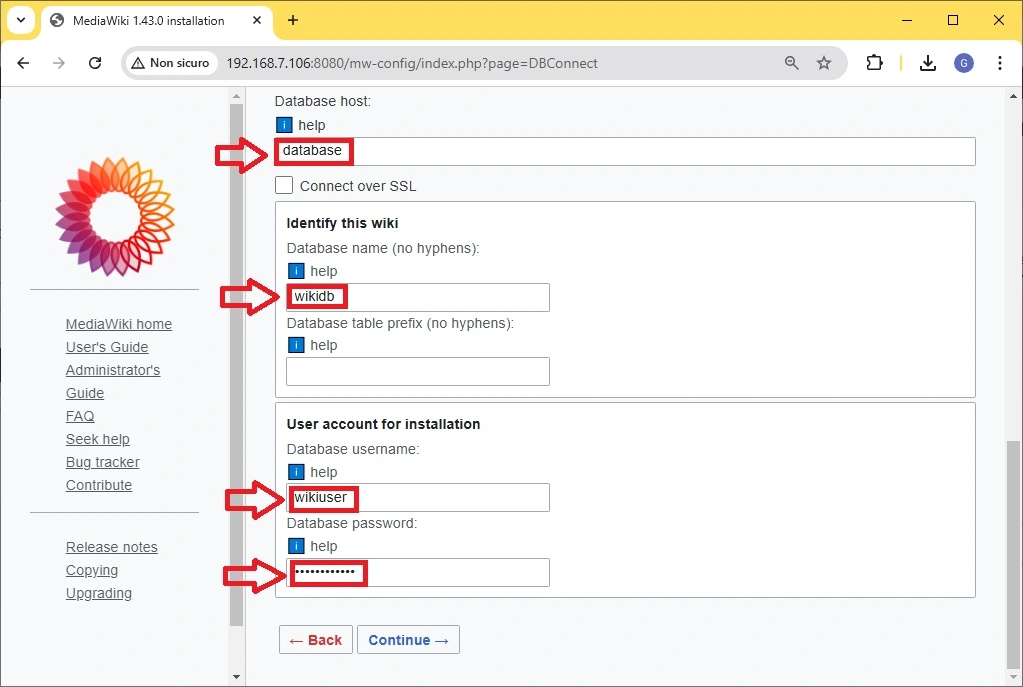
Scroll down and click Continue.
The next screen will enable you to use the same user/password configured for database connection also for web access:
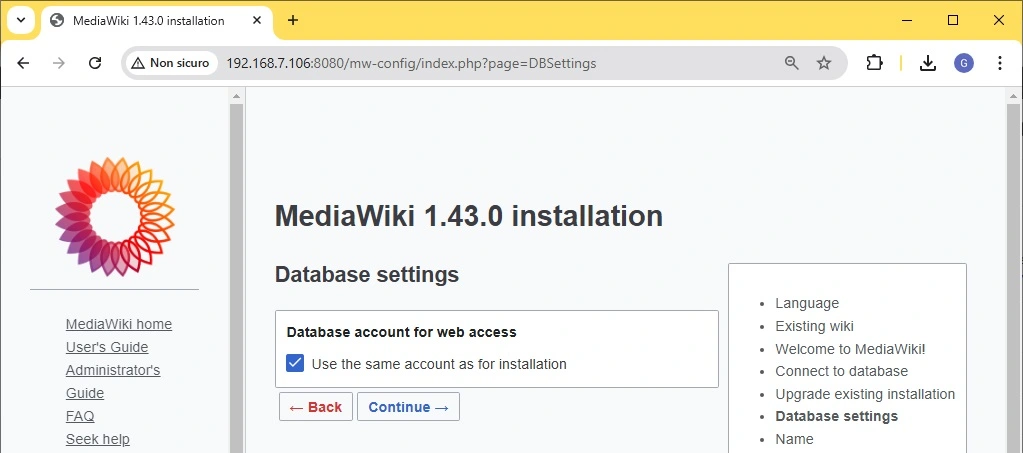
You can change and make your configuration more secure (but you need to define a new database user) or keep the default and click continue.
The next page will ask you the name of your MediaWiki page and administration account.
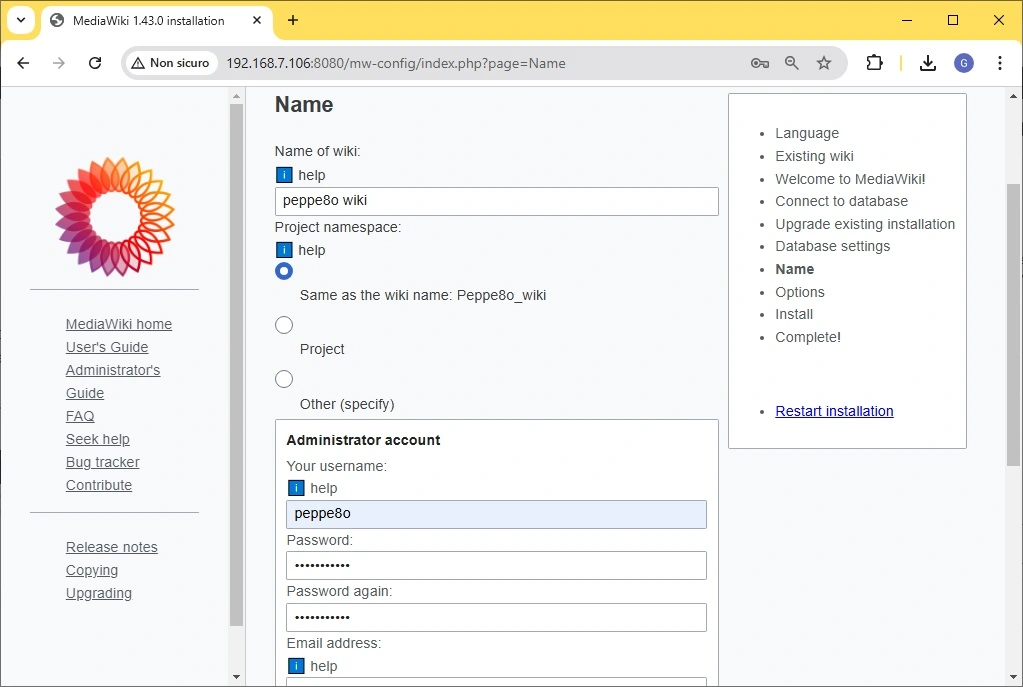
Use your favourite ones (remember to use a strong password).
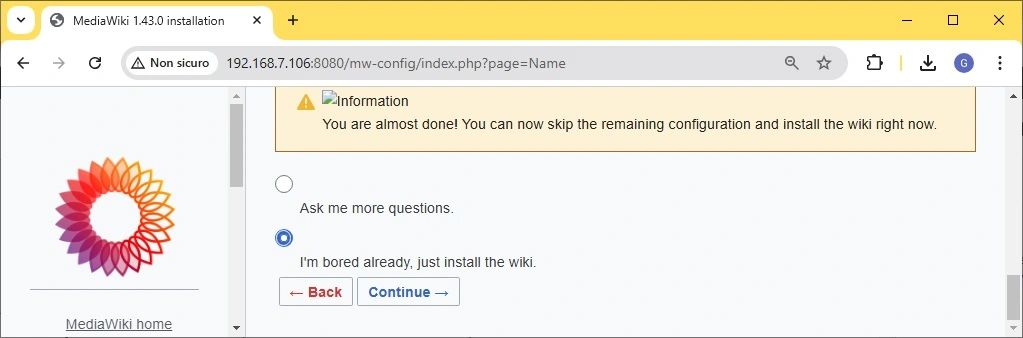
By scrolling down, you can now choose to continue with the MediaWiki customization (which you can also perform later) or to complete the installation by skipping the following questions. In my case, I will use this second way by selecting the “I’m bored already, just install the wiki” option, then click Continue:
Finally, it will ask you a confirmation to complete the installation:
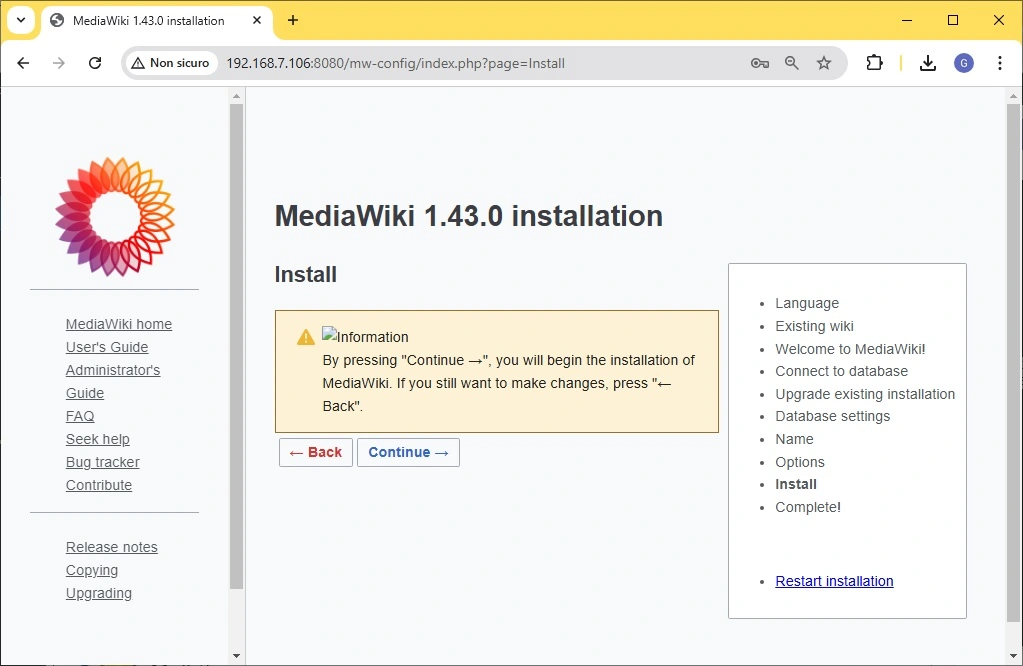
Click Continue to complete.
The next screen will resume the installation tasks and confirm that the installation is complete:
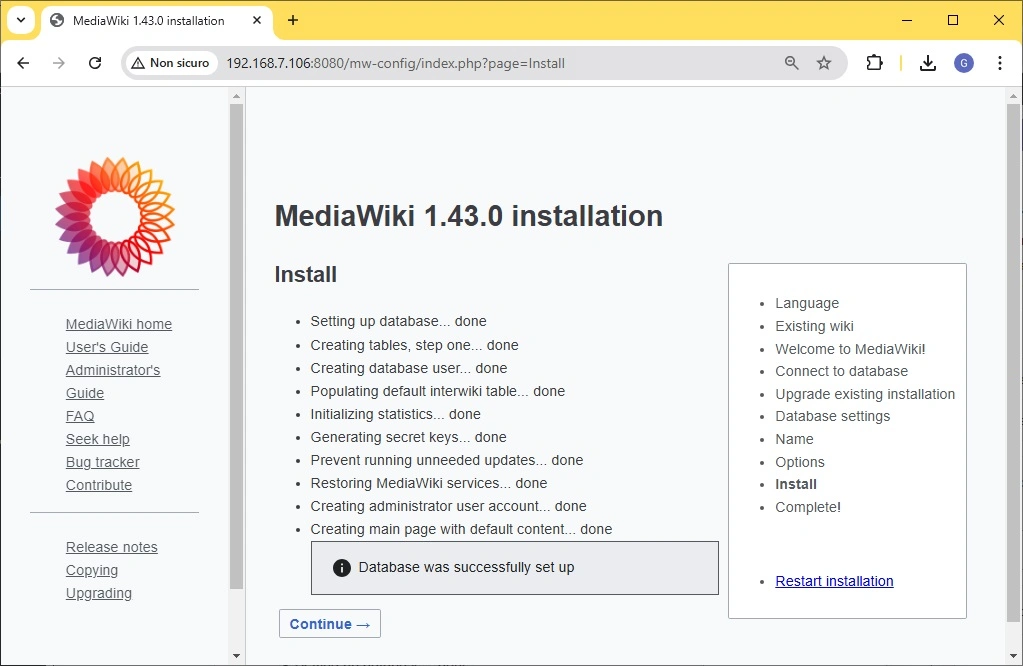
Click continue.
On the following page, a popup will open giving you a download for a file named “LocalSettings.php”. If not, you can download it by clicking the link highlighted in the following picture:
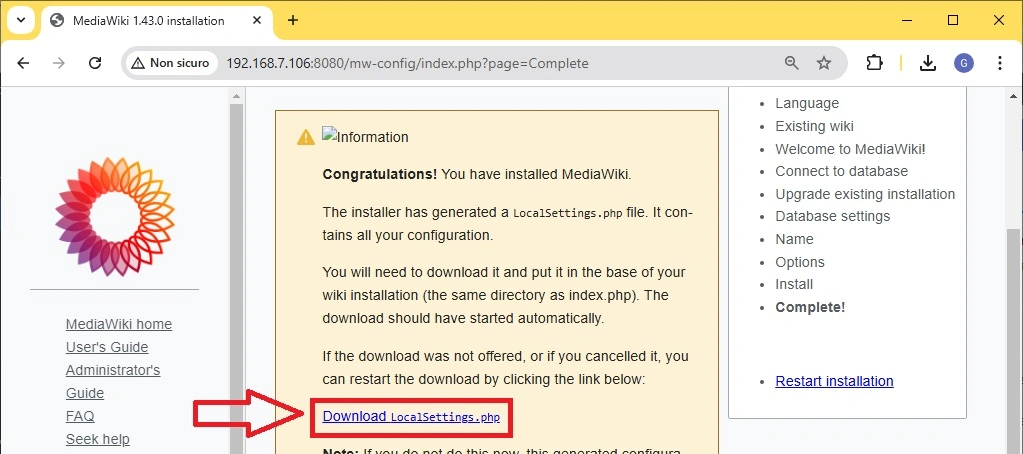
Download it locally and copy it to the MediaWiki folder in your Raspberry PI (where you stored the docker-compose.yaml file).
From the terminal, shut down the MediaWiki service:
docker compose downEdit the docker-compose.yml file by uncommenting the following line:
- ./LocalSettings.php:/var/www/html/LocalSettings.phpPlease check that this line is aligned with the – ./images:/var/www/html/images line from the same file. Save and close.
This will allow the MediaWiki container to import the LocalSettings.php file in its Apache directory. Finally, our mediawiki folder will contain the following files:
docker-compose.yml
LocalSettings.php
db
images
Start MediaWiki again in your Raspberry PI with the docker compose command:
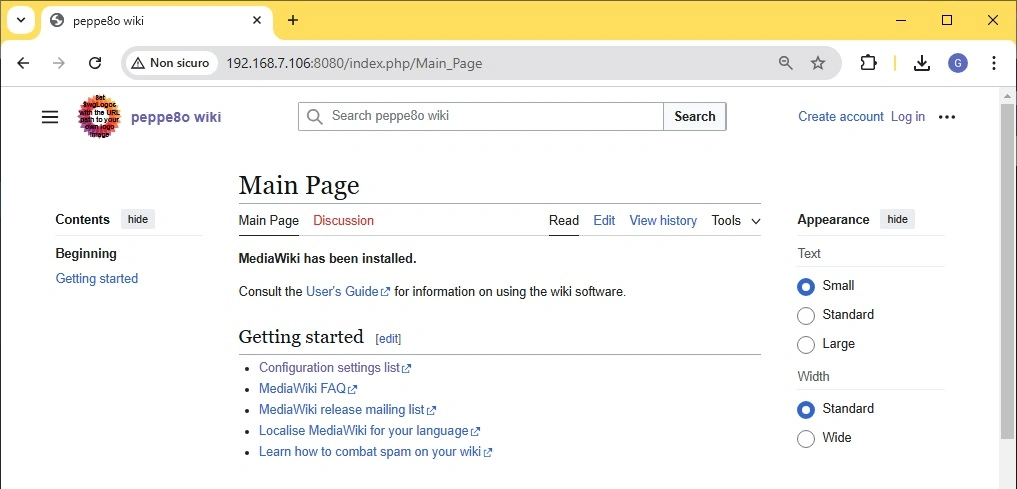
docker compose up -dGo back to your browser. Browse again the http://<<yourRaspberryIpAddress>>:8080 page. You will find your Mediawiki page ready:
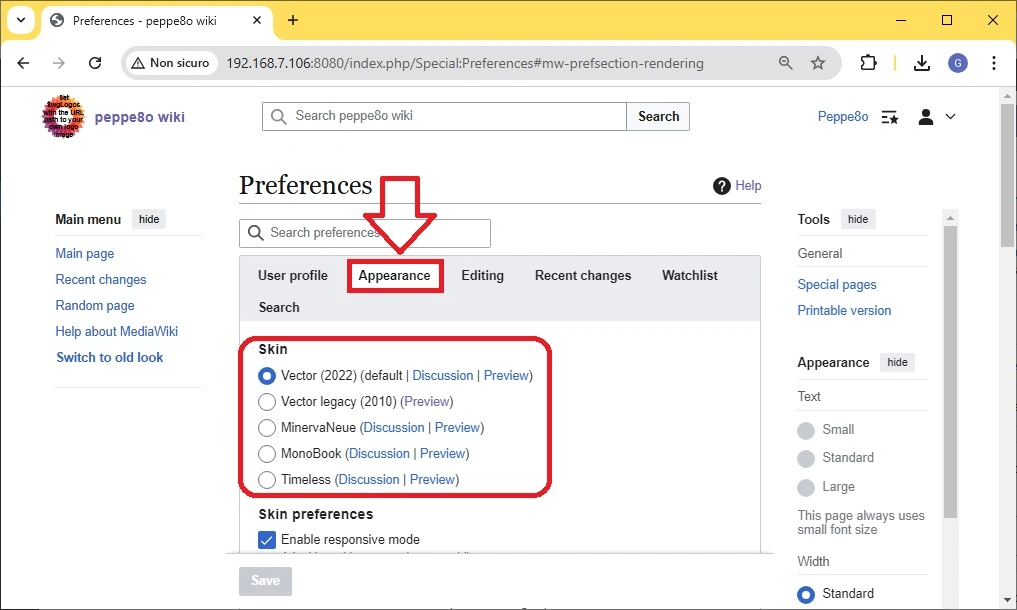
Change the MediaWiki Theme
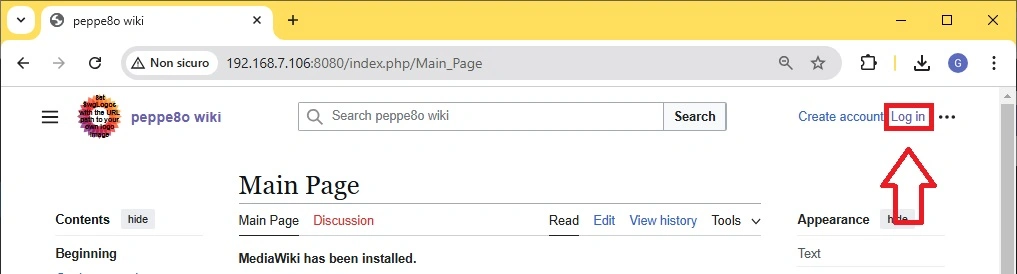
MediaWiki gives you the ability to change the main skin of your website by offering you a set of pre-installed themes. To change them, you must log-in with the administrator user we created at the setup wizard. Use the log-in link:
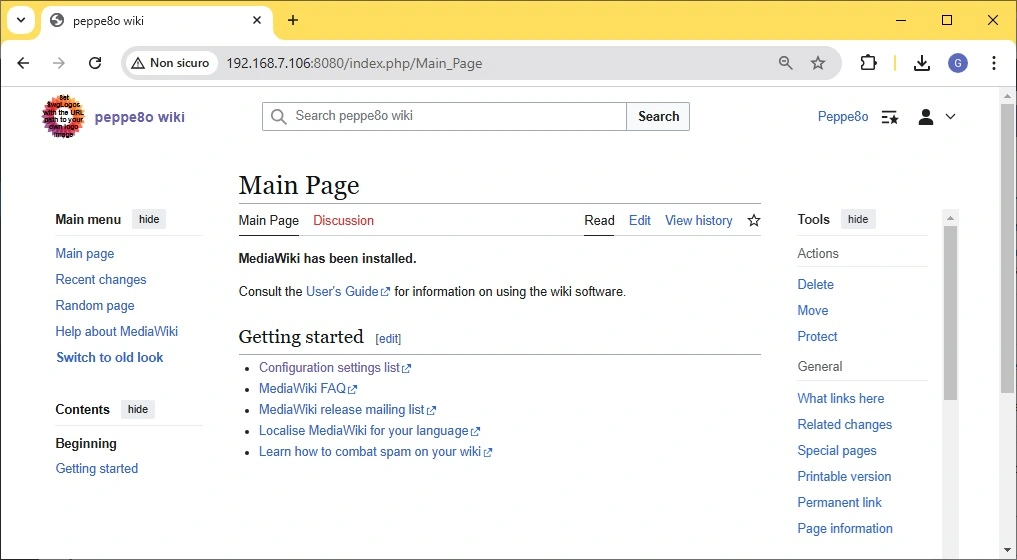
After logging in with your credentials, you will reach the MediaWiki home page for your user:
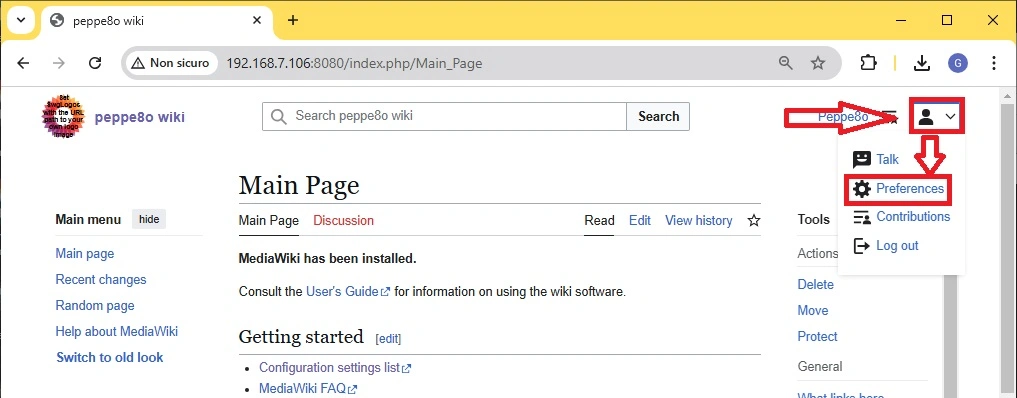
You can check that you’re logged in as you can see your username on the top-right part of the page. From the user icon, you can select the “Preferences” link to reach the related page:
Once you reach the Preferences page, you can edit the MediaWiki skin by selecting the “Appearance” tab and selecting one of the available layouts:
What’s Next
If you want to discover many other projects for your Raspberry PI, you can take a look at peppe8o Raspberry PI tutorials.
Enjoy!

Open source and Raspberry PI lover, writes tutorials for beginners since 2019. He's an ICT expert, with a strong experience in supporting medium to big companies and public administrations to manage their ICT infrastructures. He's supporting the Italian public administration in digital transformation projects.
![]()
![]()
![]()
![]()
![]()
![]()
![]()


NICE!
I had to make 1 adjustment:
Thanks for the really easy to follow tutorial
~remke
COMPOSE_HTTP_TIMEOUT=200 sudo docker-compose up -d
because of an error:
ERROR: for mediawiki_mediawiki_1 UnixHTTPConnectionPool(host=’localhost’, port=None): Read timed out. (read timeout=60)
-> COMPOSE_HTTP_TIMEOUT=200 sudo docker-compose up -d
ERROR: No such container: c4678ed7f14288eb301415a28283d63e45f5e92a3e36af20dcf1cda491cb04c2
-> FIX:
sudo docker stop c4678ed7f14288eb301415a28283d63e45f5e92a3e36af20dcf1cda491cb04c2
c4678ed7f14288eb301415a28283d63e45f5e92a3e36af20dcf1cda491cb04c2
pi@raspberrypi:~/mediawiki $ sudo docker rm -f c4678ed7f14288eb301415a28283d63e45f5e92a3e36af20dcf1cda491cb04c2
c4678ed7f14288eb301415a28283d63e45f5e92a3e36af20dcf1cda491cb04c2
pi@raspberrypi:~/mediawiki $ sudo docker-compose up -d
mediawiki_database_1 is up-to-date
Final adjustment.
The downoaded LocalSettings.php:
– not only remove the hash but also make sure to line out the “-” at the same location as the other earlier line 😉
volumes:
– mediawiki-www:/var/www/html
– ./LocalSettings.php:/var/www/html/LocalSettings.php
Otherwise the last – will be not at the right position (Yml)
~remke
Can you make an image available for sell?
Hi Mark. Please, can you better explain your question?
Very nice project. Unfortunately after an update, it suddenly stopped working and refuses any connection… Any suggestions?
I tried building this project from scratch, but it crashes at the very last step of the Dockerfile…
Building database
Step 1/7 : FROM debian
—> e9cf93b473f4
Step 2/7 : RUN apt update && apt install mariadb-server -y
—> Using cache
—> e59f6858c661
Step 3/7 : RUN sed -i ‘s/bind-address/bind-address = 0.0.0.0 #/i’ /etc/mysql/mariadb.conf.d/50-server.cnf
—> Using cache
—> 1a3e72c65d80
Step 4/7 : RUN mkdir /mysql_scripts
—> Using cache
—> 8504f050de47
Step 5/7 : COPY mySqlScript.sql /mysql_scripts/
—> Using cache
—> 5d464d21127e
Step 6/7 : RUN /etc/init.d/mysql start && mysql -u root –password=”” -e “source /mysql_scripts/mySqlScript.sql”
—> Running in 251dda90a496
/bin/sh: 1: /etc/init.d/mysql: not found
ERROR: Service ‘database’ failed to build: The command ‘/bin/sh -c /etc/init.d/mysql start && mysql -u root –password=”” -e “source /mysql_scripts/mySqlScript.sql”‘ returned a non-zero code: 127
Hi Ralf,
You are right, I have to update this tutorial as recently done in my “Custom MariaDb container in Raspberry PI” tutorial. Hope to do it by this Wednesday. Sorry
The instructions are very clear and got almost to the end. I too ran into the same error as Ralf experienced.
Below is screen capture:
Building database
Step 1/7 : FROM debian
—> f8dd32c4c981
Step 2/7 : RUN apt update && apt install mariadb-server -y
—> Using cache
—> 45ee198599ba
Step 3/7 : RUN sed -i ‘s/bind-address/bind-address = 0.0.0.0 #/i’ /etc/mysql/mariadb.conf.d/50-server.cnf
—> Using cache
—> 633b054a856f
Step 4/7 : RUN mkdir /mysql_scripts
—> Using cache
—> e08b5b733efa
Step 5/7 : COPY mySqlScript.sql /mysql_scripts/
—> Using cache
—> 9569bb081dcd
Step 6/7 : RUN /etc/init.d/mysql start && mysql -uroot –password=”” -e “source /mysql_scripts/mySqlScript.sql”
—> Running in 6562827a2280
/bin/sh: 1: /etc/init.d/mysql: not found
ERROR: Service ‘database’ failed to build: The command ‘/bin/sh -c /etc/init.d/mysql start && mysql -uroot –password=”” -e “source /mysql_scripts/mySqlScript.sql”‘ returned a non-zero code: 127
Appreciate your help in advance.
Hi Guru,
Please double check my tutorial on MariaDB dockerfile. The last rows are recently changed to:
RUN /etc/init.d/mariadb start && mysql -uroot –password=”” -e “source /mysql_scripts/mySqlScript.sql”
CMD /etc/init.d/mariadb start && tail -f /dev/null
This should solve the issue. I’m going to update this page too
Yes the fix works. Thank you for your quick help!
You are welcome!
Finally a docker tutorial for Mediawiki that actually works!!! I’ve tried several others and they all bombed at some point. I’m new to all this stuff, so I don’t have the skills to troubleshoot and fix what the issue is. This worked perfectly other than when I uncommented the line for the LocalSettings.php file it crashed until I figured out I had to make the dash at the beginning line up with the one in the active line above it. Thank you very much!
Oh, and I’m not even doing this on a Pi but in a VPS but it worked just fine.
Thank you for your feedback, Matt. Glad it helped you too!
Tried today to use the manual. Unfortunately my pi says „unknown command“ when I try to run the command „docker-compose up -d“. But its up to date.
Hi, thank you for your feedback.
From the linked tutorial you probably missed the part about installing docker compose. In any case, the new docker versions already include the compose option (without the dash character), so you should be able to use the following command:
docker compose up -dPlease let me know if this works
Great tutorial, this one work despite the many I tried to use.
Couple of observations:
Observation 1:
The following didn’t work for me:
docker-compose up -d
So I had to remove the dash and this worked:
docker-compose up -d
Observation 2:
The database password does not accept anything with special characters. It’s really strange.
Finally, are you able to create a guide on how to backup and restore? This will be the final piece in the puzzle and allow me to migrate to this solution.
Hi Sunil,
you’re right, the dash between docker and compose was a typo error from me (the old docker compose was requiring it, with the latest docker installations you don’t need it).
Regarding the backup, it should be enought to keep a copy of the data from the volumes mapped in the docker-compose.yml file. If you can run mediawiki into a different raspberry pi (or a different microSD card) keeping the data in the two volumes you should be able to recreate the same mediawiki website with all the old data