
Last Updated on 2nd September 2023 by peppe8o
In this tutorial I’m going to show you how to install a Jitsi meet server in your Raspberry PI computer board.
Even if already used with smartphones, video meetings overwhelmingly raised with Covid pandemic. Between solutions discovered in this context, a great open source and web application to host your video meetings, Jitsi, can run on Raspberry PI-
What is Jitsi
Beside having an online free service, Jitsi can transform your RPI into a web meeting server able to connect you with your parents and friends both from a web browser as from client applications available from quite all app stores.
Jitsi is a set of open source projects that allows you to easily build and deploy secure video conferencing solutions. At the heart of Jitsi are Jitsi Videobridge and Jitsi Meet, which let you have conferences on the internet, while other projects in the community enable other features such as audio, dial-in, recording, and simulcasting.
Ref.: Jitsi official website, About page
What is interesting in Jitsi is its ease setup of a meeting: you just type the meeting name and share its URL, having your friends directly accessing to your conference.
I have to admit that it took to me a few days to setup a Jitsi server. This because you can install also from a 32-bit system with no errors, but you will get a frustrating and repeating “Unfortunately something went wrong. We are trying to fix this. Reconnecting in xx seconds” error with no apparent reason. The solution was installing a 64-bit OS (also available from Raspberry PI Foundation.
If you want to use your meeting server over the internet, you will need a public IP address. More info can be found in my How to configure No-IP DUC service in your Raspberry PI tutorial. Here you can also learn how to get a free domain to use instead of a simple IP address (in this tutorial I will use “myhomepi.webhop.me” example domain). If you can’t get a public IP, your meeting server will only work inside your local network, using IP address instead of domain name for setup.
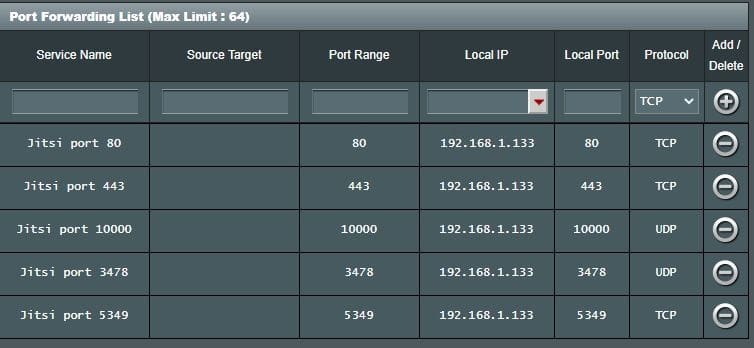
Following port forwarding rules will be also required in your router:
- 80/tcp
- 443/tcp
- 10000/udp
- 3478/udp
- 5349/tcp
Raspberry PI OS doesn’t come with an internal firewall, so you don’t need to create ufw access rules. Jitsi docs also list 22/tcp port, but this is for your ssh access and you shouldn’t forward this port to internet.
Final note, Jitsi uses a lot of RAM. Raspberry PI 3 boards hardly will be able to run jitsi, but from Raspberry PI 4 computer models you can get a 4GB RAM (or more) versions able to support your web conferences.
For this tutorial I’m going to use a Raspberry PI 4 Model B (4GB RAM version).
What We Need
As usual, I suggest adding from now to your favourite e-commerce shopping cart all the needed hardware, so that at the end you will be able to evaluate overall costs and decide if to continue with the project or remove them from the shopping cart. So, hardware will be only:
- Raspberry PI 4 Computer Board (with at least 4 GB RAM), including proper power supply or using a smartphone micro usb charger with at least 3A
- high speed micro SD card (at least 16 GB, at least class 10)
Check hardware prices with following links:


Step-by-Step Procedure
Prepare Operating System
As Jitsi requires computing resources, I suggest to use the Lite version of Raspberry PI OS. This allows a headless and performing OS.
Get your 64-bit RaspiOS image, dowloading it from https://downloads.raspberrypi.org/raspios_lite_arm64/images/ official repository. You can download latest version in “zip” file, as common flashing software can manage these compressed files.
Flash this OS to your SD card with my tutorial to install Raspberry PI OS Lite.
Make your OS up to date. From terminal, use following command:
sudo apt update -y && sudo apt upgrade -yCreate Port Forwarding Rules in your Router
At this stage, you have your Raspberry PI’s local IP address. It’s time to configure port forwarding rules in your router. Ports used are the following:
- 80/tcp
- 443/tcp
- 10000/udp
- 3478/udp
- 5349/tcp
This procedure changes depending on your router brand and model. For example, in my ASUS router I set them into “WAN” -> “Virtual Server / Port Forwarding” menù, adding the following list (where 192.168.1.133 is my local Raspberry PI’s IP address):
Install Jitsi
Install required packages. From terminal:
sudo apt install gnupg2 nginx
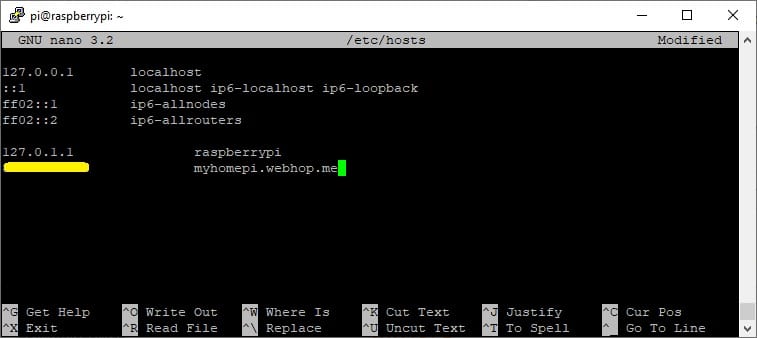
apt-transport-httpsWe’ll use an internet domain (myhomepi.webhop.me), so we have to make our RPI aware of its external name (If you are going to use a direct IP address, you can skip this part). Remeber to use your domain instead of mine:
sudo hostnamectl set-hostname myhomepi.webhop.meAlso add your domain resolution in your hosts file:
sudo nano /etc/hostsappend a row with your public IP address and domain name, like in following picture (I’ve covered with yellow my public IP):
Add the jitsi repository to your apt sources. This makes Jitsi Meet packages available directly from apt. Please note that following commands will be blaced each one into a single terminal line:
curl https://download.jitsi.org/jitsi-key.gpg.key | sudo sh -c 'gpg --dearmor > /usr/share/keyrings/jitsi-keyring.gpg'echo 'deb [signed-by=/usr/share/keyrings/jitsi-keyring.gpg] https://download.jitsi.org stable/' | sudo tee /etc/apt/sources.list.d/jitsi-stable.list > /dev/null
Update apt:
sudo apt updateAnd finally run jitsi installation:
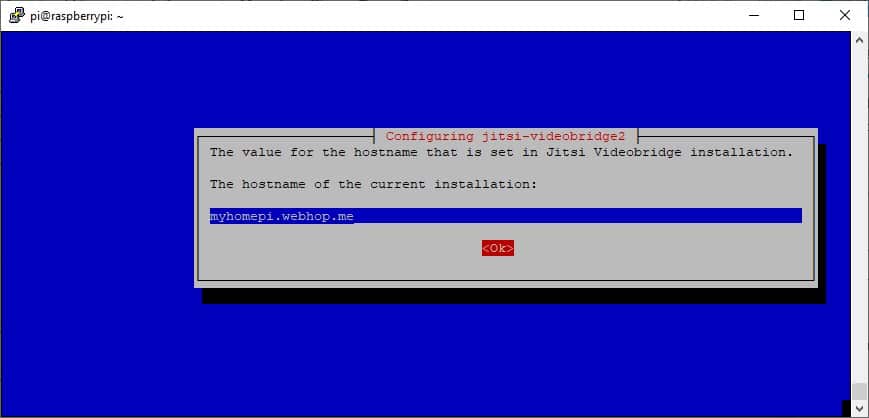
sudo apt install jitsi-meetThis setup will download all software needed and will require only 2 confirmations.
First dialog screen requests hostname where Jitsi will listen. Use your internet domain or your Raspberry PI’s IP address (if you are going to install without a domain name):
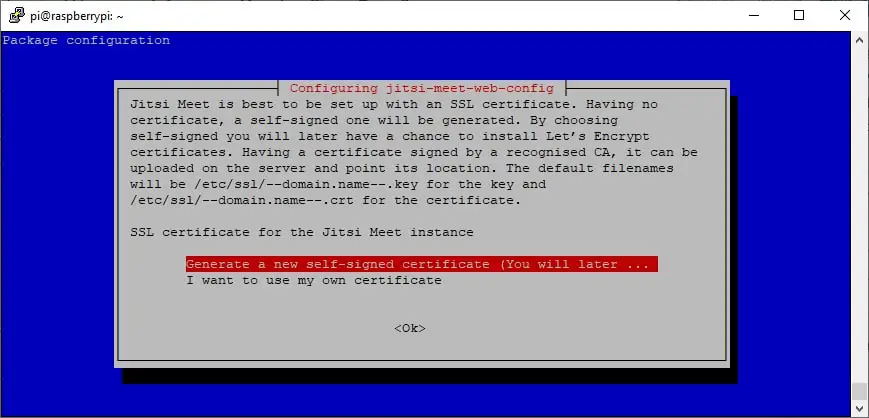
The second dialog screen will require if you already own a certificate to expose jitsi from https instead of an insecure http. Use first option, as we’ll install a certbot certificate in very next step:
When installation is finished, use following command to get your https certificate. Remember to answer with a valid email address (when requested) to make it working:
sudo /usr/share/jitsi-meet/scripts/install-letsencrypt-cert.shUse Jitsi Meet
You are now ready to connect from a client browser (maybe a smartphone or a computer) to your personal Jitsi meet server by using your domain address:
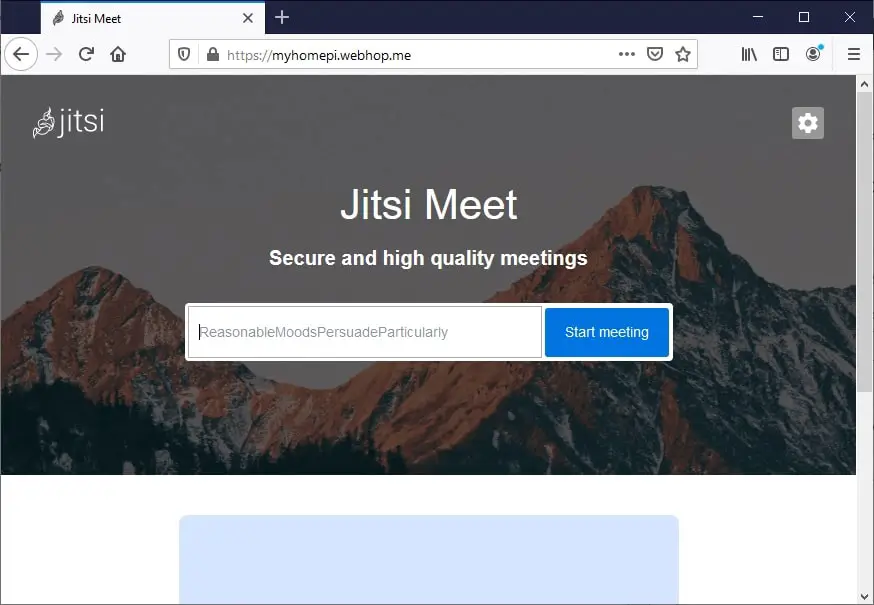
From here you can fill a name for your meeting in text box and click “start meeting button”. This will redirect to a meeting room that you can share with your friends by sending them the resulting room url.
Please note that in Jitsi community there is reported a known issue with Firefox browsers not having remote video/audio. Jitsi staff suggest to use Chrome browser instead.
Enjoy!
Common Issues/Errors
Last section of this tutorial regards some problems I had to fight in these days with Jitsi. Please note that these errors where all solved by using a 64-bit distribution instead of default 32-bit one.
Getting Certificates Failed
With 32-bit OS the install-letsencrypt-cert.sh script will fail with following error:
nginx: [emerg] "server_names_hash_bucket_size" directive is duplicate in /etc/nginx/sites-enabled/myhomepi.webhop.me.conf:1
Cleaning up challenges
nginx restart failed:
This failure can be passed by commenting “server_names_hash_bucket_size 64” in “/etc/nginx/sites-enabled/myhomepi.webhop.me.conf” (change myhomepi.webhop.me with your own domain name) and using classic let’s encrypt installation procedure for Nginx:
sudo apt install certbot python-certbot-nginx
sudo certbot --nginx
“Unfortunately something went wrong” Browser Error
Again, this is caused by 32-bit OS and moving to 64-bit distribution will solve. Some users with older Jitsi versions solved with following steps.
Check that 10000/UDP and 443/TCP port are correctly forwarded in your router.
Edit “sip-communicator.properties” file:
sudo nano /etc/jitsi/videobridge/sip-communicator.propertiesAppending following:
org.ice4j.ice.harvest.NAT_HARVESTER_LOCAL_ADDRESS=put here your local ip address
org.ice4j.ice.harvest.NAT_HARVESTER_PUBLIC_ADDRESS=put here your public ip address
Restart Jitsi services:
sudo systemctl restart prosody.service jicofo.service jitsi-videobridge2.service
Open source and Raspberry PI lover, writes tutorials for beginners since 2019. He's an ICT expert, with a strong experience in supporting medium to big companies and public administrations to manage their ICT infrastructures. He's supporting the Italian public administration in digital transformation projects.
![]()
![]()
![]()
![]()
![]()
![]()
![]()


