
Last Updated on 2nd August 2025 by peppe8o
This tutorial will show you how to create a power-on / shutdown button for Raspberry PI computer boards.
Due to their low cost, mini button switches are useful for many purposes. We have already analysed how they work (ref. Using mini Switch Button with Raspberry PI and Python) and a funny use case (ref. Reaction Game (v2) with Raspberry PI and Mini Button Switch).
One more way to use these buttons allows people to solve a practical need: powering on and shutting down their Raspberry PI. You know that powering off an RPI requires being logged in and following the procedure:
- For headless setups (Raspberry PI OS Lite), typing the “sudo shutdown -h” command
- For desktop setups (Raspberry PI OS Desktop), go to the main menù -> Shutdown -> Shutdown
Suddenly cutting the power supply without taking previous actions could result in file system corruption, and your Raspberry Pi may not boot the OS, forcing you to reinstall the OS and lose all files saved without a backup. With a power button, you will be able to securely shut down your Raspberry PI computer board from an external button, without the need to log in, also allowing us to power it on.
From the Raspberry PI 5 model B, the new models will include a power button, but many people may find it useful to create their own to adapt the Raspberry PI to a case or a project enclosure.
What We Need
As usual, I suggest adding from now to your favourite e-commerce shopping cart all the needed hardware, so that at the end you will be able to evaluate overall costs and decide if to continue with the project or remove them from the shopping cart. So, hardware will be only:
- Raspberry PI Computer Board (including proper power supply or using a smartphone micro USB charger with at least 3A)
- high speed micro SD card (at least 16 GB, at least class 10)
- Dupont wirings
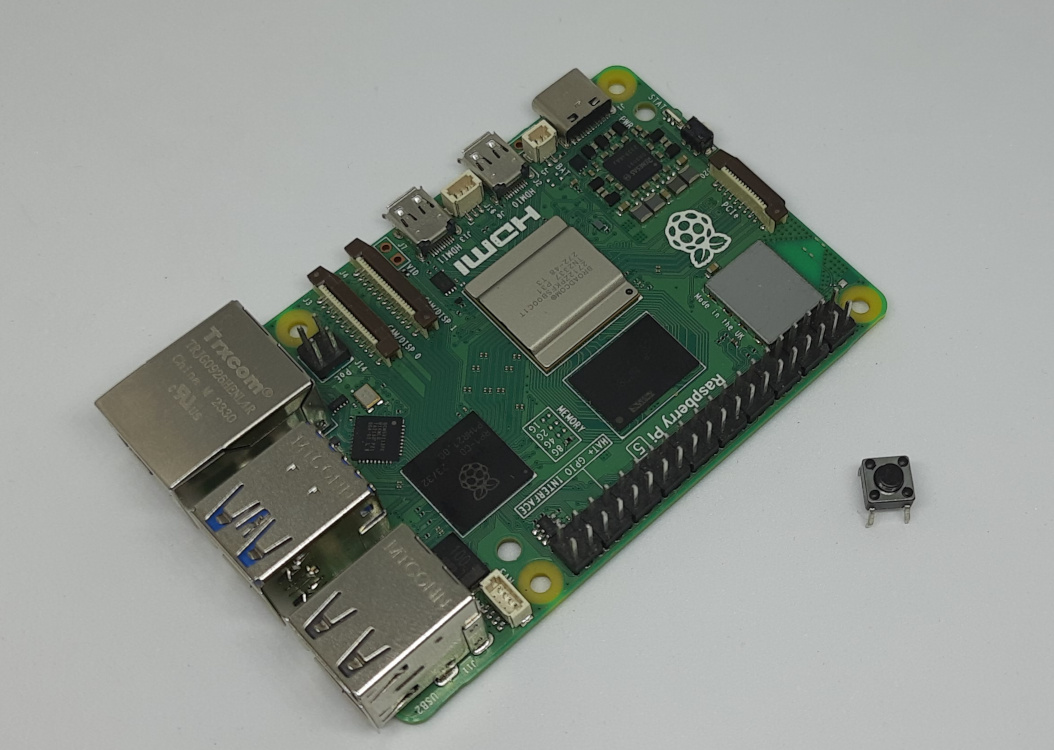
- Mini switch button
- (optional) breadboard

Step-by-Step Procedure for Raspberry PI 5
The Raspberry PI 5 (and, probably, the future models) already has its own, very small, power-on / shutdown button. It is located in the external part of the board, as detailed in the following picture:

By default, you can use it without any OS settings changes.
If you want to use your own switch button, you must use the 2 PINs near the USB-C port for your power supply:

These PINs are connected directly to the power-on / shutdown button of your Raspberry PI. By connecting these 2 PINs to a mini switch button, you will be able to use this button. The wiring schema follows:

At this point, people with Raspberry PI 5 can install the preferred Raspberry PI OS and use it as is. You can go to the following Python part if you’re interested in creating a shutdown button for Python programs.
Step-by-Step Procedure for Previous Raspberry PI computer boards
People with older Raspberry PI computer models don’t have a power-on / shutdown button for their Raspberry PI, and may need to create one to avoid unplugging the power cable and plugging it again every time to boot the board.
In this case, even if you are free to use any Raspberry PI GPIO PIN to shutdown your board, I suggest you use GPIO3 as it is the only PIN enabled to manage also the power-on part of the goal.
For Raspberry PI computer boards, the GPIO3 is a special port. The GPIO2 and GPIO3 PINs are the only ones having a hardware pull-up resistor (around 2KΩ), which pulls the value of these ports to 3.3V when they aren’t connected to any source. Moreover, the GPIO3 is the only GPIO PIN which can power on your computer board when triggered with a ground voltage.
The wiring diagram is straightforward to arrange for any computer board model, as it requires only two wires and a button. Please note that cables are connected to ground and GPIO 3 (according to the Raspberry PI pinout). The following schema provides a picture for both the Raspberry PI Zero and the more classic Raspberry PI model forms:

Please find below some detailed pictures with a Raspberry PI 4 model B:


Prepare the Operating System
The first step is installing the Raspberry PI OS Lite (I suggest the 64-bit version, for boards supporting it) to get a fast and light operating system (headless). If you need a desktop environment, you can also use the Raspberry PI OS Desktop, in this case working from its terminal app. Please find the differences between the 2 OS versions in my Raspberry PI OS Lite vs Desktop article.
For this test, I will use a headless installation. However, a Desktop installation also works by using the terminal.
Please make sure that your OS is up to date. From your terminal, use the following command:
sudo apt update -y && sudo apt full-upgrade -yEnable the Power-on / Shutdown Button for Raspberry PI (previous models)
In this case, we need to add a configuration line in the config.txt file of the Raspberry PI OS. From the terminal, please open the file for editing:
sudo nano /boot/firmware/config.txtAppend the following line at the end of the file:
dtoverlay=gpio-shutdownIf you use a different GPIO port, you can alternatively specify the port as follows (where, as an example, I use the GPIO21):
dtoverlay=gpio-shutdown,GPIO21Save and close the file. Please reboot your Raspberry PI to make this change run:
sudo reboot nowAfter the Raspberry PI boots, you can test the button both for shutting down the board and powering on it (the latter only if you use the GPIO3).
Shutdown Button with Python (all Computer Models)
If you need to control the shutdown button from a Python script, you can use the OS library to power off the board without the need to add the dtoverlay option in the config.txt file. Moreover, if you use GPIO3 with Raspberry PI 4 or older computer boards, the same button will also allow you to power on the board from the same button. The difference compared to the previous method is that you can decide when to give the user the shutdown feature inside your program.
You can easily get a copy of my shutdown script directly on your Raspberry PI with the following terminal command:
wget https://peppe8o.com/download/python/button/shutdown_button.pyThe following lines explain the script parts.
At the beginning, we import the required libraries. The GPIOZero library will give us the required object to manage the button, while the os library will allow us to send the shutdown command to the operating system:
from gpiozero import Button
import os
Then we initialise the button object according to the used GPIO pin:
button = Button(3)With this done, we can just wait for the button to be pressed. The wait_for_press() method will block the program flow until the trigger is received. Only after this trigger, the program continues to the “sudo systemctl poweroff” OS command.
The try statement only intercepts interrupts to correctly manage them:
try:
  button.wait_for_press()
  os.system("sudo systemctl poweroff")
The try statement is strictly connected to the following statement, which will intercept keyboard interrupt signals to exit from the program without executing the shutdown. This means that you can stop the script with a CTRL+C:
except KeyboardInterrupt:
  print('interrupted!')
Managing Poweroff Permissions
As you know, the poweroff/shutdown command in Raspberry PI requires root privileges (“sudo shutdown -h”).
If the script fails due to permissions issues because the sudo commands require you to insert your password, you must edit the file available in the /etc/sudoers.d/ folder referred to your user by adding a row similar to the following:
pi raspberrypi =NOPASSWD: /usr/bin/systemctl poweroffHere you must change the default “pi” user with your current user (which is available with the whoami terminal command, if you have a user different from the default “pi” user) and the default “raspberrypi” hostname with your one (which is available with the hostname terminal command).
Test the Shutdown Script
From here, you can test your shutdown script by using the following command:
python shutdown_button.pyThen push your button and the Raspberry PI will immediately start to power off.
What’s next
If you are interested in more Raspberry PI projects (both with Lite and Desktop OS), take a look at my Raspberry PI Tutorials.
Enjoy!

Open source and Raspberry PI lover, writes tutorials for beginners since 2019. He's an ICT expert, with a strong experience in supporting medium to big companies and public administrations to manage their ICT infrastructures. He's supporting the Italian public administration in digital transformation projects.
![]()
![]()
![]()
![]()
![]()
![]()
![]()


Sorry, not so good:
As soon as shutdownButton.service is active the CPU is running 99.7% on python3.
Thank you for your feedback. I prepared a modified version of shutdown_button code using python threading. You can get it with:
wget http://peppe8o.com/download/python/shutdown_button_2.pythen renaming in shutdown_button.py instead of old code.
This should fix CPU usage. Please, can you give me a feedback if it works for you?
Many thanks
I’m in a project of a retropi handheld and I’d like to put a safe shutdown/power on button on it to make things easier (and safer to myself XD). I’m learning stuff on the go, so I got some doubts, if you don’t bother helping me. I’m using this, https://othermod.com/raspberry-pi-soft-onoff-circuit/
Am I supposed to do all this circuit in the link or just that single button is enough to power on and off safely the RPI?
The referred circuit (described in second half of the page) seems a good solution as this manager the shutdown process beside powering off. But I don’t know how the writer manages the shutdown process (if with a python code like mine one or with the power wire from RPI config.txt or other ways). In other words, if you shut down and cut current on same time (from a single button), your RPI will not have enough time to shut down correctly the OS. Please ask the tutorial creator how he manages timing for both turn-off phases: shutdown and power off
Perfect!
many thanks
You’re welcome, Eoin!
Thank you for your feedback