

Last Updated on 22nd March 2026 by peppe8o
In this tutorial, I will show you how to connect and use a passive (tonal) buzzer with a Raspberry PI computer board.
A passive buzzer is a cheap and simple DC-powered element able to generate a multi-tone sound if triggered with low-voltage current. A passive buzzer differs from an active buzzer because an active one has an internal oscillator able to generate sound when simply activated with a continuous trigger. Passive buzzer, instead, needs a square wave trigger (PWM).
Raspberry PI computer boards can generate PWM (pulse-width modulation) via the GPIO PINs, so it will be easy to drive a buzzer by modulating the PWM signal from the board.
In this guide, I’ll show you how to use a passive buzzer with your Raspberry PI. I will use a Raspberry PI 5 model B, but this guide will also work with newer Raspberry PI boards.
What We Need
As usual, I suggest adding from now to your favourite e-commerce shopping cart all the needed hardware, so that at the end you will be able to evaluate overall costs and decide if to continue with the project or remove them from the shopping cart. So, hardware will be only:
- Raspberry PI Computer Board (including proper power supply or using a smartphone micro USB charger with at least 3A)
- high speed micro SD card (at least 16 GB, at least class 10)
- Dupont wirings
- Passive buzzer
- (optional) breadboard

Step-by-Step Procedure
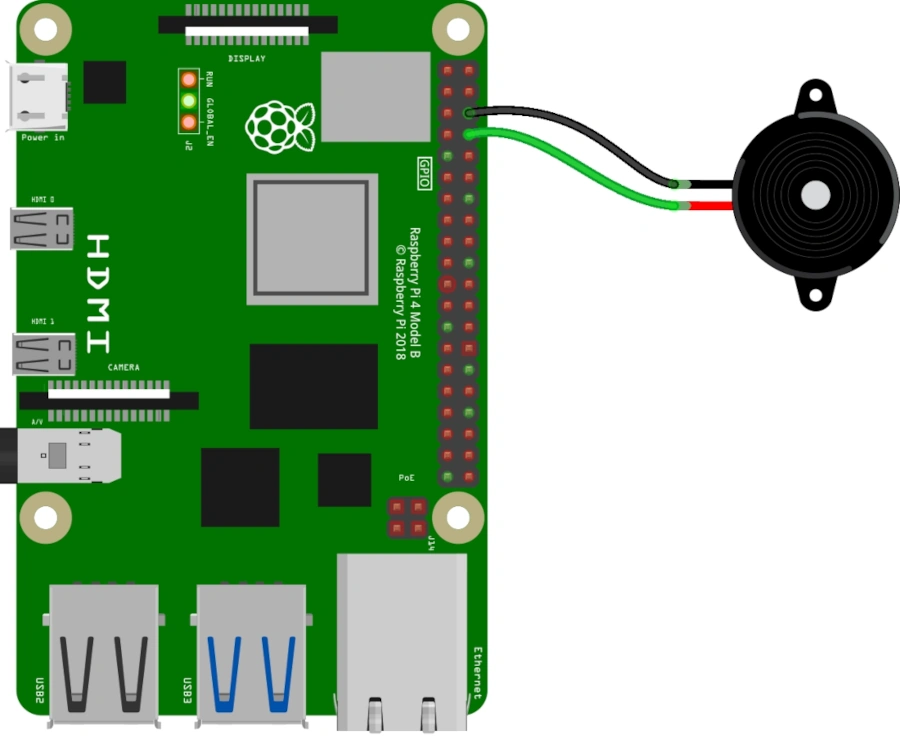
Wiring Diagram for Passive Buzzer with Raspberry PI
The following picture shows the wiring diagram, according to the Raspberry PI Pinout. Please be aware to identify and correctly connect the positive PIN of the buzzer to GPIO14. Buzzers are devices with a specific polarity! You should be able to identify the positive PIN with the seal coming on it when bought, as you’ll see in the following pictures.
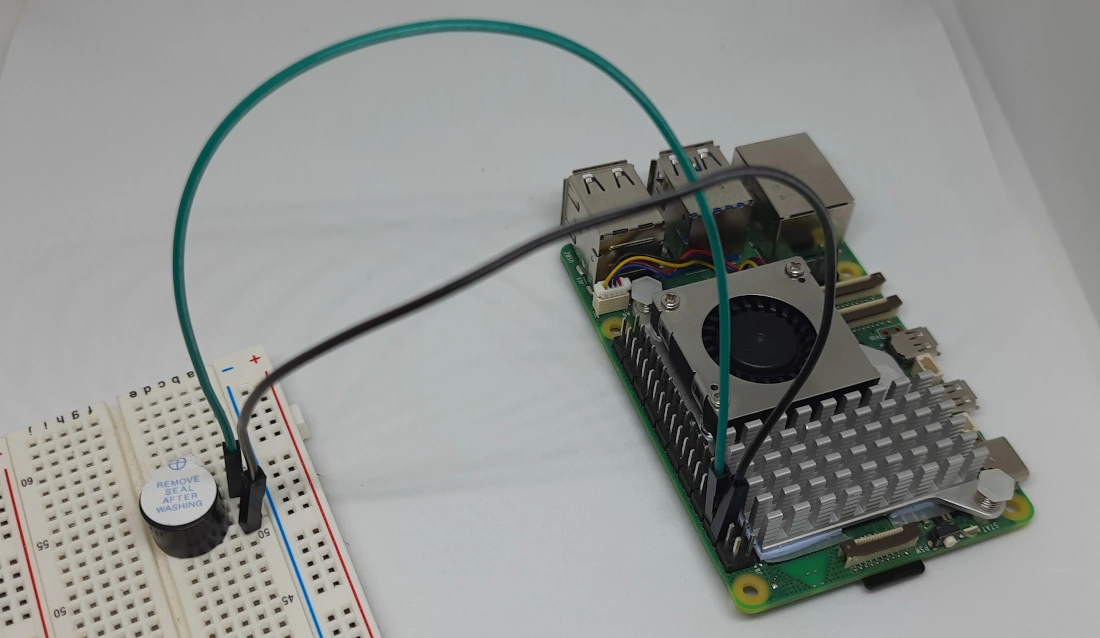
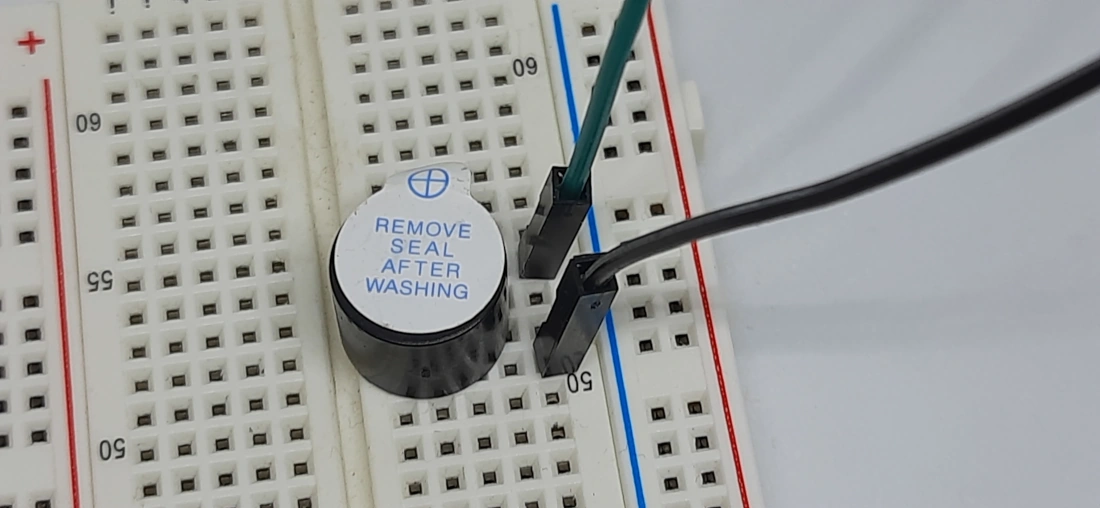
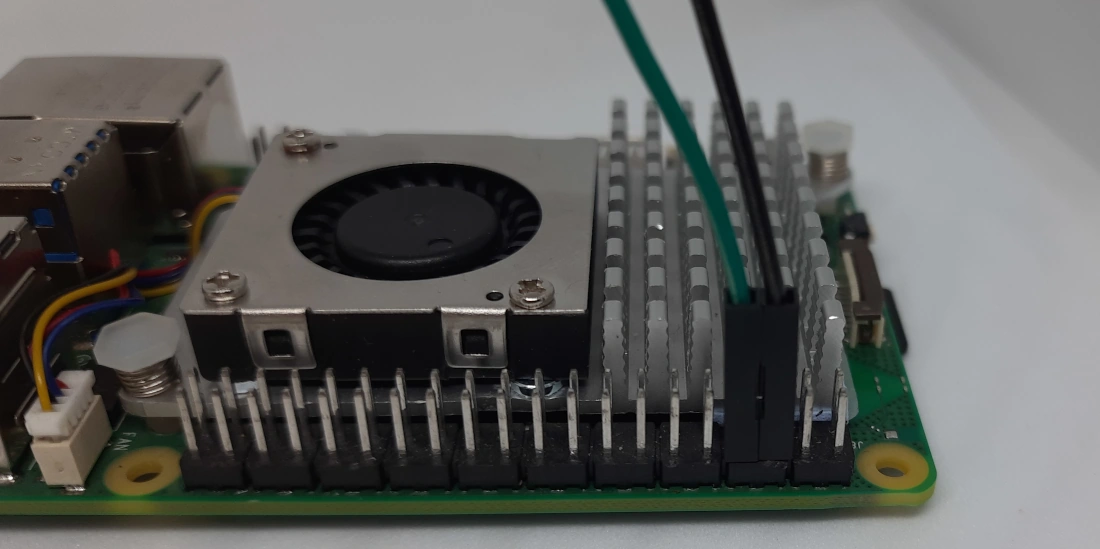
Please find below more details from the pictures of my home lab:
Prepare the Raspberry PI Operating System
The first step is installing the Raspberry PI OS Lite (I suggest the 64-bit version, for boards supporting it) to get a fast and light operating system (headless). If you need a desktop environment, you can also use the Raspberry PI OS Desktop, in this case working from its terminal app. Please find the differences between the 2 OS versions in my Raspberry PI OS Lite vs Desktop article.
For this test, I will use a headless installation. However, a Desktop installation also works by using the terminal.
Please make sure that your OS is up to date. From your terminal, use the following command:
sudo apt update -y && sudo apt full-upgrade -yGet the p8o Library
GPIOzero already has a “buzzer” device you can try to use. The reason why I wrote a new class in my library is that the one coming with the GPIOzero didn’t allow me to use a wide range of tones and had a very bad output with my Raspberry PI computer board. So I decided to write an easy-to-use library for this device.
You can get the p8o-pi library in your Raspberry PI from my GitHub repository with the following command:
wget https://raw.githubusercontent.com/peppe8o/p8o_pi/main/p8o_pi.pyThis will download a “p8o_pi.py” file, which must stay in the same folder as the file with the test example (that we’ll see below) or in the default Python path.
In this file, in the buzzer class section, you will find the following settings line:
self.duty_cycle = 0.1The duty cycle defines how much of the PWM wave must be in the HIGH state compared to a full cycle. This value goes between 0 (0%) and 1 (100%). The important thing to know is that it influences the sound you get from the buzzer. You can vary this value if you don’t feel good with the sound coming from your passive buzzer, even if I tried several values and this gave me the best result.
You can initialise a buzzer object with my library by using the following command:
buzzer(buzzer_PIN): where buzzer_PIN is a mandatory input expressing the GPIO number of the port connected to the positive PIN of your buzzer
The “buzzer” class has 2 basic methods:
play(tone, on_time*, off_time*): plays a tone. Tones can be expressed as a string representing a musical note, a frequency (floating), or a MIDI note (integer). It uses the Tone class from the GPIOzero (ref. https://gpiozero.readthedocs.io/en/stable/api_tones.html#tone). The on_time and off_time inputs are optional: with them, you can set how much time the buzzer must play the tone (on_time) and how much time of silence the buzzer must perform after playing the tone (off_time).stop(): stops the buzzer from playing any tone.
We’ll see how to use it in the following example.
Prepare a Python Test Script for Passive Buzzer
In this first test, you will see how to use the tones with the p8o_pi library. Please download it on your Raspberry PI with the following terminal command:
wget https://peppe8o.com/download/python/buzzer/buzzer_test_1.pyYou can run it in your Raspberry PI with the following command:
python buzzer_test_1.pyThe script description follows.
At the beginning, we import the required libraries. The sleep class from the time module is required only if we explicitly use it outside the play() method:
from p8o_pi import buzzer
from time import sleep
We can use a variable to store the PIN where the positive side of the buzzer is connected. Please change it from “14” to your Raspberry PI’s GPIO number if you used a different one. This is for code clarity:
buzzer_PIN = 14We can initialise a buzzer object with the following command:
b = buzzer(buzzer_PIN)The first usage example plays a “C3” note. The sleep after the play() command will make this note play for the time expressed in the sleep statement. The print line before it will just show you what test is performed:
print("Play C3")
b.play("C3")
sleep(0.5)
The second example will show you a way to avoid the sleep statement by using the on_time input variable. This way is the same as the previous, as the note will play for 0.5 seconds:
print("Play D3 with on_time")
b.play("D3", 0.5)
The following example will also add a pause of 0.5 seconds with the off_time input, after playing the note for 0.5 seconds:
print("Play E3 with on_time and off_time")
b.play("E3", 0.5, 1.5)
Please note that this play statement is the same as explicitly setting the variables as follows:
b.play("E3", on_time = 0.5, off_time = 1.5)In the following example, we’ll use a MIDI note instead of a musical note. Please note that MIDI notes go from 0 to 127. Again. you can optionally use the on_time and off_time:
print("Play MIDI tone 60")
b.play(60, 0.5)
The final play() example will use a frequency:
print("Play frequency 500")
b.play(500, 0.5)
At the end of this example script, we’ll stop (set off) the passive buzzer from the Raspberry PI:
b.stop()Comparing Musical Notes, Frequency, and MIDI Notes
The following table shows the correspondences between musical notes, frequency, and MIDI notes:
| Musical note | Frequency | MIDI note |
|---|---|---|
| A4 (LA) | 440 | 69 |
| A#4 (LAd) | 466 | 70 |
| B4 (SI) | 494 | 71 |
| C4 (DO) | 523 | 72 |
| C#4 (DOd) | 554 | 73 |
| D4 (RE) | 587 | 74 |
| D#4 (REd) | 622 | 75 |
| E4 (MI) | 659 | 76 |
| F4 (FA) | 698 | 77 |
| F#4 (FAd) | 740 | 78 |
| G4 (SOL) | 784 | 79 |
| G#4 (SOLd) | 831 | 80 |
Bonus Track
As a bonus, please try downloading the following script:
wget https://peppe8o.com/download/python/buzzer/buzzer_test_2.pyRun it with the following command:
python buzzer_test_2.pyGuess it and write the title in the comments area!
Moreover, if you want to share your track with the readers of this blog, please send it to me via email at giuseppe@peppe8o.com.
What’s next
If you are interested in more Raspberry PI projects (both with Lite and Desktop OS), take a look at my Raspberry PI Tutorials.
Enjoy!

Open source and Raspberry PI lover, writes tutorials for beginners since 2019. He's an ICT expert, with a strong experience in supporting medium to big companies and public administrations to manage their ICT infrastructures. He's supporting the Italian public administration in digital transformation projects.
![]()
![]()
![]()
![]()
![]()
![]()
![]()


Thank you very much – The post was worked very well for me.
There is a small error in the documentation: the notes table should read
Note Frequency
A (LA) 440
B (SI) 494
C (DO) 523
D (RE) 587
E (MI) 659
F (FA) 698
G (SOL) 784
Thank you Prof. Cassinis,
notes table updated.