
Last Updated on 2nd September 2023 by peppe8o
In this tutorial, I’m going to show you how to use a Raspberry PI board to create an FM Radio transmitter broadcasting on air.
Up to a few years ago, FM radios were the most common way to listen your favourite music. Internet changed the way we interface music, but radio are still alive and well in world. An old but interesting project is using Raspberry PI as FM radio transmitter to broadcast media on the air
IMPORTANT NOTE: trasmitting in FM may be subject to your Country rules. Before using this project, please verify if allowed by your regional laws.
How FM Radio Works
Differently from AM (Amplitude Modulation) broadcasting, which modify radio wave amplitude according to data signal, FM broadcasting uses wave frequency changes to carry data from station to users.
An good exemplification picture is shown in Wikipedia FM Broadcasting page:
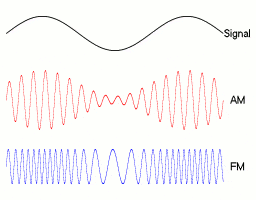
This png simplify what FM transmission is. Current FM radio transmitter uses a nominal carrier wave, which “names” radio frequency. Beside this main frequency, a wider spectrum is managed to drive several data channels. All the baseband transmission signal is moduled to run around carrier wave:
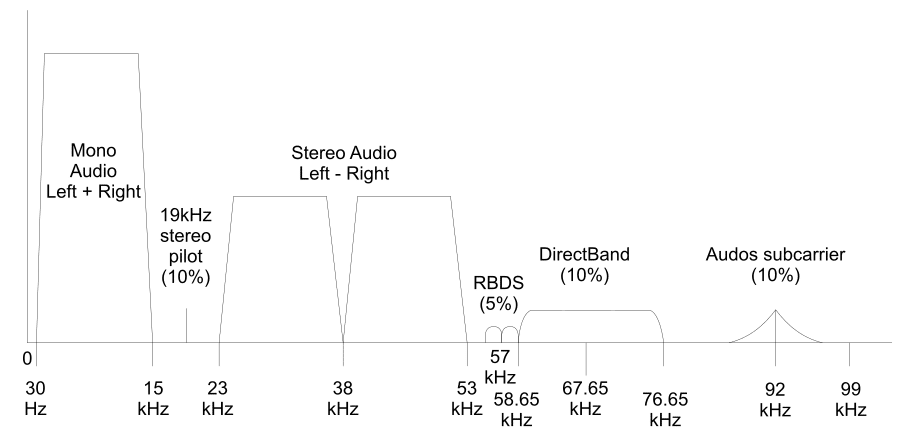
Looking at baseband overall width you can imagine the reason why FM radio channels are usually divided at least by 0,10 MHz (which equals to 100 KHz) when a county uses full baseband to deliver high quality sound.
In this tutorial I’m going to use a Raspberry PI Zero W board. However, these steps will work with any Raspberry PI board.
What We Need
As usual, I suggest adding from now to your favourite e-commerce shopping cart all the needed hardware, so that at the end you will be able to evaluate overall costs and decide if to continue with the project or remove them from the shopping cart. So, hardware will be only:
- Raspberry PI Zero W (including proper power supply or using a smartphone micro usb charger with at least 3A) or newer Raspberry PI Board
- high speed micro SD card (at least 16 GB, at least class 10)
You will also need a common FM radio receiver (many common smartphones are capable to).
Check hardware prices with following links:


Step-by-Step Procedure
Wiring Diagram
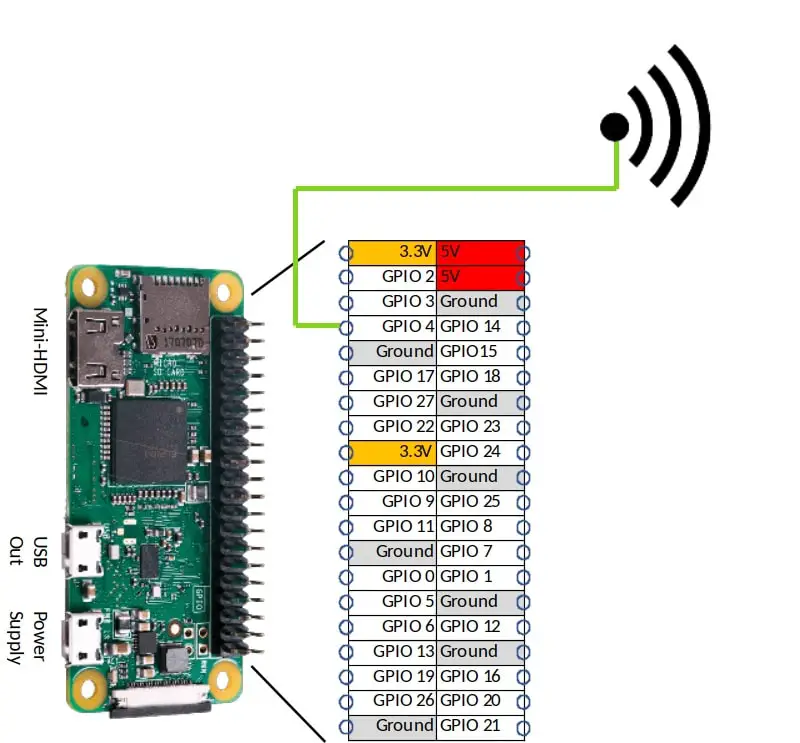
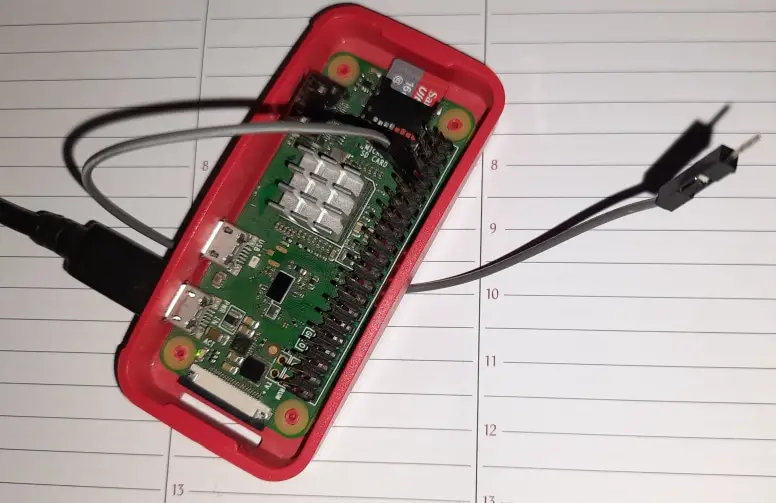
To be honest, I’ve run this project without any antenna and without any wire. This permitted me to receive my signal a few meters near my Raspberry PI, but I didn’t test what distance it was capable to reach. However, common practice for this project requires to connect a conductive material to GPIO 4, which will work as transmitting antenna. The optimal lenght whould be 75 cm (as antenna performances strictly connect average frequency and antenna leght), but many users have also adopted a simple dupont wire. Connection schema whould be following:
And overall picture:
Prepare Operating System and Download PiFM
Start installing Raspberry PI OS Lite (to get a fast, headless operating system) or Raspberry PI OS Desktop (in this case using its internal terminal).
Make your OS updated. From terminal, use following command:
sudo apt update -y && sudo apt upgrade -yFrom terminal, create a new folder which will store code:
mkdir fmRadio
cd fmRadio
Download code package:
wget http://omattos.com/pifm.tar.gzExtract from compressed file:
tar -zxvf pifm.tar.gzResulting files can be verified with Linux list command:
pi@raspberrypi:~/fmRadio $ ls -la
total 12188
drwxr-xr-x 2 pi pi    4096 Jan 18 16:01 .
drwxr-xr-x 6 pi pi    4096 Jan 20 07:28 ..
-rw-r--r-- 1 pi pi     123 Dec  9  2012 PiFm.py
-rw-r--r-- 1 pi pi     302 Dec  9  2012 PiFm.pyc
-rw-r--r-- 1 pi pi  423596 Jan  8  2014 left_right.wav
-rwxr-xr-x 1 pi pi   18840 Jan  8  2014 pifm
-rw-r--r-- 1 pi pi   21256 Jan  8  2014 pifm.c
-rw-r--r-- 1 pi pi 5813432 Jan  8  2014 pifm.tar.gz
-rw-r--r-- 1 pi pi 6174044 Dec 10  2012 sound.wav
As you can see, this package already includes 2 audio file to test your settings (left_right.wav and sound.wav).
Go On-Air
Before starting transmission, take a common FM radio receiver and check a frequency range free from transmitting stations (or at least a frequency where your radio doesn’t reproduce anything). Let’s suppose that you find 102.2 fm is free.
This funny package, whose credits go to ICRobotics, runs its base configuration with following terminal command:
sudo ./pifm left_right.wav 102.2 22050 stereoFrom your FM radio receiver you will start to hear this example audio file.
A few explaination about this command:
- left_right.wav – is the file you are going to transmit. If run directly, pifm uses “.wav” files. In next part we’ll see how to trasmit other files with pipe operator
- 102.2 – is the transmission frequency. It should work (in transmission) between 1 and 250 (MHz), even if common fm radio receivers work only between 88 and 108 MHz
- 22050 – represents sampling frequecy (in Hz). Audio signal needs to be transformed from analogic to digital before transmission. This is made by taking some samples (at a defined frequency) from original analogic file and thansmitting these samples instead of original one. Common speech frequency band starts from 11025 Hz, a common audio CD uses 44100 Hz, while 22050 Hz can be a good compromise between audio quality and required capabilities.
- stereo – final option tells piFM to use stereo sound
Transmitting Other Audio Media
At this point, you may need to send on air different media files than wav (for example mp3) or your microphone audio. For these purposes we can use the linux pipe (“|”) operator, which uses following logic:
command 1 | command 2In above example, output from command 1 is sent as input to command 2.
Trasmitting an mp3 requires software able to transform an mp3 file to into a PCM data stream. This is the perfect job for ffmpeg…
sudo apt install ffmpegGet your mp3 file. If not available, you can also use an example from github:
wget https://file-examples-com.github.io/uploads/2017/11/file_example_MP3_2MG.mp3And finally transmit your mp3 file:
ffmpeg -i file_example_MP3_2MG.mp3 -f s16le -ar 22.05k -ac 1 - | sudo ./pifm - 102.2In this command, ffmpeg uses as input (-i) our mp3 file, forces output format (-f) to 16 bit PCM (s16le), sets output audio sampling frequency (-ar) to 22050 Hz (22.05k) with a single audio channel (-ac 1). With the “-” symol, this output is passed to following command, already explained.
Similarly, also an USB microphone audio should be transmitted with arecord command (even if I didn’t yet had the opportunity to test this last command):
arecord -d0 -c2 -f S16_LE -r 22050 -twav -D copy | sudo ./pifm - 102.2Enjoy!

Open source and Raspberry PI lover, writes tutorials for beginners since 2019. He's an ICT expert, with a strong experience in supporting medium to big companies and public administrations to manage their ICT infrastructures. He's supporting the Italian public administration in digital transformation projects.
![]()
![]()
![]()
![]()
![]()
![]()
![]()


