
Last Updated on 2nd September 2023 by peppe8o
This tutorial will show you how to use Mosquitto (MQTT) with Raspberry PI Pico W with MicroPython.
Raspberry PI Pico W brings connectivity to your projects. Mosquitto is one of the most reliable, simple and fast communications for IoT projects. For this reason, MQTT and Raspberry PI Pico W will surely give you great flexibility for your Smart Things projects.
What is Mosquitto
MQTT is a messaging protocol for the Internet of Things (IoT). It is designed to use minimal network bandwidth and a reduced code for transporting messages from/to IoT devices.
MQTT is used in a wide variety of industries, such as automotive, manufacturing, telecommunications, oil and gas, etc.
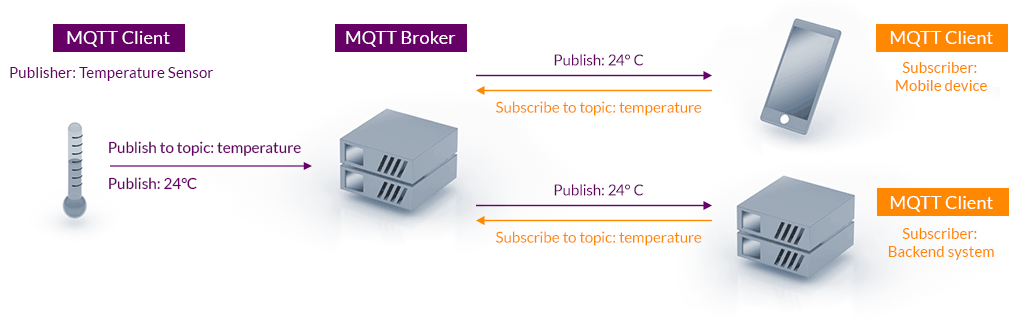
The Mosquitto architecture includes 3 main actors.
- The MQTT Publisher Client publishes data, usually collected from sensors. It is the device(s) where row data are generated. You can think of these devices as social media stars who continuously publish their data stream to whoever wants to read.
- The MQTT Subscriber Client is where data are visualized. In the new generation wording, they are something like social followers who “subscribe” to a specific topic in order to get notified of every new data on that topic
- The MQTT Broker is an intermediate service that makes it possible for subscribers to get data and for publishers to send their ones. The IoT publisher devices are usually not so much “smart”: they usually have a very simple logic in order to make their hardware as low cost as possible. So, collecting and presenting data is demanded to the MQTT Broker, which also manages the subscriber’s access and permissions (where required).
The following picture gives a visual example of MQTT Publish / Subscribe Architecture:
Mosquitto (MQTT) uses standard ports: TCP/IP port 1883 is reserved with IANA for use with MQTT. TCP/IP port 8883 is also registered, for using MQTT over SSL.
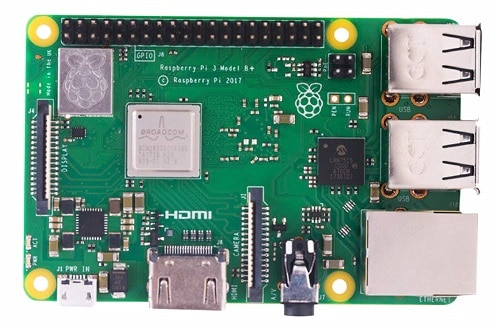
In order to test MQTT, we’ll need to create an MQTT Broker, besides the Raspberry PI Pico W. In this tutorial, I will use a Raspberry PI computer board (Raspberry PI 3 Model B) and I will show also how to arrange a very basic configuration for the broker. In our tests, based on the Raspberry PI Pico W function, our computer board will perform the complementary functions:
| Test | RPI Pico W function | RPI computer board functions |
|---|---|---|
| Send MQTT messages from Pico | Publisher | Broker, Subscriber |
| Read MQTT messages on Pico | Subscriber | Broker, Publisher |
What We Need
As usual, I suggest adding from now to your favourite e-commerce shopping cart all the needed hardware, so that at the end you will be able to evaluate overall costs and decide if to continue with the project or remove them from the shopping cart. So, hardware will be only:
- A common computer (maybe with Windows, Linux or Mac). It can also be a Raspberry PI Computer board
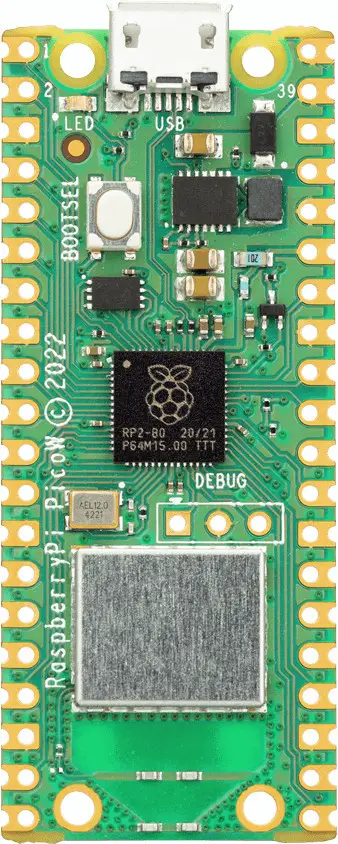
- Raspberry PI Pico W microcontroller (with a common micro USB cable)
Step-by-Step Procedure
In the following, just to try keeping the tests clear, I will use
- the yellow background to identify code/commands for Raspberry PI Computer Board (or your Linux computer)
- the grey background to identify code/commands for Raspberry PI Pico W (Thonny shell)
Prepare MQTT broker with Raspberry PI Computer
Please start installing the OS on your Raspberry PI computer board.
I’ll use Raspberry PI OS Lite, in order to have a fast and headless OS.
If not already done, please make your OS up to date. From the terminal, use the following command:
sudo apt update -y && sudo apt upgrade -yYou can now install Mosquitto with the command:
sudo apt install mosquitto mosquitto-clients -yCheck that Mosquitto is correctly running:
pi@raspberrypi:~ $ sudo systemctl status mosquitto.service
● mosquitto.service - Mosquitto MQTT Broker
     Loaded: loaded (/lib/systemd/system/mosquitto.service; enabled; vendor preset: enabled)
     Active: active (running) since Wed 2022-07-27 17:17:06 CEST; 1 day 4h ago
       Docs: man:mosquitto.conf(5)
             man:mosquitto(8)
    Process: 474 ExecStartPre=/bin/mkdir -m 740 -p /var/log/mosquitto (code=exited, status=0/SUCCESS)
    Process: 483 ExecStartPre=/bin/chown mosquitto /var/log/mosquitto (code=exited, status=0/SUCCESS)
    Process: 486 ExecStartPre=/bin/mkdir -m 740 -p /run/mosquitto (code=exited, status=0/SUCCESS)
    Process: 487 ExecStartPre=/bin/chown mosquitto /run/mosquitto (code=exited, status=0/SUCCESS)
   Main PID: 489 (mosquitto)
      Tasks: 1 (limit: 780)
        CPU: 1min 15.183s
     CGroup: /system.slice/mosquitto.service
             └─489 /usr/sbin/mosquitto -c /etc/mosquitto/mosquitto.conf

Jul 27 17:17:06 raspberrypi systemd[1]: Starting Mosquitto MQTT Broker...
Jul 27 17:17:06 raspberrypi systemd[1]: Started Mosquitto MQTT Broker.
In order to get safer communication, we can set the user and password to use to add a bit of security. For this example, I will set a user “pico” with the password “picopassword”, but change it with your favourite one. Issue the following command (change “pico” with your user name):
sudo mosquitto_passwd -c /etc/mosquitto/credentials picoThe process will automatically request a password (“picopassword” for my example, but use your one). The “/etc/mosquitto/credentials” file will be generated, including your password encrypted.
At this moment, a password has been generated, but it is still not used by our MQTT broker. You need to set it in your mosquitto configuration. Open it to edit:
sudo nano /etc/mosquitto/mosquitto.confAppend the following lines at the end:
allow_anonymous false
password_file /etc/mosquitto/credentials
listener 1883
Finally, please restart the Mosquitto service:
sudo systemctl restart mosquitto.servicePrepare Raspberry PI Pico W for MQTT
From MQTT broker side, the job has been done. We can now move to Raspberry PI Pico W.
Start preparing your Raspberry PI Pico W firmware. Please note that the official MicroPython firmware could still not support the RPI Pico W connection. For this reason, please refer to my Getting Started with WiFi on Raspberry PI Pico W and MicroPython tutorial.
Once the WiFi connection works, you must save in your Raspberry PI Pico W storage the 2 following external modules:
The first one has already been used in the previously cited Getting Started with WiFi on Raspberry PI Pico W and MicroPython tutorial and manages the WiFi connection.
The umqttsimple.py has already been used with the WIZnet ethernet HAT and works also with the RPI Pico W, making simpler the MQTT communication process. My Smart Farm with Raspberry PI, RPI Pico and WIZnet Ethernet Hat tutorial is another use case for this module.
Use Raspberry PI Pico as MQTT Publisher
In this test, our Raspberry PI Pico W will work as Publisher, sending the MQTT messages. Our Raspberry PI computer board will perform both the MQTT broker and subscriber functions.
Please get and save in your Raspberry PI Pico W also the following MicroPython script:
Here is the code that you can edit to adapt to your projects. The following will give you a brief code explanation.
Firstly, we import the required modules:
import netman
import time
from umqttsimple import MQTTClient
from machine import Pin
We set the WiFi country, SSID and password (change them with your home ones) and we start the WiFi connection:
country = 'IT'
ssid = 'yourWiFiSSID'
password = 'yourWiFiPassword'

wifi_connection = netman.connectWiFi(ssid,password,country)
The following variables will set the connection with your MQTT broker. In my case, my Raspberry PI 3 Model B has 192.168.1.91 as IP address, change it with your MQTT server one. The client_id can be set at your choice, some MQTT services (like ThingsBoard) allow you to use it to better define your IoT sensors. The user_t and password_t must be the same as that set in the previous chapter when securing the MQTT broker communication in Raspberry PI 3 Model B. The topic_pub is the topic on which we’ll publish our MQTT messages:
mqtt_server = '192.168.1.91'
client_id = 'PicoW'
user_t = 'pico'
password_t = 'picopassword'
topic_pub = 'hello'
The following part just manages the MQTT connection with the broker:
last_message = 0
message_interval = 5
counter = 0

def mqtt_connect():
    client = MQTTClient(client_id, mqtt_server, user=user_t, password=password_t, keepalive=60)
    client.connect()
    print('Connected to %s MQTT Broker'%(mqtt_server))
    return client

def reconnect():
    print('Failed to connected to MQTT Broker. Reconnecting...')
    time.sleep(5)
    machine.reset()
Finally, the main loop.
The first part manages the MQTT connection with the broker:
while True:
    try:
        client = mqtt_connect()
    except OSError as e:
        reconnect()
Once the MQTT connection is established, publishing an MQTT message on a specific topic is really simple with the use of client.publish() statement. The remaining code just manages exceptions and disconnects the client (for sure, I can make the while loops better…):
    while True:
        try:
            client.publish(topic_pub, msg='Hello from Pico!')
            print('published')
            time.sleep(3)
        except:
            reconnect()
            pass
    client.disconnect()
Run the MQTT publishing test
The MQTT broker is always running on Raspberry PI 3 Model B as it is a daemonized service. We have only to start the Mosquitto subscriber, in order to check if messages are delivered, with the following terminal command from our RPI computer board (please use your Mosquitto user/password instead of the example ones):
pi@raspberrypi:~ $ mosquitto_sub -d -t hello -u pico -P picopasswordNow you can also run (on Raspberry PI Pico W side) the mttq_picow.py code from Thonny. It will start trying to establish the WiFi connection, the MQTT connection and then sending the moquitto messages (in case of errors, please double check user/password and IP):
>>> %Run -c $EDITOR_CONTENT
waiting for connection...
waiting for connection...
waiting for connection...
waiting for connection...
connected
ip = 192.168.1.42
Connected to 192.168.1.91 MQTT Broker
published
published
published
At the same time, on the Raspberry PI computer board, you will have something like the following, which states that the messages are correctly delivered:
pi@raspberrypi:~ $ mosquitto_sub -d -t hello -u pico -P picopassword
Client (null) sending CONNECT
Client (null) received CONNACK (0)
Client (null) sending SUBSCRIBE (Mid: 1, Topic: hello, QoS: 0, Options: 0x00)
Client (null) received SUBACK
Subscribed (mid: 1): 0
Client (null) received PUBLISH (d0, q0, r0, m0, 'hello', ... (16 bytes))
Hello from Pico!
Client (null) received PUBLISH (d0, q0, r0, m0, 'hello', ... (16 bytes))
Hello from Pico!
Client (null) received PUBLISH (d0, q0, r0, m0, 'hello', ... (16 bytes))
Hello from Pico!
Use Raspberry PI Pico as MQTT Subscriber
In this test, our Raspberry PI Pico W will work as subscriber, reading the MQTT messages. Our Raspberry PI computer board will perform both the MQTT broker and publisher functions. So we’ll publish on Raspberry PI computer board some messages and we’ll read the from the Pico console.
Please get and save in your Raspberry PI Pico W also the following MicroPython script, still keeping the netman.py and umqttsimple.py in your Raspberry PI Pico root:
Here I will explain only what changes compared to the previous script.
You will find a new variable:
keep_alive=30This become necessary as I noted that after a while without messages exchange the Pico was crashing. This variable sets the number of seconds after which a keep alive message should be sent from the pico to the MQTT broker.
The following function will define the actions to perform when the Raspberry PI Pico gets a new message from the MQTT broker (which will already bring the topic and the message). In my case I’m going just to print the 2 values:
def new_message_callback(topic, msg):
    topic , msg=topic.decode('ascii') , msg.decode('ascii')
    print("Topic: "+topic+" | Message: "+msg)
You can use this callback function, for example, to execute specific MicroPython tasks based on the message content.
Besides the mqtt_connect() command, the try statement now includes a set_callback(). It sets the actions to execute when a message is received, so referring to our “new_message_callback” custom function above described. Then, we proceed with the topic subscription:
try:
    client = mqtt_connect()
    client.set_callback(new_message_callback)
    client.subscribe(topic_pub.encode('utf-8'))
In the main loop, the check_msg() function will constantly look for new messages. At each new message arriving, the callback function previously defined is executed. After this, a time.sleep() is required:
        client.check_msg()
        time.sleep(0.001)
Finally, still in the main loop, the following if statement will perform the keep alive monitoring and message sending. The message text can be whatever you prefer, as the important thing is just that the connection is kept active:
        if (time.time() - last_message) > keep_alive:
              client.publish(topic_pub, "Keep alive message")
              last_message = time.time()
Run the MQTT subscribing test
Now you can run on Raspberry PI Pico W the mttq_picow_subscriber.py code from Thonny. It will start trying to establish the WiFi connection, the MQTT connection and then will wait for messages. At the defined keep_alive time, we’ll see the related message as in this case the Pico will read (as subscriber) what it just sent to the broker (as publisher):
>>> %Run -c $EDITOR_CONTENT
connected
ip = 192.168.1.42
Connected to 192.168.1.91 MQTT Broker
Topic: hello | Message: Keep alive message
Topic: hello | Message: Keep alive message
Again, the MQTT broker is always running on the Raspberry PI computer board as it is a daemonized service, so no commands are required for the broker. This time we’ll need to perform a Mosquitto publishing, with the following terminal command from our RPI computer board, that will publish the message “Hello World!”:
pi@raspberrypi:~ $ mosquitto_pub -u pico -P picopassword -t 'hello' -m 'Hello World!'At the same time, looking at the Thonny shell, you will see the message delivered:
>>> %Run -c $EDITOR_CONTENT
connected
ip = 192.168.1.42
Connected to 192.168.1.91 MQTT Broker
Topic: hello | Message: Keep alive message
Topic: hello | Message: Keep alive message
Topic: hello | Message: Hello World!
What’s Next
Interested in more cool Raspberry PI Pico guides? Take a look at my Raspberry PI Pico tutorials for useful and funny projects!
Enjoy!

Open source and Raspberry PI lover, writes tutorials for beginners since 2019. He's an ICT expert, with a strong experience in supporting medium to big companies and public administrations to manage their ICT infrastructures. He's supporting the Italian public administration in digital transformation projects.
![]()
![]()
![]()
![]()
![]()
![]()
![]()


Great tutorial thanks!
Thank you for your feedback, Stefano!
Shouldn’t the code
while True:
try:
client = mqtt_connect()
except OSError as e:
reconnect()
be change to the follow, so after in connects it goes on?
while True:
try:
client = mqtt_connect()
break()
except OSError as e:
reconnect()
Hi. I have the latest version of mosquitto (2.0.15) and I can’t connect to the mosquitto broker from my rpi w.
Failed to connected to MQTT Broker. Reconnecting…
but if I make a test from my desktop using a mqtt client I can publish the messsage to the topic. any version compatibility problem maybe?
Hi,
I don’t think that the problem can reside on MTTQ version. I assume that you verified your RPI Pico W connection to the same LAN as the server (if you are at home it should be ok), so double check the user and password. Please let me know
Hi,
i searched for a Raspi Pico Wifi MQTT broker but unfortunately this broker is a Rasp 3 – only the Publisher is a Pico.
How about using the pico as the broker?
I dont want to spend 99 Bucks for an MQTT broker.
Hi Henry,
I can understand the current problems in finding a Raspberry PI computer board at an honest price… Anyway, you have 2 options. You can install a free MQTT in your personal computer (the one with Thonny) or you can use a free online MQTT broker service
Hello, thank you for the tutorial. Both the raspberry Pi 3 and Raspberry Pi pico and it keeps saying that it failed to connect to MQTT broker both are connected to the same wireless network, and I put the right IP address in the script could there be another thing i can try to get this to work?
Also just to add I keep getting these messages on the Pi 3:
Client (null) sending PINGREQ
Client (null) received PINGRESP
Hi Randa,
I suppose that the 2 boards can ping each other with no problems (a ping from RPI 3 to RPI Pico gives you enough info in a flat environment like a home one).
It seems to me a password issue. In some cases (I don’t know if this is your one), I suggest to avoid the minus char in password as when copied and pasted from MS Office it can give automatically the horizontal bar that has different value.
Please re-check it.
Moreover, please take a look at your “sudo systemctl status mosquitto.service”, that could give more info.
If we have no luck with these tests, you should enable the mosquitto broker logs on RPI 3 and check if there are some warnings or errors
This is a great guide. Thank you.
Can you tell me how I can send a message from the pi4 running the broker to the pico w. So getting the Pico W to be the subscriber instead of the publisher.
Hi David,
thank you for your feedback. Your question is becoming a common need. Or, said from a different perspective, many users need to get a backward MQTT communication from the MQTT server to the Raspberry PI Pico (publisher). Based on what I currently know, the Raspberry PI Pico can’t run an MQTT broker service but maybe it could work as subscriber… I’ll try to find something in this direction.
David, I just finished publishing an update on this tutorial with a section including the code to use the Raspberry PI Pico as MQTT subscriber, so reading messages from the broker. A feedback would be appreciated!
Thanks for this in depth explanation . I am about to buy a second and/or third pico W to develope a solution.
My – older – parents are used to use wood to heat their house but they are used to over heat the oven by throwing in too many or too big logs.
My idea is to give them a pico w with a display that shows them the temperature figures of the connected warm water pipes that run throught the oven, I mean the circulation of water temp. in and out of the oven into the heating system.
If the temperatures are quite high and close to each others it means that there is no demand for more heat or wood to burn like 60°C out and 59°C in.
If that would be a 50°C out figure and a 41°C in this would mean that a lot of heat is used in the rooms and it could be beneficial to add another log. They have reduced the oil consumption by 80% so far but I guess by overheating or over feeding the oven with too much wood.
My question would be like such of many others how to build a pico w temperature sensor (and if multiple can be used to show all room temperatures) and a pico w with OLED as a message / status display.
Beyond that how can that first temp. sensor transmitting Pico W be also used to transmitt further temp sensor data like for 2 at least in my case cause the pipes (in and out) are running so close to each other (10 cm) that it should be easy to glue such temp sensors to the pipes comming together in 1 pico W MQTT publisher.
I guess a lot would learn even more from such an example especially nowadays at least in europe where energy prices are sky rocketing and such a tool would help a lot to help people how to heat more efficiently cause above 60°C it does not make sense to throw in another log into the ofen cause only the exhaust gas temperature will increase.
And in this case my examples could be a great show case how to really benefit from that.
Just to let you know: I have already purchased a 2 sensor fridge temp sensor system with display. Works somehow cause the sensors are in a huge case powered by 2 aa batteries and far away from the pipe that the display shows far lower temperatures than the oven thermostats inside the pipes.
Final disadavantage of my “bought product” is the poor readible display, where the PicoW with OLED offers a better choice especially for older people that need bigger fonts to read them easily.
Yes, lot of points, but I guess that might fit pretty well to this first introduction as a real world use case cause everyone has a heating system and a pipe in / out temperature that might be usefull for a lot of people especially with mqtt and homeassistant / smarthome.
In case you have further questions or want some pictures of the current situation and the poor solution of the bought solution do not hesitate to write a mail. I will try to reply soon.
Hello,
I followed all the steps as you said, but I could not establish a connection between Pico W and Raspberry Pi 4. The publisher code in Pico W does not give any errors. I checked the passwords and IP address in the code many times. Also, when I type the command sudo systemctl status mosquitto.service, I see that it is active. Can you help me?
Hi. Are you able to ping your RPI Pico W from the Raspberry PI 4?
No I can’t
So, the problem is that at least one between your Raspberry PI Pico W and your Raspberry PI 4 model B isn’t connected to WiFi. The most probable is the RPI Pico. For this reason, please recheck your WiFi settings (SSID name and WiFi Password). Also check that your router hasn’t any kind of mac address filtering or blocking