
Last Updated on 30th January 2026 by peppe8o
This tutorial will show you how to install and use Playwright on a Raspberry PI computer board, enabling you to automate your browser tasks such as checking prices from your favourite online stores, monitoring web info, checking sensor values from the producer’s web app, or even managing your home router.
About Playwright
Playwright is a modern browser automation framework created for reliable end‑to‑end testing and web scripting.
It lets you control Chromium, Firefox and WebKit with code, simulating real user interactions like clicks, form fills, navigation and screenshots, across multiple browsers and platforms.
It can also run in “headless” mode, so that it can run even without any desktop environment.
Another great feature of Playwright is that it greatly supports dynamic websites, where many of the available web crawlers fail to scrape data.
In this guide, you will learn how to install Playwright on Raspberry PI in two different ways: with pip and with a Docker container. For my tests, I’ve used a Raspberry PI 5 Model B, but this procedure should work with any Raspberry PI computer board. Anyway, I recommend using a Raspberry PI board with at least 2 GB of RAM, as browsers (even in headless mode) consume a lot of RAM.
As an example, I will also show you how to use it to scrape prices from the Amazon store with a real, working example script.
What We Need
As usual, I suggest adding from now to your favourite e-commerce shopping cart all the needed hardware, so that at the end you will be able to evaluate overall costs and decide if to continue with the project or remove them from the shopping cart. So, hardware will be only:
- Raspberry PI Computer Board (including proper power supply or using a smartphone micro USB charger with at least 3A)
- high speed micro SD card (at least 16 GB, at least class 10)

Step-by-Step Procedure
Prepare Operating System
If not already done, please install Raspberry Pi OS Lite (for a fast, headless OS) or Raspberry PI OS Desktop (in this case, working from its internal terminal). You can find the differences between the two versions in my Raspberry PI OS Lite vs Desktop post.
Make your OS up to date. From terminal:
sudo apt update -y && sudo apt full-upgrade -yIn case you have a computer board with a low amount of RAM, I also suggest increasing the Raspberry PI swap memory.
Install Playwright on Raspberry Pi with pip (Python Virtual Environment)
This method is ideal if you want a complete setup with the ability to show Playwright in action (opening and showing the browser instance) on your desktop environment. This also allows you an easier debug on what’s happening during your actions.
Step 1: Create and activate a virtual environment
First of all, let’s create a virtual environment on Python. I will name it “playwright”, but you can give it the name you prefer (please refer to my Beginner’s Guide to Use Python Virtual Environment with Raspberry PI for more details about Python Virtual Environments).
python3 -m venv playwrightActivate the virtual environment:
source playwright/bin/activateYou will need to activate this virtual environment every time after deactivating it, logging out, or rebooting the Raspberry PI. When you finish running the script, you can deactivate it with the command:
deactivateStep 2: Install the Playwright Python package
The PIP installation is as simple as using the following terminal commands:
pip install pytest-playwrightNow, we must install the Playwright dependencies (including the browsers). Alternatively, you can install all the available browsers:
playwright installOr you can save disk space by installing only one of the browsers. For example, with chromium:
playwright install chromiumInstall Playwright on Raspberry Pi Using Docker
If you prefer Docker environments or want to run the same Playwright setup on multiple machines (Raspberry Pi and x86 servers), Docker is a great solution. On the other hand, in this scenario, you can’t show the browser and you will need to run it in headless mode.
Step 1: Install Docker on Raspberry Pi
For this step, please refer to my Beginner’s Guide to Install and Use Docker with Raspberry PI. From this tutorial, installing Portainer is not strictly required.
Step 2: Create a Dockerfile for Playwright Python
Create a dedicated directory and enter it:
mkdir playwright
cd playwright
Create the Dockerfile file:
nano DockerfileAnd fill it with the following lines. In this case, I use the 3.14 version of Python with the “slim” container. You can check if there are any other, newer “slim” versions which better fit your needs from the Python page on Docker Hub.
FROM python:3.14-slim
WORKDIR /app
RUN pip install --no-cache-dir playwright pytest-playwright && \
    playwright install chromium && playwright install-deps
Save and close.
Finally, we also need the app folder (inside the playwright one) which will contain the scripts to run with Playwright:
mkdir appStep 3: Build the Playwright Docker image on Raspberry Pi
Now, you can build your Playwright image with the command (please don’t miss the final “.”):
docker build -t my:playwright .Main Playwright Commands
In this section I will show you the most common Playwright commands to use in basic Python scripts.
Starting Playwright and Launching a Browser
Even if Playwright can work in a sincronous way, I suggest to use an asyncronous approca as this allows you to wait for the task to be completed before proceeding with the following line. It is important, for example, with slow pages, where you should wait for the elements to appear before performing actions.
For asyncronous scripts, Playwright uses asyncio.
The following shows a basic asyncronous script which just opens a page and closes it:
from playwright.async_api import async_playwright
import asyncio
async def main():
playwright = await async_playwright().start()
browser = await playwright.chromium.launch() # or .firefox, .webkit
page = await browser.new_page()
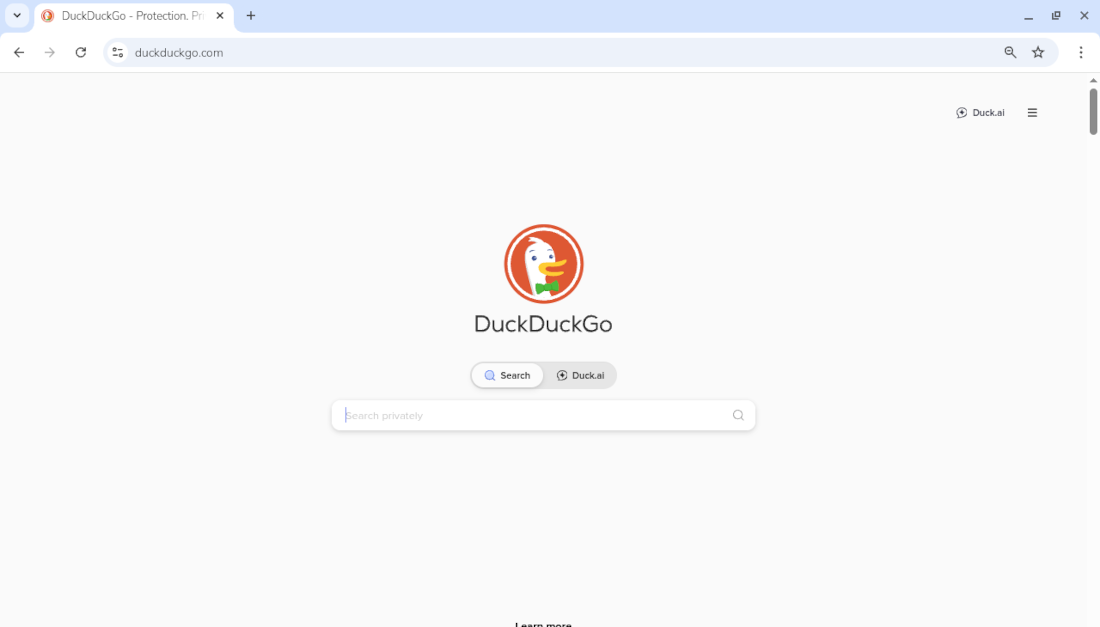
await page.goto("https://duckduckgo.com")
# Your Actions ............................
await browser.close()
asyncio.run(main())The key commands, besides importing the required libraries:
async_playwright().start()– starts the Playwright engine;playwright.chromium.launch()– launches a Chromium browser (headless by default);browser.new_page()– opens a new tab (page) in that browser;page.goto(url)– loads the given URL and waits until the page is ready;browser.close()– closes the browser and frees resources.
If you want to see the live browser, you must set headless=False at the launch of the browser. The line becomes:
browser = await playwright.chromium.launch(headless=False, slow_mo=200)The slow_mo option adds a small delay after every action, so that you can see what’s happening in the browser.
Running Interactive Commands
You can also run an interactive python shell, where to test you commands one by one, with the following command:
python -m asyncioThis opens a Python shell, where you can paste each line. In this case, you don’t need to import the asyncio library and you don’t need to create a function to run. The same example becomes the following (copy and paste one line at time):
from playwright.async_api import async_playwright

playwright = await async_playwright().start()
browser = await playwright.chromium.launch(headless=False, slow_mo=200) # or .firefox, .webkit
page = await browser.new_page()
await page.goto("https://duckduckgo.com")
# Your Actions ............................
await browser.close()
You will see something like the following:
Finding Elements with Locators
A locator is an object pointing at one or more elements on a page. By saving a locator, you can interact with the pointd objects (click, type, read text, etc.).
Instead of storing a fixed element reference, a locator stores the query (like a CSS selector, text, role, or test id) and resolves it fresh every time you use it.
l = page.locator("input[name='q']")The page.locator(selector) creates a “locator” for items that match a specific HTML object. In the above example, “input” is the HTML tag, “name” is a property of that tag and “q” is thevalue of that property.
It can happen that a page has several items matching the locator query. In this case, you can see all the results:
await l.all()Then , you can select a specific result by tuning the locator query, or selecting the 1st, 2nd, 3rd, … with l.first or l.nth(0), l.nth(1), and so on.
Reading Text
You can read and get text and attributes from any element of the page:
title = await page.inner_text("h1")
print("Title:", title)
With locators:
t = page.locator("h1")
title = await t.first.inner_text()
print("Title:", title)
Typing Text into Input Fields
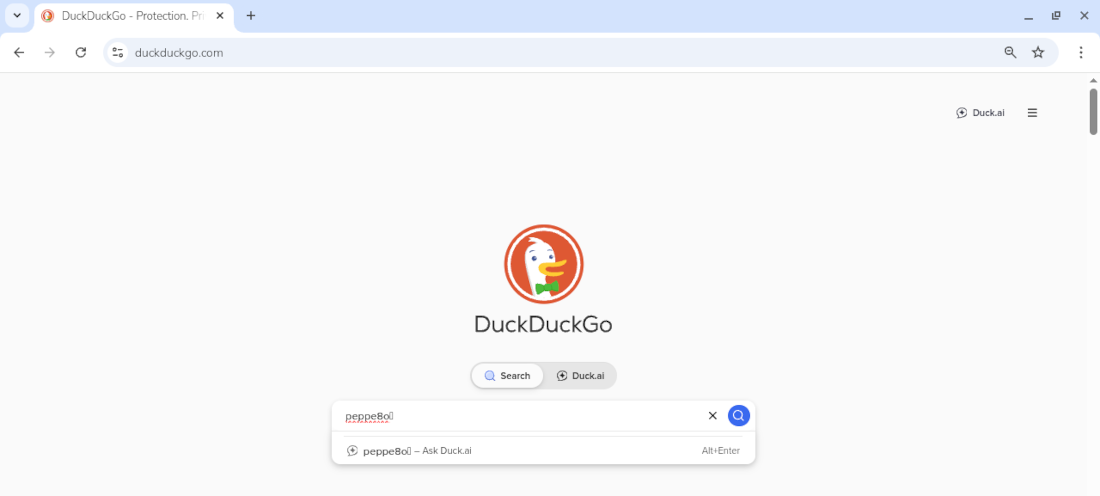
You can type a text into an input field with the fill command directly. It is important to note that the fill command will clear the current text in the input field:
await page.fill("input[name='q']", "peppe8o")or using a locator:
search_box = page.locator("input[name='q']")
await search_box.fill("peppe8o")
page.fill(selector, text)– clears the field and types the new text.locator.fill(text)– same, but using a locator object.
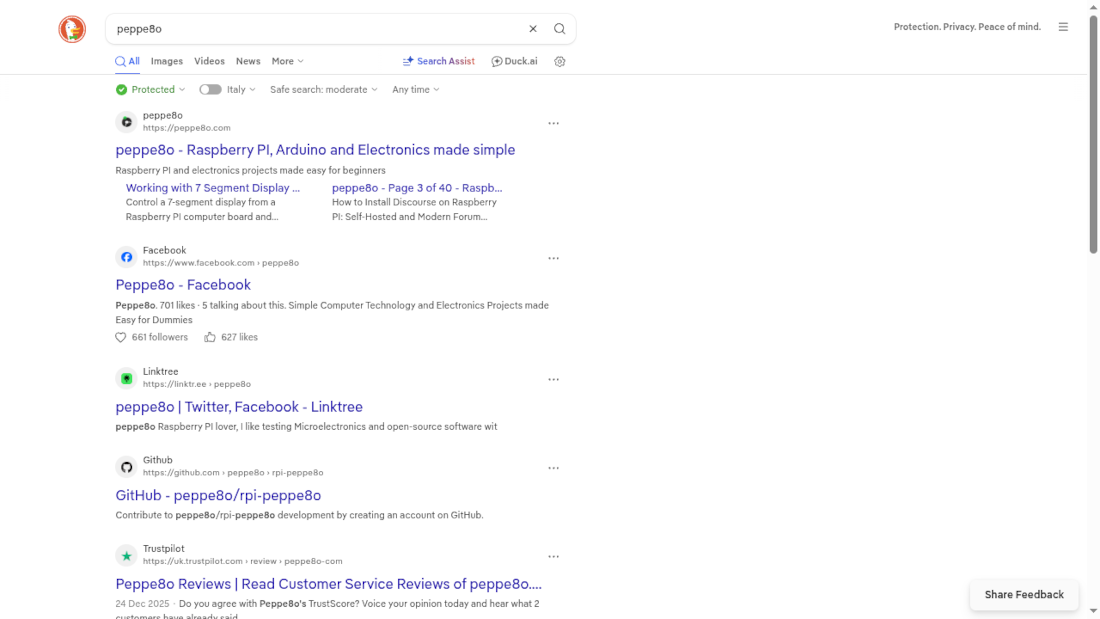
With our page, we’ll see the input search box filled:
Clicking buttons and links
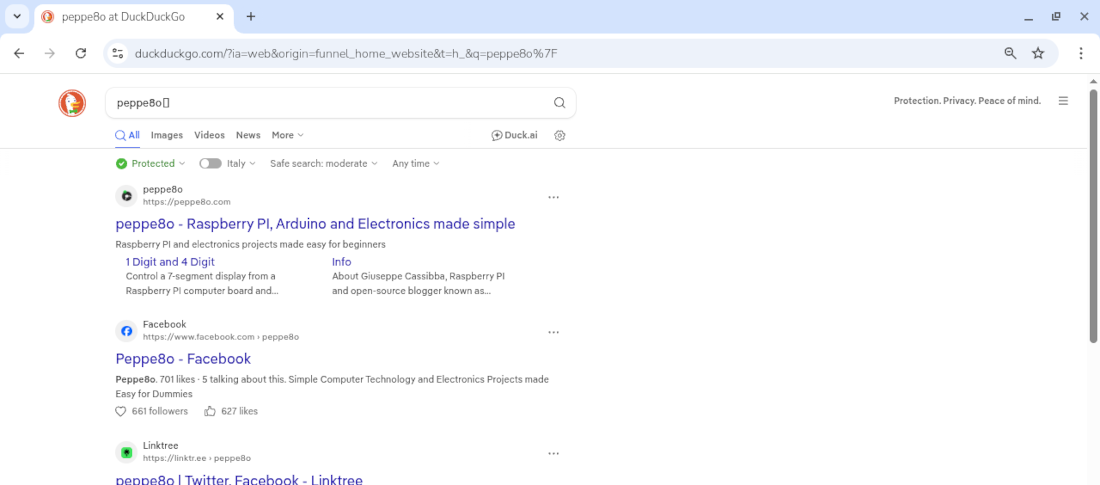
The click command executes this action once you identified the item to click:
await page.click("button[type='submit']")or
search_button = page.locator("button[type='submit']")
await search_button.click()
You can also use CSS/ID selectors (if available):
await page.click("#submit-button")The current page will move to the search results:
Read Attributes
To read attributes:
result_links = page.locator("h2 a")
href = await result_links.nth(0).get_attribute("href")
Taking screenshots
You can take and save a screenshot of the current page (even if running in headless mode) with the screenshot method. It requires a path where to save the screenshot, and you can optionally force it to show the full page:
await page.screenshot(path="page.png", full_page=True)Here is the screenshot result:
You can also screenshot a single element:
article = page.locator("article")
await article.first.screenshot(path="article.png")
And that’s the result. In this case, the only CONS I found is that the result is a bit cropped on the edge:

Use Playwright with Raspberry Pi to Scrape a Price from Amazon
Now let’s use a real script to show how to use Playwright on Raspberry Pi: we will open an Amazon product page and extract the current price from it.
Prepare the get_prices.py Script
For this goal, we need to create a Python script. We’ll name it get_prices.py:
nano get_prices.pyPlease fill the script with the following content:
from playwright.async_api import async_playwright
import asyncio

page_to_check = "https://amzn.to/3MfZ63w"

async def get_prices():
    # Start Playwright
    playwright = await async_playwright().start()

    # Launch Chromium browser (headless by default)
    browser = await playwright.chromium.launch()
    page = await browser.new_page()

    # Go to the Raspberry Pi product page on Amazon.it
    await page.goto(page_to_check)

    # Wait for the price element and read its text
    price_locator = page.locator(".a-price .a-offscreen").first
    price = await price_locator.inner_text()

    # Print the result
    print("Price found from the", page_to_check, "link:")
    print(price)

    # Close browser and Playwright
    await browser.close()
    await playwright.stop()

if __name__ == "__main__":
    asyncio.run(get_prices())
Please note that, only if you installed Playwright with Docker, you must move this script inside the “app” folder. In this case, the following command should do the task:
mv get_prices.py app/Here’s a short description of the main parts of this script:
async_playwright().start()starts the Playwright engine in async mode.playwright.chromium.launch()launches a headless Chromium browser instance.page.goto(...)loads the Amazon.it product page of a Raspberry Pi board..a-price .a-offscreenis a common CSS selector used by Amazon to display the visible price.inner_text()returns the price string that you print to the console.
You can run this script in both environments.
With Docker (from the playwright folder):
docker run --rm --init --shm-size=256m -v ./app:/app -w /app my:playwright python get_prices.pyIn this command:
--rmremoves the container one it finished its job--initensures proper signal handling and avoids zombie processes.--shm-size=256mincreases shared memory; without this, Chromium may crash inside the container.-v ./app:/appmounts the current folder into the container so you can edit files on the host.-w /appsets the working directory inside the container.
With PIP (after you activated the virtual environment):
python get_prices.pyFor this script we have just included a “print” statement to print the scraped price, but you can change this statement to store the values in you preferred application, maybe to monitor daily prices and get min/max. similarly, you can send them to your email (see my Send Email from Raspberry PI with Python) when the price reaches a threshold or is near to the minimum.
When to Use pip vs Docker for Playwright on Raspberry Pi
To help you to choose the best installation method, you can see this comparison table.
| Use case | pip + virtualenv on Raspberry Pi | Docker container on Raspberry Pi |
|---|---|---|
| Single Raspberry Pi, simple scripts | Very convenient and lightweight | Possible, but not strictly needed |
| Same setup on Raspberry Pi and x86 server | Harder to replicate exactly | Easy: same image runs on both architectures |
| Isolation from system packages | Good (Python level) | Excellent (full container isolation) |
| Disk usage | Lower (Playwright + browsers only) | Higher (base image + Playwright + browsers) |
| Debugging scripts directly on the Pi | Simple (run Python files directly, see the browser with “headless=False”) | Slightly more complex (enter container, logs) |
| Integration into a Docker‑based home‑lab stack | Less natural | Ideal for docker‑compose and automated workflows |
For most home projects, installing Playwright with pip in a virtual environment will be the fastest way to get started. If you already heavily use Docker on your Raspberry Pi or want a reproducible environment across multiple machines, a Playwright Docker image is often the best choice.
Resources
- https://playwright.dev/
- https://playwright.dev/python/docs/intro
- https://playwright.dev/python/docs/locators
What’s next
If you are interested in more Raspberry PI projects (both with Lite and Desktop OS), take a look at my Raspberry PI Tutorials.
Enjoy!

Open source and Raspberry PI lover, writes tutorials for beginners since 2019. He's an ICT expert, with a strong experience in supporting medium to big companies and public administrations to manage their ICT infrastructures. He's supporting the Italian public administration in digital transformation projects.
![]()
![]()
![]()
![]()
![]()
![]()
![]()


