
Last Updated on 2nd September 2023 by peppe8o
With this tutorial, you will learn to send email from Raspberry PI with Python and how to schedule them to run with a specified frequency.
Using your Raspberry PI for automated controls allows you to keep control of many devices or conditions with a low power consumption device. Understanding how to send periodic email reports will also give you a reliable channel to get constantly informed on the status of your projects.
What is the smtplib python library?
The Python smtplib library is a built-in module that provides a simple way to send email messages from a Python script using the Simple Mail Transfer Protocol (SMTP). It allows users to create, send, and receive email messages programmatically, making it useful for tasks such as sending automated emails, notifications, or alerts.
The smtplib library provides functions to connect to an SMTP server, authenticate the user’s credentials, and send the email message. It supports both plain text and MIME (Multipurpose Internet Mail Extensions) message formats. This makes it possible to include attachments, images, or other multimedia content in their email messages.
To use the smtplib library, users need to have access to an SMTP server, typically provided by an external email provider. The library supports various authentication methods, such as plain text, CRAM-MD5, and OAuth2, making it flexible and secure.
The Cron Process
The Cron utility is a time-based job scheduler for Linux systems. It allows users to automate the execution of commands or scripts at specific intervals or dates. It is a built-in utility that runs in the background and triggers scheduled tasks based on a pre-defined schedule, which can be set using the crontab command.
Users can specify the desired frequency and timing of their jobs by setting the appropriate values for minute, hour, day of the month, month, and day of the week. Cron also supports wildcard characters and ranges, allowing for flexible scheduling options.
Cron is a powerful tool that can be used for a variety of tasks, such as running backups, performing system maintenance, sending automated reports or emails, and more. Its simplicity and reliability make it a popular choice among Linux users for automating routine tasks.
Cron allows us to schedule any command at the desired frequency, including scheduling to send an email from Raspberry PI with Python at a defined hour, minute, weekday and month day.
What We Need

As usual, I suggest adding from now to your favourite e-commerce shopping cart all the needed hardware, so that at the end you will be able to evaluate overall costs and decide if to continue with the project or remove them from the shopping cart. So, hardware will be only:
- a Raspberry PI computer board (including proper power supply or using a smartphone micro usb charger with at least 3A)
- high speed micro SD card (at least 16 GB, at least class 10)
Step-by-Step Procedure
The Google App Password chapter here describes the way that Gmail users will have to generate a specific password for our python script. All the other users can go straight to the next chapter.
Google App Passwords (only for Gmail users)
Usually, the common free email providers let you define your account password that you can use with any email client. With a Gmail account, authentication is supported by a web form that hardly can be used with headless installation or in scripts.
For this reason, Google provides a procedure to define a specific password for apps which can’t perform web authentication by a browser. This is our case, as we need to use a Gmail account for sending messages from python scripts. The procedure will allow you to create a so-called “App Password”. This is an alternative password to your Google account and that will allow you to use this with your username (the Gmail address) to authenticate.
In order to generate a Google App Password, you can follow this instructions list, according to Google Sign in with App Passwords guide:
- Go to your Google Account
- Select Security
- Under “Signing in to Google,” select App Passwords. You may need to sign in. If you don’t have this option, it might be because:
- 2-Step Verification is not set up for your account
- 2-Step Verification is only set up for security keys
- Your account is through work, school, or other organization
- You turned on Advanced Protection
- At the bottom, choose Select app and choose the app you using and then Select device and choose the device you’re using and then Generate
- Follow the instructions to enter the App Password. The App Password is the 16-character code in the yellow bar on your device
- Tap Done
Preparing Raspberry PI OS
Install your favourite Raspberry PI OS. You can install Raspberry PI OS Lite for a headless, performing Operating System. Or you can use Raspberry PI OS Desktop, in this case working from its internal terminal app. If you don’t know what exactly fits your needs, you can use my Raspberry PI OS Lite vs Desktop: comparison between the 2 distributions article to get better clarifications.
After the installation, please make sure that your OS is up to date. With the terminal, use the following command:
sudo apt update - y && sudo apt upgrade -yWe don’t need to install any additional packages, as both Raspberry PI OS distributions come with all the required python modules.
Create a Folder for your Automated Tasks
This step isn’t really mandatory, but I suggest it to you for better script organization.
In your Raspberry PI, I suggest creating a folder that will include my main script to simplify the email sending process and all the automation. The command mkdir just creates this empty folder in your user home, while the cd command just enters there:
mkdir automations
cd automations
So, if your user is “pi”, this folder will be placed at the absolute path “/home/pi/automations/”.
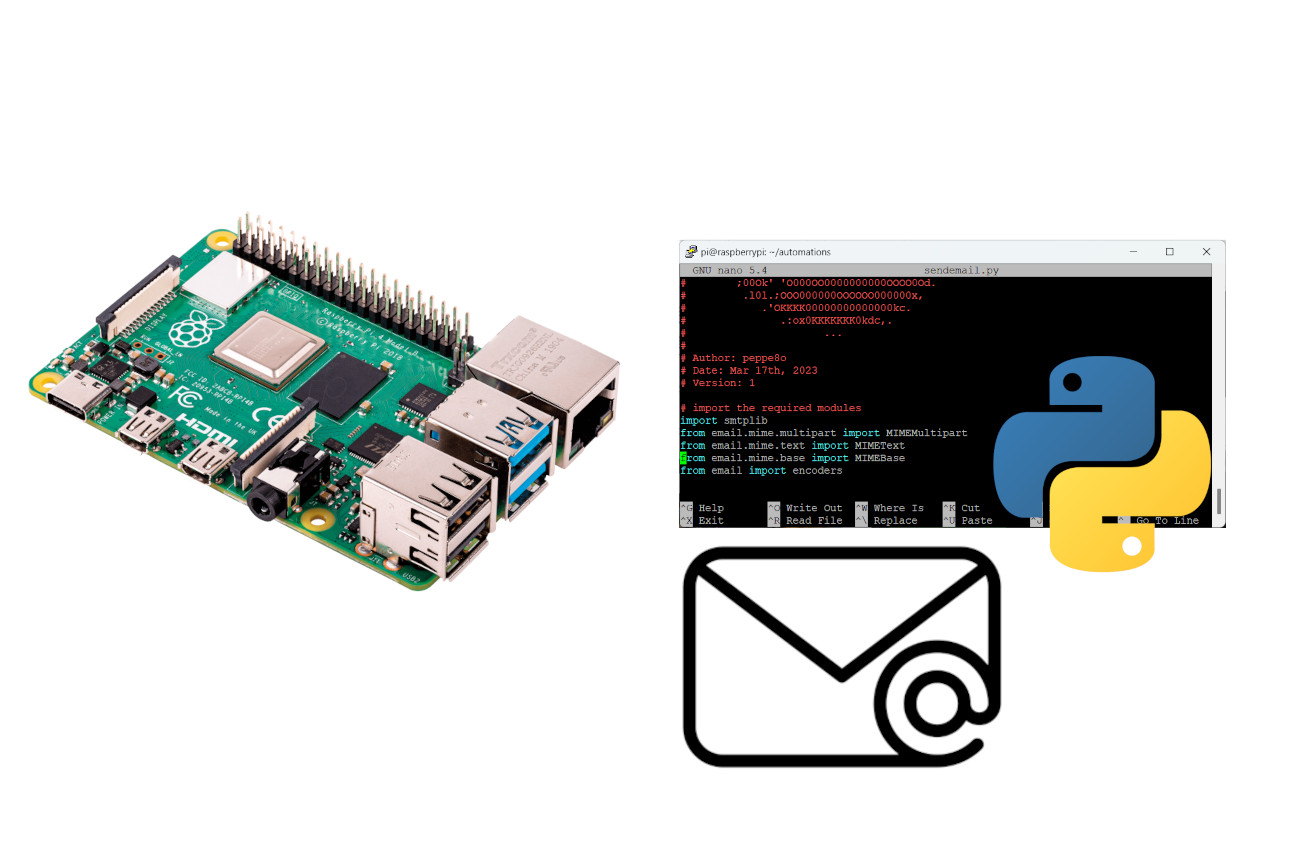
Here, we’ll place our “sendemail.py” main script that groups all the commands to perform an email shipment. I also suggest creating as many Python scripts as required, each grouping the check and report based on the frequency.
For example, all your daily checks will be collected within a single script named “daily.py”, the weekly checks in a script named “weekly.py”, and so on. In the end, this folder content will look similar to this:
sendemail.py
hourly.py
daily.py
weekly.py
monthly.py
The sendemail.py Python Script
Please get my sendemail.py script directly in your Raspberry PI
wget https://peppe8o.com/download/python/sendemail/sendemail.pyThe following will explain the sendemail.py code lines.
In the beginning, all the required libraries are imported. The smtplib will allow us to perform the email shipment, while the other libraries will allow us to compose a more complete email like adding attachments and composing the email body with HTML code
import smtplib
from email.mime.multipart import MIMEMultipart
from email.mime.text import MIMEText
from email.mime.base import MIMEBase
from email import encoders
Then, we setup our email account from where the emails will be delivered. So, this account will appear as the sender in our emails. Please set username, password, smtp_host and smtp_port according to your email service provider configurations. The smtp_port must be a number, so without brackets. The host and port here specified are valid for Gmail accounts:
username = "your_email@gmail.com"
password = "your_password"
smtp_host = "smtp.gmail.com"
smtp_port = 587
All the module is based on a single custom function that will arrange the email preparation and delivery. The email_send() function requires the following input parameters:
- rec [MANDATORY]: is a list of the recipients, which can contain one or more email addresses. I you need one recipient, this will be something like [“recipient@example.com”]. More recipients will appear like [“recipient_1@example.com”, “recipient_3@example.com”, “recipient_3@example.com”]. We’ll see in the following script how to compose these lists.
- subj [MANDATORY]: is the email subject
- message [MANDATORY]: is the email body
- sender [optional]: is the email address that will appear as the sender. By default, it matches the user account, but you can use this field in order to get a better appearance like specifying the sender name and surname like “Name Surname <name.surname@example.com>”
- attachments [OPTIONAL]: is a list of files that you want to attach. Similar to the recipients object in terms of construction, there you will list the attachment paths (I suggest using absolute paths). An example is [“/home/pi/file1.txt”, “/home/pi/file2.txt”, “/home/pi/file3.txt”]. By default, no attachments will be added.
- body_type [OPTIONAL]: lets you specify if you want to send a plain text message (setting it to “plain”) or an HTML message (setting it to “html”). By default, it sets to use HTML format.
def email_send(rec, subj, message, sender=username, attachments=[], body_type="html"):The following line creates a MIMEMultipart object that will store all the email fields in order to get it sent:
msg = MIMEMultipart()
The first parts added are the message subject, the sender and the message body:
	msg['Subject'] = subj
	msg['From'] = sender

	msg.attach(MIMEText(message, body_type))
Then, we check if there are any attachments. If so, we add each attachment one by one, encoding it:
	if len(attachments)>0:
		for i in attachments:
			filename = i
			attachment = open(i, "rb")
			p = MIMEBase('application', 'octet-stream')
			p.set_payload((attachment).read())
			encoders.encode_base64(p)
			p.add_header('Content-Disposition', "attachment; filename= %s" % filename)
			msg.attach(p)
Now, we convert the whole MIMEMultipart object into a string:
text = msg.as_string()We are now ready for the email sending from our python script, so we activate the authentication session and we send the authentication credentials. Please note that this script uses TLS authentication, which works for the most common email services. If you use a provider different from Gmail, you should check its SMTP settings:
	s = smtplib.SMTP(smtp_host, smtp_port) # creates SMTP session
	s.starttls() # start TLS for security
	s.login(username, password) # Authentication
If everything went correctly, we can now send an email message to each recipient available from the rec input list. Please note that this will send singular emails to each recipient so that they will not see the whole recipients addresses:
for r in rec: s.sendmail(username, r, text)
Finally, we can close the SMTP session with the email server of our provider:
s.quit()After changing the email setup parameters at the start of this script, you can save and close it.
Create a Report Script to Send Email from Raspberry PI and Python
The sendemail.py script doesn’t perform any action by itself, as it simply defines the email_send() function which requires to be triggered from an external script.
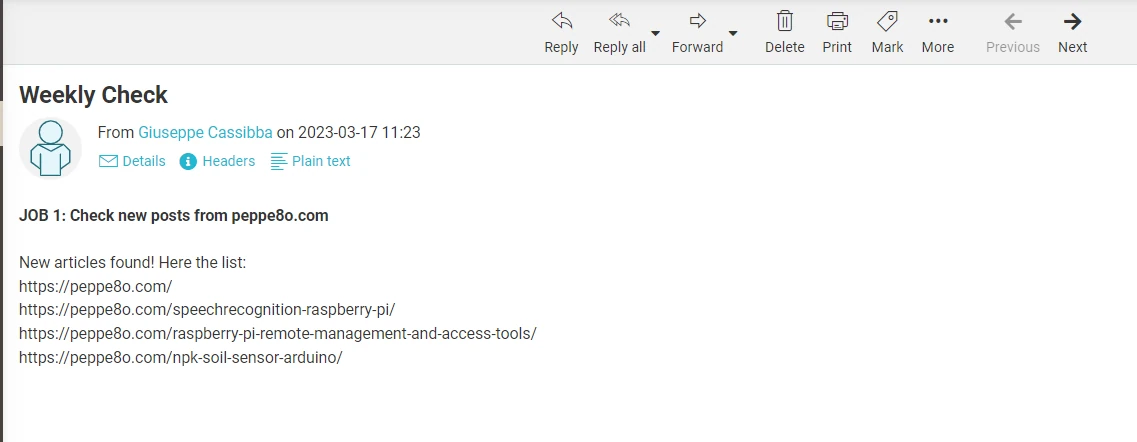
Let’s create, for example, a weekly script that checks peppe8o.com posts and sends an email with the new articles published.
You can get also this script from my download area with the following command:
wget https://peppe8o.com/download/python/sendemail/weekly.pyLet’s look at how this script sends an email by analyzing it line by line.
At the beginning, we import the email_send() function:
from sendemail import email_sendThen, we define the subject, sender, recipient(s). Please set the parts highlighted in red with your ones. You can add more recipients by appending as many lines as you need with new “recipients.append()” lines. What is important, here, is to initialize the recipients list object with an empty list (“[]”) before appending objects, in order to start with an empty list:
subject = "Weekly Check"
sender = "Name Surname <your_email@gmail.com>"

recipients = []
recipients.append("your_recipient@example.com")
Same considerations for the attachments list object. Here, I don’t need to send an attachment, but I also provided a commented line with the example to attach a “test.txt” file available from the same folder where the script runs.
attachments = []
#attachments.append("test.txt")
If you have an attachment in a different folder, please use an absolute path like, for example:
attachments.append(“/home/pi/automations/test.txt”)
We also initialize the body message:
body = ""All the body text must be added to the previous body part with a “body=body+….” in order to avoid deleting what is already saved in this variable. The body will be in HTML format, so it includes a few HTML tags to make text in bold (these words between <b> and </b> tags), or to add a new line carriage (the <br> tag).
The code lines in blue check my posts sitemap and I’m not going to explain them here, in order to avoid you from getting bored of what is out of scope.
It is important, to have a clear code, adding a comment line (the first in the following code excerpt) identifying what the code part will perform. This will allow you to merge different tasks in one single script and organize it clearly.
Please note that every check adds a part in my message body.
# ------------- check new posts from peppe8o.com ----------------------------
body=body+"<b>JOB 1: Check new posts from peppe8o.com</b><br><br>"

import urllib.request
from datetime import datetime

with urllib.request.urlopen('https://peppe8o.com/post-sitemap.xml') as url:
    data = url.read().decode('utf-8').split("<url>")

posts=[]

for l in data:
    try:
        link_start=l.index("<loc>") + len("<loc>")
        link_end=l.index("</loc>")
        mod_start=l.index("<lastmod>") + len("<lastmod>")
        mod_end=l.index("</lastmod>")
        post_url=l[link_start:link_end]
        post_date=datetime.strptime(l[mod_start:mod_end],'%Y-%m-%dT%H:%M:%S+00:00')
        if (datetime.utcnow() - post_date).days <= 7:
            posts.append(post_url)
    except ValueError:
        continue

if len(posts)>0:
	body=body+"New articles found! Here the list:<br>"
	for p in posts: body=body+p+"<br>"
else:
	body=body+"No new posts from peppe8o.com<br>"
The last line, performs the email delivery with a single email_send() function call:
# ------------------- SEND RESULT REPORT -------------------------------
email_send(recipients, subject, body, sender, attachments)
After editing the sender and recipients of this script, you can save and close it.
With the “sendemail.py” and the “weekly.py” scripts, you can now test the project and send an email from Raspberry PI with Python using the following command:
python3 weekly.pyThis command will take only a few seconds and will end without any console message. You can now check your recipient email box (even in the spam folder, if nothing arrives in about one minute) and you will find the report, similar to the following:
Schedule with Cron
Of course, you want to automate the email from Raspberry PI with Python without the need to enter the console and run it manually. So, we’ll set a job in our Cron table to run the “weekly.py” script once a week at every Saturday 9.00AM. To do this, please open your cron-tab with the following command (use your Raspberry PI user instead of “pi”):
crontab -u pi -eIf asked, please select “nano” as editor (or your favourite one).
Append the following line at the end of the opened file:
0 9 * * sat python3 /home/pi/automations/weekly.pyThe first 5 words will identify the schedule according to the Cron man. The following part will tell our OS to execute the command “python3 /home/pi/automations/weekly.py” at the defined schedule. Please note that you have to identify the full path of your script here.
You can save and close it (CTRL + X, then Y, then ENTER).
You can also use the great https://crontab.guru/ web tool to get help identifying the right schedule expression for your needs. Examples are:
Every hour at the minute 00:
0 * * * * your_cmdEvery day at 6.00 PM:
0 18 * * * your_cmdEvery week on Saturday at 9.00 (similar to what seen):
0 9 * * sat your_cmdEvery month on the 1st day, at 7.00 AM:
0 7 1 * * your_cmdIn this way, you can create different scripts for tasks with different frequencies and append one line in your crontab for each script, so getting different schedules for the sent email from Raspberry PI with Python.
Next Steps
Interested in more projects with your RPI? Take a look at peppe8o Raspberry PI computer tutorials pages.
Enjoy!

Open source and Raspberry PI lover, writes tutorials for beginners since 2019. He's an ICT expert, with a strong experience in supporting medium to big companies and public administrations to manage their ICT infrastructures. He's supporting the Italian public administration in digital transformation projects.
![]()
![]()
![]()
![]()
![]()
![]()
![]()


I was skeptical about the gmail piece of this, my result is pretty much what I was expecting:
Traceback (most recent call last):File "/home/linda/bin/weekly.py", line 15, in
email_send(recipients, subject, body, sender, attachments)
File "/home/linda/bin/sendemail.py", line 69, in email_send
s.login(username, password) # Authentication
File "/usr/lib/python3.9/smtplib.py", line 734, in login
raise last_exception
File "/usr/lib/python3.9/smtplib.py", line 723, in login
(code, resp) = self.auth(
File "/usr/lib/python3.9/smtplib.py", line 646, in auth
raise SMTPAuthenticationError(code, resp)
smtplib.SMTPAuthenticationError: (535, b'5.7.8 Username and Password not accepted. For more information, go to\n5.7.8 https://support.google.com/mail/?p=BadCredentials d2e1a72fcca58-6f4d2a8280csm22753924b3a.61 - gsmtp')
I don’t think you can log in to gmail this way.
* If you have this script working somewhere with gmail, please share the working example, including a sample message as received with headers.
* If there is some configuration of the gmail account to adjust which allows it, I’d be delighted to know about it.
* If there is some 3rd-party provider accepting this “bare” TLS login on 587 (or any port), I’d like to know about that.
Hi Erik,

I confirm that I currently use this script for a daily job monitoring my blog with Python.
Here’s the output of the header’s parser:
There are no specific configuration of my gmail account, besides using an App Password, as defined in this tutorial. The only note is that the Google App Password includes spaces inside the block of characters and I keept these spaces in the script.
If you have a spare microSD card, it would be interesting to know if it works to you with a fresh Raspberry PI OS installation.
Please let me know