

Last Updated on 2nd September 2023 by peppe8o
In this tutorial, I’m going to show you how to install EarnApp on Raspberry PI and make it work to start earning by simply sharing your internet bandwidth and a very few resources.
In the past, I’ve been struggling on how to earn from one my Raspberry PIs which is always powered on to run some home services. Recently I discovered that EarnApp on Raspberry PI can give a little income
Let’s be clear, this application isn’t going to make you rich or pay your bills. But if you have a device always powered on for any other services, a flat bandwidth internet plan and you want to try keeping some money from that, it is worth a try and may give you money for a new Raspberry PI board in a few months or to buy new sensors in a few weeks :).
Wath is EarnApp
EarnApp is an application compatible with several Operating Systems. Besides Raspberry PIs, you can use it with Windows, Linux and Android.
EarnApp uses your free, unused internet bandwidth for companies research. Actually, when a company uses its own internet access, it can get data filtered or affected from its IP address. Getting pages from different IP addresses helps to check what regular users see and how they see its pages.
Here are some usage examples provided from EarnApp FAQs:
- Protect brand: Are sites selling fake versions of company product?
- Protect users: Are advertisers showing ads for products the company doesn’t allow (e.g. firearms)
- Offer the best prices: What are the real prices
EarnApp is owned by Bright Data Inc, a web data platform helping the industry collect data and analytics.
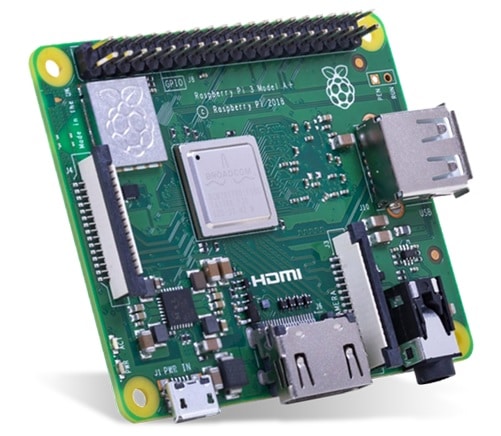
For this tutorial, I’m going to use a Raspberry PI 3 Model A computer board. This tutorial will work on any Raspberry PI computer board with internet connectivity. Please note that Raspberry PI Pico is a microcontroller (not a computer), so it won’t work on it.
What We Need
As usual, I suggest adding from now to your favourite e-commerce shopping cart all the needed hardware, so that at the end you will be able to evaluate overall costs and decide if to continue with the project or remove them from the shopping cart. So, hardware will be only:
- Raspberry PI 3 Model A+ (including proper power supply or using a smartphone micro usb charger with at least 3A) or newer Raspberry PI computer Board
- high speed micro SD card (at least 16 GB, at least class 10)
Check hardware prices with the following links:


Step-by-Step procedure
Signup to EarnApp
With the following link, go to EarnApp to register your account. You can also register with a Google Account to get an integrated sign-in authentication. You have only to get your account signed in so that after the installation on Raspberry PI we’ll use a terminal generated link to register our device in our EarnApp dashboard.
Please note that you will be asked to accept EarnApp terms during installation.
Prepare OS
If not already done, start preparing your OS. You can both install Raspberry PI OS Lite (for a headless, performing OS to be used for server applications) or Raspberry PI OS Desktop (if you need a Desktop environment).
Make your OS updated. From the terminal, please use the following command:
sudo apt update -y && sudo apt upgrade -yInstall EarnApp on Raspberry PI
EarnApp installation is quite straightful. Still from the terminal, use the following command:
wget -qO- https://brightdata.com/static/earnapp/install.sh > /tmp/earnapp.sh && sudo bash /tmp/earnapp.shBefore completing the fast installation, you are asked to accept EarnApp’s terms:
To use EarnApp, allow BrightData to occasionally access websites through your device. BrightData will only access public Internet    web pages, not slow down your device or Internet and never access personal information, except IP address - see privacy policy and    full terms of service on earnapp.com.
Do you agree to EarnApp's terms? (Write 'yes' to continue):
If you accept them, please type yes and press return on your keyboard. This will download the installer and automatically run it.
NOTE: because of a temporary issue with the new RPI OS version, you may get an “internal/fs/utils.js:307” and “throw err;” error. In this case, please scroll down this post for the temporary solution while waiting for Earnapp team to solve it definitely.
After a few seconds, you will get from the terminal the link to use to connect your Raspberry PI device to your EarnApp account:

Copy this link and open it into a new tab on the same browser where you signed in to EarnApp. This will redirect the web page to your dashboard, which will show your device linked
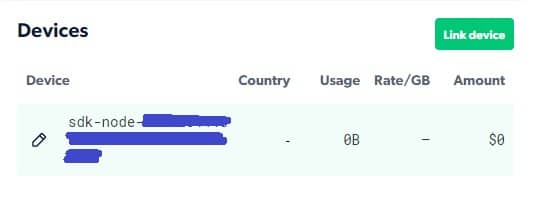
At the start, your device will not show traffic and/or country, but after a few hours it will start showing stats including the country where your public IP is registered, the amount of network data used, the earning rate for GB and the amount earned. The following picture shows my earnings after 2 days:
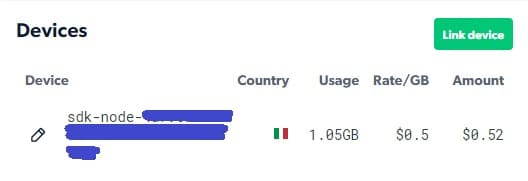
Of course, earnings may vary depending on the traffic required in your period and from your country.
You can also rename your linked devices, for better mnemonic labelling, by using the pencil button near the device you want to modify.
You can check that EarnApp is running by issuing the following terminal command:
pi@raspberrypi:~ $ sudo systemctl status earnapp.service
● earnapp.service - EarnApp
     Loaded: loaded (/etc/systemd/system/earnapp.service; enabled; vendor preset: enabled)
     Active: active (running) since Sat 2022-01-29 07:44:39 GMT; 21min ago
   Main PID: 1028 (earnapp)
      Tasks: 11 (limit: 409)
        CPU: 7.714s
     CGroup: /system.slice/earnapp.service
             └─1028 /usr/bin/earnapp run

Jan 29 07:44:39 raspberrypi systemd[1]: Started EarnApp.
Change Country
I suggest using EarnApps for at least a week with your own IP to see results before checking ways to increase earnings. After that, a legit way to try increasing earnings is changing your IP country. EarnApp allows this (according to their FAQs), but they warn that if you use an IP with too many users, it might be marked as non-residential IP and then you don’t earn or you won’t get traffic at all. In that case, you’ll see a notification in the dashboard. If your IP is banned, anyway, you can change it reverting to your public IP address. You can check if your IP is ok or not by testing it on EarnAPP IP Checker online tool. Your current IP can be get from the following terminal command:
curl ipinfo.ioA way to change your IP is by using a proxy which is viable if having an IP from a different country doesn’t interfere with your Raspberry PI usage.
Once get your proxy IP and port, you can configure it with the following commands:
export http_proxy=http(s)://proxy_ip:proxy_port
export https_proxy=http(s)://proxy_ip:proxy_port
This way, a new issue of the “curl ipinfo.io” command will return the proxied IP and country.
The previous export command will expire on Raspberry PI reboot. To make it persistent after reboots, please open to editing the environment file:
sudo nano /etc/environmentAnd add the following lines:
export http_proxy==http(s)://proxy_ip:proxy_port
export https_proxy==http(s)://proxy_ip:proxy_port
Uninstall EarnApp
If for any reason you will need to uninstall EarnApp, you can use the following terminal command:
sudo earnapp uninstallReferral Program
EarnApp also gives a small percentage (10%) of its earnings to you for every people you invite by using their referral program. You can get your referral link in your EarnApp dashboard and invite your friends by using that link.
Fixing the “throw err” Error
For this fix, a great thank goes to Michael Dansie.
The temporary fix is getting a bootstrap.js code from github and using it. Please use the following commands:
wget https://raw.githubusercontent.com/twbs/bootstrap/main/dist/js/bootstrap.js
sudo mkdir -p /tmp/node_modules/workerjs
sudo cp bootstrap.js /tmp/node_modules/workerjs
sudo mkdir -p /usr/bin/node_modules/workerjs
sudo cp bootstrap.js /usr/bin/node_modules/workerjs
From here, we can use again the original Earnapp installation command:
wget -qO- https://brightdata.com/static/earnapp/install.sh > /tmp/earnapp.sh && sudo bash /tmp/earnapp.shAfter the installation finishes, we can remove the bootstrap.js just downloaded:
sudo rm /tmp/node_modules -r
rm ./bootstrap.js
Now, please go back to the procedure in “Install EarnApp on Raspberry PI” chapter of this tutorial.
What’s Next
If you want to discover many other projects for your Raspberry PI, you can take a look at peppe8o Raspberry PI tutorials.
Enjoy!

Open source and Raspberry PI lover, writes tutorials for beginners since 2019. He's an ICT expert, with a strong experience in supporting medium to big companies and public administrations to manage their ICT infrastructures. He's supporting the Italian public administration in digital transformation projects.
![]()
![]()
![]()
![]()
![]()
![]()
![]()


Is it me or does EarnApp only allow signing up with Google?? Because that would make it a “no-no” for me.
Perhaps I’m missing something?
John
Hi John, you should try contacting EarnApp team to submit your issue
They do. And it’s then a “no-no”
hi, my third raspberry pi zero wh is arm1 and no more supported. ( i got already 2 running just fine but i installed them before the earnapp update ).
Is there a way to get a link to install and older version ( or previous ) on my last raspberry pi zero ?
Hi.
Looking at EarnApp installation script with the following terminal command:
wget -qO- https://brightdata.com/static/earnapp/install.shyou can see that it supports ARM from armv6l (that should be the RPI Zero W CPU architecture).
Try from a scretch RPI OS installation, otherwise it EarnApp doesn’t support anymore specific ARM versions it’s hard to get an old copy with their installation process
Hi, you can copy the executable (maybe /usr/bin/earnapp) from your other raspberry to the last one, and copy the earnapp systemd service too (only earnapp.service, not earnapp_upgrader.service). This way you don’t need the external script and it should work.
If you still have it, can you send a link with this executable? It’s for my raspberry pi zero and may be very useful for other users too.