
Last Updated on 14th December 2025 by peppe8o
In this tutorial, I will show you how to monitor (and manage) my solar storage system by using the EcoFlow API from Raspberry PI with N8N. I have tested it with my EcoFlow Stream AC PRO system.
This guide will show you the simple approach to get data from the API of any photovoltaic system producer. The whole process will be made easy by using n8n.
Please note that n8n supports only ARM64 platforms. This means that you will be able to use this process only with Raspberry PI computer models supporting the 64-bit OS.
About Ecoflow Stream AC PRO
The product I’m going to use for my tests is a plug-and-play solar battery. Once you have it, you can plug the battery into one of the electrical sockets of your home and just use it (except for some countries where you must connect it to your general electrical panel). You can set it to charge or discharge based on a user-defined plan.

What makes this product really flexible is that you can use it with any existing photovoltaic system: as it takes the input in AC, you don’t need to connect it to your existing inverter, and there are quite no specialistic tasks to perform. With some EcoFlow products (different from the AC PRO), you can also connect photovoltaic panels directly to the EcoFlow storage, so you get a complete solar system.
Using it with a compatible Smart Meter, you can set the EcoFlow Stream storage to charge only with the excess current from your current photovoltaic system, and discharge only when your home load requires it.
What We Need
As usual, I suggest adding from now to your favourite e-commerce shopping cart all the needed hardware, so that at the end you will be able to evaluate overall costs and decide if to continue with the project or remove them from the shopping cart. So, hardware will be only:
- Raspberry PI Computer Board (including proper power supply or using a smartphone micro USB charger with at least 3A)
- high speed micro SD card (at least 16 GB, at least class 10)
- EcoFlow Battery from the Stream series, available from Amazon or the EcoFlow store
- (optional) a smart meter

Step-by-Step Procedure
Get the Producer’s API Reference
Generally, the first step is reaching the API Docs for your producer. For my product, I got them from the EcoFlow Developer pages.
Depending on the producer, you may need to subscribe to their developer program and wait for them to accept your application. Please look at the introduction part of the documents, where they generally explain how to authenticate to their API. Usually, the authentication part is the hardest part of the project, while the following are quite easy to follow based on their docs.
With Ecoflow, you need to register and get the credentials to access their API service. These credentials are composed of an AccessKey and a SecretKey.
Prepare the Raspberry PI Operating System
The first step is to install the Raspberry PI OS Lite (we need the 64-bit version) to get a fast and lightweight operating system (headless). If you need a desktop environment, you can also use the Raspberry PI OS Desktop, in which case will work from its terminal app. Please find the differences between the 2 OS versions in my Raspberry PI OS Lite vs Desktop article. For low RAM Raspberry PI computer models, the Lite OS is strongly suggested.
Please make sure that your OS is up to date. From your terminal, use the following command:
sudo apt update -y && sudo apt full-upgrade -yWe also need Docker. For this task, please refer to my Beginner’s Guide to Install and Use Docker with Raspberry PI tutorial.
Then, we need to install N8N. For this part, please refer to my How to use n8n and Raspberry PI to create workflows and automate APIs.
Create the N8n Workflow to Use the EcoFlow API from Raspberry PI
From here, all the job will be done from the n8n web GUI.
We need to take the steps required to interface the API and create the nodes inside our workflow, performing these steps. The following will show you how to do this job with the EcoFlow products.
In my case, the complete steps from the producer are listed below:
- Step 1: Request parameters must be sorted by ASCII value and concatenated with characters =, &
E.g. str=param1=value1¶m2=value2 - Step 2: If the type is nested, expand and splice according to the method of step 1.
E.g. deviceInfo.id=1&deviceList[0].id=1&deviceList[1].id=2&ids[0]=1&ids[1]=2&ids[2]=3&name=demo1 - Step 3: concatenate accessKey, nonce, timestamp
E.g. str=param1=value1¶m2=value2&accessKey=***&nonce=…×tamp=… - Step 4: encrypt
E.g. byte[] signBytes = HMAC-SHA256(str, secretKey) - Step 5: convert byte[] to a hexadecimal string. String sign = bytesToHexString(signBytes)
E.g. sign=85776ede686fe4783eac48135b0b1748ba2d7e9bb7791b826dc942fc29d4ada8 - Step 6: Add accessKey, nonce, timestamp, and sign to the HTTP header
- Step 7: get request data according to the Content-Type header
If Content-Type is “application/json;charset=UTF-8”, get request data from the request body, else get from the request query string. - Step 8: Verify that the steps to generate the signature are correct
Here’s a visual example of what we’re going to create:

For my workflow, it will run only when manually triggered. I will show the procedure for a basic process to get all the registered devices from EcoFlow.
Step 0: Setup the Credentials
This isn’t a step coming from the EcoFlow Docs. Usually, n8n allows you to store credentials in the related feature. When you don’t have a credentials template similar to yours, you can just store them inside an “Edit Fields” node.
In my “Setup credentials” node, I set the required parameters for authentication (some are hidden because they are my personal ones):
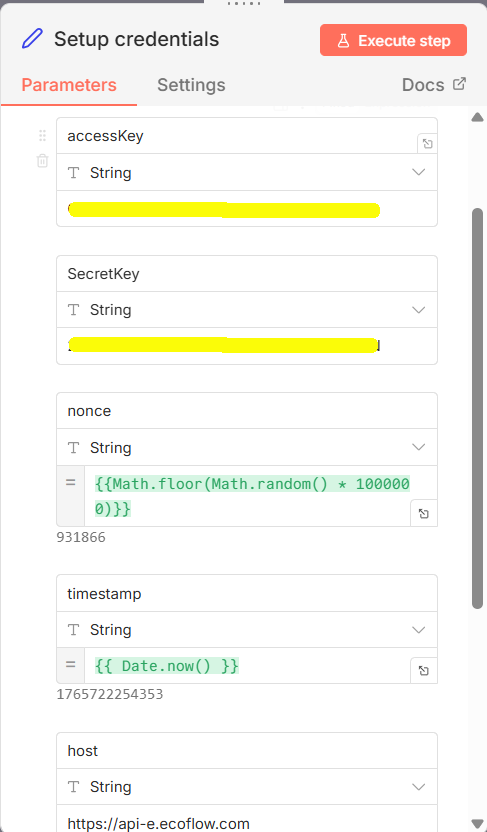
Please note that the nonce is a random, variable string. You can generate a random number with the JavaScript function {{Math.floor(Math.random() * 1000000)}}. On the other hand, the timestamp in UNIX format can be generated with the {{ Date.now() }} JavaScript function.
After this node, you will get the following variables:
- accessKey: ******************************
- SecretKey: ******************************
- nonce: a random number (for EcoFlow, this must be composed of 6 numbers)
- timestamp: the current timestamp in UNIX (13 numbers)
- host: https://api-e.ecoflow.com
Step 1: Create the Sign String
The following Edit Fields node, named “auth clear” in my example, puts together the fields required to compose the sign for authentication. At the moment, the sign will remain in clear text. Here’s the node:
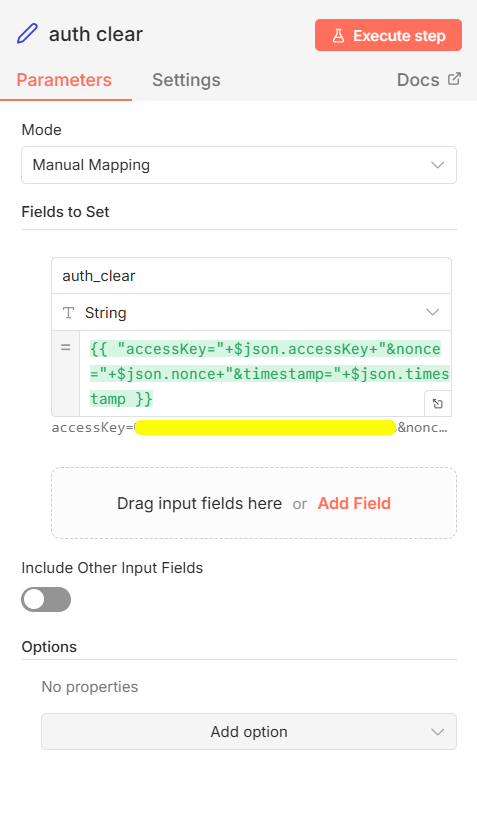
As you can see, you can concatenate the required fields with the “+” operator in JavaScript. The resulting JavaScript formula will be {{ "accessKey="+$json.accessKey+"&nonce="+$json.nonce+"×tamp="+$json.timestamp }}.
I labelled this resulting parameter as “auth_clear”.
Step 2: Create the Query
A web query is the string in the web URL following the ? character.
For this test, we don’t need to add a specific query. But, according to the EcoFlow docs, we need to use it both in the URL and the encrypted sign. The resulting edit node will be as follows:
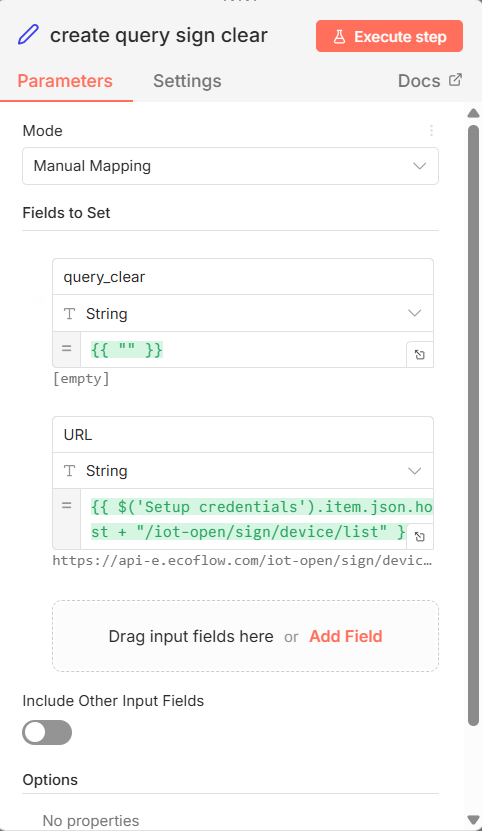
When you need to submit a query, you can set the query part (the part after the ? symbol) in the query_clear variable. In the same way, if you need to use a different path, you can set it in the URL variable, by changing the current "/iot-open/sign/device/list".
Here are the two JavaScript strings:
- query_clear:
{{ "" }} - URL:
{{ $('Setup credentials').item.json.host + "/iot-open/sign/device/list" }}
Step 3: Encrypt the Query and Sign
The Crypto node from n8n does this task in a straightforward way. Just append the node to the workflow and configure it as follows:
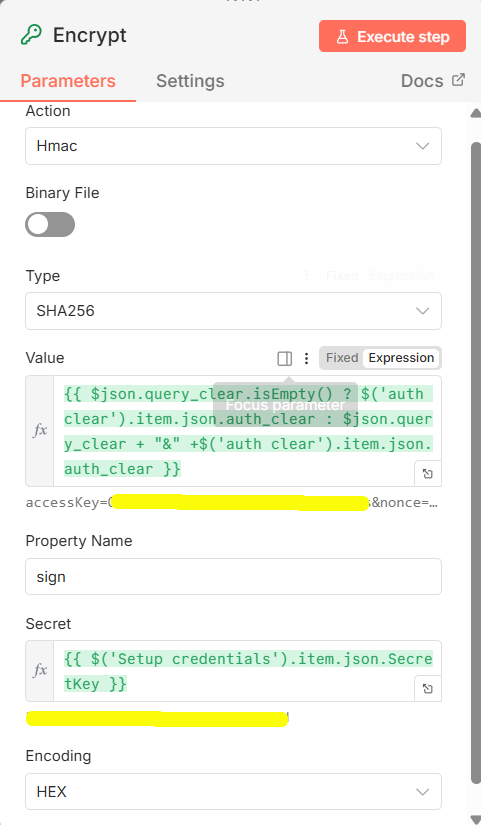
The value to be encrypted is composed of the query (if not empty) and the authentication part. The resulting value, the sign, will be encrypted with the SecredKey according to HMAC-SHA256 encryption and encoded as hexadecimal. The JavaScript parts follow:
- Value:
{{ $json.query_clear.isEmpty() ? $('auth clear').item.json.auth_clear : $json.query_clear + "&" +$('auth clear').item.json.auth_clear }} - Secret:
{{ $('Setup credentials').item.json.SecretKey }}
This is the most important part of the authentication project. For me, I was saved by the EcoFlow developers, who provided the following test values and encrypted result:
accessKey=Fp4SvIprYSDPXtYJidEtUAd1o
secretKey=WIbFEKre0s6sLnh4ei7SPUeYnptHG6V
nonce=345164
timestamp=1671171709428

resulting encrypted sign -> 07c13b65e037faf3b153d51613638fa80003c4c38d2407379a7f52851af1473e
You can’t use these values to test the connection, but you can use them to check that your encryption process is correct:
Step 4: Run the API Request
The final step will perform the request and will get the resulting data. According to this example, the screenshots of the complete configuration for the HTTP Request node follow:
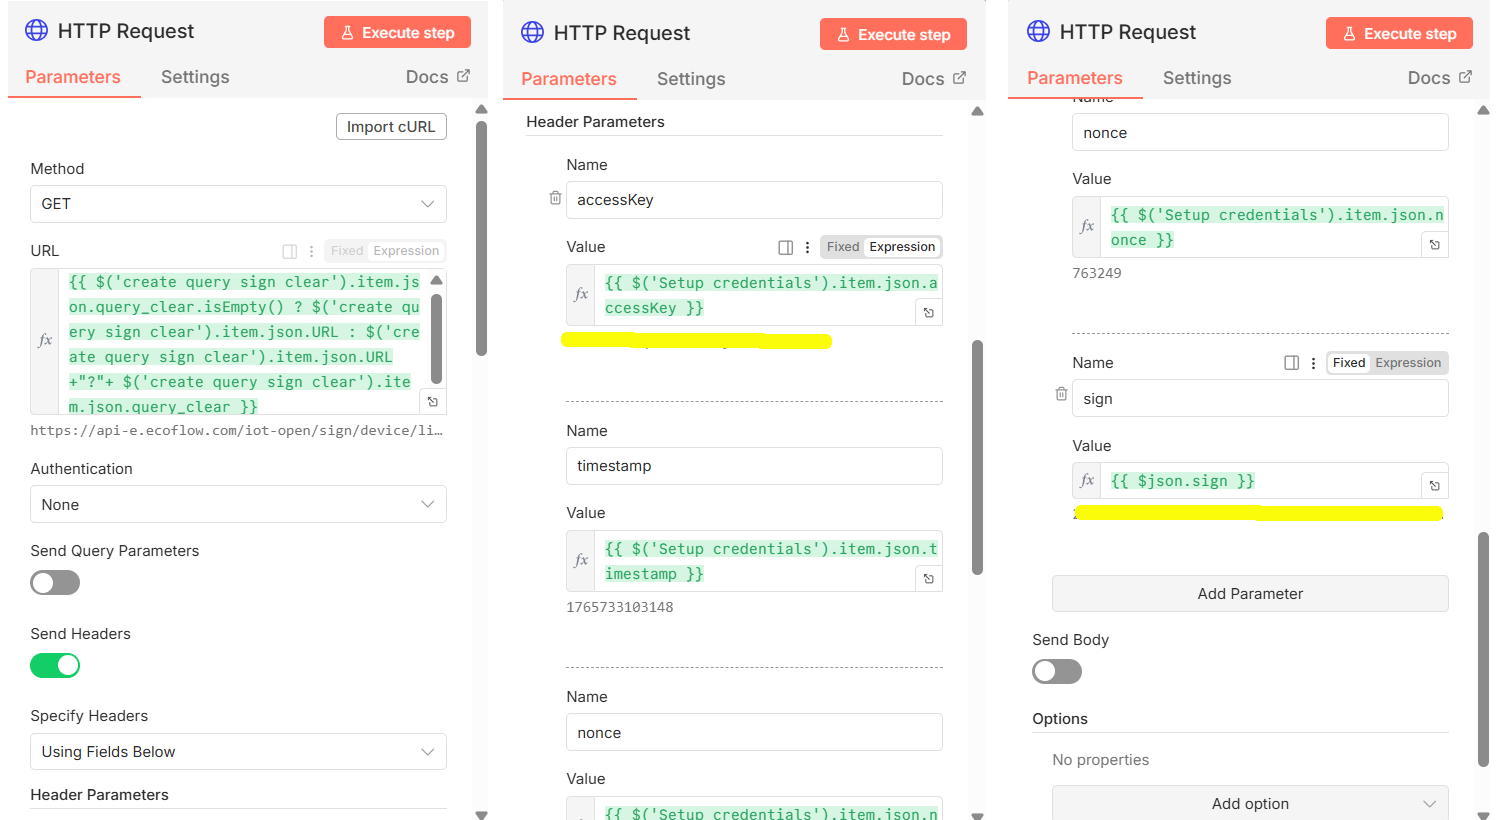
The URL is the only part which may appear a bit more complicated. It is just an if statement in JavaScript which checks if the query string is empty or not, and appends it to the URL is available:
{{ $('create query sign clear').item.json.query_clear.isEmpty() ? $('create query sign clear').item.json.URL : $('create query sign clear').item.json.URL + "?" + $('create query sign clear').item.json.query_clear }}Final Result
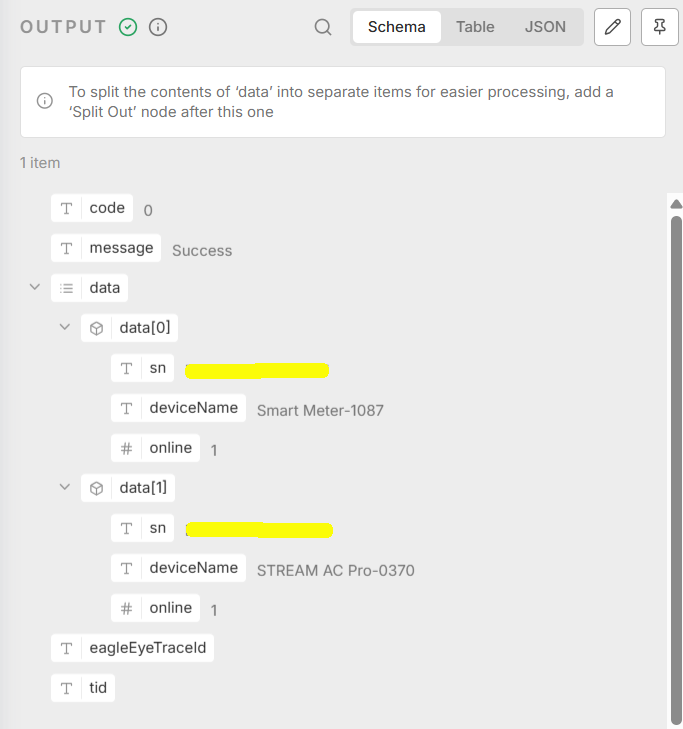
If you run the complete workflow, you should get a complete list of your EcoFlow devices. By querying the EcoFlow API from your Raspberry PI you should get something like the following screenshot:
From this basic workflow, you can build your custom query to EcoFlow devices by implementing the queries as described in the EcoFlow developer Docs.
Next Steps
Interested in more projects with your Raspberry PI? Take a look at peppe8o Raspberry PI computer tutorials pages.
Enjoy the EcoFlow API from Raspberry PI!

Open source and Raspberry PI lover, writes tutorials for beginners since 2019. He's an ICT expert, with a strong experience in supporting medium to big companies and public administrations to manage their ICT infrastructures. He's supporting the Italian public administration in digital transformation projects.
![]()
![]()
![]()
![]()
![]()
![]()
![]()


Hello! Thank you for the great instructions. I have an Ecoflow Stream AC Pro and Ultimate. So far, I’ve only been able to query the device list and the device itself. Have you found a way to change the state of charge or the SOC limit? I can’t find any information on how to do this. All my attempts fail with an error message about an incorrect string.
Hi Björn,
I got it working with some tests (at least to change the backup value). You can get my workflow from my download area at this link: . From the resulting script, you must change the following values with your one:
my_access_key
my_secret_key
my_serial_number
Soc_backup_value (this value is included 2 times)
Then you can import the resulting JSON file in your N8N and try it. It isn’t still in the best version, but it can be a start point.
In a few words, you must change the URL string and include the same query both in the secret and the HTTP PUT body.
Hope this helps you.