
Last Updated on 19th June 2025 by peppe8o
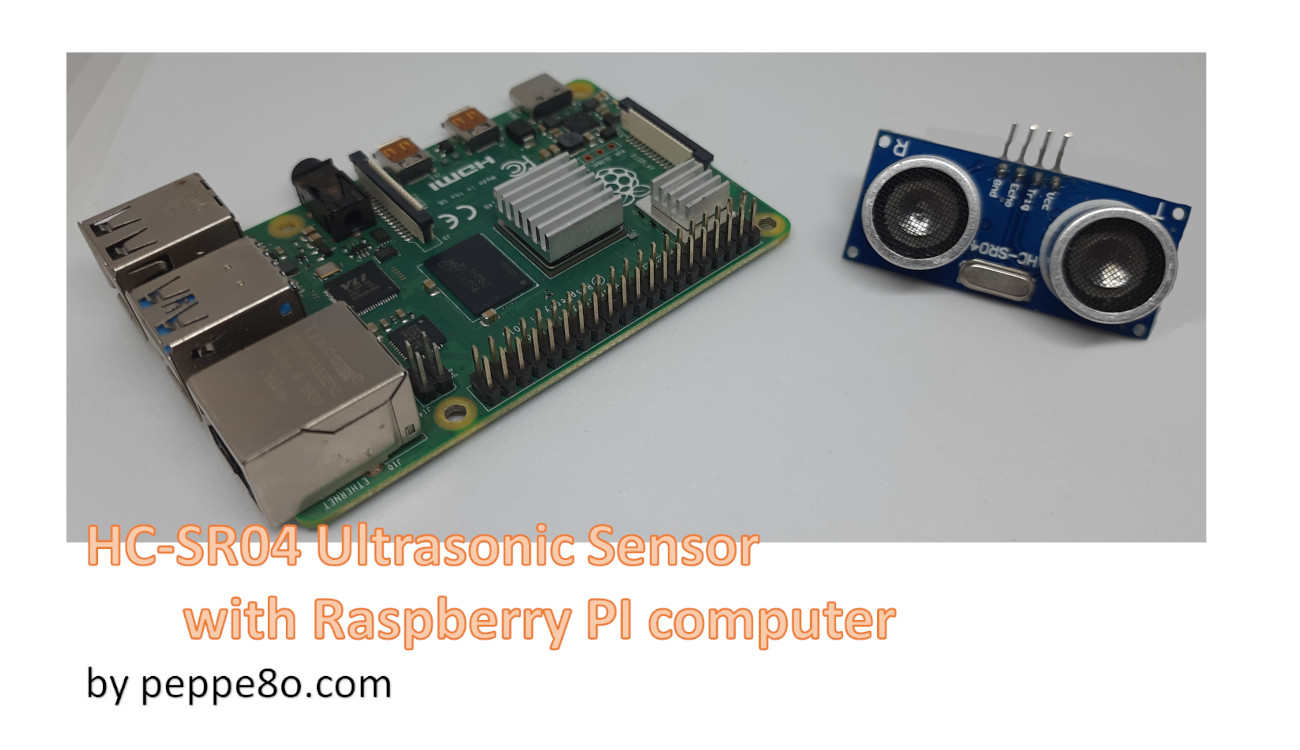
This tutorial will show you how to use an HC-SR04 Ultrasonic Sensor with a Raspberry PI computer board, giving you the wiring diagram and the Python code to test it.
Ultrasonic Sensors are great for all kinds of projects that need distance measurements, like obstacle detection. It is a cheap and easy-to-use solution which gives you reliable results unless you need high precision distance measurements.
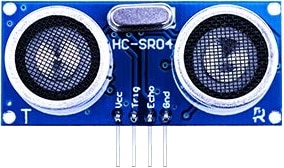
How the HC-SR04 Ultrasonic Sensor Module Works
The HC-SR04 ultrasonic sensor module provides a 2 cm – 400 cm non-contact measurement function, with a ranging accuracy down to 3mm.
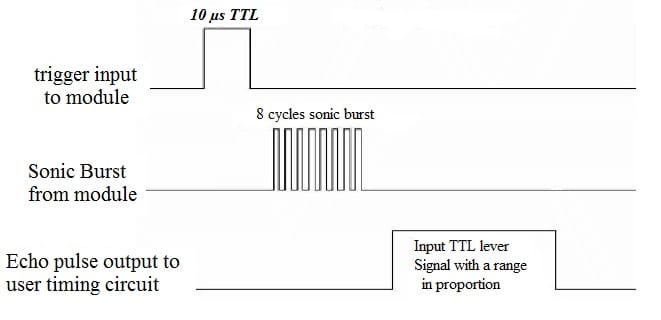
The basic principle of work:
- IO trigger high-level signal (for at least 10us) starts the process
- The module automatically sends eight micro signals at 40 kHz and starts to listen for detecting whether there is a feedback signal.
- If there is a feedback signal, the time of high input IO duration is the time taken for the ultrasonic signal to hit the object and return back to the module.
So, the distance can be calculated as:
high-level ingress duration × speed of sound (34300cm/s) / 2.
The final division is because we have feedback for the complete round-trip, and the distance is half.
The Timing diagram is shown below:
Connecting the HC-SR04 Ultrasonic Sensor with Raspberry PI
Voltage levels must be kept in consideration. The HC-SR04 module works with a 5V current (except trigger, which can be lower) and outputs a 5V signal on echo. The echo goes back to the Raspberry PI for duration measurement on GPIOs. Raspberry PI GPIO reading should not be higher than 3.3V to avoid circuit failure, so we need to implement a simple voltage reduction circuit with resistors. A good solution can be found from learningaboutelectronics.com: How to Reduce Voltage with Resistors. Our voltage circuit will follow this physical diagram:
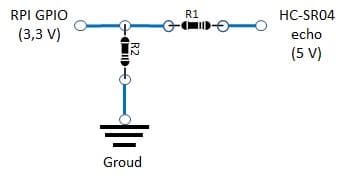
The calculations can be done according to the following formulas:

So, once defined:
- Vgpio = 3.3 Volt,
- Vecho = 5 Volt
We choose R1 and derive R2 from following:
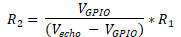
High -> 1,3V
From the last equation, if you have a 220-ohm resistor for R1, you should supply a 194.12-ohm resistor from R2.
As the Raspberry PI GPIO can detect a high signal from 1.3V, and we don’t need to measure the exact value of the resulting voltage level (we need only to know how long the signal stays high), we can arrange the resistors so that the resulting voltage level from the Echo PIN remains in the 1.3V – 3.3V. This can be achieved, for example, by using the same resistor value for both R1 and R2, giving us the Echo level at 2.5V.
For this, I will use 220-ohm resistors both for R1 and R2. The final voltage reduction circuit is:

Now we can start our project.
In this article, we’ll control our HC-SR04 ultrasonic sensor from a Raspberry PI 4 Model B computer board. This article also applies to all the Raspberry PI computer boards.
What We Need
As usual, I suggest adding from now to your favourite e-commerce shopping cart all the needed hardware, so that at the end you will be able to evaluate overall costs and decide if to continue with the project or remove them from the shopping cart. So, hardware will be only:
- Raspberry PI Computer Board (including proper power supply or using a smartphone micro USB charger with at least 3A)
- high speed micro SD card (at least 16 GB, at least class 10)
- an HC-SR04 Ultrasonic Sensor
- Dupont wirings
- breadboard (optional)
- 2x resistors (this tutorial uses 220-ohm resistors)
Step-by-Step Procedure
Wiring Diagram
Please prepare the cabling as shown in the following picture, according to the Raspberry PI Pinout:

Here’s the connection table:
| Raspberry PI | HC-SR04 Ultrasonic Sensor |
|---|---|
| GND (ground) | GND (ground) |
| GPIO 15 | Echo (with voltage divide circuit) |
| GPIO 14 | Trigger |
| 5V | VCC |
Please find below some pictures from my cabling:


Prepare the Raspberry PI OS Operating System
The first step is installing the Raspberry PI OS Lite to get a fast and light operating system (headless). In this case, you will need to work from a remote SSH terminal. If you need a desktop environment, you can also use the Raspberry PI OS Desktop, in this case working from its terminal app. Please find the differences between the 2 OS versions in my Raspberry PI OS Lite vs Desktop article.
Make sure that your system is up to date. Connect via SSH terminal and type the following command:
sudo apt update -y && sudo apt full-upgrade -yThe HC-SR04 ultrasonic distance sensor can give more reliable results to your Raspberry PI if this specifies the pin_factory. To make it work, we also need to enable and start the gpiod service on our Raspberry PI computer board. This task can be performed with the following terminal commands:
sudo systemctl enable pigpiod.service
sudo systemctl start pigpiod.service
Without these commands, we’ll get the following errors when trying to use the PiGPIOFactory library:
%%%%%%%%%%%%%%%%%%%%%%%%%%%%%%%%%%%%%%%%%%%%%%%%%%%%%%%%%%%%
Can't connect to pigpio at localhost(8888)

Did you start the pigpio daemon? E.g. sudo pigpiod

Did you specify the correct Pi host/port in the environment
variables PIGPIO_ADDR/PIGPIO_PORT?
E.g. export PIGPIO_ADDR=soft, export PIGPIO_PORT=8888

Did you specify the correct Pi host/port in the
pigpio.pi() function? E.g. pigpio.pi('soft', 8888)
%%%%%%%%%%%%%%%%%%%%%%%%%%%%%%%%%%%%%%%%%%%%%%%%%%%%%%%%%%%%
The GPIOZero library is already installed in your Raspberry PI, and it gives you the DistanceSensor() class to manage the ultrasonic distance sensor. I’ll show you a basic and an advanced usage of this class.
Basic Usage of Ultrasonic Sensor with Raspberry PI
The basic example shows you how to correctly setup the distance sensor and get distance values printed in the terminal. For this test, please get from my download area the ultrasonic-hcsr04.py script:
wget https://peppe8o.com/download/python/ultrasonic/ultrasonic-hcsr04-basic.pyThe line-by-line script explanation follows.
At the beginning, we import the required modules. The PiGPIOFactory allows us to get better reliability of our results, while the DistanceSensor will give us the Python class, which makes it simple to manage the results from the sensor. The sleep module allows us to add a pause between each measurement, so that our results in the terminal shell will not be overwritten too quickly:
from gpiozero.pins.pigpio import PiGPIOFactory
from gpiozero import DistanceSensor
from time import sleep
We can initialise a DistanceSensor object with only the echo and trigger PINS. But I suggest you explicitly set the max_distance value (by default 1 meter) and the pin_factory (by default None):
sensor = DistanceSensor(echo=15, trigger=14, max_distance = 4, pin_factory = PiGPIOFactory())Now, we can get the distance result (in meters) with the sensor.distance property of the DistanceSensor class. This script will make the readings repeat every 1 second and will print the results in your terminal. The try ... except statement will manage any errors coming from the sensor by simply skipping them. The KeyboardInterrupt will make it possible to you to stop the Python script by sending an interrupt signal (CTRL+C) from your keyboard:
while True:
  try:
    print('Measured Distance', sensor.distance, 'm')
    sleep(1)
  except KeyboardInterrupt:
    quit()
You can run this script with the following command:
python ultrasonic-hcsr04-basic.pyThis will return to you the distance measurements as in the following:
pi@raspberrypi:~ $ python ultrasonic-hcsr04-basic.py
Measured Distance 2.0200850999999997 m
Measured Distance 2.0200850999999997 m
Measured Distance 2.02094325 m
Measured Distance 2.0192269499999997 m
Measured Distance 2.0200850999999997 m
Measured Distance 2.02094325 m
Measured Distance 2.0243758499999998 m
Measured Distance 2.0200850999999997 m
Measured Distance 0.0823824 m
Measured Distance 0.0720846 m
Measured Distance 0.0755172 m
Measured Distance 0.08667315 m
Measured Distance 2.0200850999999997 m
As said, at any time you can press CTRL+C on your keyboard to stop the script.
Advanced Usage of Ultrasonic Sensor with Raspberry PI
The advanced example shows you how to setup a distance threshold, which will trigger a custom function when objects are detected at a distance lower or higher than the threshold. For this test, please get from my download area the ultrasonic-hcsr04.py script:
wget https://peppe8o.com/download/python/ultrasonic/ultrasonic-hcsr04-advanced.pyAgain, the line-by-line script explanation follows.
At the beginning, we import the required modules. The PiGPIOFactory and DistanceSensor has already been explained. We don’t need the sleep module here:
from gpiozero.pins.pigpio import PiGPIOFactory
from gpiozero import DistanceSensor
Again, we initialise the DistanceSensor() object. In this case, you can see that we set a different max_distance value (1 meter) and a threshold_distance input of 0.2 (0.2 meters, meaning 20 cm). The default value for this parameter is 0.3 meters.
sensor = DistanceSensor(echo=15, trigger=14, max_distance=1, threshold_distance=0.2, pin_factory = PiGPIOFactory())We also define 2 custom functions. For simplicity, in_range_actions() and out_range_actions() will print a terminal message with the related action, but you can write here whatever program code to execute:
def in_range_actions():
  print("In range")

def out_range_actions():
  print("Out of range")
The try statement will start at the beginning of the main program. The when_in_range property of the DistanceSensor class will execute the in_range_actions function when an object has been detected entering at a distance lower than the threshold_distance, while the when_out_of_range property will execute the out_range_actions function when an object exits from this threshold space. You don’t need to add these lines in the main loop of your program, as they run as a temporary code interrupt, executing the custom function lines and then moving back to the main program:
try:
  sensor.when_in_range = in_range_actions
  sensor.when_out_of_range = out_range_actions
For this example, the main program will execute nothing: the pass statement will just move to the following run in the while loop, but you can change the main loop with your program code. The except KeyboardInterrupt will close the try statement from the previous lines by catching any keyboard interrupt (CTRL+C) signal:
  while True:
    # Here goes your code for other stuff
    pass

except KeyboardInterrupt:
  quit()
You can run this script with the following command:
python ultrasonic-hcsr04-advanced.pyYou can trigger the object detection, for example, by putting your hand in front of the HC-SR04 ultrasonic sensor (at a distance lower than the threshold) and then moving it out. This will return to you the messages as in the following:
pi@raspberrypi:~ $ python ultrasonic-hcsr04-advanced.py
In range
Out of range
In range
Out of range
In range
Out of range
In range
Out of range
In range
Out of range
What’s next
If you are interested in more Raspberry PI projects (both with Lite and Desktop OS), take a look at my Raspberry PI Tutorials.
Enjoy!

Open source and Raspberry PI lover, writes tutorials for beginners since 2019. He's an ICT expert, with a strong experience in supporting medium to big companies and public administrations to manage their ICT infrastructures. He's supporting the Italian public administration in digital transformation projects.
![]()
![]()
![]()
![]()
![]()
![]()
![]()


Hi peppe8o,
Thanks for the tutorial. Just a heads up that the code downloaded from
https://peppe8o.com/download/python/ultrasonic-hcsr04.pyuses GPIOs 20,21 whereas your circuit shows GPIOs 14, 15 connected. With the following GPIO assignments the code works with the circuit you show.echoPIN = 15
triggerPIN = 14
Thank you for your feedback, Hank. Your note is correct.
Script updated according to wiring image.
Hi peppe, the output I should see is the distance message? Once i run the code nothings happens, not even an error but I can’t see any message of programm working. 🙁
Hi Juan,
you should must seeing a number which measures the distance of first object in front of HC-SR04.
Please recheck cabling and verify that echoPIN and triggerPIN variables correctly matches your wiring. Also try changing PINs on Raspberry PI: sometimes a wrong soldering could intake your results. If still nothing happens, please send me at giuseppe@peppe8o.com a few pictures from your cabling and a copy of your code (the .py) with your variables setting.
I’m not seeing that output, I think that cabling is wrong, cause I add prints to code and it reacts only when I disconnect VCC cable and that not make sense for me.
I’m very novice in electronics so probabbly my connections are wrong, cause pins are working correctly. I’m going to send a mail to you begging for your help haha. I’m very grateful for your time =)
Sure, no problems 😉
Hi peppe80,
Running this code and it works. Thank you for the clear tutorial.
Quick question. How can I run this to do say 10 readings and then stop, instead of an infinite loop ?
Hope you can give me a hint.
Hi. Thank you for your feedback.
for the limited readings, it’s quite simple. Just change the final “while True” loop with:
x = 0
while x < 10: print (" Distance: " + str(distance())+ " ", end='\r') x += 1 (please add spaces before the last 2 rows to honour the micropython indenting rules as html comments are trimming the spaces before text)
Hi peppe80,
Thank you so much for the reply! What I’m trying to accomplish is to have ten readings written out to a text file, so that I can parse the data and work out an average. Will try what you said.
Regards
Hi again,
Thank you so much for the reply! What I’m trying to accomplish is to do 10 readings and output
them to a text file, each reading on a seperate line.
Tried to add what you said, but I’m missing something. Here’s what I have :
# ——————————————————————–
# MAIN LOOP
# ——————————————————————–
try:
while True:
x = 0
while x < 10: print (" Distance: " + str(distance())+ " ", end='\r') x += 1
except KeyboardInterrupt:
print('interrupted!')
GPIO.cleanup()
My apologies,
Here is the the code:
https://pastebin.com/RN52Nw2Y
and the error I get :
https://pastebin.com/WxxjGKbR
Please move x+=1 into a new line, with the same indentation of the print statement
…and remove the “while True:” line from your code
It works, gives me the distance , beet it keeps on running infinitely, printing the reading in the same line.
Here is what I have :https://pastebin.com/FvTTCXcX
The pastebin is about the new code.
I didn’t understand if it stopped or not after the 10 runnings. Please can you share the print output?
I let it run for more than 5 minutes :
The ouput is :
Distance: 287.5 – and this fluctuates, but hasn’t stopped.
Ah, ok.
The print statement must stay in a different row from while one. It has also to be indented compared to the while line.
The x+=1 line has to be indented as the print statement
Thank you – here is the new code :https://pastebin.com/paZ6bX8J
It prints the distance reading for a couple of seconds ( 4-5 ) seconds, then stops. So it’s not infinite anymore.
Now I need to figure out how to get 10 readings, each one on a new line, so that I can print that to a text file.The 10 readings fluctuate, but to fast to capture all ten different ones.
Any input would be most welcome.
Ok, please remove this part from the print statement:
+ ” “, end=’\r’
At the end, it should work as required
Got it working ! Thank you again!
Regards
Hi again, just a little mistake I noticed. At the top where it says “otherwise, you can get it installed with the command “sudo apt-install python3-rpi.gpio”, that needs to be sudo apt-get install or sudo apt install, for those that are new to linux 🙂
Argh… You are right!
Thank you for your note, corrected