How to Enable Raspberry PI SNMP Monitoring (Computer Boards)
Last Updated on 2nd September 2023 by peppe8o
This tutorial will show you how to enable Raspberry PI SNMP monitoring, including a trick to add a personal script (in Python) to your monitored objects.
Using Raspberry PI SNMP Monitoring allows you to keep control of your computer board settings and values so that you can manage it with professional software.
It is important to note that this tutorial deals with activating the Raspberry PI agent to answer SNMP queries. If you are looking for a monitoring server (with dashboards), you should look at my Network monitoring with Raspberry PI and NEMS (Nagios) or Raspberry PI and LibreNMS: Powerful Monitor for Home Network. You can refer to one of these tutorials after finishing to setup the agent with this article.
What is SNMP
SNMP (Simple Network Management Protocol) is a widely known communication protocol enabling you to manage network devices and systems. System administrators use it to collect information about device status, so getting a simpler way to manage complex environments and automate troubleshooting.
SNMP works with a server-agent architecture. The server collects information showing the devices in powerful dashboards while the agents, which are individual network devices, provide their status info.
This protocol uses Management Information Bases (MIBs), a hierarchical structure of information which follows a common standard. Each MIB object is identified by a unique Object Identifier (OID), corresponding to a specific device attribute (such as CPU/RAM utilization, interface status, or system temperature).
SNMP Versions
There are three main SNMP versions: SNMPv1, SNMPv2c, and SNMPv3. The last (SNMPv3) addresses security concerns by providing encryption, authentication, and access control, making it the most secure version. So, this tutorial will deal with this SNMP version.
For this tutorial, I’m going to use my Raspberry PI Zero 2 W computer board, but the instructions here provided should work with any Raspberry PI computer board.
What We Need
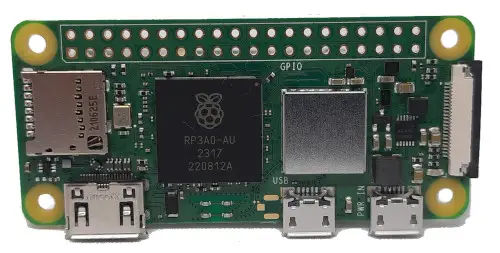
As usual, I suggest adding from now to your favourite e-commerce shopping cart all the needed hardware, so that at the end you will be able to evaluate overall costs and decide if to continue with the project or remove them from the shopping cart. So, hardware will be only:
- Raspberry PI Zero W (including proper power supply or using a smartphone micro USB charger with at least 3A) or newer Raspberry PI Board
- high speed micro SD card (at least 16 GB, at least class 10)
Step-by-Step Procedure
Prepare the Operating System
Start preparing the Raspberry PI OS. Usually, for remote devices, you don’t need to have a Desktop environment. So I suggest you to install Raspberry PI OS Lite to have a headless, fast OS.
After this step, please make your OS up-to-date. From terminal:
sudo apt update -y && sudo apt upgrade -yInstall SNMPv3 Daemon and Create a User
There are only a very few packages to install for getting the SNMP enabled. From the terminal, please use the following:
sudo apt install snmp snmpd libsnmp-dev -yBy default, we need to add a bit of configuration to get the SNMP working. After every configuration, we need to restart the snmpd service in order to get the new config running. Or you can stop the daemon before making the changes and then start it again.
Let’s create our first user, that will enable our Raspberry PI SNMP monitoring both from local and remote.
Stop the snmpd service:
sudo systemctl stop snmpd.serviceWe’ll need to define 3 values, of your choice, for our credentials:
- The User Name (Security Name): for this tutorial, I will use “snmpuser”
- The Authentication Protocol Pass Phrase: for this tutorial, I will use “snmpauthpwd”
- The Privacy Protocol Pass Phrase: for this tutorial, I will use “snmpprivpwd”
Please remember that the Pass Phrases must be at least 8 characters.
Use the following command to create your user, changing the credentials with your one:
sudo net-snmp-config --create-snmpv3-user -ro -A snmpauthpwd -X snmpprivpwd -a SHA -x AES snmpuserAt the date of this tutorial, there is a bug affecting the user creation command. For this reason, you will probably get a “No such file or directory” error on “/snmp/snmpd.conf”. If you don’t get this error, please move to the next testing chapter.
The full bug output will appear like the following:
pi@raspberrypi:~ $ sudo net-snmp-config --create-snmpv3-user -ro -A snmpauthpwd -X snmpprivpwd -a SHA -x AES snmpuser
adding the following line to /var/lib/snmp/snmpd.conf:
   createUser snmpuser SHA "snmpauthpwd" AES "snmpprivpwd"
adding the following line to /snmp/snmpd.conf:
   rouser snmpuser
touch: cannot touch '/snmp/snmpd.conf': No such file or directory
/usr/bin/net-snmp-create-v3-user: 144: cannot create /snmp/snmpd.conf: Directory nonexistent
This happens because the user creation looks on the wrong directory for the “snmpd.conf”. But we can solve the problem by manually adding the new user. Please open the file from the right directory:
sudo nano /etc/snmp/snmpd.confAnd append the following:
rouser snmpuserIf we want to remotely access the Raspberry PI MIBs, we must also configure it to bing at the network interface. You can do it by finding the “agentaddress” in your “snmpd.conf” (which should be still open) and appending your Raspberry PI’s IP address (mine is 192.168.1.18) separated with a comma, as in the following line:
agentaddress 127.0.0.1,[::1],192.168.1.18Close the file and save. Restart the snmpd service:
sudo systemctl start snmpd.serviceTest the MIB
For a very simple test, we can use the snmpwalk command from the same Raspberry PI where we have configured the SNMP. By using your credentials, you can browse the monitored objects with the following line, where the “localhost” must be changed with your Raspberry PI’s IP address if you are running the command remotely. Also, please note that the final “| head” will limit the output only to the first 10 rows. By removing it you will have the complete set (quite a long set) of information:
pi@raspberrypi:~ $ snmpwalk -v3 -a SHA -A snmpauthpwd -x AES -X snmpprivpwd -l authPriv -u snmpuser localhost | head

iso.3.6.1.2.1.1.1.0 = STRING: "Linux raspberrypi 6.1.21-v8+ #1642 SMP PREEMPT Mon Apr  3 17:24:16 BST 2023 aarch64"
iso.3.6.1.2.1.1.2.0 = OID: iso.3.6.1.4.1.8072.3.2.10
iso.3.6.1.2.1.1.3.0 = Timeticks: (7599) 0:01:15.99
iso.3.6.1.2.1.1.4.0 = STRING: "Me <[email protected]>"
iso.3.6.1.2.1.1.5.0 = STRING: "raspberrypi"
iso.3.6.1.2.1.1.6.0 = STRING: "Sitting on the Dock of the Bay"
iso.3.6.1.2.1.1.7.0 = INTEGER: 72
iso.3.6.1.2.1.1.8.0 = Timeticks: (9) 0:00:00.09
iso.3.6.1.2.1.1.9.1.2.1 = OID: iso.3.6.1.6.3.10.3.1.1
iso.3.6.1.2.1.1.9.1.2.2 = OID: iso.3.6.1.6.3.11.3.1.1
If you want to check a specific OID, you can specify the OID to query (where the “iso” from the previous output stands for “.1”):
pi@raspberrypi:~ $ snmpwalk -v3 -a SHA -A snmpauthpwd -x AES -X snmpprivpwd -l authPriv -u snmpuser localhost .1.3.6.1.2.1.1.6.0

iso.3.6.1.2.1.1.6.0 = STRING: "Sitting on the Dock of the Bay"
Main OIDs for Raspberry PI SNMP Monitoring
There are a number of OIDs that usually take more attention for common monitoring tasks. Here I will show you a brief list of OIDs to check CPU, RAM and Disk status.
The main CPU OIDs are:
- .1.3.6.1.4.1.2021.10.1.3.1 -> 1 minute CPU Load
- .1.3.6.1.4.1.2021.10.1.3.2 -> 5 minute CPU Load
- .1.3.6.1.4.1.2021.10.1.3.3 -> 15 minute CPU Load
- .1.3.6.1.4.1.2021.11.11.0 -> Idle CPU time (%)
The main RAM OIDs are:
- .1.3.6.1.4.1.2021.4.3.0 – SWAP memory size
- .1.3.6.1.4.1.2021.4.5.0 -> Total RAM
- .1.3.6.1.4.1.2021.4.6.0 -> Used RAM
- .1.3.6.1.4.1.2021.4.11.0 -> Free RAM
Regarding Disk monitoring, the task requires a bit of additional configuration. By default, the partitions monitoring is not enabled, so we must add changes to our “snmpd.conf” file:
sudo nano /etc/snmp/snmpd.confAnd append the “includeAllDisks” option, specifying a percentage. The percentage should theoretically identify the minimal usage threshold for the partitions to be listed, but I experienced that it isn’t honoured and the result will show all the partitions, even if the number is mandatory. So, append the following line:
includeAllDisks 10%Close and save the file. Please restart the snmpd service:
sudo systemctl restart snmpd.serviceNow, we’ll have a full OIDs three looking at the partition table with the following command:
pi@raspberrypi:~ $ snmpwalk -v3 -a SHA -A snmpauthpwd -x AES -X snmpprivpwd -l authPriv -u snmpuser localhost .1.3.6.1.4.1.2021.9

iso.3.6.1.4.1.2021.9.1.1.1 = INTEGER: 1
iso.3.6.1.4.1.2021.9.1.1.6 = INTEGER: 6
iso.3.6.1.4.1.2021.9.1.1.8 = INTEGER: 8
iso.3.6.1.4.1.2021.9.1.1.9 = INTEGER: 9
iso.3.6.1.4.1.2021.9.1.1.20 = INTEGER: 20
iso.3.6.1.4.1.2021.9.1.1.21 = INTEGER: 21
iso.3.6.1.4.1.2021.9.1.2.1 = STRING: "/"
iso.3.6.1.4.1.2021.9.1.2.6 = STRING: "/dev/shm"
iso.3.6.1.4.1.2021.9.1.2.8 = STRING: "/run"
iso.3.6.1.4.1.2021.9.1.2.9 = STRING: "/run/lock"
iso.3.6.1.4.1.2021.9.1.2.20 = STRING: "/boot"
iso.3.6.1.4.1.2021.9.1.2.21 = STRING: "/run/user/1000"
iso.3.6.1.4.1.2021.9.1.3.1 = STRING: "/dev/root"
iso.3.6.1.4.1.2021.9.1.3.6 = STRING: "tmpfs"
iso.3.6.1.4.1.2021.9.1.3.8 = STRING: "tmpfs"
iso.3.6.1.4.1.2021.9.1.3.9 = STRING: "tmpfs"
iso.3.6.1.4.1.2021.9.1.3.20 = STRING: "/dev/mmcblk0p1"
...
You can compare the output with the “df” command:
pi@raspberrypi:~ $ df
Filesystem     1K-blocks    Used Available Use% Mounted on
/dev/root       15020268 1806468  12569864  13% /
devtmpfs           81548       0     81548   0% /dev
tmpfs             214700       0    214700   0% /dev/shm
tmpfs              85880     916     84964   2% /run
tmpfs               5120       4      5116   1% /run/lock
/dev/mmcblk0p1    261108   31380    229728  13% /boot
tmpfs              42940       0     42940   0% /run/user/1000
OIDs Customization
You can also create personal OIDs for your Raspberry PI, showing the result of custom scripts. Here, the interesting thing is that you can also use Python to generate a script output to be monitored. This enables you, for example, to associate an OID to a specific external sensor managed from a Python script.
The hard part of this job is finding a free OID number to associate with our script. I’ve seen several internet tutorials using the “.1.3.6.1.2.1.25.1.8” OID, but none of these explains why this address and what are the CONs.
In any case, you can try the snmpwalk command to check that the identified OID is free:
pi@raspberrypi:~ $ snmpwalk -v3 -a SHA -A snmpauthpwd -x AES -X snmpprivpwd -l authPriv -u snmpuser localhost .1.3.6.1.2.1.25.1.8
iso.3.6.1.2.1.25.1.8 = No Such Object available on this agent at this OID
For this reason, we’ll use a three based on this OID root to create a custom OID space. I will create only one of them, by appending the final “.1”, so you should continue with progressive numbers if you need more OIDs.
Start creating the script to execute within the “/usr/local/bin/” folder. I will name my script “snmpCpuTemp”:
sudo nano /usr/local/bin/snmpCpuTempInsert here your Python code.
In order to work, it must return a value if you call it with “-g” argument and return 3 rows: the OID number, the data type (as referred to in rfc2578) and the value.
The following Python script, as an example, will return the Raspberry PI CPU temperature:
import sys
from subprocess import check_output

def console(cmd):
    cmd=cmd.split()
    return check_output(cmd).decode("utf-8").rstrip()

temp_cmd="cat /sys/class/thermal/thermal_zone0/temp"

if sys.argv[1] == "-g":
        print(".1.3.6.1.2.1.25.1.8.1")
        print("Gauge32")
        temp=int(console(temp_cmd))
        temp = temp/1000
        print(temp)
exit()
Save the file and close. Change the file attributes in order to make it executable:
sudo chmod +x /usr/local/bin/snmpCpuTempTest the file alone:
pi@raspberrypi:~ $ python3 /usr/local/bin/snmpCpuTemp -g
.1.3.6.1.2.1.25.1.8
Gauge32
44.008
To make it answering to our OID, we must add it to the SNMP configuration file:
sudo nano /etc/snmp/snmpd.confwith the pass directive, remembering to use the full Python exec path (“/bin/python3”) before the full script path. So, append the following line at the end:
pass .1.3.6.1.2.1.25.1.8.1 /bin/python3 /usr/local/bin/snmpCpuTempSave and close. Also, restart the SNMP service:
sudo systemctl restart snmpd.serviceNow, the new custom OID should answer correctly to the snmpwalk command, which will round the result (as the gauge is an integer data type):
pi@raspberrypi:~ $ snmpwalk -v3 -a SHA -A snmpauthpwd -x AES -X snmpprivpwd -l authPriv -u snmpuser localhost .1.3.6.1.2.1.25.1.8.1
iso.3.6.1.2.1.25.1.8.1 = Gauge32: 43
What’s Next
You can take a look at my Raspberry PI projects to take inspiration for your Raspberry PI projects!
Enjoy!





Good day Thanks for sharing this project. We have a NMS system but i need a basic alarm system to warn staff of an alarm on NMS system via a buzzer and a security alarm light that there is an alarm and they have to attend to it. Is there a way that you can use a raspberry PI via GPIO and a relay board to provide this. That is when the raspberry PI receive the trigger to create an alarm.
Can you possibly guide me on how to setup this project.
Hi Theunis,
I suppose you don’t want just to show alarms based on internal Raspberry PI state, otherwise you can use my Python script and implement a custom function which enables a LED and activates a passive buzzer () or an active buzzer () instead of simply printing the temperature.
If you need to activate the warnings based on external device states, your Raspberry PI must reach their state. If your NMS has APIs, you can try developing a Python code to read these APIs and activates the warnings based on that. Another option is running the SNMP walk to remote devices from your Python program and activate the warnings based on retrieved values. I hope this helps you in getting your project started
I am trying to run a python script to check the status of the GPIO pins on a Pi4. The script performs fine when I execute the script from from the terminal. However when I try and “pass” and “extend” the script from the snmpd.conf file and perform a walk command I get the following error. I also tried running the python command from a shell script. The shell script runs (with the -g option) but I get the same same result.. “cannot find the pysnmp module” (FYI the pysnmp module is called within the pyton script)
Any thoughts?
————————————————–
376: enterprises.2021.255.1.2.1.2.7.47.98.105.110.47.115.104 /usr/local/bin/alarms_new.sh
377: enterprises.2021.255.1.2.1.3.7.47.98.105.110.47.115.104 -g
378: enterprises.2021.255.1.2.1.4.7.47.98.105.110.47.115.104
379: enterprises.2021.255.1.2.1.5.7.47.98.105.110.47.115.104 5
380: enterprises.2021.255.1.2.1.6.7.47.98.105.110.47.115.104 1
381: enterprises.2021.255.1.2.1.7.7.47.98.105.110.47.115.104 1
382: enterprises.2021.255.1.2.1.20.7.47.98.105.110.47.115.104 4
383: enterprises.2021.255.1.2.1.21.7.47.98.105.110.47.115.104 1
384: enterprises.2021.255.1.3.1.1.7.47.98.105.110.47.115.104 .1.3.6.1.4.1.2021.255.1
385: enterprises.2021.255.1.3.1.2.7.47.98.105.110.47.115.104 .1.3.6.1.4.1.2021.255.1 value Traceback (most recent call last): File “/usr/local/bin/alarms_new.py”, line 9, in from pysnmp.hlapi import * ModuleNotFoundError: No module named ‘pysnmp’
386: enterprises.2021.255.1.3.1.3.7.47.98.105.110.47.115.104 6
387: enterprises.2021.255.1.3.1.4.7.47.98.105.110.47.115.104 0
388: enterprises.2021.255.1.4.1.2.7.47.98.105.110.47.115.104.1 .1.3.6.1.4.1.2021.255.1
389: enterprises.2021.255.1.4.1.2.7.47.98.105.110.47.115.104.2 value
390: enterprises.2021.255.1.4.1.2.7.47.98.105.110.47.115.104.3 Traceback (most recent call last):
391: enterprises.2021.255.1.4.1.2.7.47.98.105.110.47.115.104.4 File “/usr/local/bin/alarms_new.py”, line 9, in
392: enterprises.2021.255.1.4.1.2.7.47.98.105.110.47.115.104.5 from pysnmp.hlapi import *
393: enterprises.2021.255.1.4.1.2.7.47.98.105.110.47.115.104.6 ModuleNotFoundError: No module named ‘pysnmp’
I’ve not tested the pysnmp. Anyway, usually this kind of error raises in Python when you install the module with pip3 as a user (for example the “pi” user, without sudo) and try to run the python script from a different user 8for example the root.
Long story short, issuing a “sudo pip3 install pysnmp” will probably help to let your script finding the pysnmp module.