Last Updated on 7th August 2026 by peppe8o
In this tutorial, I’m going to show you how to install Exim4 on Raspberry PI to send email from the terminal, also showing usage examples. I’m going to use a Raspberry PI 4 Model B (4GB RAM) with Raspberry PI OS Lite, but this tutorial also applies to other Raspberry Pi computer boards and with desktop OS distributions. I also include real, measured data on resource usage and deliverability.
Email communication remained one of the most used media even with the rise of social networks and instant messaging services. It is free, it is unlimited, and it can be scripted. A specific usage for makers is with their IoT devices, sending emails when defined thresholds are triggered. Almost everyone owns an email address and can receive emails.
What is Exim
Exim is a Mail Transfer Agent (MTA). Distributed under the GNU General Public License, it aims to give flexibility to route emails and can be used in place of classic Sendmail or a more complex Postfix installation.
Advanced configuration can be done through a (typically single) configuration file, covering ACLs (SMTP session behaviour), routers (address processing), transports (message delivery), retry policy, address rewriting, and authenticators. In this tutorial, I will just show you the simplest way to send email messages.
Quick Answer
Install Exim4 with sudo apt install exim4, configure it with sudo dpkg-reconfigure exim4-config choosing “internet site”, then send mail from terminal with exim -t followed by To/From/Subject headers and CTRL+D.
On a Raspberry Pi 4, the Exim daemon uses about 22 MB of RAM at idle and briefly peaks at 50-70 MB while sending – negligible even on a Pi Zero. The bigger concern isn’t performance, it’s deliverability: without SPF/DKIM, providers like Gmail will reject your mail messages (see the Security & Deliverability section below).
Real Resource Usage on a Raspberry Pi 4
Before walking through the install, here’s how many resources Exim4 uses – measured, not estimated. I’ve performed the measurement using a small monitoring script, which sampled ps every 0.25 seconds while running the sending examples further down this guide. Here’re the results in CPU and RAM on a Pi 4 (4GB):
| Scenario | Peak RAM | Peak CPU | Peak activity window |
|---|---|---|---|
| Daemon at rest | ~22 MB | ~0% | – |
| Test 1: plain text, 1 recipient | ~47 MB | 19.1% | ~1.7s |
| Test 2: plain text, multiple recipients + cc | ~63 MB | 25.0% | ~5.5s |
| Test 3: HTML, multiple recipients + cc | ~70 MB | 150.0%* | ~7.3s |
* Methodology note: some samples showed CPU readings above 100% (up to 150%). Exim briefly runs as two separate processes at once (the main daemon plus a short-lived one it creates to actually deliver the message). The measurement script added their CPU usage together. On a quad-core Pi 4, this is still tiny in absolute terms – nothing close to maxing out the system.
Even in the last scenario, RAM usage remained under 75 MB for a few seconds before dropping back to the idle value. Even on a Pi Zero W (512 MB RAM), this is still a secure resource usage.
Before You Start: Is Port 25 Even Open?
Exim uses the internet port 25 to send email messages. Before installing anything, it’s worth checking whether your ISP allows outbound traffic on that port, as some consumer ISPs can block it by default to fight spam. If it’s blocked, there’s no way to fix it; you’d need to route through an authenticated smarthost instead (e.g. your ISP’s own SMTP server, or a transactional email provider).
To test it, please use the following terminal command from your Raspberry Pi:
nc -zv smtp.gmail.com 25If you see succeeded, you’re good to proceed.
What We Need
As usual, I suggest adding from now to your favourite e-commerce shopping cart all the needed hardware, so that at the end you will be able to evaluate overall costs and decide if to continue with the project or remove them from the shopping cart. So, hardware will be only:
- Raspberry PI Computer Board (including a proper power supply or using a smartphone micro USB charger with at least 3A)
- high-speed micro SD card (at least 16 GB, at least Class 10)
Step-by-Step Procedure
Prepare Operating System
The first step is to install the Raspberry PI OS Lite to get a fast and lightweight operating system (headless). If you need a desktop environment, you can also use the Raspberry PI OS Desktop, in which case you will work from its terminal app. Please find the differences between the 2 OS versions in my Raspberry PI OS Lite vs Desktop article.
Please make sure that your Operating System is up to date. From your terminal, use the following command:
sudo apt update -y && sudo apt full-upgrade -yInstall and Configure Exim4
Exim installation is very simple with the aptitude package manager. From the terminal:
sudo apt install exim4On Debian Trixie, this pulls in 12 packages (exim4-config, exim4-base, exim4-daemon-light, and dependencies), roughly 3.3 MB to download and under 8 MB of disk space – light enough for any micro SD storage card.
Configure Exim4
After completing the Exim installation, a pre-configuration is required to make it work. From the terminal, type:
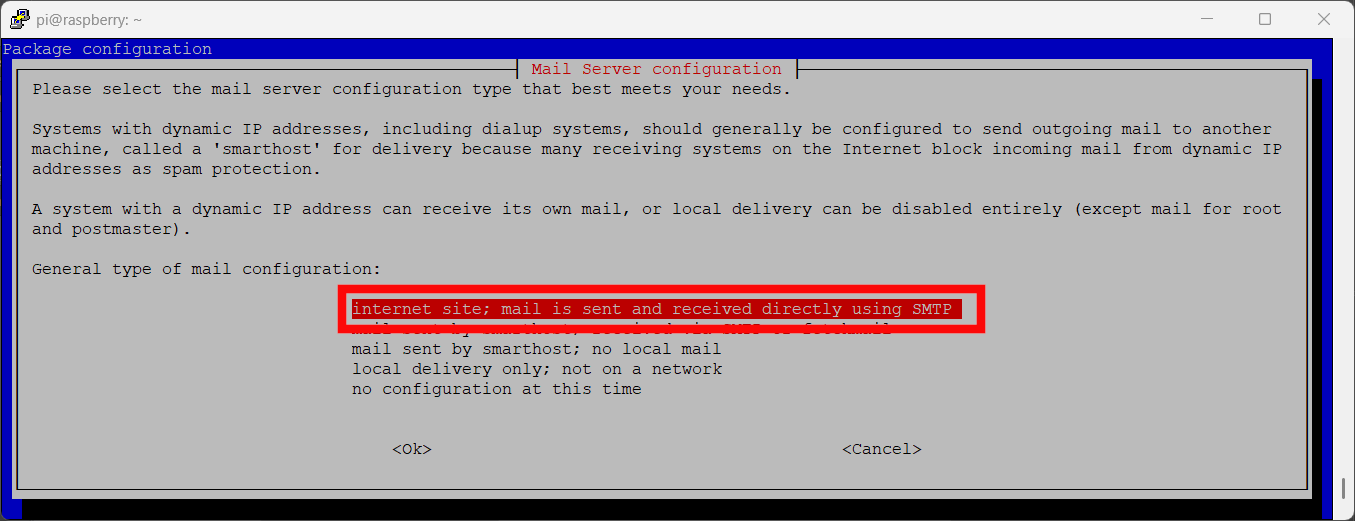
sudo dpkg-reconfigure exim4-configThis will start the Exim configuration wizard. For each window, press Return to confirm and move on to the next page. After finishing, you can also reconfigure Exim by repeating the above command.
The first screen will ask you to define what type of service you want to configure. Sending email directly to the internet (instead of routing through another server) will require selecting Internet Site:
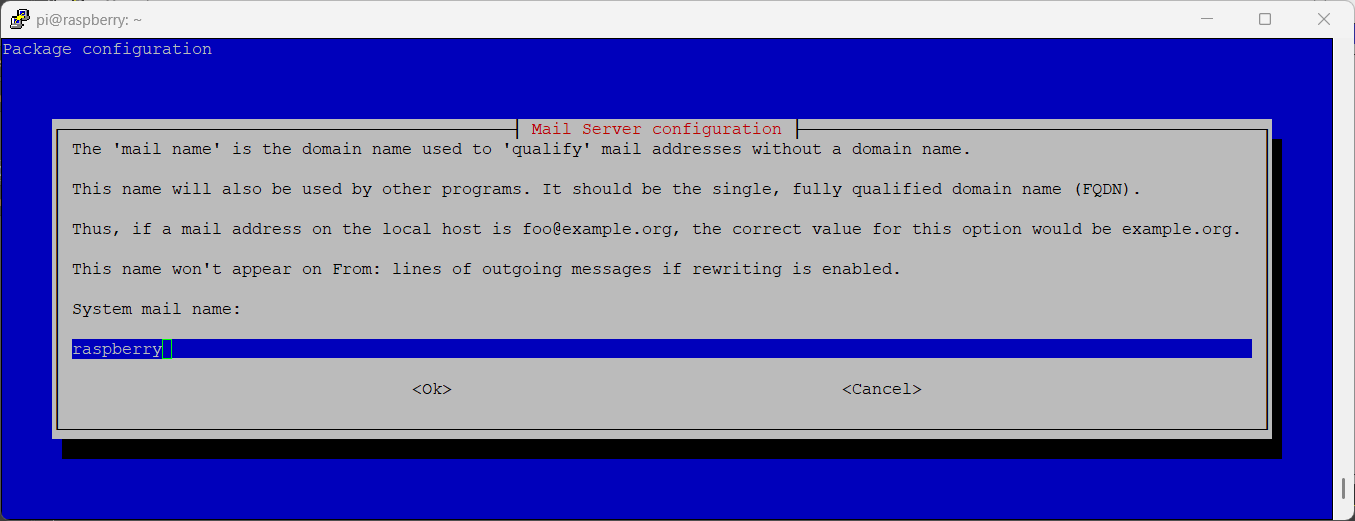
The second screen will ask for the domain used to qualify local addresses. You can leave the default (raspberry, or your Pi’s hostname) unless you have a real domain to use here:
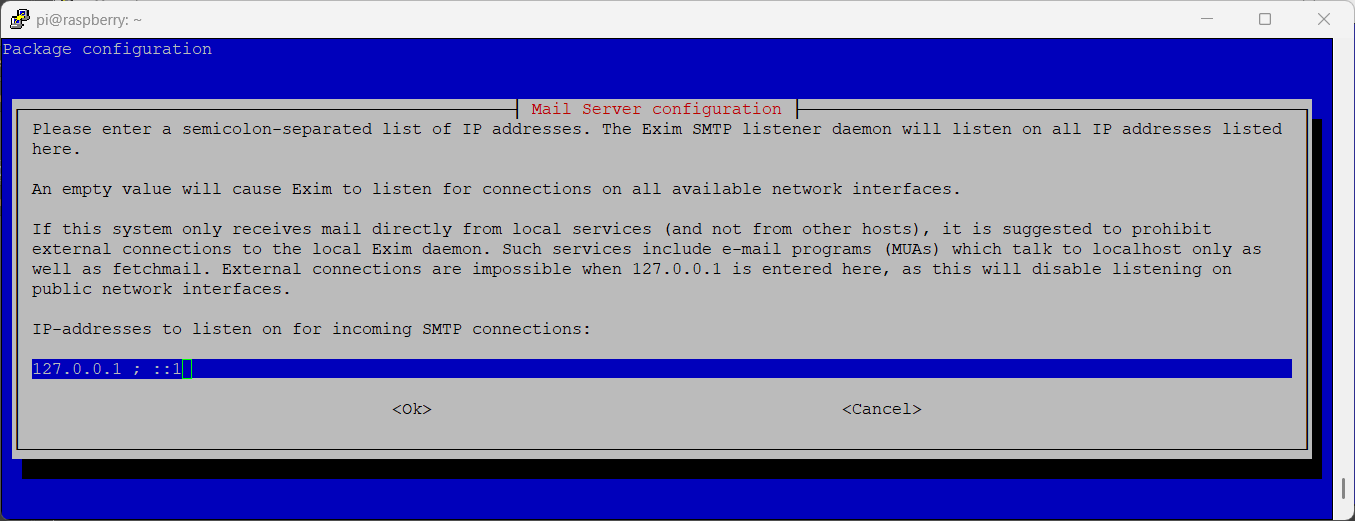
The next screen will ask for IP addresses where to listen if you want to use Exim also to receive mail (separated by a “,” semicolon). If you want only to send, you can leave the default (supporting both IPv4 and IPv6):
The next screen requires the domains for which Exim should accept email received for local storage. If you want to use Exim only to send emails, you can leave the default:
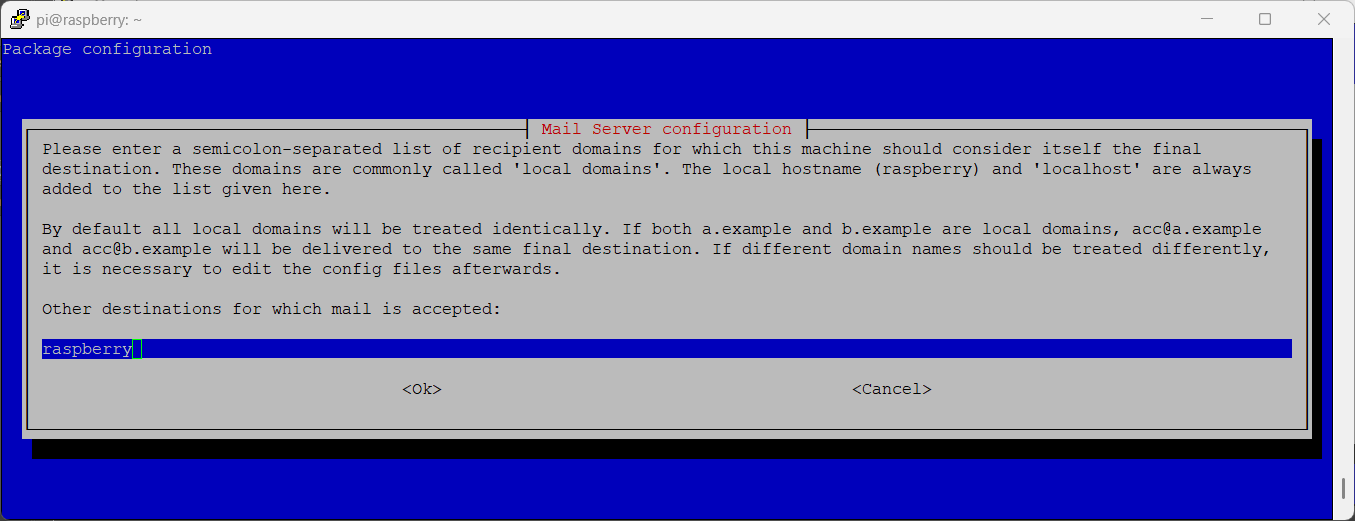
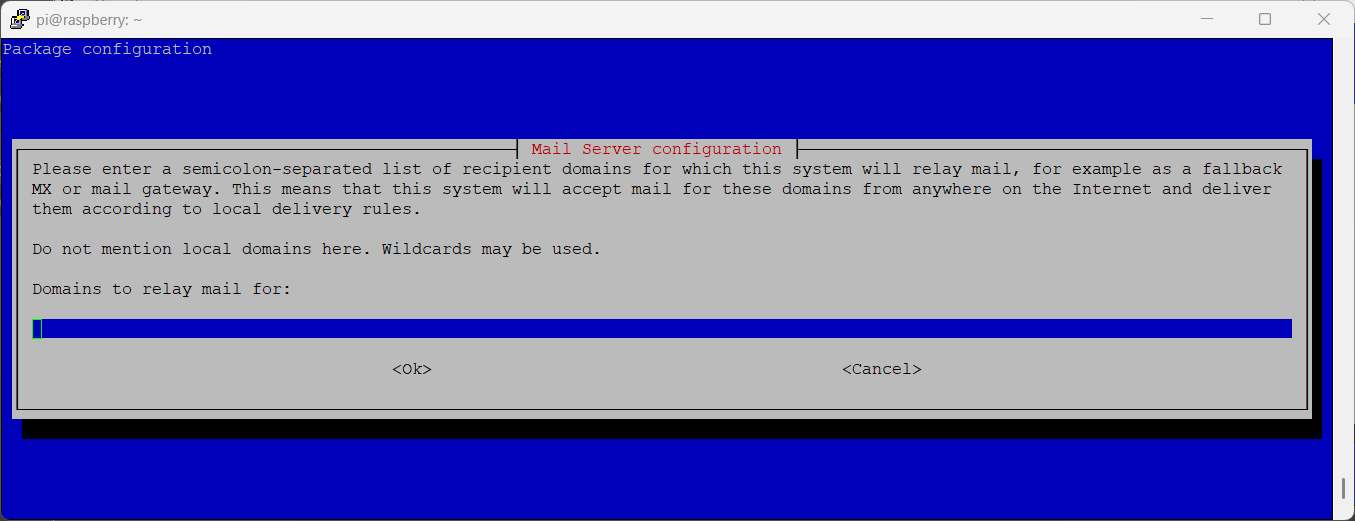
The next screen will ask for domains for which Exim should receive emails and forward them to external email systems. Again, you can leave it default if you want to use Exim only to send email messages:
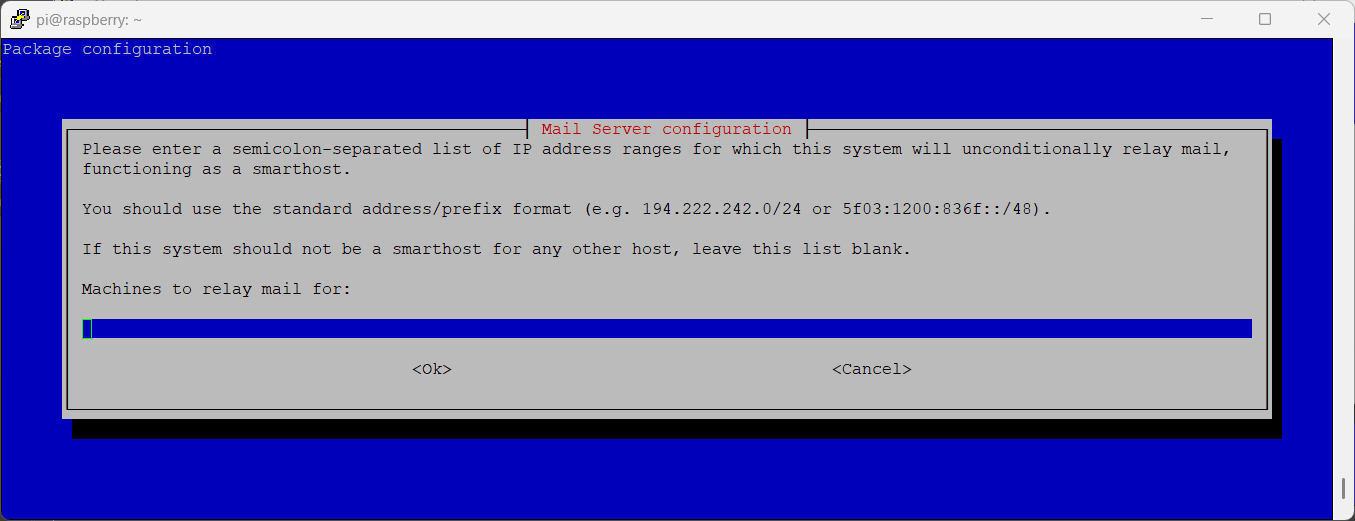
The following screen asks for IP addresses from which Exim should unconditionally route traffic (smarthost). You can leave as default, as we only want to send messages:
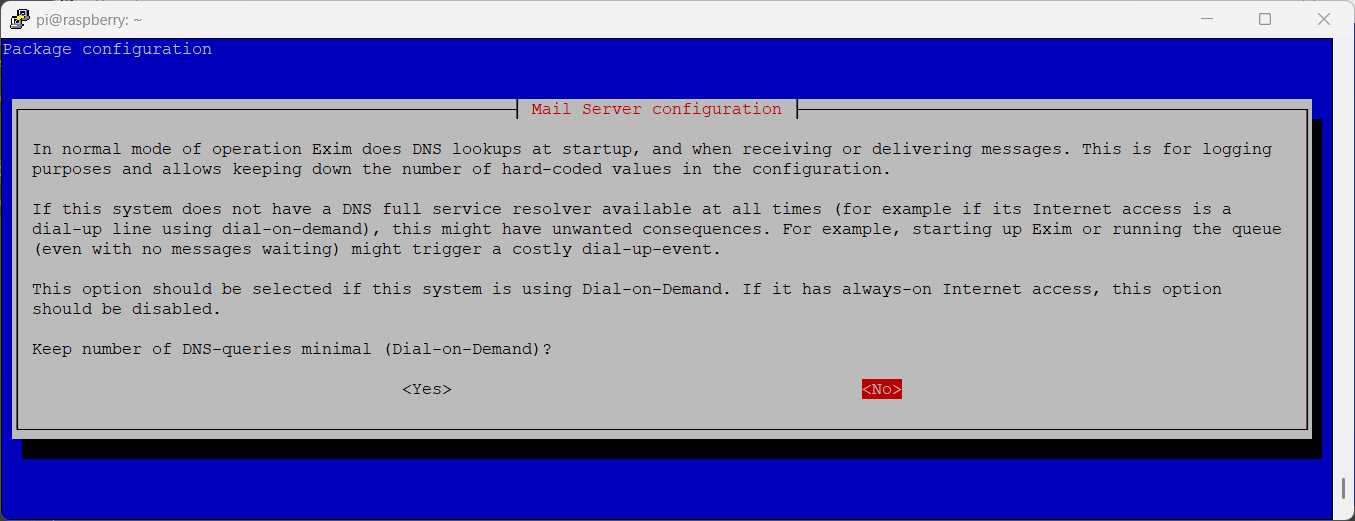
In the following screen, the wizard will ask if Exim should minimise DNS traffic by reducing ns-lookup queries. You can leave the default value (NO):
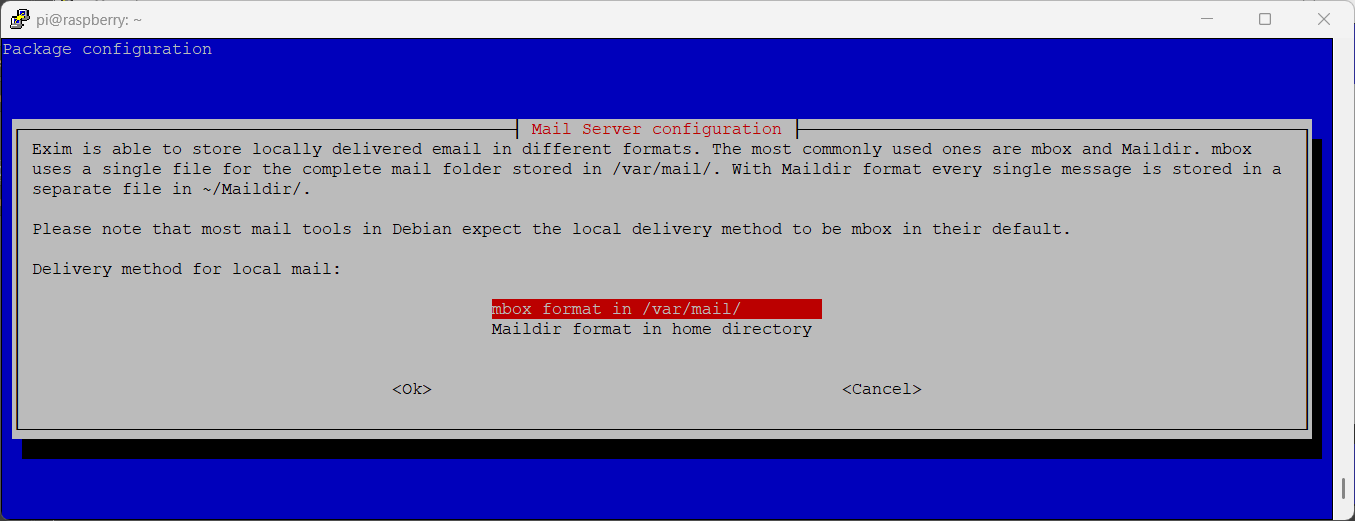
The following screen will ask the format to adopt for emails stored locally. You can leave the default value:
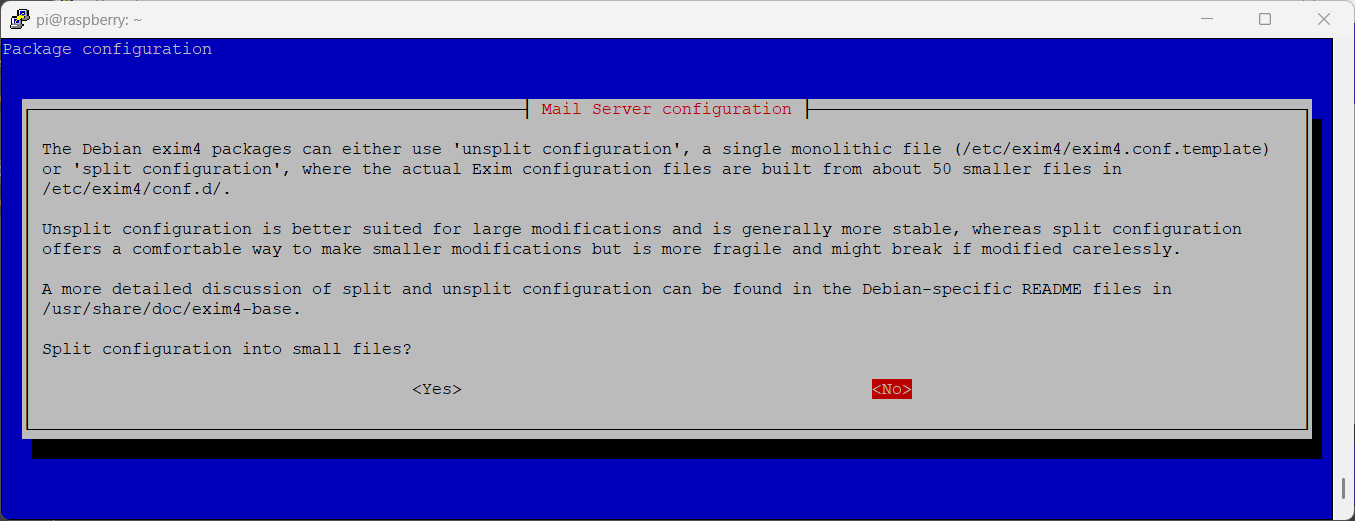
In the next question, you can decide to split exim configuration into smaller config files. This is useful for complex configurations, but it isn’t our case. You can leave the default (NO):
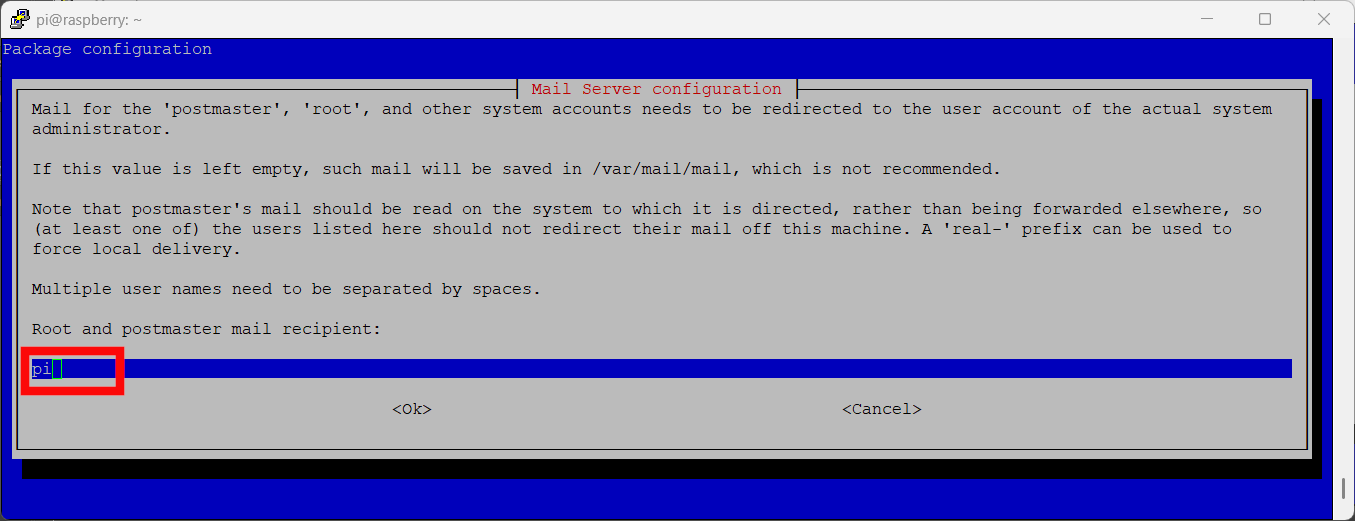
The last screen will ask for a default postmaster address, discouraging to leave it blank. Enter your actual system username (e.g. pi) so that mail addressed to root/postmaster is actually readable:
Exim configuration ended. It may take a very few seconds to automatically restart the service, and then you will have your prompt back for sending email from the terminal.
You can verify that the service is running with the following commands:
systemctl status exim4
systemctl is-enabled exim4
You should see active (running) and enabled.
Exim Email Sending Examples
Email sending process from the terminal is very simple, but requires a little knowledge.
The terminal command “exim” can be used with some options:
-v: shows the sending log directly on the terminal. Useful to watch what’s happening, though in my testing this mode occasionally had trouble delivering messages to CC recipients correctly.-t: doesn’t print live logs (they still go to/var/log/exim4/mainlog), but handles To/Cc/Bcc more reliably.
Using the -v option, you will need to specify recipient addresses from the first command. With -t option, you can specify them within the email setup.
When you run exim interactively, it enters a line-by-line input mode; each line is confirmed with Enter, and CTRL+D sends the message.
Let’s start with a few usage examples. In the terminal lines, I will use a generic “user@example.com” recipient. Please change it to email addresses that you can check.
Exim example 1 – Plain Text With Verbose Output
In this example, you will send a simple plain text email to 1 recipient. You will also set exim to show sending logs.
From terminal (press ENTER key after each row):
pi@raspberrypi:~ $ exim -v recipientTo@example.com
From:sender@example.com
Subject:Test Mail 1
Exim example 1 - Plain Text With Verbose Output
The last line will be the email body message. After it, please press CTRL+D to send. Then, check the recipient mailbox (also Spam Folder).
On my Pi 4, this example took Exim about 1.7 seconds of elevated activity and peaked at ~47 MB RAM before returning to idle.
Exim example 2 – Plain Text With Multiple Recipients and cc
In this example, you will send a simple plain text email to multiple recipients. Using -t option, you will not have terminal logs.
From the terminal (press ENTER key after each row):
pi@raspberrypi:~ $ exim -t
To:recipientTo_1@example.com, recipientTo_2@example.com
From:sender@example.com
Cc:recipientTo_3@example.com
Subject:Test Mail 2
Exim example 2 - Plain Text With Multiple Recipients and cc
After the last row, press CTRL+D to send. Check recipients’ mailboxes.
With three recipients (in my test, two of them rejected the message for deliverability reasons described below), Exim’s activity window stretched to ~5.5 seconds, and RAM peaked at ~63 MB, still returning cleanly to ~22 MB afterwards.
If you need to check the delivery logs from Exim, you can get them with the command:
sudo tail -20 /var/log/exim4/mainlogWhere -20 tells the command to show only the last 20 lines from the log to reduce the terminal output (you can vary this number as you like).
Exim example 3 – HTML Text With Multiple Recipients and cc
In this example, you will send a simple HTML email message to multiple recipients. Again, you will not have terminal logs using the -t option.
From terminal (press ENTER key after each row):
pi@raspberrypi:~ $ exim -t
To:recipientTo_1@example.com, recipientTo_2@example.com
From:sender@example.com
Cc:recipientTo_3@example.com
Content-type:text/html
Subject:Test Mail 3
<h1>Test HTML email</h1><p>Test to check exim resource usage with <strong>HTML content</strong>, multiple recipients and cc</p>
After the last row, press CTRL+D to send. Check the recipient’s mailbox.
This was the heaviest of the three tests: ~7.3 seconds of activity and a ~70 MB RAM peak, driven by the larger message body and multiple delivery attempts.
Exim Alternatives
If you’re comparing options between different alternatives, Exim’s main advantage is a single, well-documented configuration file and a simpler setup for a Pi that just needs to send occasional alerts – which is exactly this guide’s use case.
Another simple, terminal-based solution is Sendmail.
If you want to use your existing email account to send messages from Python, you can also consider my Send Email from Raspberry PI with Python tutorial.
A well-known service alternative is Postfix, which takes a more modular, multi-file approach and is generally preferred for systems that need to receive mail at scale or integrate with more complex mail stacks. For a Raspberry Pi doing lightweight outbound notifications, Exim’s simplicity is a good match; Postfix is worth considering if you already know it from other Linux systems and want consistency.
If you need a simple and complete email server, you can also consider DMS (Docker Mail Server).
Security & Deliverability: What Actually Happens When You Send
This is the part most tutorials skip – and it’s the part that actually determines whether your emails arrive. I tested delivery to three real providers (Hotmail/Outlook, Gmail, and an Italian provider, inwind.it) and documented exactly what happened.
The self-signed certificate warning
Every time the Exim4 daemon starts, it logs:
Warning: No server certificate defined; will use a selfsigned one.
Suggested action: either install a certificate or change tls_advertise_hosts option
This is expected for a basic setup and doesn’t block sending, but it means your outgoing TLS connections use an unverified certificate. For a Pi only sending occasional alerts to yourself, this is a low-risk trade-off worth being aware of rather than ignoring.
Delivery without any authentication: it can work, partially
My first test (a single plain-text email to a Hotmail/Outlook address, sent with no SPF, no DKIM, no domain authentication) was delivered successfully, over TLS 1.3, and landed in the inbox rather than Spam.
That’s a genuinely useful data point, but don’t take it as a guarantee: it reflects this specific IP’s reputation with Microsoft at test time, and results will vary by recipient provider and by your own ISP’s IP range.
Gmail: a hard rejection, with the exact reason
The same message sent to a Gmail address was rejected outright:
550-5.7.26 Your email has been blocked because the sender is unauthenticated.
550-5.7.26 Gmail requires all senders to authenticate with either SPF or DKIM.
550-5.7.26  Authentication results:
550-5.7.26  DKIM = did not pass
550-5.7.26  SPF [raspberry] with ip: [your-ip] = did not pass
Gmail now requires bulk and even casual senders to pass SPF or DKIM. A self-hosted Exim instance with no DNS records configured will be rejected every time, regardless of content or volume.
If your use case includes sending to Gmail addresses, this isn’t optional.
A hidden bug I found along the way: the envelope sender
While digging into a separate rejection from inwind.it (550 Invalid Domain), I noticed the actual envelope sender in the logs was pi@raspberry — even though the From: header in our test message read giuseppe@peppe8o.com. Exim was using the local hostname as the default envelope-from domain, and raspberry isn’t a real, resolvable domain. Once I set the envelope sender explicitly:
exim -f my_real_sender@example.com -t
(...)
inwind.it accepted the message immediately.
If you’re testing deliverability and getting domain-related rejections, check your envelope sender before assuming it’s a bigger problem. For permanent use, this should be set via the qualify domain option in Exim’s configuration rather than the -f flag on every send.
What’s still needed for full deliverability (not implemented here)
Fixing the envelope sender wasn’t enough for Gmail. It still rejected the retest, now correctly checking the sender domain but finding no SPF record for it. Going further requires:
- A valid FQDN for HELO/EHLO: our test also surfaced a bounce rejected by a real mail server with
504 5.5.2 <raspberry>: Helo command rejected: need fully-qualified hostname— the Pi’s hostname needs to be a real, resolvable domain name, not justraspberry, for stricter servers to accept the connection at all. - An SPF record: a DNS TXT record on your sending domain (e.g.
v=spf1 ip4:<your-public-IP> ~all) authorising your Pi’s IP to send on the domain’s behalf. - DKIM signing: configuring Exim to cryptographically sign outgoing mail, with the matching public key published in DNS.
- Reverse DNS (PTR): many providers also check that your IP resolves back to your sending domain. On a home internet connection, this typically requires a business-tier or static IP plan from your ISP. It’s often simply not available to individual users, and is worth knowing as a hard limit before investing time in the rest.
Troubleshooting
Check queued messages:
sudo mailqRead the live log:
sudo tail -50 /var/log/exim4/mainlogRemove a stuck/frozen message (get the message ID from mailq first):
sudo exim -Mrm <message-id>Replace <message-id> with the actual ID (e.g. 1wsGE2-000000005mO-3GvG)
Common errors I actually hit during testing:
TLS error on connection (recv): The TLS connection was non-properly terminated– this appeared right before several successful deliveries in our logs. It’s usually a benign side effect of how the receiving server closes the SMTP session, not a sign your message failed. Check the following log line forCompletedbefore assuming it’s a real problem.550 Invalid Domain— check your envelope sender (see the Security & Deliverability section above); it’s often not the same as yourFrom:header unless explicitly set.550-5.7.26 ... unauthenticated(Gmail) – you need SPF and/or DKIM configured for your sending domain; there’s no workaround at the Exim configuration level alone.504 5.5.2 ... need fully-qualified hostname– your Pi’s hostname isn’t a valid FQDN as far as the receiving server is concerned; this requires a real domain name, not just the localraspberryhostname.
Exim Docs
The official Exim docs are available at https://www.exim.org/docs.html. You can also find more command examples at Debian exim4-base manpages.
What’s Next
Interested in more projects for your Raspberry Pi computer board? Take a look at peppe8o Raspberry PI tutorials!
Enjoy!

Open source and Raspberry PI lover, writes tutorials for beginners since 2019. He's an ICT expert, with a strong experience in supporting medium to big companies and public administrations to manage their ICT infrastructures. He's supporting the Italian public administration in digital transformation projects.