
Last Updated on 24th April 2026 by peppe8o
HyperText Transfer Protocol Secure (https) is a communication protocol adding a security layer to classic http. It uses TLS and certificates communication between two computers, reducing man-in-the-middle attack risks. Beside common configuration, you can set a self signed configuration on Raspberry Pi running Apache web services
Https (which uses port 443 instead of default http port 80) became a common standard as cyber security risks increased over the time. Today it can be a requirement for some services to run correctly (like, for example, Grocy project). In this tutorial I’m going to show how to setup a self signed certificate in your Raspberry PI running Apache web server.
How TLS Handshake Works
TLS (Transport Layer Security) grants security in https connections. It defines the way two computers (a client and a server) has to establish their communication respecting this security protocol.
Before starting communication, web server needs to get “verified” by an external Certification Authority (CA). This external part checks that that server, at that URL, is really who claims to be. When this step is successfully performed, the CA emits a certificate (with encrypted keys) which includes Certification Authority references. This certificate is usually limited to a specific time: server owners need to renew its certificate before this goes expired.
When a client connects to that server (with an https url), it receives the certificate and verify with CA that the certificate is correct (keys haven’t been modified by unwanted malicious intruder). Client can then share with server all required keys to encrypt communication.
This “three parties verification” assures better security on communication and reduce interference risks.
In some circumstances, web server can’t be reached from certification authority to be verified. In these case, a self signed certificate can be a valid workaround as it allow establishing TLS handshake. What changes is that the same server is working also as CA and is issuing its own certificate. This result on common browsers accepting this connection, but warning you that certificate can’t be verified from an indipendent third party.
Self signed certificates is useful in a number of cases. For example, you could prefer not conecting your apache server to internet, leaving it closed ino a local network (home). Or you could need to test your application in a development environment, not connected to internet. In these cases, your security is assured because your service is restriced to a secure network.
For this guide I’m going to use a Raspberry PI Zero W, but this procedure applies to all Raspberry PI computer boards.
What We Need
As usual, I suggest adding from now to your favourite e-commerce shopping cart all the needed hardware, so that at the end you will be able to evaluate overall costs and decide if to continue with the project or remove them from the shopping cart. So, hardware will be only:
- Raspberry PI Zero W (including proper power supply or using a smartphone micro usb charger with at least 3A) or newer Raspberry PI Board
- high speed micro SD card (at least 16 GB, at least class 10)
Check hardware prices with following links:


Step-by-Step Procedure
Prepare OS
Start installing your operating system. You can install Raspberry PI OS Lite (for a fast, headless environment) or install Raspberry PI OS Desktop (in this case, working from its internal terminal).
Make your OS up to date. From terminal:
sudo apt update && sudo apt upgradeWe need to install our application server: Apache. This is deeply covered in my tutorial to install LAMP server in Raspberry PI. For this project, we need to install only Apache, so use following terminal command:
sudo apt install apache2 -yVerify that apache service is running with systemctl:
pi@raspberrypi:~ $ sudo systemctl status apache2.service
 ● apache2.service - The Apache HTTP Server
    Loaded: loaded (/lib/systemd/system/apache2.service; enabled; vendor preset: enabled)
    Active: active (running) since Sat 2021-02-06 13:27:40 GMT; 1min 49s ago
      Docs: https://httpd.apache.org/docs/2.4/
 Main PID: 8741 (apache2)
     Tasks: 55 (limit: 881)
    CGroup: /system.slice/apache2.service
            ├─8741 /usr/sbin/apache2 -k start
            ├─8742 /usr/sbin/apache2 -k start
            └─8743 /usr/sbin/apache2 -k start
Feb 06 13:27:39 raspberrypi systemd[1]: Starting The Apache HTTP Server…
Feb 06 13:27:40 raspberrypi apachectl[8730]: AH00558: apache2: Could not reliably determine the server's fully qualified domain name, using ....
Feb 06 13:27:40 raspberrypi systemd[1]: Started The Apache HTTP Server.
If everything is ok, you can go with your favourite browser and use http (without “S”) to reach your Raspberry PI’s IP address (mine one for this tutorial is 192.168.1.78) for Apache default page:
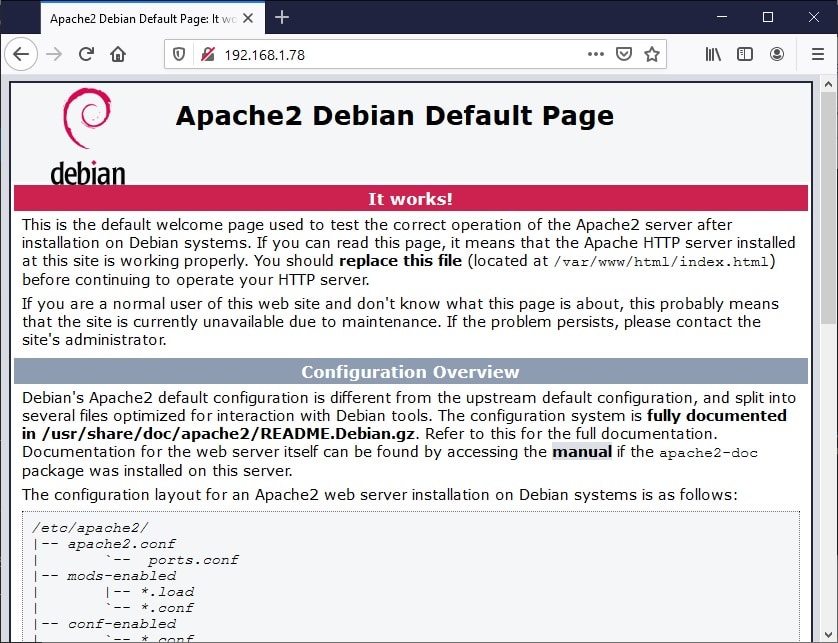
Please note that if you try, at this point, to use https you will get an error (ERR_CONNECTION_REFUSED).
Generate Private Key and Certificate
We’ll use OpenSSL package (already available in Raspberry PI OS) to generate the self signed certificate. We’ll also include following options:
- req: This subcommand enables certificate request and certificate generating utility
- -x509: this option outputs a self signed certificate instead of an external certificate request
- -nodes: this option requires a not encrypted private key
- -days 356: this option sets expiration days to 365. default value is 30 days
- -newkey rsa:2048: this option creates a new certificate request and a new private key. The argument rsa:nbits, where nbits is the number of bits, generates an RSA key nbits in size.
- -keyout: This options set private key name (optional, using a full path you can also put key in desired folder)
- -out: This option set certificate name (optional, using a full path you can also put certificate in desired folder)
You can use whatever certificate/key file name you want. It is important that you then refer correctly files in following configuration. From terminal:
sudo openssl req -x509 -nodes -days 365 -newkey rsa:2048 -keyout private.key -out certificate.crtAfter generating the private key, OpenSSL will ask you for some info requests. Answer according to your preferences. The most important line is “Common Name”, which will require domain name or IP address (this being my case):
Country Name (2 letter code) [AU]:
State or Province Name (full name) [Some-State]:
Locality Name (eg, city) []:
Organization Name (eg, company) [Internet Widgits Pty Ltd]:
Organizational Unit Name (eg, section) []:
Common Name (e.g. server FQDN or YOUR name) []:192.168.1.78
Email Address []:
You will have now 2 files in your folder. With “cat” terminal command you can verify that certificate has first and last row indicating begin and end of certificate, with encrypted data inside these limiters:
pi@raspberrypi:~ $ cat certificate.crt
-----BEGIN CERTIFICATE-----
..... (omitted incomprensible chars) .....
-----END CERTIFICATE-----
Same for private key, which will require sudo permissions for catting text:
pi@raspberrypi:~ $ sudo cat private.key
-----BEGIN PRIVATE KEY-----
..... (omitted incompresible chars) .....
-----END PRIVATE KEY-----
Move certificate and private key in ssl folder:
sudo mv private.key /etc/ssl/private/
sudo mv certificate.crt /etc/ssl/certs/
Configure Apache to use Self Signed Certificate and Key
Edit Apache 000-default.conf, the default Apache Virtual Host file. Remember default ports (https=443, http=80). From terminal:
sudo nano /etc/apache2/sites-available/000-default.confYou will find a pre-configured generic VirtualHost answering to port 80 (*:80). Append following code to add a new VirtualHost which will answer to all requests received on port 443 (https):
<VirtualHost *:443>
        ServerAdmin webmaster@localhost
        DocumentRoot /var/www/html
        ErrorLog ${APACHE_LOG_DIR}/error.log
        CustomLog ${APACHE_LOG_DIR}/access.log combined
        SSLEngine on
        SSLProtocol all -SSLv2
        SSLCipherSuite HIGH:MEDIUM:!aNULL:!MD5
        SSLCertificateFile "/etc/ssl/certs/certificate.crt"
        SSLCertificateKeyFile "/etc/ssl/private/private.key"
</VirtualHost>
Close and save. From terminal, enable ssl, check configuration (if you used IP address, you can skip “Could not reliably determine the server’s fully qualified domain name” warnings) and restart apache:
sudo a2enmod ssl
sudo apache2ctl configtest
sudo systemctl restart apache2.service
Back to browser, change http to https (with same URL using Raspberry PI’s IP address). You will get a warning (whose page appearence can change with different browsers):
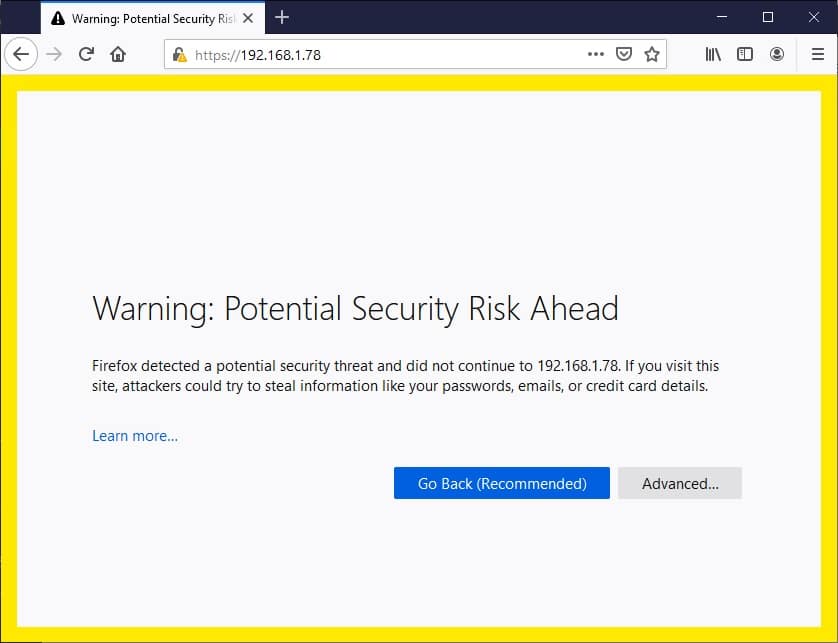
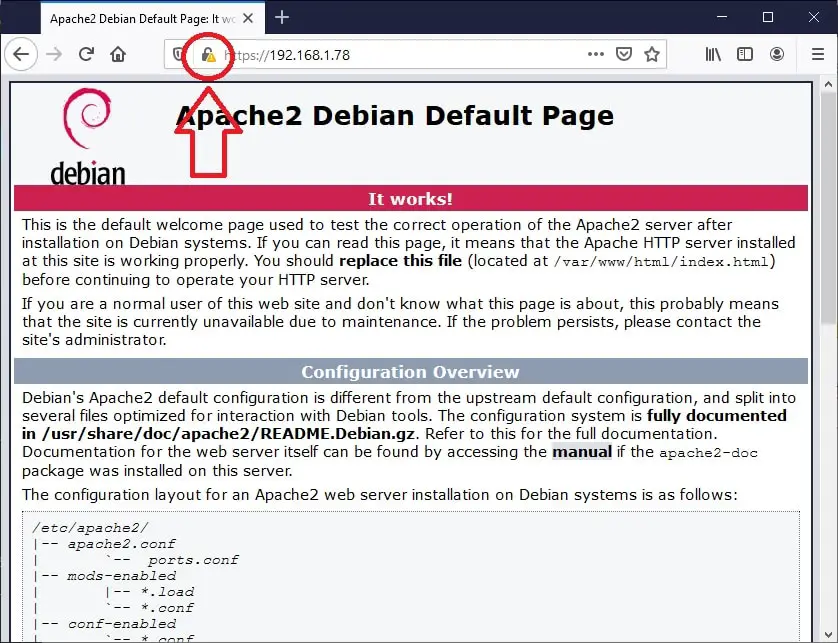
Depending on browser, you will find a different way to continue: for example, in FIrefox Advanced button + “Accept the risk and continue”, in Chrome “Advanced” + “Proceed to x.x.x.x (not secure)”. Go on, as this is your Raspberry PI and you are sure of that. You will get apache default https page with a different padlock icon:
Redirecting Http to Https
One more addictional feature, you could need routing all http connections to https pages. This trick can be achieved by adding a Redirect in your Apache default configuration. From terminal
sudo nano /etc/apache2/sites-available/000-default.confChange first virtual block (answering to port 80) by adding following row:
<VirtualHost *:80>
        . . .
        Redirect "/" "https://your_domain_or_IP/"
        . . .
</VirtualHost>
Close and save. Restart apache service:
sudo systemctl restart apache2.serviceFrom now your http connections will be automatically redirected to their https pages.
Enjoy!

Open source and Raspberry PI lover, writes tutorials for beginners since 2019. He's an ICT expert, with a strong experience in supporting medium to big companies and public administrations to manage their ICT infrastructures. He's supporting the Italian public administration in digital transformation projects.
![]()
![]()
![]()
![]()
![]()
![]()
![]()


Thanks. Your instructions worked flawlessly on my Raspberry Pi 3 B+ with Raspberry-Pi-OS 32-bit. I’m running a personal web server without a registered domain name; just an ISP assigned IP address. I may have to change the certificate if my ISP changes my IP address, but it wont take long with these instructions.
Glad to hear your feedback. I personally suggest, if you are using this web server for you and your parents, to use No-IP service (configure no-ip duc service tutorial) with a VPN (Raspberry PI VPN server tutorial). In this way you will have a free public name (autoupdating itself on ISP changes) for your VPN and your webserver will be available only for people in your locan network
Thanks for the instructions. It worked flawlessly on a LAN-based Pi 4+ running apache2. Now I can get at it from my other systems on the LAN using https instead of http. It’s not exposed to the Internet, but I have several local systems I use to debug/modify the site before enabling uploads to a VPS Web server.
Does this open port 443?
Hi John. To enable http (that is probably what you want to achieve) you need to refer Apache docs about enabling SSL. However, you have also to get a certificate, that may be locally generated or from Let’s Encrypt. Both procedures are already detailed in this blog (please use the search field)
Nicely done and it worked for me!
Thank you for your feedback, John!
It works great!!! Thanks.
One question, how can I export that certificate and import to the iOS device?
Thanks
Hi Serm,
this procedure is to certificate on any external device connecting to your Apache that the Apache Server is the legitimate one to answer your queries. I don’t think that it can work on iOS devices (if I correctly understood your question)
I want to start to put all my photos up on my camera, and start a blog or something. Where is a good place to do this like a website or something, do i have to copyright them thanks :).
Hi Stanley. Instead of working directly on a LAMP server, which requires a lot of effort to develop php/html/javascript code, I suggest you to use WordPress or Drupal. Both can be installed in your Raspberry PI for free:
https://peppe8o.com/install-a-complete-wordpress-host-in-a-raspberry-pi/
https://peppe8o.com/install-drupal-in-raspberry-pi/