
Last Updated on 19th July 2024 by peppe8o
In this tutorial, I’m going to show you how to create a time-lapse video with a the rpicamera-still, Raspberry PI board, and a Camera. So, we’ll use the rpicamera-apps to get images and the ffmpeg library to create a new time-lapse video.
One of the most common Raspberry PI accessories is the Raspberry PI Camera. Besides common usages (like videoconferencing), RPI gives a lot of advanced functions. One of the most intriguing is getting a time-lapse video from a Raspberry PI camera.
Before digging into technical commands, please find in the following chapter a brief introduction to what a time-lapse video is.
Time Lapse Technique
Looking at a list of images projected on a screen, human eyes can’t distinguish interruptions between an image (frame) and the following one with a switch rate higher than 60 Frames Per Second (fps). On the other side, getting an illusion of continuous motion requires at least 10 fps (even if the optimal fps is supposed to 25). This uses the so-called Persistence of Vision.
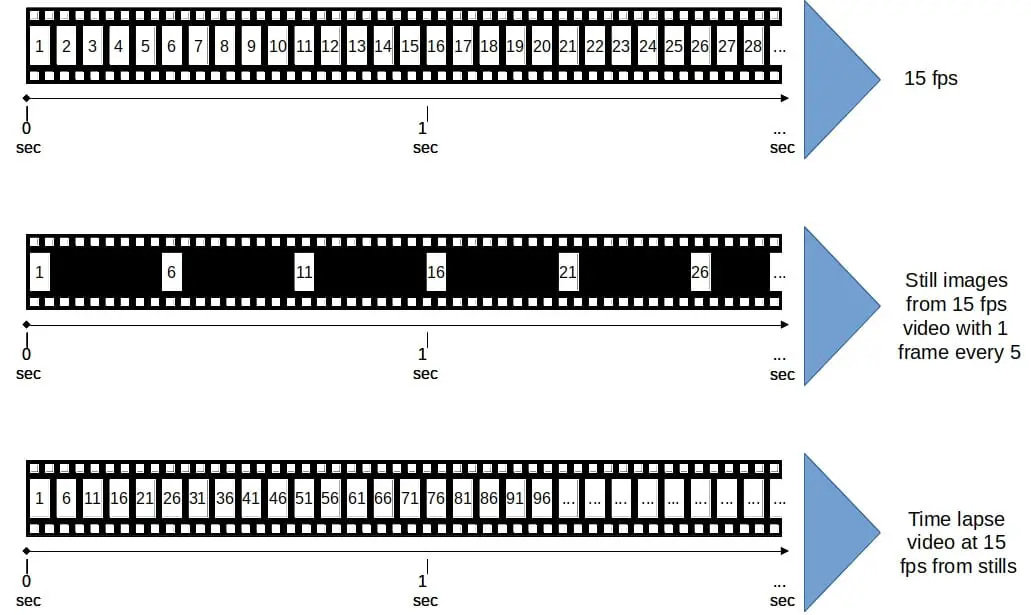
Time Lapse technique uses only some still frames, extracting them from a video stream or capturing these frames from a camera with defined intervals. Still images, consolidated in smaller intervals so that they can appear to the human eye as a continuous flow, give the illusion that time is running faster on video.
In the following picture, this process is described with an example, where from 15 fps (frame per second) we take 1 image every 5 and compress extracted images in a new video. Images that would be shown after 5 seconds (from frame 76) will appear in a new video file after 1 second:
In this tutorial I will use my old Raspberry PI 3 model B+ for the tests, but this tutorial should work with any Raspberry PI computer board.
What We Need
As usual, I suggest adding from now to your favourite e-commerce shopping cart all the needed hardware, so that at the end you will be able to evaluate overall costs and decide if to continue with the project or remove them from the shopping cart. So, hardware will be only:
- Raspberry PI Computer Board (including proper power supply or using a smartphone micro USB charger with at least 3A)
- high speed micro SD card (at least 16 GB, at least class 10)
- Raspberry PI Camera (please check the camera model with a cable compatible with your Raspberry PI computer board model)

Step-by-Step Procedure
Please connect the camera module to your Raspberry PI in its port before starting. The Raspberry PI provided a complete article about connecting it in their install a raspberry pi camera article.
Prepare Operating System
I will use only the terminal commands, so you can install Raspberry PI OS Lite (for a fast, headless OS) or Raspberry PI OS Desktop (in this case, using its internal terminal).
Once installed, please make your OS up to date. From the terminal, use the following command:
sudo apt update -y && sudo apt upgrade -yWe also need FFmpeg:
sudo apt install ffmpegWith old Raspberry PI OS releases, you had to enable the camera interface from the raspi-config tool (from the System Options menu). With the last releases the camera module automatically becomes active at the sensor connection.
Capturing Images with rpicamera-still and Raspberry PI
Create a new folder named as you like and enter it. Here we’ll store all the frames and we’ll create the still video:
mkdir timelapse
cd timelapse
With the following command we’ll capture images with defined intervals and save them with increasing naming:
rpicam-still -t 60000 --timelapse 2000 -o image%04d.jpgIn rpicam-still command, the following parameters are used:
- -t 60000 [or –timeout 60000]: this option will make the command last for a total of 60 seconds (the number is in milliseconds)
- -timelapse 2000: this option produces a capture (frame) every 2 seconds (the number is in milliseconds)
- -o image%04d.jpg: every frame captured is saved as jpg file with names like image0001.jpg, image0002.jpg, image0003.jpg and so on. “%04d” indicates to use 4 digits with leading zeroes padding missing digits.
This will generate a list of jpg files inside the current folder as expected:
pi@raspberrypi:~/timelapse $ ls
image0000.jpg  image0001.jpg  image0002.jpg  image0003.jpg  image0004.jpg  image0005.jpg  image0006.jpg  image0007.jpg  image0008.jpg  image0009.jpg  image0010.jpg  image0011.jpg  image0012.jpg  image0013.jpg  image0014.jpg  image0015.jpg  image0016.jpg  image0017.jpg  image0018.jpg  image0019.jpg  image0020.jpg  image0021.jpg  image0022.jpg  image0023.jpg  image0024.jpg  image0025.jpg  image0026.jpg  image0027.jpg  image0028.jpg
Creating Time Lapse Video
Output (time-lapsed) video can be created from jpg images with the following command:
ffmpeg -f image2 -pattern_type glob -i '*.jpg' -s 1280x768 outVideo.mp4Where:
- -f image2: This option tells ffmpeg to read from a list of image files specified by a pattern. The syntax and meaning of the pattern is specified by the option pattern_type
- -pattern_type glob: this option allows you to use wildcard patterns
- -i ‘*.jpg’: -i option indicates the input media. With the “*” wildcard, we instruct the ffmpeg to collect all the files in the current folder that terminates with “.jpg”
- -s 1280×768: sets output resolution. Lower resolution allows to use fewer resources to generate the file (it is important for files with a high number of images)
- outVideo.mp4: sets output file name
After this command you will find a new file named outVideo.mp4 which you can download in your remote computer (for example with SFTP software like Filezilla) and play in your favourite media player (supporting mp4 format, like VLC).
As you can see, we already used -s option to reduce the required computing power and make it compatible with a low hardware board like Raspberry PI. Ffmpeg requires a lot of RAM to run video manipulation. When RAM problems occur, you will receive from the terminal a “killed” notification and the command journalctl -xe | grep ffmpeg will return an Out of Memory error. In these cases, you have a few options:
- Change the Raspberry PI swap file size
- reduce computing resources required by reducing output file quality (by tuning output frame rate, resolution, presets)
- move the concatenation step on computers with higher RAM (higher Raspberry PI, notebook, desktop PC)
Optimizing the Results and Performances with rpicam-still
The following options will let you adjust your jpg files so that you can customize performances and quality
- –width / –height: these options allow you to get input images with a reduced resolution. If your video will be with specific sizes, these options will help you to reduce the file sizes and improve ffmpeg elaboration
rpicam-still -t 60000 --timelapse 2000 --width 1280 --height 768 -o image%04d.jpg- –gain / –awbgains: these options allow you to set the Gain Control and White Balance, disabling the automatic detection, according to the specs of your camera model
rpicam-still -t 8000 --timelapse 2000 --gain 1 --awbgains 2,1 -o image%04d.jpgOptimizing the Results and Performances with ffmpeg
The following ones are additional options that you can use with ffmpeg:
- -r: sets the framerate (default value, if not specified “-r 30”). It can be used both for input media as for output media. The following example command uses a
-r 10option that makes the video a bit longer and can give you a
ffmpeg -r 10 -f image2 -pattern_type glob -i '*.jpg' -s 1280x768 outVideo_2.mp4- -preset: sets preset (default value, if not specified “-preset medium”). A preset is a collection of options that will provide a certain encoding speed to compression ratio. Available values are [ultrafast, superfast, veryfast, faster, fast, medium, slow, slower, veryslow, placebo]
ffmpeg -f image2 -pattern_type glob -i '*.jpg' -s 1280x768 -preset slow outVideo_3.mp4A nice final feature for our video is adding a text box on it. After you have generated your time lapse video, use it again as input with ffmpeg add a Text box with the following terminal command:
ffmpeg -i outVideo.mp4 -vf drawtext="text='peppe8o.com': fontcolor=white: fontsize=24: box=1: boxcolor=black@0.5: boxborderw=5: x=(w-text_w)/2: y=(h-text_h)*4/5" -codec:a copy finOUT.mp4Final Result Example
As final example for results, I’ve prepared a video with a time lapse captured from 45 minutes, with 1 second between each image and restricting width and height to 1280×768 from jpg files:
rpicam-still -t 2700000 --timelapse 2000 --width 1280 --height 768 -o image%04d.jpgThe remaining steps follow the commands provided in this tutorial. The resulting video can be shown in the following:
What’s Next
Want to know more about cool projects to do with Raspberry PI computer boards? In this case, the right resource for you is my Raspberry PI tutorials pages.
Enjoy!

Open source and Raspberry PI lover, writes tutorials for beginners since 2019. He's an ICT expert, with a strong experience in supporting medium to big companies and public administrations to manage their ICT infrastructures. He's supporting the Italian public administration in digital transformation projects.
![]()
![]()
![]()
![]()
![]()
![]()
![]()


