
Last Updated on 16th May 2026 by peppe8o
This tutorial will help you to install and setup ZoneMinder with Raspberry PI computer boards, also bringing some tricks to make it work from a common ZoneMinder issue on boot.
Monitoring your spaces with cameras can help you get a better life, check if something requires your attention and keep your home more secure from malicious people. ZoneMinder with Raspberry PI is a free solution to create a monitoring system with advanced zones management and controlling cameras from a wide number of producers.
What is ZoneMinder
ZoneMinder is an open-source video surveillance software system that uses your hardware with any camera out of the box. It allows you to design a system as large or as small as you need.
It provides a complete surveillance solution allowing the use of any CCTV or security cameras for advanced management like analysis, recording and monitoring.
It includes different access alternatives like the main web page, where you can fully configure your installation, as well as the Google Play app (for Android) and iOS app (for iPhone).
It is composed of different modules, each one performing a specific task on the overall system. They are mainly binary executables, Perl and PHP scripts.
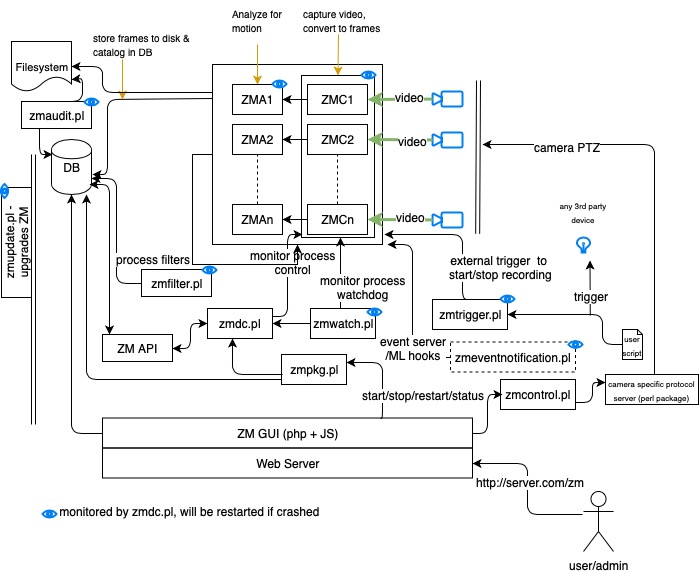
The ZoneMinder source is also available on GitHub for contributions and issue raising.
For this tutorial, I’m going to use a Raspberry PI 4 Model B computer board, but this should work with any Raspberry PI computer model.
What We Need
As usual, I suggest adding from now to your favourite e-commerce shopping cart all the needed hardware, so that at the end you will be able to evaluate overall costs and decide if to continue with the project or remove them from the shopping cart. So, hardware will be only:
- Raspberry PI Computer Board (including proper power supply or using a smartphone micro USB charger with at least 3A)
- high-speed micro SD card (at least 16 GB, at least class 10)
- IP Cameras compatible with ONVIF (this tutorial uses as an example the IeGeek IG62)

Step-by-step Procedure
Prepare the Operating System
The first step is to install the Raspberry PI OS Lite (64-bit version) to get a fast and lightweight operating system (headless). If you need a desktop environment, you can also use the Raspberry PI OS Desktop (also here, 64-bit version), in which case you will work from its terminal app. Please find the differences between the 2 OS versions in my Raspberry PI OS Lite vs Desktop article.
Please make sure that your Operating System is up to date. From your terminal, use the following command:
sudo apt update -y && sudo apt full-upgrade -yWe also need to install Docker on Raspberry PI (please refer to the linked tutorial).
With boards having low RAM (1GB or less), I also suggest increasing the Raspberry PI Swap Memory and reducing the Raspberry PI GPU memory (for boards where this is applicable).
You can use my tutorial, and changing to 1000MB the Swap size.
Install and Prepare the Database
We also need to install a database. A good choice for Raspberry PI, compatible with ZoneMinder, is MariaDB. You can find more info on how to install and secure MariaDB in my LAMP on Raspberry PI tutorial. Nevertheless, the main commands are the following:
sudo apt install mariadb-server -yCreate the database with a related user, and assign the proper permissions with the following terminal commands (copy-paste line by line). Please change the user name and user password (marked in red) with your preferred:
sudo su
mariadb
CREATE DATABASE zm;
CREATE USER zmuser@localhost IDENTIFIED BY 'zmpass';
GRANT ALL ON zm.* TO zmuser@localhost;
FLUSH PRIVILEGES;
exit;
exit
Please note that the database name (“zm”) is linked in the following DB preparation script from ZoneMinder. If you want to change the name, you will have to edit the default database configuration script by using the new name..
Install ZoneMinder
We can now proceed with ZoneMinder installation. As it is already available from the Aptitude repository (even if not the very last release, but anyway it is a tested release for our distribution), we can perform this task with one command line:
sudo apt install zoneminder -yIt will also install all the required dependencies.
Now we must prepare the database configuration for ZoneMinder. The software brings a ready-to-use SQL script that does all the job for us. It is available at /usr/share/zoneminder/db/zm_create.sql path.
So, we can perform all the database configurations with this single line command, where “zmuser” and “zmpass” must be changed with the ones set a few lines before. Please note that the password is attached with the “-p” option:
mariadb -u zmuser -pzmpass < /usr/share/zoneminder/db/zm_create.sqlThis script will create all the required database structures, setting up the required tables with the needed columns and charsets.
Tweak Zoneminder configuration for Raspberry PI
Before starting the services, we need to perform some configuration tweaks in order to make it work. Without these tweaks, you will get no camera streaming and the following error:
Socket /var/run/zm/zms-887029s.sock does not exist. This file is created by zms, and since it does not exist, either zms did not run, or zms exited early. Please check your zms logs and ensure that CGI is enabled in apache and check that the PATH_ZMS is set correctly. Make sure that ZM is actually recording. If you are trying to view a live stream and the capture process (zmc) is not running then zms will exit. Please go to http://zoneminder.readthedocs.io/en/latest/faq.html#why-can-t-i-see-streamed-images-when-i-can-see-stills-in-the-zone-window-etc for more information.Coming from the zoneminder.service that is not starting at boot.
So, the following commands will set the proper file permissions for zm.conf and the ZoneMinder cache, in order to have the software working at boot. Moreover, some Apache tweaks will complete the settings for Raspberry PI:
sudo apt install php libapache2-mod-php php-mysql -y
sudo chmod 740 /etc/zm/zm.conf
sudo chown root:www-data /etc/zm/zm.conf
sudo chown -R www-data:www-data /var/cache/zoneminder/
sudo adduser www-data video
sudo a2enmod cgi
sudo a2enmod rewrite
sudo a2enconf zoneminder
sudo systemctl reload apache2.service
sudo systemctl enable zoneminder.service
sudo systemctl start zoneminder.service
At this point, you should have your zoneminder.service running correctly (check it with the systemctl status command):
pi@raspberrypi:~ $ sudo systemctl status zoneminder.service
● zoneminder.service - ZoneMinder CCTV recording and surveillance system
     Loaded: loaded (/usr/lib/systemd/system/zoneminder.service; enabled; preset: enabled)
     Active: active (running) since Fri 2026-05-15 16:16:22 CEST; 6min ago
 Invocation: e5339ec462d4413ca40bd9812c882f84
       Docs: http://zoneminder.readthedocs.org/en/latest/
    Process: 27319 ExecStart=/usr/bin/zmpkg.pl start (code=exited, status=0/SUCCESS)
   Main PID: 27331 (zmdc.pl)
      Tasks: 5 (limit: 3920)
        CPU: 4.854s
     CGroup: /system.slice/zoneminder.service
             ├─27331 /usr/bin/perl -wT /usr/bin/zmdc.pl startup
             ├─27360 /usr/bin/perl -wT /usr/bin/zmfilter.pl --filter_id=1 --daemon
             ├─27365 /usr/bin/perl -wT /usr/bin/zmfilter.pl --filter_id=2 --daemon
             ├─27370 /usr/bin/perl -wT /usr/bin/zmwatch.pl
             └─27376 /usr/bin/perl -wT /usr/bin/zmstats.pl

May 15 16:16:18 raspberrypi systemd[1]: Starting zoneminder.service - ZoneMinder CCTV recording and surveillance system...
May 15 16:16:22 raspberrypi systemd[1]: Started zoneminder.service - ZoneMinder CCTV recording and surveillance system.
Connect Zoneminder Web UI
Now, your ZoneMinder service should be up and running. You can reach it by using the Raspberry PI’s IP Address with the “/zm” trailing as URL in your favourite browser. For example, as my RPI has IP 192.168.1.14, the complete URL will be https://192.168.1.14/zm. This will show the Privacy note:
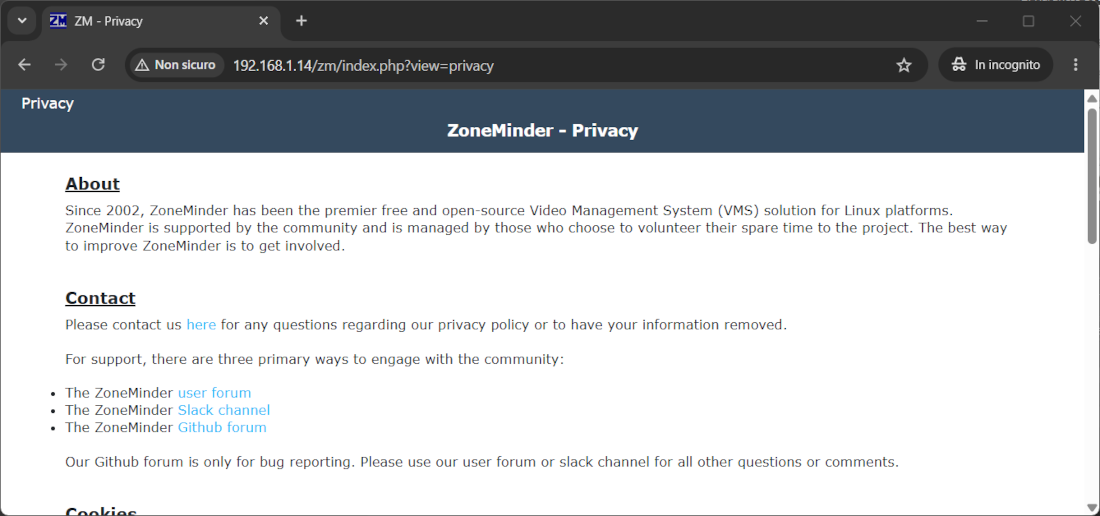
Read the Privacy note. You will be able to use ZoneMinder only by accepting it. To accept, scroll down to the end of the page and select “Accept” instead of “Decline” in the drop-down menù:

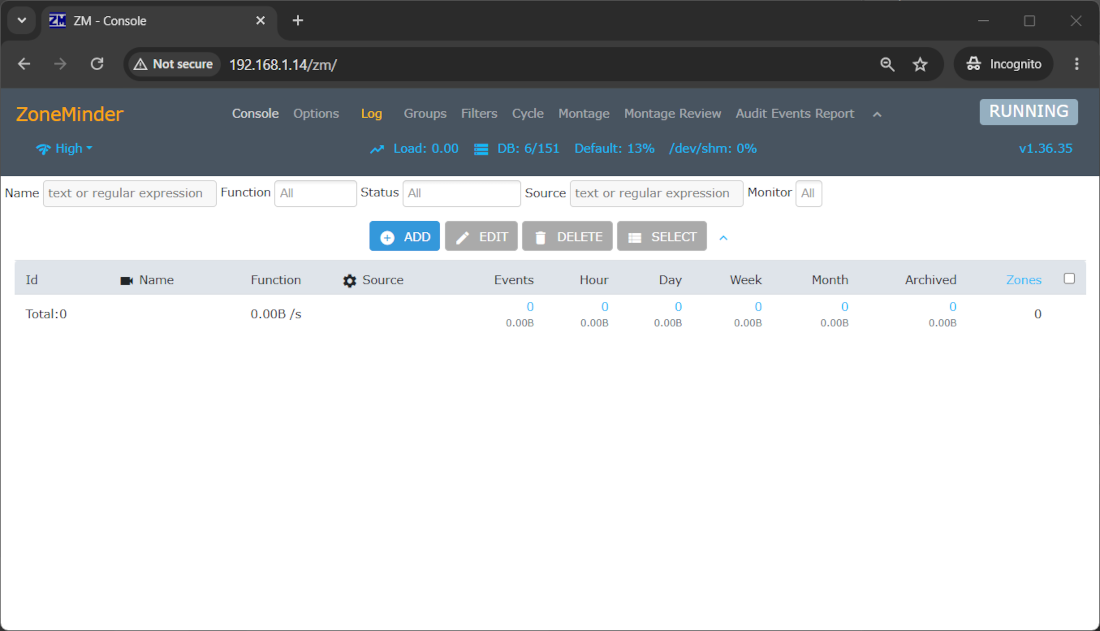
Then click Apply. This will show you the ZoneMinder Console:
Set ZoneMinder Timezone
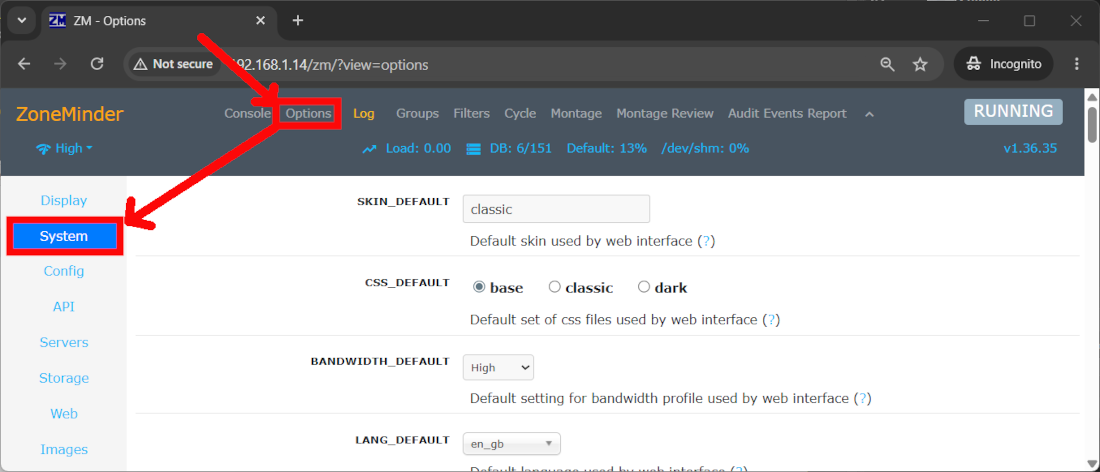
The first suggested action is to correctly set the Timezone. For this task, please go to Options -> System:
Find the TIMEZONE variable and set it to your local timezone (Rome in my case):
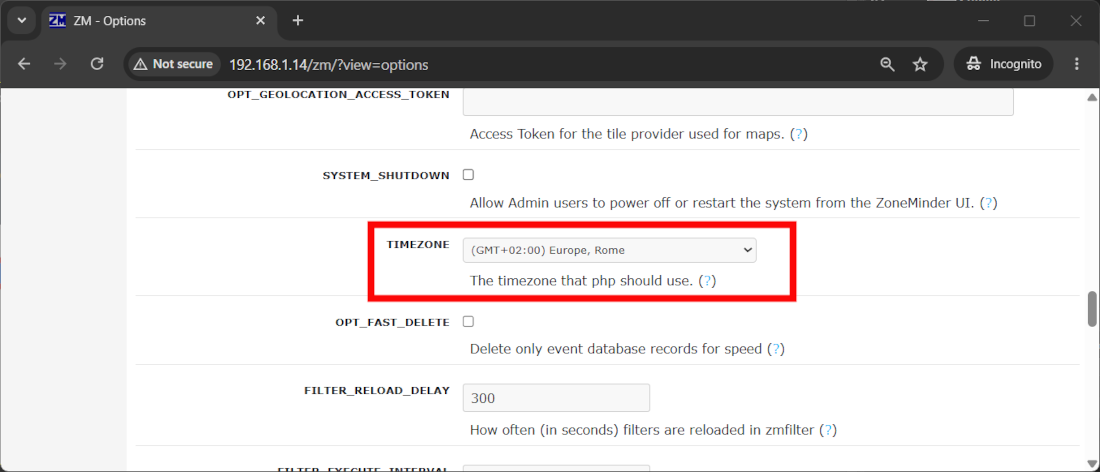
Once set, please scroll down the page and click “Save”.
Enable Authentication
By default, there is no authentication for the web interface. I strongly suggest enabling it.
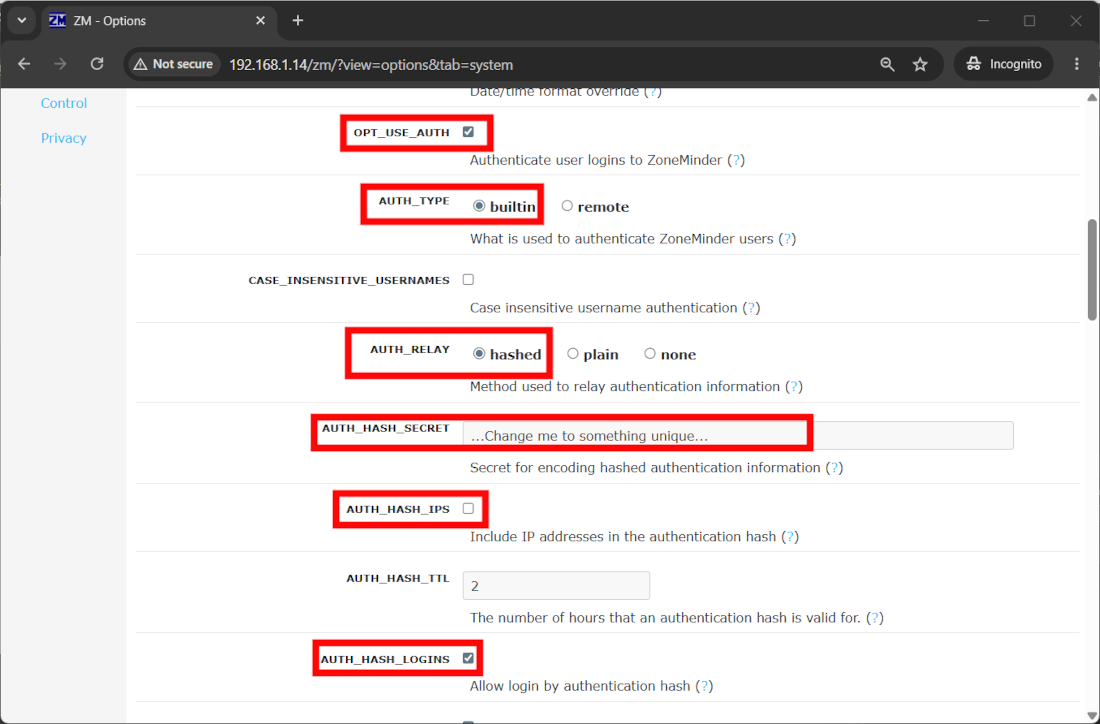
Basic authentication can be activated from Options -> System, setting the following highlighted as in the following picture:
Please note that the “AUTH_HASH_SECRET” isn’t the admin password, but a key to hash the user password. You will get your login credentials after the following picture:
Then scroll down and click save. You will go to the login page:
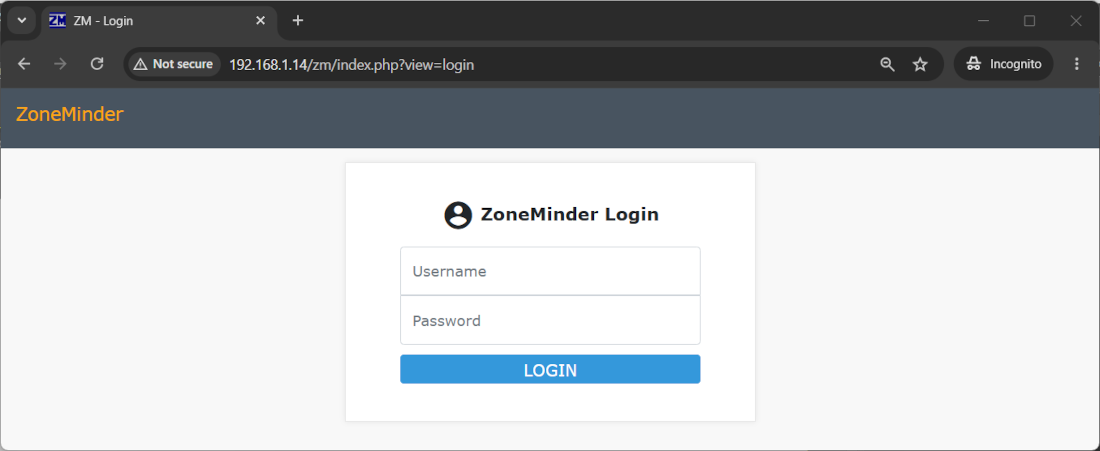
The default username and password are admin/admin.
You will be able to change the admin password (also strongly suggested) from Options -> Users menu, then clicking the “admin” user link.
Add a Camera
ZoneMinder makes no sense without cameras. You can add a lot of camera models (a list is available at https://wiki.zoneminder.com/Hardware_Compatibility_List).
Go to ZoneMinder Console and click the ADD button:
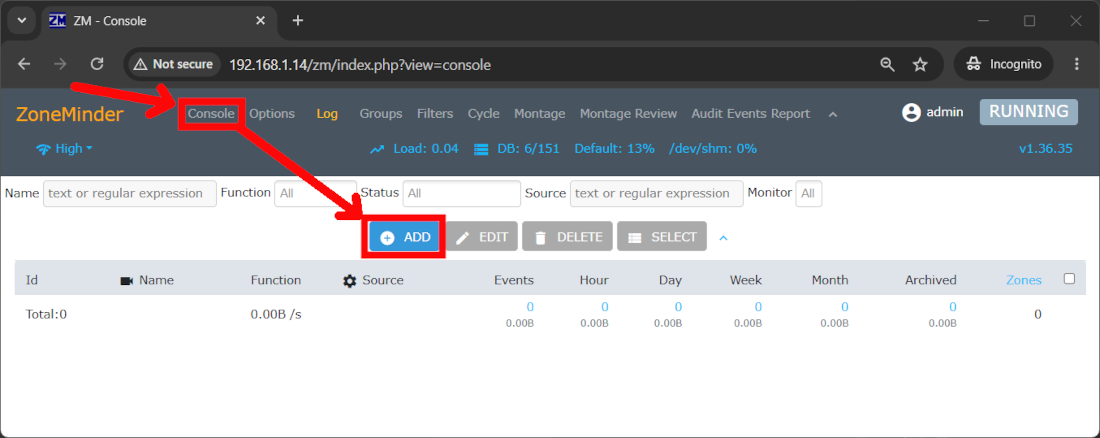
This will open the form to add cameras to your dashboard. One note: ZoneMinder names the cameras in their docs as “monitor”, so look for this term when searching their documentation. More info on adding cameras is available at the ZoneMinder docs.
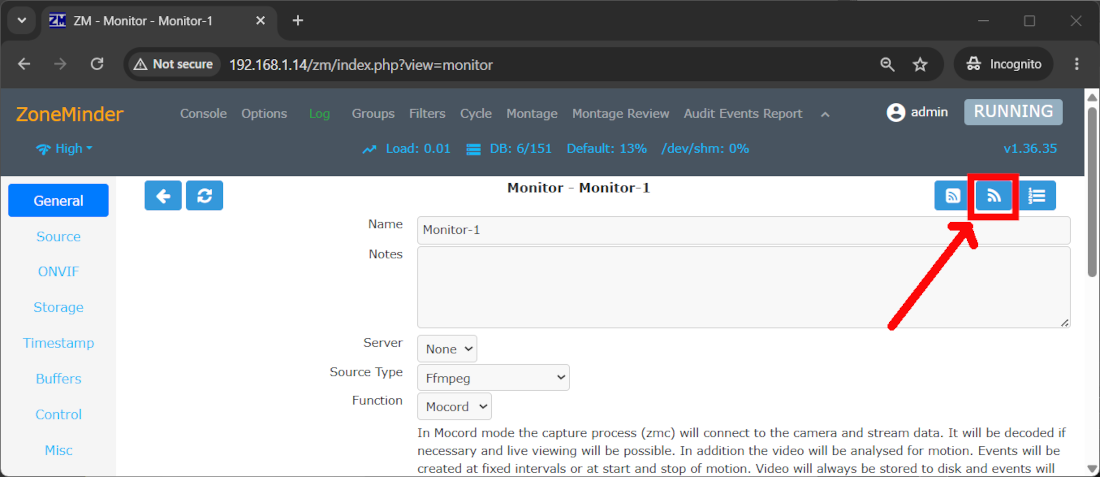
For this tutorial, I’m going to use my IeGeek IG62 IP camera, which allows using the ONVIF (Open Network Video Interface Forum) protocol. So, identify the ONVIF link on the top right of the following page and click it:
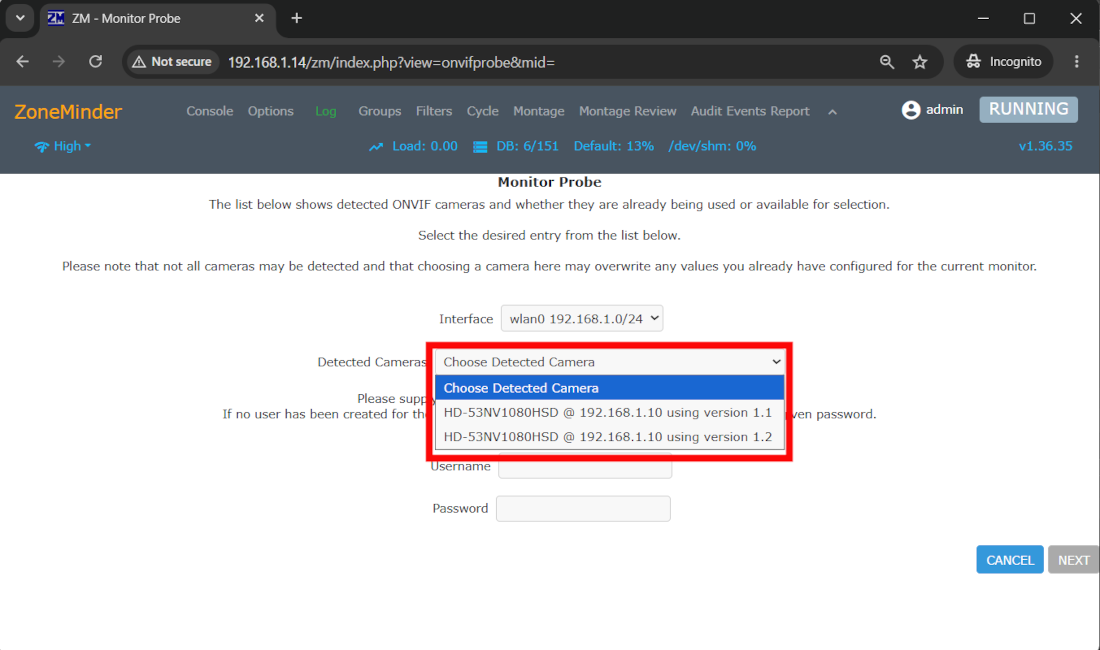
After a scan of your network, the following page will show you the detected cameras in the related drop-down menu. Select your desired camera.
IMPORTANT NOTE: Please note that the page also asks for a Username and Password. These are the camera credentials (NOT the ZoneMinder credentials) and should be provided by your camera producer. Sometimes these are also shown on your camera label. For IeGeek IG62, for example, the default is admin / admin:
Once the camera is selected and its credentials are added, please click the next “button”.
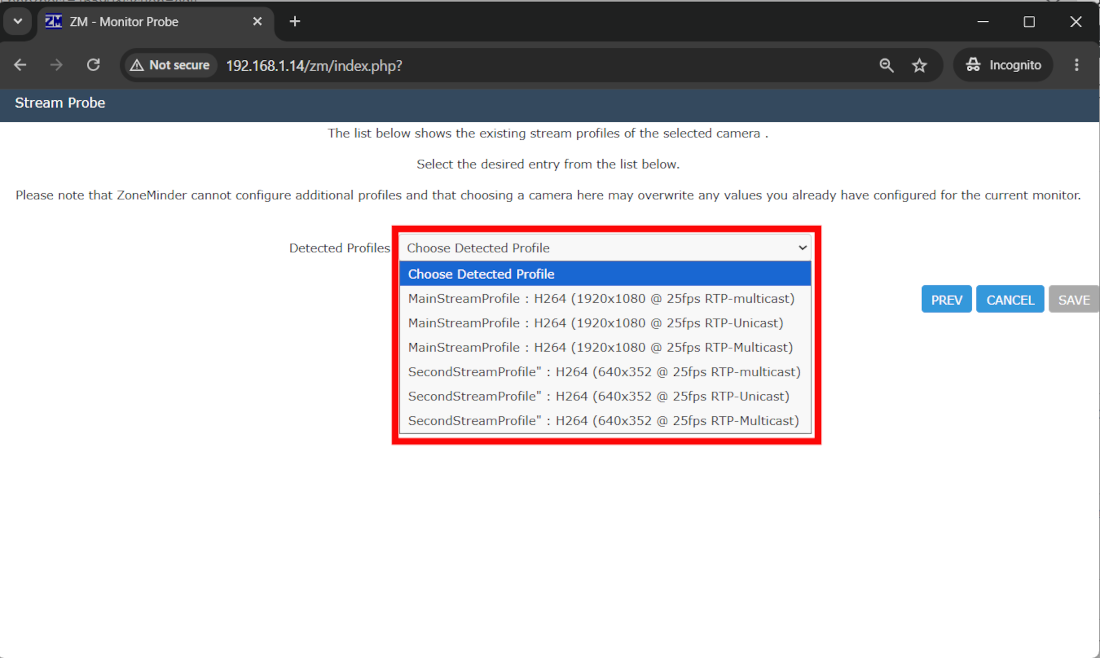
The following page will allow you to choose the profile from those exposed by your camera. In my case, my camera offers several possible resolutions. Consider that lower resolution requires less CPU and RAM, both for live showing and alarm detection, so allowing our Raspberry PI to manage more cameras. You can perform tests monitoring the CPU and RAM usage with the “htop” command, so deciding in a second moment what resolution to use. To change the resolution, you will probably need to remove the camera and add it again with the changed profile.
Going forward with this tutorial, I will choose the high-resolution profile (1920×1080):
Then click “Save”.
The page goes back to the camera addition form, where you can name the camera with your preferred label:
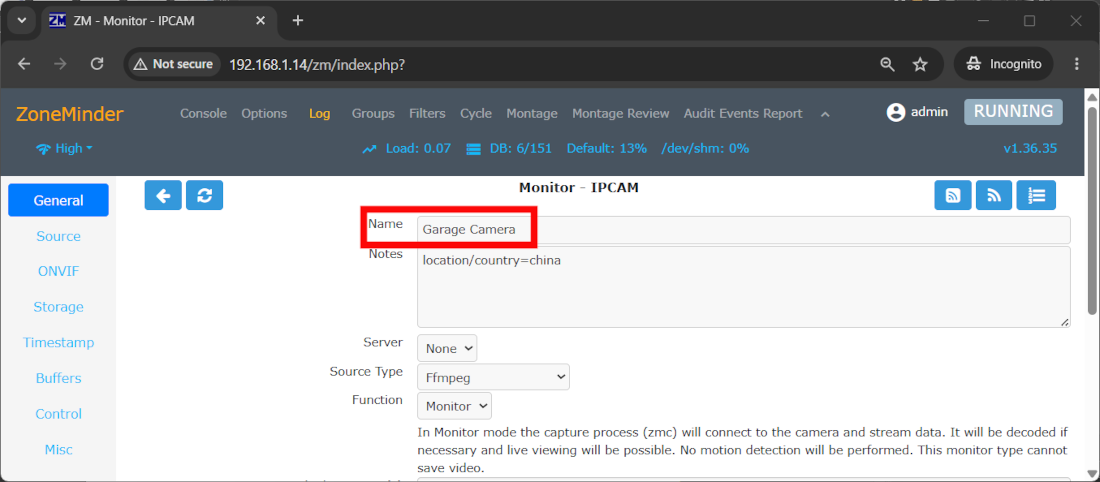
All the other settings can be changed at any time by editing the camera settings. Scroll down to the “Save” button and click it.
Back to the ZoneMinder Console, you will see the camera active. If this appears inactive, please refresh the page:
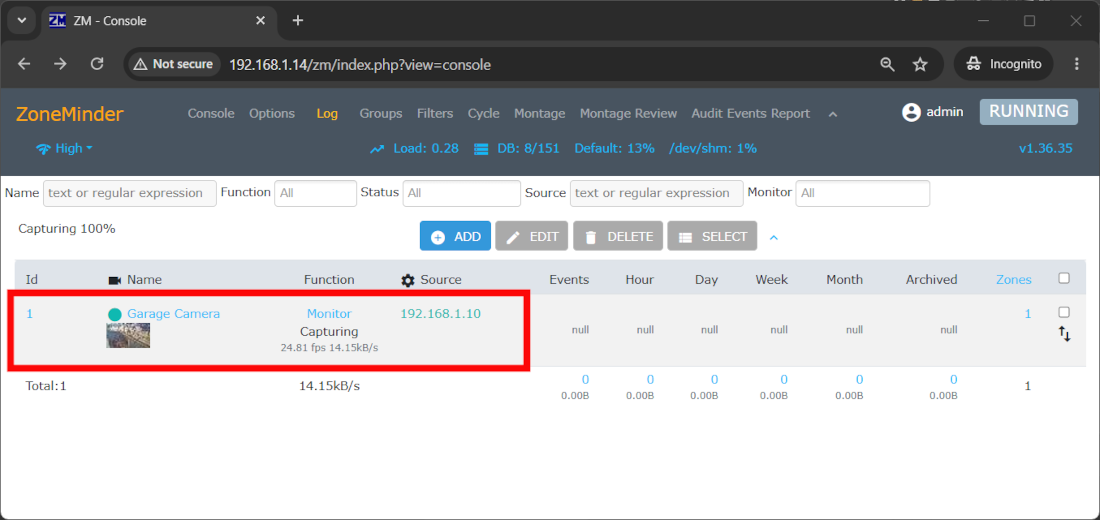
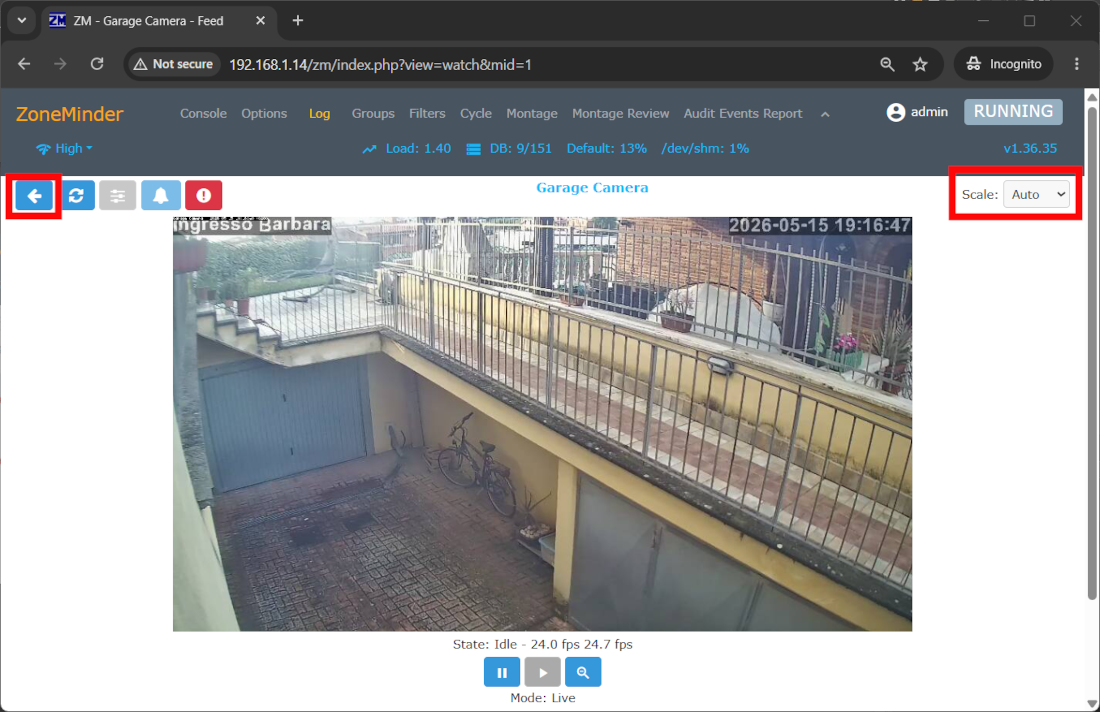
From the camera name link (“Garage Camera” in the previous picture), you can go to the live preview. The “Scale” options will help you to fit the preview according to your needs, while the “Back” button (at the right side of this) will bring us back to the Console:
Configure the ZoneMinder Function
Finally, we can set the alarm triggers for our camera. Before doing that, please consider that ZoneMinder uses different Camera functions in order to set what that camera does. This means, in a few words, that depending on the value set for the camera function, our camera will record or not the live preview and record/trigger or not the events. A summary table for available functions follows:
| Function | Live Recording | Event Recording |
| None | None | None |
| Monitor | Yes | None |
| Modect | None | On Motion Detection |
| Record | Continuous | Events of a fixed length will be generated (No motion detection) |
| Mocord | Continuous | On Motion Detection |
| Nodect | Continuous | Only on external Triggers |
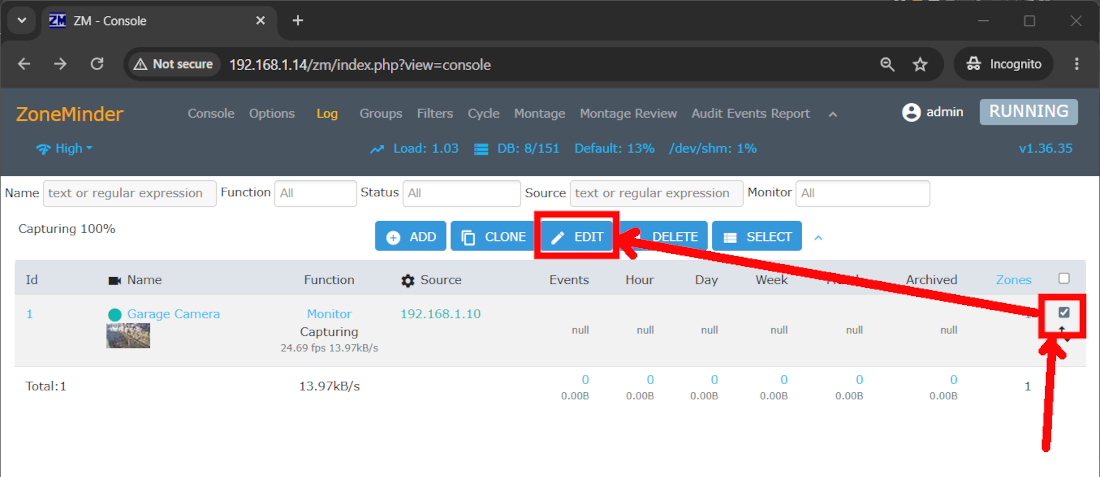
I will set my camera for recording both live preview and triggering alarms on event detection. This means that I will use the “Mocord” function. To do it, please select the camera by clicking the selection box at the right side of your camera row and clicking the “Edit” button, as shown in the following picture:
Here you will find the camera properties editing form (already seen in the camera addition step). Please change the “Function” value to Mocord (or your preferred one):
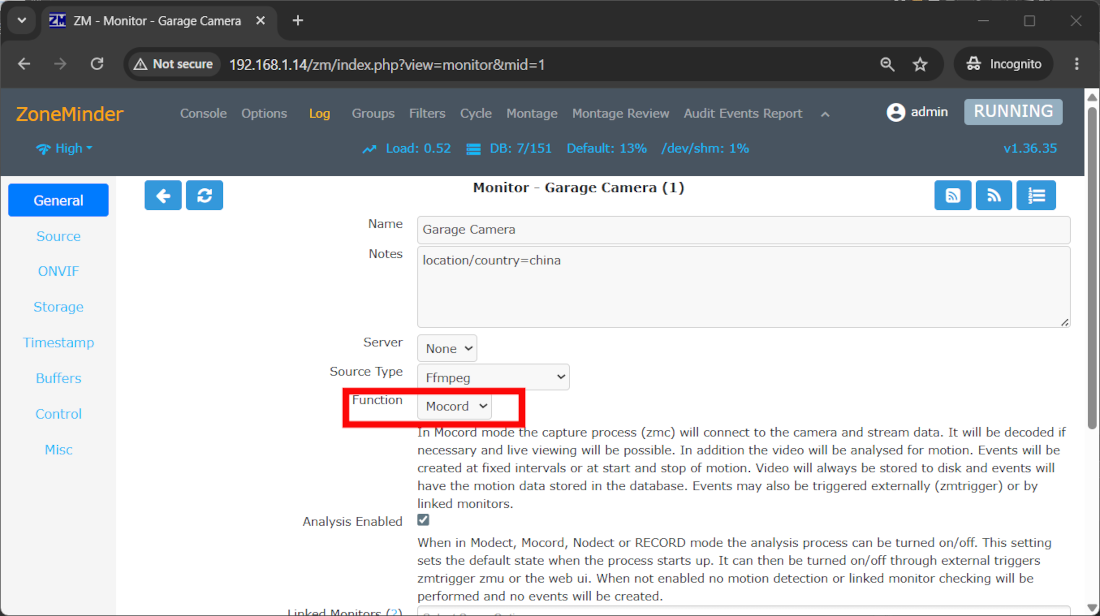
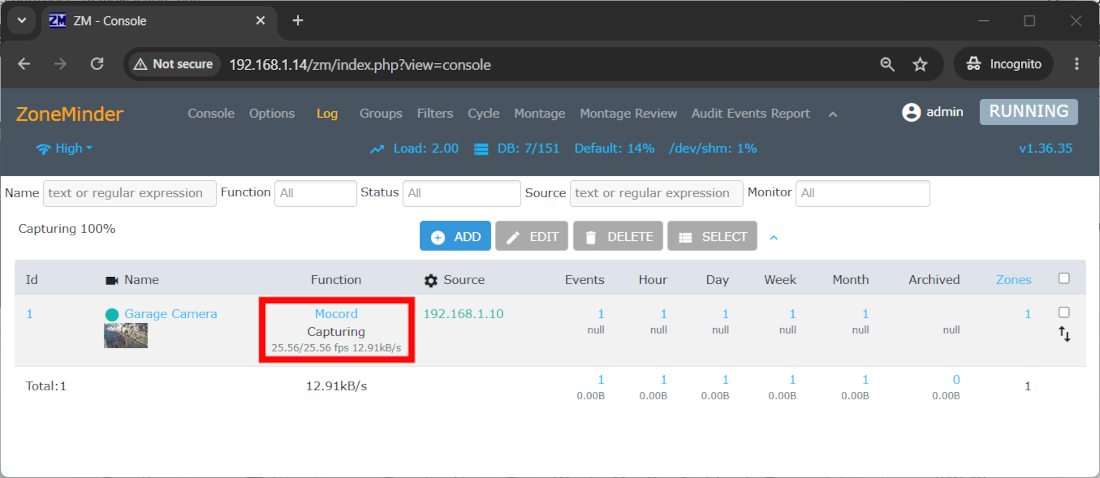
Click “Save”. Back to ZoneMinder Console, it will show your camera set to Mocord and capturing:
Setting Alarm Zones
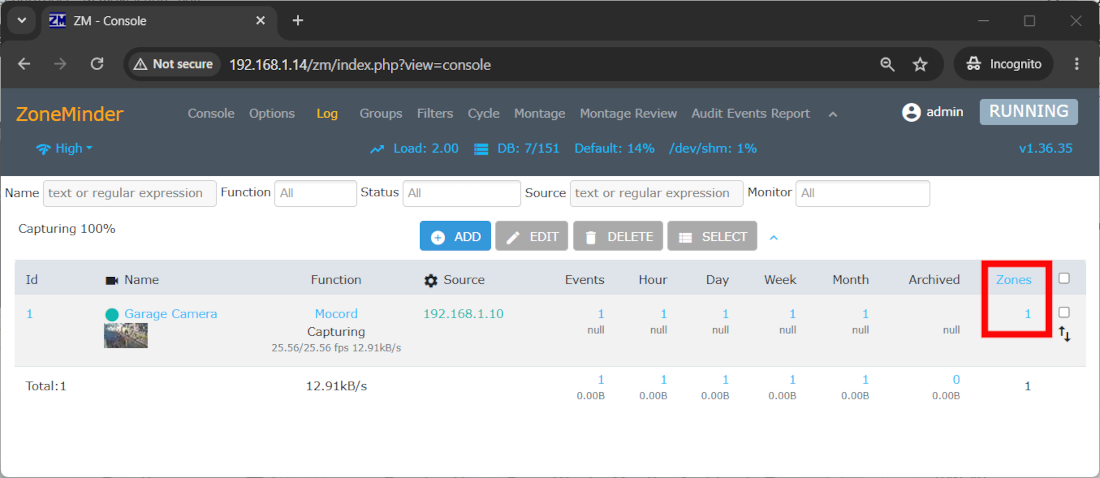
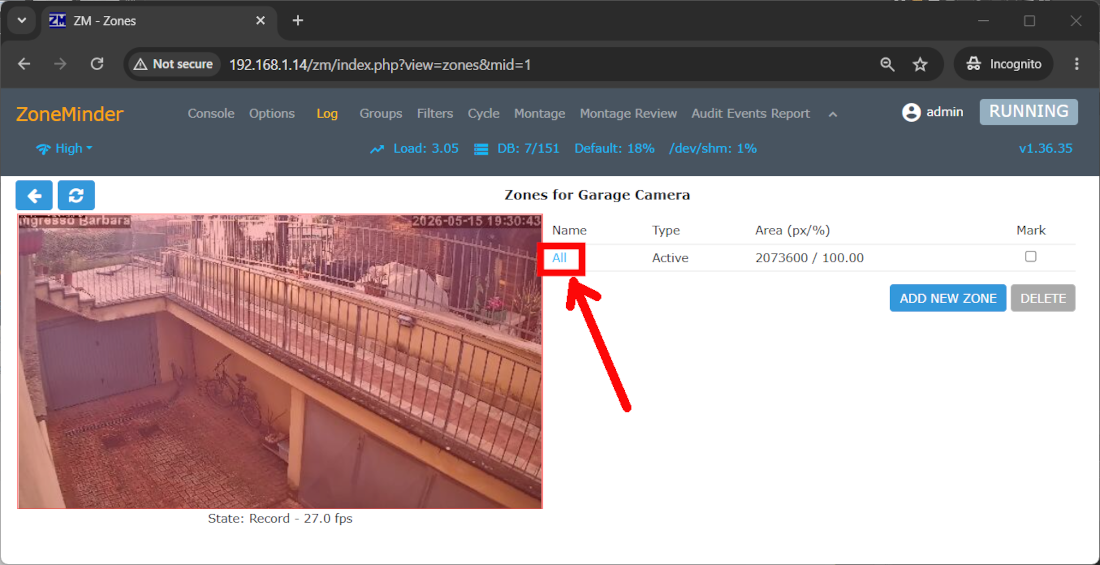
By default, ZoneMinder sets the detection to the whole camera area with a single, full-screen “zone”. But we can fine-tune it by working with the zones. Please click the zone number for your camera:
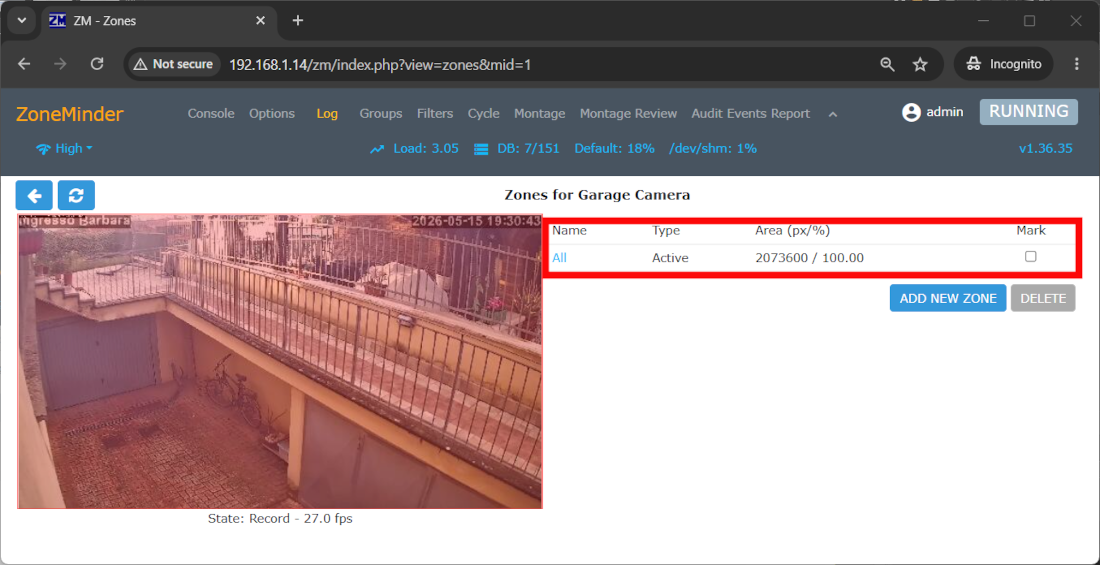
This will open a new window listing all the zones configured for your camera.
Depending on your camera size and your PC display size, the zones list can be found by scrolling down the page or on the right side of the running live camera preview:
You can change a specific zone area and settings by clicking the zone name:
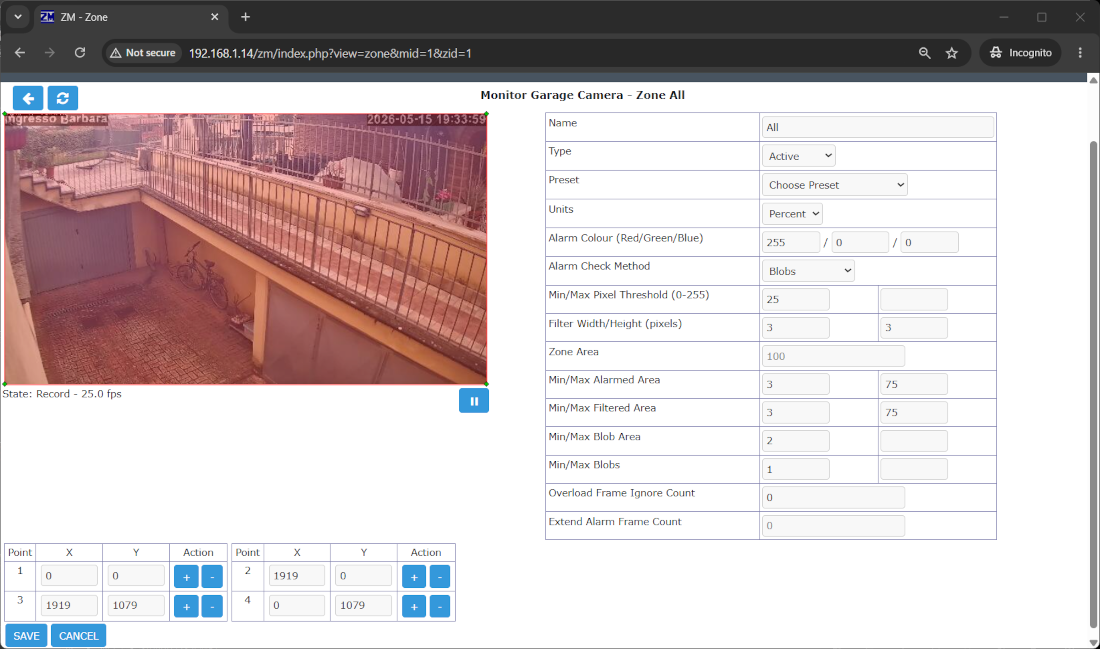
The new window will allow you to change all the settings for the zone, like the name, triggers and points defining the zone area. In the settings table, the “Presets” will allow a fast configuration of camera settings for your alarms. I suggest testing different presets to find the one that better fits your needs and then fine-tuning it if required:
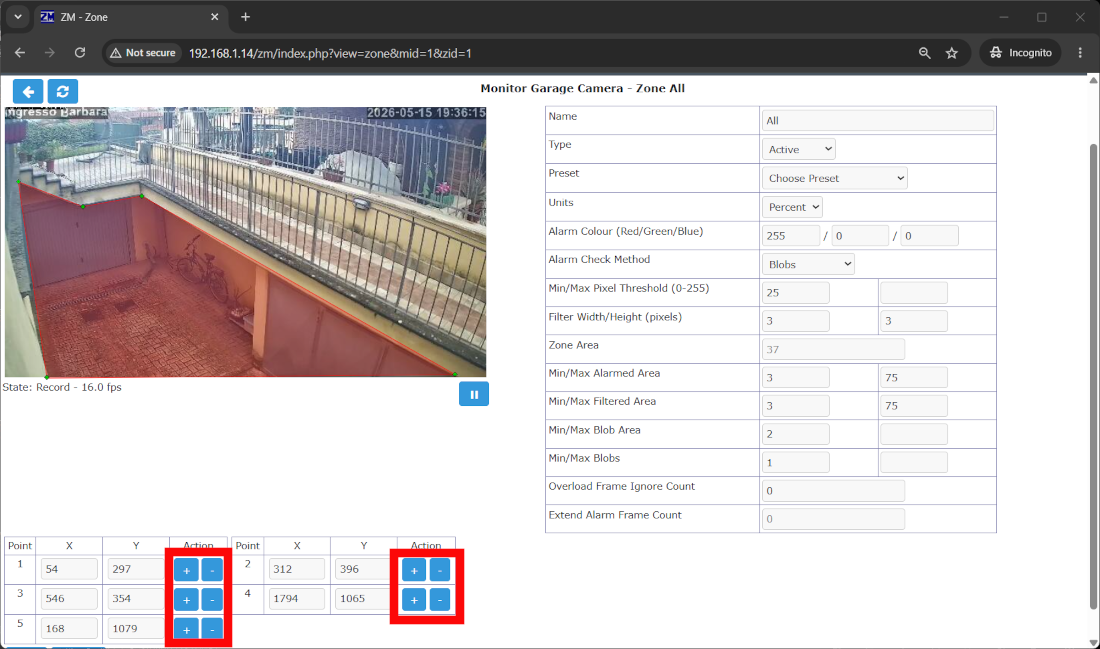
Moreover, the points list will allow you to manage the area covered by your zone by editing its position and/or deleting/adding the zone corners. You can edit their position both by defining the X and Y, or by dragging from the live preview the red area corners. Moreover, you can add or delete points with the buttons highlighted in the following screenshot, so that the zone area can perfectly fit your needs:
Click “Save” when finished.
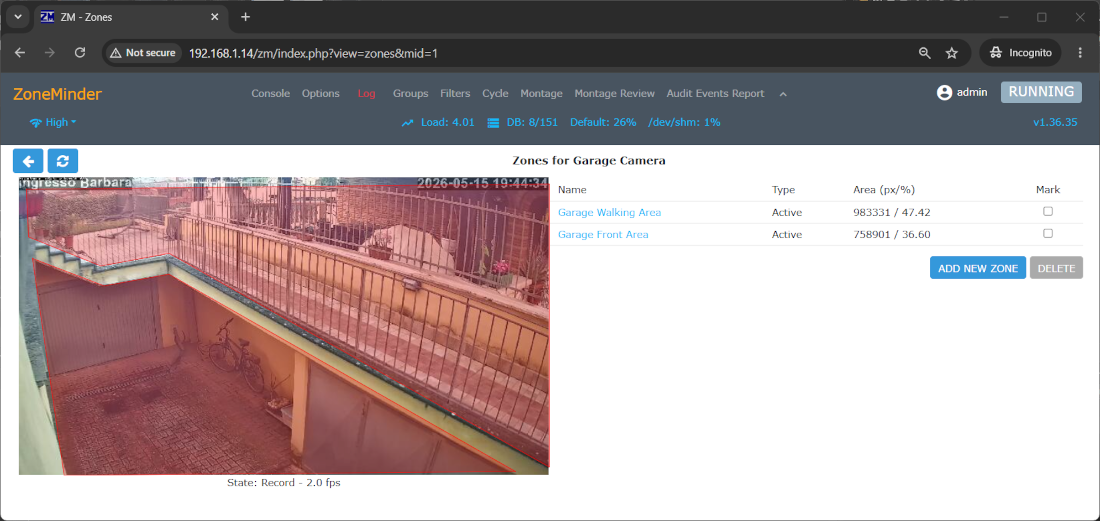
From the Zone menu, you can also create multiple zones on the same camera with the “Add new Zone” button. This will allow you to better name the alarms, so getting more info on what’s happening and where. Please remember to set the Preset (for example, to the default) and to set some required parameters for the zone.
The final result shows all the zones mapped in your area. For example, the following picture shows 2 zones: one in front of the garage and one in the walking area beside the garage:
Back to the ZoneMinder Console, for each camera, you will be able to see the number of events and, by clicking on them, watch and export videos.
At any time, you can refine the events triggering from the zone editing page.
Final Operations
ZoneMinder allows setting more features, like defining actions on event detection (like sending warning emails) and creating custom views that better fit your monitoring needs.
As the Raspberry PI micro SD card could be too small to continuously record video and events, you can also use my Automount USB storage with Raspberry PI OS Lite: fstab and autofs tutorial to get a USB storage mounted automatically at boot and then move the camera recording to that storage.
Finally, please refer to the ZoneMinder User Guide for the complete manual.
Resources
- https://zoneminder.com/
- https://zoneminder.readthedocs.io/en/latest/userguide/components.html#system-overview
- https://github.com/ZoneMinder/ZoneMinder/
- https://peppe8o.com/install-raspberry-pi-os-lite-in-your-raspberry-pi/
- https://peppe8o.com/install-raspberry-pi-os-desktop-with-optional-remote-desktop/
- https://peppe8o.com/raspberry-pi-swap-memory/
- https://peppe8o.com/manage-raspberry-pi-gpu-memory-split/
- https://peppe8o.com/lamp-server-on-raspberry-pi/
- https://wiki.zoneminder.com/Hardware_Compatibility_List
- https://peppe8o.com/automount-usb-storage-with-raspberry-pi-os-lite-fstab-and-autofs/
- https://zoneminder.readthedocs.io/en/latest/userguide/index.html
What’s Next
If you want to discover many other projects for your Raspberry PI, you can take a look at peppe8o’s Raspberry PI tutorials.
Enjoy!

Open source and Raspberry PI lover, writes tutorials for beginners since 2019. He's an ICT expert, with a strong experience in supporting medium to big companies and public administrations to manage their ICT infrastructures. He's supporting the Italian public administration in digital transformation projects.
![]()
![]()
![]()
![]()
![]()
![]()
![]()


Me sorprende que le funcione, yo tengo una Rapsberry Pi 4 con el Raspbian oficial y una camara IP tapo, sigo exactamente los mismos pasos y obtengo el siguiente error:
ERR [zmc_m2] [Unable to open codec for video stream
Obviamente no tengo video en zoneminder pero el streaming de mis cámaras funciona perfectamente en VLC o en mi móvil, el problema esta en el sistema o en el zoneminder, en foros le ocurre a mas gente, la configuración mostrada aquí no esta preparada para funcionar, probablemente falte instalar algún codec pero me resulta imposible solucionarlo.
Hi Miguel. Have you tried to use the “Source Type” setting in your Monitor options? From what I know, it includes “Libvlc” which should use the same VLC libraries