

Last Updated on 2nd September 2023 by peppe8o
In this tutorial, I’m going to show you how to move Chromium cache into a new RAM disk partition with Raspberry PI 4 and OS Desktop.
With the new Raspberry PI computer models having much more RAM, improving Chromium performance can be a core goal for people using it as Desktop computer. To achieve this, a good practice is moving cache on a RAMDisk
What is RAMDisk?
Briefly, a RAM disk is part of your computer RAM managed as a common storage disk. In Raspberry PI computers world it’s like having an additional MicroSD card or USB storage but running on RAM.
This is a common Linux practice to get more performance for applications that require many storage accesses. RAM is far faster than every possible storage and having applications reading from RAM make them get data and files faster, which means an overall performance improvement.
But this technique has a negative aspect: data on RAM are deleted without being saved at every reboot. And this is also for RAM Disk. That means that if you are storing data on a RAM Disk you have to be sure to implement a procedure that continuously saves data in your persistent storage OR you have to be sure that data on RAM disk can be deleted without affecting your application on restart.
What if we Delete Caching Data?
The second case fits well with browsers cache data. These are data saved by your browser when you visit pages, in order to reuse the files of that website on a second visit and make your browsing experience faster. You can also completely discard that files (cleaning cache is a common troubleshooting step): what will result is simply that you will need to download again these files on your next visit to a specific page. But this also means that when you navigate on a generic page, you will continuously write and read data from the cache, so generating a lot of traffic for your storage (commonly the MicroSD).

This fits perfectly to use RAM disk. Even if you will lose cache data at every Raspberry PI reboot, the overall performance will result better, especially if you have a decent internet speed.
As RAM Disk will use RAM space, it is a good option only if you have enough RAM in your computer. Raspberry PI 4 Model B boards have 4GB and 8GB versions which bring enough RAM space to take part of it for browser caching. At the same time, Raspberry PI OS Desktop is enough small to avoid filling it entirely on average usage.
Step-By-Step Procedure
I’m supposing that you are using Raspberry Pi OS Desktop.
The first task is creating the RAM Disk. From the terminal, open the fstab for editing:
sudo nano /etc/fstabAppend the following line at the end:
tmpfs /media/ramdisk tmpfs defaults,noatime,mode=1777 0 0save and close. Reboot your Raspberry PI.
The new disk will be visible from the “df -h” terminal command, with a 0% usage.
Change Chromium Cache Folder
The fastest way to make Chromium using a different caching folder is simply running it with the proper option. From the terminal you can do it with the following command:
chromium-browser %U --disk-cache-dir="/media/ramdisk/"Please remember that you need to close all active Chromium windows and re-open them from the previous command to make the option active
Change Chromium Desktop Entry
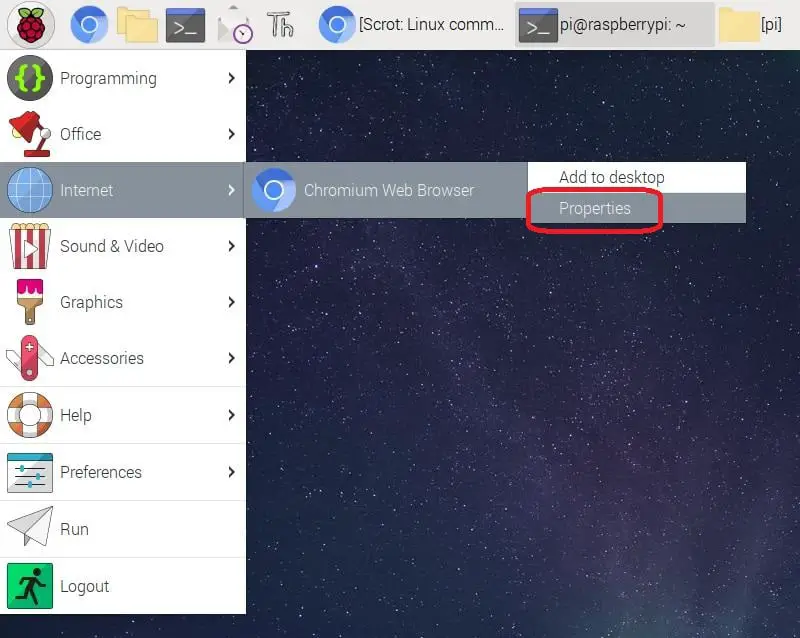
But as a Desktop user, you will prefer running it directly from your desktop entries… For this, go to Raspberry PI OS Desktop menu, then “Internet” and right click with the mouse on “Chromium Web Browser”. This will open a sub-menu. Click (left button on mouse) the “Properties”:
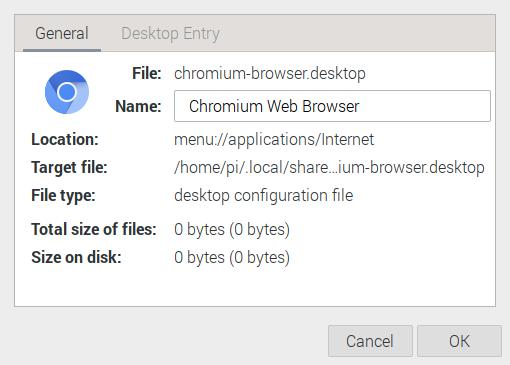
A new window will open, with General Tab activated:
Move to “Desktop Entry” tab selecting this from the top window area:
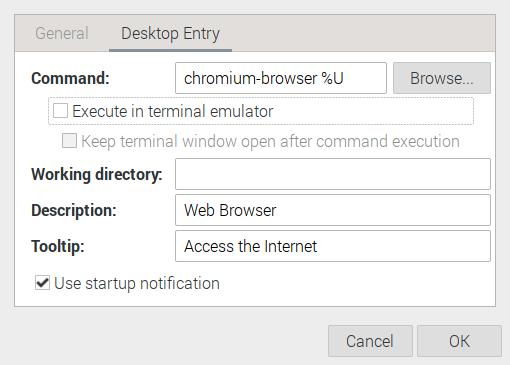
in the “Command” section, change the current “chromium-browser %U” with the following:
chromium-browser %U --disk-cache-dir="/media/ramdisk/"Then click the “OK” button for confirmation.
Close all active Chromium windows and open a new Chromium window.
Check That Works
You can check that Chromium is using the RAM Disk for cache. From terminal, check the “Use%” column for your /media/ramdisk file system with the “df -h” command:
pi@raspberrypi:~ $ df -h
Filesystem      Size  Used Avail Use% Mounted on
/dev/root       110G  5.2G  101G   5% /
devtmpfs        1.7G     0  1.7G   0% /dev
tmpfs           1.8G     0  1.8G   0% /dev/shm
tmpfs           732M  1.1M  731M   1% /run
tmpfs           5.0M  4.0K  5.0M   1% /run/lock
tmpfs           1.8G  190M  1.7G  11% /media/ramdisk
/dev/sda1       253M   49M  204M  20% /boot
tmpfs           366M   40K  366M   1% /run/user/1000
It will start increasing as you will navigate new pages.
If you are not satisfied with this change, you can revert all steps by moving with previous steps in a reverse sense.
Enjoy your Raspberry PI with Chromium cache on RAM Disk!

Open source and Raspberry PI lover, writes tutorials for beginners since 2019. He's an ICT expert, with a strong experience in supporting medium to big companies and public administrations to manage their ICT infrastructures. He's supporting the Italian public administration in digital transformation projects.
![]()
![]()
![]()
![]()
![]()
![]()
![]()


Thanks for this post. I mounted the ramdisk directly to /home/pi/.cache which seems to work just fine. Benefits are that it can speed up other apps as well, and no change to the launcher properties are needed.
Wondering if you have measured the performance improvement with Chromium?
Hi Rod, thank you for your feedback and your idea. I’ve not measured the performance improvements. In my experience I use a lot Chromium when writing on WordPress with a list of extensions enabled. With the ramdisk, after a boot the Chromium performance are going better and better during the session once the cache goes filled. Without ramdisk it was really hard to write my WordPress posts as the typing was really slow.